Transcription
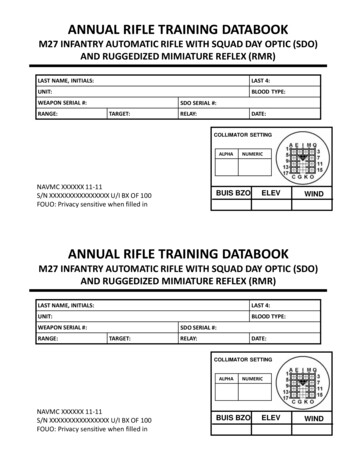
ANNUAL RIFLE TRAINING DATABOOKM27 INFANTRY AUTOMATIC RIFLE WITH SQUAD DAY OPTIC (SDO)AND RUGGEDIZED MIMIATURE REFLEX (RMR)LAST NAME, INITIALS:LAST 4:UNIT:BLOOD TYPE:WEAPON SERIAL #:RANGE:SDO SERIAL #:TARGET:RELAY:DATE:COLLIMATOR SETTINGALPHANAVMC XXXXXX 11-11S/N XXXXXXXXXXXXXXXX U/I BX OF 100FOUO: Privacy sensitive when filled inNUMERICBUIS BZOELEVWINDANNUAL RIFLE TRAINING DATABOOKM27 INFANTRY AUTOMATIC RIFLE WITH SQUAD DAY OPTIC (SDO)AND RUGGEDIZED MIMIATURE REFLEX (RMR)LAST NAME, INITIALS:LAST 4:UNIT:BLOOD TYPE:WEAPON SERIAL #:RANGE:SDO SERIAL #:TARGET:RELAY:DATE:COLLIMATOR SETTINGALPHANAVMC XXXXXX 11-11S/N XXXXXXXXXXXXXXXX U/I BX OF 100FOUO: Privacy sensitive when filled inNUMERICBUIS BZOELEVWIND
Rifleman’s CreedTHIS IS MY RIFLE.There are many like it, but this one is mine. My rifle is my bestfriend. It is my life. I must master it as I must master my life.My rifle, without me, is useless. Without my rifle, I am useless. I must fire my rifle true. I mustshoot straighter than my enemy who is trying to kill me. I must shoot him before he shoots me.I will.My rifle and myself know that what counts in this war is not the rounds we fire, thenoise of our burst, nor the smoke we make. We know that it is the hits that count.We will hit.My rifle is human, even as I, because it is my life. Thus, I will learn it as a brother. I will learn itsweaknesses, its strength, its parts, its accessories, its sights and its barrel. I will keep my rifleclean and ready, even as I am clean and ready. We will become part of each other.We will.Before God, I swear this creed. My rifle and myself are the defendersof my country. We are the masters of our enemy.We are the saviors of my life.So be it, until victory is America's and there is no enemy, but peace!- Major General William H. Rupertus -Rifleman’s CreedTHIS IS MY RIFLE.There are many like it, but this one is mine. My rifle is my bestfriend. It is my life. I must master it as I must master my life.My rifle, without me, is useless. Without my rifle, I am useless. I must fire my rifle true. I mustshoot straighter than my enemy who is trying to kill me. I must shoot him before he shoots me.I will.My rifle and myself know that what counts in this war is not the rounds we fire, thenoise of our burst, nor the smoke we make. We know that it is the hits that count.We will hit.My rifle is human, even as I, because it is my life. Thus, I will learn it as a brother. I will learn itsweaknesses, its strength, its parts, its accessories, its sights and its barrel. I will keep my rifleclean and ready, even as I am clean and ready. We will become part of each other.We will.Before God, I swear this creed. My rifle and myself are the defendersof my country. We are the masters of our enemy.We are the saviors of my life.So be it, until victory is America's and there is no enemy, but peace!- Major General William H. Rupertus -
SAFETY RULES1. TREAT EVERY WEAPON AS IF IT WERE LOADED.2. NEVER POINT A WEAPON AT ANYTHING YOU DO NOTINTEND TO SHOOT.3. KEEP YOUR FINGER STRAIGHT AND OFF THE TRIGGERUNTIL YOU ARE READY TO FIRE.4. KEEP THE WEAPON ON SAFE UNTIL YOU INTEND TO FIRE.1SAFETY RULES1. TREAT EVERY WEAPON AS IF IT WERE LOADED.2. NEVER POINT A WEAPON AT ANYTHING YOU DO NOTINTEND TO SHOOT.3. KEEP YOUR FINGER STRAIGHT AND OFF THE TRIGGERUNTIL YOU ARE READY TO FIRE.4. KEEP THE WEAPON ON SAFE UNTIL YOU INTEND TO FIRE.1
WEAPONS HANDLINGWEAPON COMMANDSWEAPON CONDITIONSCONDITION1SAFETY ON, MAGAZINE INSERTED, ROUNDIN CHAMBER, BOLT FORWARD, EJECTIONPORT COVER CLOSED.CONDITION2NOT APPLICABLE TO THE M16A4 RIFLE.CONDITION3SAFETY ON, MAGAZINE INSERTED,CHAMBER EMPTY, BOLT FORWARD,EJECTION PORT COVER CLOSED.CONDITION4SAFETY ON, MAGAZINE REMOVED,CHAMBER EMPTY, BOLT FORWARD,EJECTION PORT COVER CLOSED.“LOAD”TAKES THE WEAPON FROMCONDITION 4 TO CONDITION 3“MAKE READY”TAKES THE WEAPON FROMCONDITION 3 TO CONDITION 1“FIRE”ENGAGE TARGET(S)“CEASE FIRE”CEASE TARGET ENGAGEMENT“UNLOAD”TAKES THE WEAPON FROM ANYCONDITION TO CONDITION 4“UNLOAD, SHOWCLEAR”REQUIRES A SECOND INDIVIDUALTO INSPECT THE WEAPONBEFORE THE WEAPON IS PLACEDINTO CONDITION 42WEAPONS HANDLINGWEAPON COMMANDSWEAPON CONDITIONSCONDITION1SAFETY ON, MAGAZINE INSERTED, ROUNDIN CHAMBER, BOLT FORWARD, EJECTIONPORT COVER CLOSED.CONDITION2NOT APPLICABLE TO THE M16A4 RIFLE.CONDITION3SAFETY ON, MAGAZINE INSERTED,CHAMBER EMPTY, BOLT FORWARD,EJECTION PORT COVER CLOSED.CONDITION4SAFETY ON, MAGAZINE REMOVED,CHAMBER EMPTY, BOLT FORWARD,EJECTION PORT COVER CLOSED.“LOAD”TAKES THE WEAPON FROMCONDITION 4 TO CONDITION 3“MAKE READY”TAKES THE WEAPON FROMCONDITION 3 TO CONDITION 1“FIRE”“CEASE FIRE”2ENGAGE TARGET(S)CEASE TARGET ENGAGEMENT“UNLOAD”TAKES THE WEAPON FROM ANYCONDITION TO CONDITION 4“UNLOAD, SHOWCLEAR”REQUIRES A SECOND INDIVIDUALTO INSPECT THE WEAPONBEFORE THE WEAPON IS PLACEDINTO CONDITION 4
USER SERVICEABILITY INSPECTIONPerform a user serviceability inspection before beginning live fire to ensure the weapon is in acceptableoperating condition. This inspection complements, but does not replace, the pre-fire inspection (PFI)conducted by a qualified armorer. Specific inspection areas are:1.2.3.4.5.6.Weapon is in Condition 4.Compensator: Centered, and tight.Barrel: Tight.BUIS tightly secured to rail system, adjustable, straight. Front Sight Post: Adjustable, straight, shape.Rail System: No cracks, chips, severe dents, rail covers present, no cracks, not excessively loose.Sighting System: Proper model RCO for weapon, attached correctly/throw levers secured, lenses not cracked,scratched, or broken, and reticle not canted.7. Stock: Tight on lower receiver, then break weapon down shotgun style.8. Chamber/barrel: Remove bolt carrier group; clear of obstructions, no major pitts or cracks.9. Gas Tube (from chamber end): Not bent or damaged, uniform shape.10. Bolt Carrier Group: Properly assembled, rotates freely, gas rings staggered evenly around bolt.11. Lubrication: Lubricated for operational condition and climate, replace bolt carrier group, and reassembleweapon.3USER SERVICEABILITY INSPECTIONPerform a user serviceability inspection before beginning live fire to ensure the weapon is in acceptableoperating condition. This inspection complements, but does not replace, the pre-fire inspection (PFI)conducted by a qualified armorer. Specific inspection areas are:1.2.3.4.5.6.Weapon is in Condition 4.Compensator: Centered, and tight.Barrel: Tight.BUIS tightly secured to rail system, adjustable, straight. Front Sight Post: Adjustable, straight, shape.Rail System: No cracks, chips, severe dents, rail covers present, no cracks, not excessively loose.Sighting System: Proper model RCO for weapon, attached correctly/throw levers secured, lenses not cracked,scratched, or broken, and reticle not canted.7. Stock: Tight on lower receiver, then break weapon down shotgun style.8. Chamber/barrel: Remove bolt carrier group; clear of obstructions, no major pitts or cracks.9. Gas Tube (from chamber end): Not bent or damaged, uniform shape.10. Bolt Carrier Group: Properly assembled, rotates freely, gas rings staggered evenly around bolt.11. Lubrication: Lubricated for operational condition and climate, replace bolt carrier group, and reassembleweapon.3
FUNCTION CHECKA function check is performed after reassembling the rifle to ensure the rifle is operational.1.Ensure rifle is in Condition 4.2.Pull charging handle to rear and release. Ensure selector lever is on SAFE. Move the trigger to therear – hammer should not fall.3.Place selector lever on SEMI. Move the trigger to the rear and hold to rear – hammer should fall.While holding the trigger to the rear, pull charging handle to rear and release. Release trigger untilyou hear a “clunk”.4.Place selector lever on BURST. Move the trigger to the rear and hold to rear – hammer should fall.While holding the trigger to the rear, pull charging handle to rear three times and release. Releasetrigger until you hear a “clunk”, and move to the rear again – hammer should fall.5.Pull charging handle to rear and release. Place selector lever on SAFE, close ejection port cover.4FUNCTION CHECKA function check is performed after reassembling the rifle to ensure the rifle is operational.1.Ensure rifle is in Condition 4.2.Pull charging handle to rear and release. Ensure selector lever is on SAFE. Move the trigger to therear – hammer should not fall.3.Place selector lever on SEMI. Move the trigger to the rear and hold to rear – hammer should fall.While holding the trigger to the rear, pull charging handle to rear and release. Release trigger untilyou hear a “clunk”.4.Place selector lever on BURST. Move the trigger to the rear and hold to rear – hammer should fall.While holding the trigger to the rear, pull charging handle to rear three times and release. Releasetrigger until you hear a “clunk”, and move to the rear again – hammer should fall.5.Pull charging handle to rear and release. Place selector lever on SAFE, close ejection port cover.4
CORRECTIVE ACTIONCorrective action is the process of identifying the cause of a stoppage, clearingthe stoppage, and returning the weapon to operation.INDICATORCORRECTIVE ACTIONBolt is forward or ejection port cover closed.Observe, tap, rack, bang.Bolt is locked to the rear.Observe, conduct a speed reload.Brass is obstructing chamber area.(Usually indicates double feed or failure to eject)Observe, lock bolt to rear, remove magazine. Clear out theobstruction. Conduct a reload.Brass stuck above the bolt.Observe, place the weapon on SAFE, remove the magazine. Hold thebolt face back with a sturdy object while pushing forward on thecharging handle to clear obstruction. Conduct reload.Audible pop (reduced report), reduced recoil,or excessive smoke escaping from the chamber area.(May indicate a bullet is lodged in the bore)- STOP FIRING! Observe, Place weapon in Condition 4.- Push rear take down pin all the way, pivot lower receiver.- Remove bolt carrier.- Inspect bore for obstruction by projectile.- Insert cleaning rod into bore from muzzle end and clearobstruction.- Reload, sight in, and attempt to fire (take weapon to anarmorer if in training).5CORRECTIVE ACTIONCorrective action is the process of identifying the cause of a stoppage, clearingthe stoppage, and returning the weapon to operation.INDICATORCORRECTIVE ACTIONBolt is forward or ejection port cover closed.Observe, tap, rack, bang.Bolt is locked to the rear.Observe, conduct a speed reload.Brass is obstructing chamber area.(Usually indicates double feed or failure to eject)Observe, lock bolt to rear, remove magazine. Clear out theobstruction. Conduct a reload.Brass stuck above the bolt.Observe, place the weapon on SAFE, remove the magazine. Hold thebolt face back with a sturdy object while pushing forward on thecharging handle to clear obstruction. Conduct reload.Audible pop (reduced report), reduced recoil,or excessive smoke escaping from the chamber area.(May indicate a bullet is lodged in the bore)- STOP FIRING! Observe, Place weapon in Condition 4.- Push rear take down pin all the way, pivot lower receiver.- Remove bolt carrier.- Inspect bore for obstruction by projectile.- Insert cleaning rod into bore from muzzle end and clearobstruction.- Reload, sight in, and attempt to fire (take weapon to anarmorer if in training).5
7 COMMON FACTORS OF SHOOTING POSITIONSBUTT OFWEAPON HIGHIN POCKETOF SHOULDER 25STOCKWELDAND EYE RELIEF1PLACEMENT OF4REAR ELBOWFORWARD HAND RELAXED ANDELBOW CLOSE TO THE WEAPON(PROVIDING VERTICAL BONE SUPPORT)36 BREATHINGHIGH FIRMPISTOL GRIPNaturalPoint ofAim7 MUSCULAR CONTROLNatural point of aim is the point at which the rifle sights settle whenbone support and muscular relaxation are achieved. The marksman willalways check it (and adjust as necessary) every time a position is built.67 COMMON FACTORS OF SHOOTING POSITIONSBUTT OFWEAPON HIGHIN POCKETOF SHOULDER 25STOCKWELDAND EYE RELIEF1PLACEMENT OF4REAR ELBOWFORWARD HAND RELAXED ANDELBOW CLOSE TO THE WEAPON(PROVIDING VERTICAL BONE SUPPORT)36 BREATHINGHIGH FIRMPISTOL GRIPNaturalPoint ofAim7 MUSCULAR CONTROLNatural point of aim is the point at which the rifle sights settle whenbone support and muscular relaxation are achieved. The marksman willalways check it (and adjust as necessary) every time a position is built.6
AIMINGCORRECT SIGHTPICTURE (100 yd)CORRECT SIGHTALIGNMENTThe full field ofview whilemaintaining thedesired aimingpoint (reticle)and hold(placement ofaiming point onthe target).NOTE: Opticoutline removedfor clarity.FULL FIELD OFVIEW. Theaiming eyealigned to theocular lens sothat no scopeshadow ispresent. Properstockweld andeye relief arethe means forachievingcorrect sightalignment.Improper eye relief and/or improper sight alignment will cause scope shadow and will result in improper shot placement.IMPROPER SIGHT ALIGNMENTIMPROPER EYE RELIEFTOO CLOSETOO FARBULLET WILL STRIKE LOWBULLET WILL STRIKE HIGHBULLET WILL STRIKE RIGHT BULLET WILL STRIKE LEFT7AIMINGCORRECT SIGHTPICTURE (100 yd)CORRECT SIGHTALIGNMENTThe full field ofview whilemaintaining thedesired aimingpoint (reticle)and hold(placement ofaiming point onthe target).NOTE: Opticoutline removedfor clarity.FULL FIELD OFVIEW. Theaiming eyealigned to theocular lens sothat no scopeshadow ispresent. Properstockweld andeye relief arethe means forachievingcorrect sightalignment.Improper eye relief and/or improper sight alignment will cause scope shadow and will result in improper shot placement.IMPROPER SIGHT ALIGNMENTIMPROPER EYE RELIEFTOO CLOSETOO FARBULLET WILL STRIKE LOWBULLET WILL STRIKE HIGH7BULLET WILL STRIKE RIGHT BULLET WILL STRIKE LEFT
BREATH CONTROLBreathing causes the body to move, which is transferred to the rifle, making it impossible tomaintain sight picture. Therefore, natural point of aim, aiming refinement and shot deliverymust each be accomplished during the natural respiratory pause - between breaths.8BREATH CONTROLBreathing causes the body to move, which is transferred to the rifle, making it impossible tomaintain sight picture. Therefore, natural point of aim, aiming refinement and shot deliverymust each be accomplished during the natural respiratory pause - between breaths.8
TRIGGER CONTROLTRIGGER CONTROLUNINTERRUPTEDTRIGGER CONTROLINTERRUPTEDTRIGGER CONTROLCommonErrorsTrigger Control is the skillful manipulation of the trigger to the rearthat causes the rifle to fire without disturbing sight alignment or sightpicture.Uninterrupted trigger control is when the trigger is moved straight tothe rear with a single, smooth motion.Interrupted trigger control is when the application of trigger pressureis interrupted when an error in the aiming process is detected. Theapplied pressure is kept on the trigger until the error is corrected. Lateral movement of the trigger (not straight to the rear) Grip pressure: trigger finger not moving independently from the hand and other fingers9TRIGGER CONTROLTRIGGER CONTROLTrigger Control is the skillful manipulation of the trigger to the rearthat causes the rifle to fire without disturbing sight alignment or sightpicture.UNINTERRUPTEDTRIGGER CONTROLUninterrupted trigger control is when the trigger is moved straight tothe rear with a single, smooth motion.INTERRUPTEDTRIGGER CONTROLInterrupted trigger control is when the application of trigger pressureis interrupted when an error in the aiming process is detected. Theapplied pressure is kept on the trigger until the error is corrected.CommonErrors Lateral movement of the trigger (not straight to the rear) Grip pressure: trigger finger not moving independently from the hand and other fingers9
FOLLOW-THROUGH / RECOIL RECOVERYAs a shot is fired, the natural recoil of a weapon will test a shooter’s position. Ifproper bone support, muscular control and natural point of aim are applied, theweapon will return to the shooter’s natural point of aim, ready for another shot.FOLLOW-THROUGH - Follow-through is the continued application of the fundamentals until theround has exited the barrel. In combat, follow-through is important to avoid alteringthe impact of the round by keeping the rifle as still as possible until the round exits the barrel.RECOIL RECOVERY - Management of recoil in preparation to deliver a follow-on shot. Pressure onthe trigger is released smoothly until you hear and feel the trigger reset with a “clunk”. The fingerremains on the trigger to provide consistency in trigger control while firing successive shots.CommonErrors Trigger Control: removing the finger from the trigger Anticipation – bucking, flinching Position – natural point of aim not achieved, forward elbow not providing vertical support10FOLLOW-THROUGH / RECOIL RECOVERYAs a shot is fired, the natural recoil of a weapon will test a shooter’s position. Ifproper bone support, muscular control and natural point of aim are applied, theweapon will return to the shooter’s natural point of aim, ready for another shot.FOLLOW-THROUGH - Follow-through is the continued application of the fundamentals until theround has exited the barrel. In combat, follow-through is important to avoid alteringthe impact of the round by keeping the rifle as still as possible until the round exits the barrel.RECOIL RECOVERY - Management of recoil in preparation to deliver a follow-on shot. Pressure onthe trigger is released smoothly until you hear and feel the trigger reset with a “clunk”. The fingerremains on the trigger to provide consistency in trigger control while firing successive shots.CommonErrors Trigger Control: removing the finger from the trigger Anticipation – bucking, flinching Position – natural point of aim not achieved, forward elbow not providing vertical support10
ne wind direction by observing the direction vegetation is moving, byfeeling the wind blow against the body, or by observing the direction of a flag.9Winds are classified according to the direction from which they are blowing inrelation to the direction of fire. The clock system indicates wind direction andvalue. The target is always at 12 LUENOVALUE63HALFVALUEVELOCITY (OBSERVATION METHOD)Under 3 MPHThe wind can hardly be felt on the face, but the presenceof a slight wind can be detected by drifting smoke.3 – 5 MPHWind can be felt lightly on the face.5 – 8 MPHWind keeps tree leaves in constant motion.8 – 12 MPHWind will raise dust and loose paper.12 – 15 MPHWind will cause small trees to sway.15 – 25 MPHWind will cause large trees to Determine wind direction by observing the direction vegetation is moving, byfeeling the wind blow against the body, or by observing the direction of a flag.Winds are classified according to the direction from which they are blowing inrelation to the direction of fire. The clock system indicates wind direction andvalue. The target is always at 12 o’clock.VELOCITY (OBSERVATION METHOD)Under 3 MPHThe wind can hardly be felt on the face, but the presenceof a slight wind can be detected by drifting smoke.3 – 5 MPHWind can be felt lightly on the face.5 – 8 MPHWind keeps tree leaves in constant motion.8 – 12 MPHWind will raise dust and loose paper.12 – 15 MPHWind will cause small trees to sway.15 – 25 MPHWind will cause large trees to ENOVALUE6HALFVALUE3
WINDAGE HOLDS M27Wind speed isdetermined by theangle of the flag.The differentspeeds at eachangle can beapproximatedbased on how fastthe flag flutters ateach angle.5 MPH10 MPHWIND VALUEWIND VALUE15 MPHWIND VALUE20 MPHWIND VALUE25 MPHWIND 35”17”52”26”69”34”87”43”RANGE (yards)The values in the above table reflect the windage holds that should be used when the surrounding terrain does not reduce the effect wind has onthe flight of the bullet. While conducting marksmanship training on known-distance ranges, these values must be adjusted in order to compensatefor the wind-reducing effects of the side-berms and/or trees. The figures in the following pages have been adjusted accordingly.12WINDAGE HOLDS M16A4Wind speed isdetermined by theangle of the flag.The differentspeeds at eachangle can beapproximatedbased on how fastthe flag flutters ateach angle.5 MPH10 MPH15 MPH20 MPH25 MPHWIND VALUEWIND VALUEWIND VALUEWIND VALUEWIND 35”17”52”26”69”34”87”43”RANGE (yards)The values in the above table reflect the windage holds that should be used when the surrounding terrain does not reduce the effect wind has onthe flight of the bullet. While conducting marksmanship training on known-distance ranges, these values must be adjusted in order to compensatefor the wind-reducing effects of the side-berms and/or trees. The figures in the following pages have been adjusted accordingly.12
SDO RETICLE RANGING AND POINTS OF AIM100m200m 300m 400m 500m 600m700m800m900m 1000mTA11SDO1 CLICK 0.1 MIL700 MK 10M QUAL-SDO1 CLICK 0.1 MIL700 MK 10mQUAL13SDO RETICLE RANGING AND POINTS OF AIM100m200m 300m 400m 500m 600m700mTA11SDO1 CLICK 0.1 MIL700 MK 10M QUAL-SDO1 CLICK 0.1 MIL700 MK 10mQUAL13800m900m 1000m
DEFINITIONSAIMINGPOINTThe point within the reticle where the aiming eye is focused whenengaging a target.HOLDThe placement of the aiming point relative to the target required toplace a single shot, or the center of a shot group, in a pre-designatedlocation on a target at a specific range, from a specific firing position,under specific weather conditions.ZEROThe elevation and windage settings (BUIS), or hold (RCO) required toplace a single shot, or the center of a shot group, in a pre-designatedlocation on a target at a specific range, from a specific firing position,under ideal weather conditions.The elevation and windage settings required to place a single shot, orthe center of a shot group, in a pre-designated location on a targetfrom 0 to 300 yards/meters, under ideal weather conditions.14DEFINITIONSAIMINGPOINTThe point within the reticle where the aiming eye is focused whenengaging a target.HOLDThe placement of the aiming point relative to the target required toplace a single shot, or the center of a shot group, in a pre-designatedlocation on a target at a specific range, from a specific firing position,under specific weather conditions.ZEROThe elevation and windage settings (BUIS), or hold (RCO) required toplace a single shot, or the center of a shot group, in a pre-designatedlocation on a target at a specific range, from a specific firing position,under ideal weather conditions.The elevation and windage settings required to place a single shot, orthe center of a shot group, in a pre-designated location on a targetfrom 0 to 300 yards/meters, under ideal weather conditions.14
SDO NOMENCLATURE (EXTERNAL)Cm Adjustments (Left) Inch Adjustments (Right)WaterproofO-ring15SDO NOMENCLATURE (EXTERNAL)Cm Adjustments (Left) Inch Adjustments (Right)WaterproofO-ring15
MOUNTING THE SDOThe SDO is attached to the weapon’s MIL-STD-1913 rail using a locking throw levermount. Prior to placing the SDO on the M1913 rail, ensure that the two lockinglevers are in the unlocked position.To unlock the two throw levers, open the front lever first, then on the rear lever, slidethe Thumb Lock Safety to the open position and open the rear leverThe throw lever mount is unlocked when the front and rear leversare pointing forwardWith the locking throw levers open, place the SDO onto the M1913 rail. Besure to align the Interface Stud located on the bottom of the mount with thegroove on the MIL-STD-1913 Rail as illustratedThe locking throw lever mount is locked when both locking levers arefacing to the rear and the thumb lock is locked into the mount asillustrated16MOUNTING THE SDOThe SDO is attached to the weapon’s MIL-STD-1913 rail using a locking throw levermount. Prior to placing the SDO on the M1913 rail, ensure that the two lockinglevers are in the unlocked position.To unlock the two throw levers, open the front lever first, then on the rear lever, slidethe Thumb Lock Safety to the open position and open the rear leverThe throw lever mount is unlocked when the front and rear leversare pointing forwardWith the locking throw levers open, place the SDO onto the M1913 rail. Besure to align the Interface Stud located on the bottom of the mount with thegroove on the MIL-STD-1913 Rail as illustratedThe locking throw lever mount is locked when both locking levers arefacing to the rear and the thumb lock is locked into the mount asillustrated16
MOUNTING THE SDOIf loose, remove the SDO from the rail and move the levers to the closedposition and turn the locknut, using the 3/8” wrench provided, in aclockwise direction incrementally 1/16th-1/8th a turn until resistance is metwhen pushing the levers into the closed position on the rail.If tight, remove the SDO from the rail and move the levers to the openposition and turn the locknut, using the 3/8” wrench provided, in a counterclockwise direction incrementally 1/16th-1/8th a turn until resistance is metwhen pushing the levers into the closed position on the rail.The throw lever mount includes multiple mounting holes to give theoperator flexibility when mounting the optic and to assist in bringing theoptic over the rear sight to allow the operator to get the proper 2.4” of eyerelief for a full Field of View.INSTALLATION OF THE ANTI REFLECTION DEVICE (ARD)(1) Slide the Eyepiece Flip Up Lens Cover over the Ocular lens.(2) Screw the ARD onto the Objective housing.(3) Slide Objective Flip Up Lens Cover onto the ARD. DO NOT useThread Locking Compound on Threads.17MOUNTING THE SDOIf loose, remove the SDO from the rail and move the levers to the closedposition and turn the locknut, using the 3/8” wrench provided, in aclockwise direction incrementally 1/16th-1/8th a turn until resistance is metwhen pushing the levers into the closed position on the rail.If tight, remove the SDO from the rail and move the levers to the openposition and turn the locknut, using the 3/8” wrench provided, in a counterclockwise direction incrementally 1/16th-1/8th a turn until resistance is metwhen pushing the levers into the closed position on the rail.The throw lever mount includes multiple mounting holes to give theoperator flexibility when mounting the optic and to assist in bringing theoptic over the rear sight to allow the operator to get the proper 2.4” of eyerelief for a full Field of View.INSTALLATION OF THE ANTI REFLECTION DEVICE (ARD)(1) Slide the Eyepiece Flip Up Lens Cover over the Ocular lens.(2) Screw the ARD onto the Objective housing.(3) Slide Objective Flip Up Lens Cover onto the ARD. DO NOT useThread Locking Compound on Threads.17
TABLE 1A COURSE OF FIREBLOCK / DAY1&23STAGERANGETIMEAMMOFILL PLAN# MAGS / # RNDS 5 0060 SEC60 SEC202/10DOGSITTINGLOOP3SLOW-FIRE3005 MIN51/5ABLESITTINGLOOP4RAPID-FIRE30060 SEC60 SEC202/10DOGSTANDING TO PRONELOOP5SLOW-FIRE50015 MIN151/10B-MOD.PRONELOOP1SLOW-FIRE20020 RAPID-FIRE20060 SEC101/10DOGSITTINGLOOP3SLOW-FIRE3005 MIN51/5ABLESITTINGLOOP4RAPID-FIRE30060 SEC101/10DOGSTANDING TO PRONELOOP5SLOW-FIRE50010 PPARADE18TABLE 1A COURSE OF FIREBLOCK / DAY1&23STAGERANGETIMEAMMOFILL PLAN# MAGS / # RNDS EA.1SLOW-FIRE20025 0060 SEC60 SEC202/10DOGSITTINGLOOP3SLOW-FIRE3005 MIN51/5ABLESITTINGLOOP4RAPID-FIRE30060 SEC60 SEC202/10DOGSTANDING TO PRONELOOP5SLOW-FIRE50015 MIN151/10B-MOD.PRONELOOP1SLOW-FIRE20020 RAPID-FIRE20060 SEC101/10DOGSITTINGLOOP3SLOW-FIRE3005 MIN51/5ABLESITTINGLOOP4RAPID-FIRE30060 SEC101/10DOGSTANDING TO PRONELOOP5SLOW-FIRE50010 MIN101/10B-MOD.PRONELOOP18
TABLE 1TARGET DIMENSIONS4’ 0”6’ 0”6’ 0”8”6’ dified”Target18TABLE 1TARGET DIMENSIONS4’ 0”6’ 0”6’ 0”8”6’ Modified”Target
EXAMPLEBEFORE FIRING200 YARD SLOW-FIRE SITTINGZEROHOLD WIND NOHALFHALFHOLDS IN INCHESFULLFULLHALFHALFNOWEATHER 45AFTER FIRINGPLOTPRECIPOVERCASTXVALUEXPARTLYCLOUDY18DRYLT RAINMISTHVY RAIN12CLEARDURING FIRING1SIGHT PICTUREADJUSTMENT(WITHOUT 18REMARKSSome clouds, sun out of 2:00 low in the sky, temp cool. Changed hold onshot 3. Anticipated shot 4. Otherwise good zero.HOLD1988EXAMPLEBEFORE FIRING200 YARD SLOW-FIRE SITTINGZEROHOLD WIND NOHALFHALFHOLDS IN INCHESFULLFULLHALFHALFNOWEATHER 45AFTER FIRINGPLOTPRECIPOVERCASTXVALUEXPARTLYCLOUDY18DRYLT RAINMISTHVY RAIN12CLEARDURING FIRING12SIGHT PICTUREADJUSTMENT(WITHOUT 8REMARKSHOLDSome clouds, sun out of 2:00 low in the sky, temp cool. Changed hold onshot 3. Anticipated shot 4. Otherwise good zero.1988
200 YARD RAPID-FIRE SITTINGZEROBEFORE FIRINGWIND EXAMPLEHOLD NOHALFHOLDS IN mphFULL257911HALF1234DURING FIRINGPLOT 1ST STRING302418181212XXXX XXXX X X6INCHES302ND STRING HOLD24X XX XXXXXX X5PLOT 2ND PRECIPOVERCASTPARTLYCLOUDYXCLEARDRYLT RAINMISTHVY RAINMiscalculated wind data.Corrected on 2nd string.SIGHT PICTUREADJUSTMENT(WITHOUT WIND)20200 YARD RAPID-FIRE SITTINGZEROBEFORE FIRINGWIND EXAMPLEHOLD NOHALFHOLDS IN mphFULL257911HALF12345DURING FIRINGPLOT 1ST STRING3024302ND STRING HOLD2418181212XXXX XXXX X X6INCHESX XX XXXXXX XPLOT 2ND STRING066IN
3. Place selector lever on SEMI. Move the trigger to the rear and hold to rear t hammer should fall. While holding the trigger to the rear, pull charging handle to rear and release. Release trigger until Ç}µZ oµvl _X 4. Place selector lever on BURST. Move the trigger to the rea