Transcription
Shift Handoff ToolImplementation GuideandTechnical ManualClinician Desktop ServiceVeterans Health Information TechnologyVersion 1October 2018
Revision HistoryDateDescriptionAuthorOctober 2018Setup: New SERVICE/SECTIONREDACTEDJune 2008Initial ReleaseREDACTEDOctober 2018Shift Handoff Tool Implementation Guide and Technical ManualPage 2
Table of ContentsRevision History . 2Introduction . 4Installation . 5Server Installation . 5Client Installation . 5Tools Menu . 5Maintenance . 7Secondary Menu . 7Security Keys . 7Parameters . 7Setup. 9Shift Handoff Manager . 9Creating a New SERVICE/SECTION Entry . 10Preference Configuration . 13Handoff (HOT) Team Manager. 20Create new HOT List . 20Delete HOT List. 21Configure HOT List . 22Exported Items . 23Assign Menu to Secondary Menu. 23Security Keys . 23Files . 24Data Dictionaries . 24Routines. 25Globals. 25Application Programmer Interfaces . 26How to Generate On-Line Documentation . 28Routines. 28Files . 28External Relationships . 29Troubleshooting. 30October 2018Shift Handoff Tool Implementation Guide and Technical ManualPage 3
IntroductionThis manual covers technical aspects of the Shift Handoff Tool for Information Resource Management Service(IRMS) staff and Clinical Applications Coordinators (CACs). Included are installation, setup, and maintenanceinstructions as well as complete technical data.The Shift Handoff Tool is a utility that assists hospital staff going off shift to create a report for the incoming shift.This report contains demographic and medical information about each patient being handed off. At a minimum itshows medications and allergies, but can be customized to show other medical information that is relevant to thepatient’s condition.October 2018Shift Handoff Tool Implementation Guide and Technical ManualPage 4
InstallationThere is both an M (or Server) component and a Windows (or Client) component. All the required files arecontained in the distribution zip file: SHIFTHANDOFFTOOL.ZIPTable 1: Contents of ftHandoffTool ExecutableCRHD Help FileInstall Guide (Word Version)Install GuideImplementation Guide and Technical Manual (Word Version)Implementation Guide and Technical ManualUser Manual (Word Version)User ManualCRHD Release Notes (Word Version)CRHD Release NotesServer InstallationSee the Shift Handoff Tool Install Guide (CRHDIG.PDF) for complete instructions on installation of the Mcomponent.Client InstallationThe installation of the Windows component will vary according to your own local management policies. Basically,it consists of the following steps:1. Place the executable, ShiftHandoffTool.exe, and the help file, CRHD.hlp, in the same directory on eachworkstation or on a network drive accessible from each workstation.2. Add Shift Handoff Tool to the Tools menu of CPRS.In addition, you can also setup the Shift Handoff Tool to run as a standalone application by doing the following toworkstations in the hospital area(s) that are going to use this tool: Place a shortcut to ShiftHandoffTool.exe on the desktop. The parameters on the command line of thisshortcut (S and P ) must be the same as the parameters in the CPRS shortcut. S Vista Server P RPCBroker PortTools MenuYou may set up the tools menu on the User, Location, Service, Division, or System level. The lowest leveloverrides higher levels.Select GUI Parameters Option: ?CS GUI Cover Sheet Display Parameters .HS GUI Health Summary TypesTM GUI Tool Menu ItemsMP GUI Parameters - MiscellaneousUC GUI Clear Size & Position Settings for UserRE GUI Report Parameters .NV GUI Non-VA Med Statements/ReasonsRM GUI Remove Button EnabledNON GUI Remove Button Enabled for Non-OR AlertsEIE GUI Mark Allergy Entered in ErrorEnter ? for more options, ? for brief descriptions, ?OPTION for help text.Select GUI Parameters Option: TM GUI Tool Menu ItemsOctober 2018Shift Handoff Tool Implementation Guide and Technical ManualPage 5
CPRS GUI Tools Menu may be set for the following:1 User USR [choose from NEW PERSON]2 Location LOC [choose from HOSPITAL LOCATION]2.5 Service SRV [choose from SERVICE/SECTION]3 Division DIV [choose from INSTITUTION]4 System SYS [DEVCUR.FO-SLC.MED.VA.GOV]Enter selection: 3 Division INSTITUTIONSelect INSTITUTION NAME: salt1 SALT LAKE CITY UT EES 9252 SALT LAKE CITY UT NHC 6609AA3 SALT LAKE CITY UT USAF 660CZ4 SALT LAKE CITY HCS UT VAMC 6605 SALT LAKE CITY OIFO UT ISC 5000Press RETURN to see more, ' ' to exit this list, ORCHOOSE 1-5: 5 SALT LAKE CITY OIFO UT ISC 5000------- Setting CPRS GUI Tools Menu for Division: SALT LAKE CITY OIFO -------SelectSequence: 2Are you adding 2 as a new Sequence? Yes// y YESSequence: 2// 2Name Command: &Shift Handoff Tool C:/CPRS/ShiftHandoffTool.exe S %SVR P %PORTSelect Sequence:October 2018Shift Handoff Tool Implementation Guide and Technical ManualPage 6
MaintenanceSecondary MenuCRHD SHIFT CHANGE HANDOFF is the secondary menu exported with this application. You cannot runShiftHandoff.exe from a workstation unless you have this menu option or you have programmer access mode. Allusers of this application should have this menu assigned to them as a secondary menu or as part of their primarymenu tree.Security KeysThe following keys are exported for use with the Shift Handoff Tool:CRHD SHIFT CHG HANDOFF MGR (This gives access to Preference Page)CRHD HOT TEAM MGR (This gives access to the configuration Handoff Tool (HOT) list)ParametersThe following parameters are kept in the CRHD HANDOFF PARAMETERS (#183) file.Table 2: Content of the CRHD HANDOFF PARAMETERS (#183) fileParameter NameDescriptionTEMP FLD 1 TITLETemporary field 1 TitleTEMP FLD 2 TITLETemporary field 2 TitleTEMP FLD 3 TITLETemporary field 3 TitleTEMP FLD 4 TITLETemporary field 4 TitleTEMP FLD COLORTemporary field colorTEMP FLD FONTCOLORTemporary field font colorSTUDENTMedical Students and phoneRESIDENTResident and phonePATIENT DEMOGRAPHICSPatient demographicsPATIENT DEMO PRINTLBLPrint patient demographics labelsMED DETAIL FLGInclude Meds detailsMED EXCLUDE IVExclude IVs from Med listCONSULTSConsults requestLABS IMAGINGLabs and RadiologyPRINT ORIENTATIONPortrait/LandscapeORDER BYSort patients by for printed reportMULTI DNRDisplay multiple active DNR orders if foundFILE LocationTeam Info file locationOctober 2018Shift Handoff Tool Implementation Guide and Technical ManualPage 7
The following parameters are stored in the VistA PARAMETER DEFINITION FILE (#8989.51) file:Table 3: Contents of the VistA PARAMETER DEFINITION FILE (#8989.51) FileParameter NameDescriptionCRHD DEFAULT PREFERENCEDefault PreferenceCRHD DNR ORDER TITLEDNR search stringsCRHD DNR ORDERABLE ITEMSDNR search itemsCRHD TEMP FLD EXPIRETemporary field expiration in daysOctober 2018Shift Handoff Tool Implementation Guide and Technical ManualPage 8
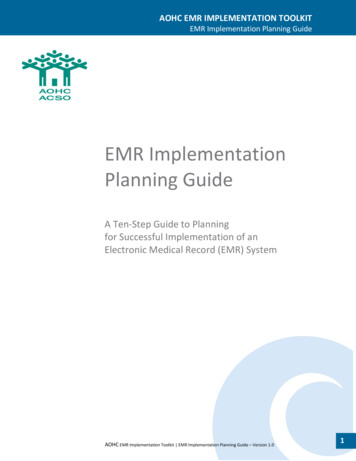
SetupManagers and Clinical Application Coordinators (CACs) do not need to use VistA to manage team lists andpreferences. Holders of the CRHD SHIFT CHG HANDOFF MGR key have access to the Preference Configurationdialog and can enter and manage multiple configurations. Holders of the CRHD HOT TEAM MGR key haveaccess to the Handoff Team (HOT) list management dialog.An important point is that each list, including HOT lists, has a different setup associated with it. Many aspects ofthe final printout can be managed separately for each list. The Shift Handoff Manager or CAC for each serviceshould study the options carefully so lists can be configured to the greatest possible advantage.Shift Handoff ManagerThe Preference Configuration menu command does not appear on the File menu unless the user holds the CRHDSHIFT CHG HANDOFF MGR key.Selecting this menu command brings up the selection dialog:October 2018Shift Handoff Tool Implementation Guide and Technical ManualPage 9
Preferences can only be named after providers, teams, service, or divisions that already exist in the system. Notice,for example, that all medical centers are listed. These are only used as names for profiles and do not interact withany system external to your local site.Notice above that we have five preferences defined, one is name after a local clinic, another is names after aprovider, and three of them are named after medical centers. All are simply being used as names of preferences inour local system.Creating a New SERVICE/SECTION EntryThough VistA is not needed to manage team lists and preferences, it is necessary to use VistA to create a newSERVICE/SECTION.Note: This file requires programmer access (@) to add or edit items. The requestor will need to work with theirlocal/regional systems manager to request the changes.VistA FileMan may be used to create the new SERVICE/SECTION entry as in the example below.VA FileMan 22.2Select OPTION: ENTER OR EDIT FILE ENTRIESInput to what File: SERVICE/SECTION// (158 entries)EDIT WHICH FIELD: ALL//Select SERVICE/SECTION NAME: TEST THERAPYAre you adding 'TEST THERAPY' as a new SERVICE/SECTION (the 159TH)? No// Y (Yes)SERVICE/SECTION MAIL SYMBOL: JSGTSERVICE/SECTION PARENT SERVICE: 1171 117 PHYSICAL THERAPY 1172 117 SPEECH THERAPY 117 SPEECH THERAPYCHOOSE 1-2: 1 PHYSICAL THERAPY 117ABBREVIATION: JSGTDESCRIPTION:Edit? NO//MAIL SYMBOL: JSGT//PARENT SERVICE: PHYSICAL THERAPY//TYPE OF SERVICE: C PATIENT CARECHIEF: Staff, ChiefSelect CHIEF PHONE:ASST CHIEF:Select ASST CHIEF PHONE:LOCATION:MIS COSTING CODE:COST CENTER:TYPE OF COSTING SECTION:AMBULATORY CARE FLAG:Select DATE CLOSED:NATIONAL SERVICE:COORDINATOR (IRM):October 2018Shift Handoff Tool Implementation Guide and Technical ManualPage 10
Select SERVICE/SECTION NAME:Once the new SERVICE/SECTION has been created, login to the Shift Handoff Tool GUI application. SelectFile/Preference Configuration (or Ctrl Alt P ) from the top menu bar.Then select the [ Service ] button. Highlight in the list box the Service you would like to add to the CRHDHANDOFF PARAMETERS NAME file (#183) and double click or select Enter . Reminder, the service MUSTexist in SERVICE/SECTION file (#49) for it to show up in this list.October 2018Shift Handoff Tool Implementation Guide and Technical ManualPage 11
The Shift Handoff Preference Configuration window for the Service Name that was selected will be displayed.Select the [ SUBMIT DATA ] button at the bottom of this window.If VistA FileMan is now used to inquire on the CRHD HANDOFF PARAMETERS NAME file (#183), the Serviceshould now be seen.VA FileMan 22.2Select OPTION: INQUIRE TO FILE ENTRIESOutput from what File: SERVICE/SECTION// 183 CRHD HANDOFF PARAMETERS (4 entries)Select CRHD HANDOFF PARAMETERS NAME: ?Answer with CRHD HANDOFF PARAMETERS NAMEChoose from:EDUCATIONTEST THERAPYSelect CRHD HANDOFF PARAMETERS NAME: orforforforforaaaaaNEW PERSON, (pointed-to by NAME)OE/RR LIST, (pointed-to by NAME)FACILITY TREATING SPECIALTY, (pointed-to by NAME)TEAM, (pointed-to by NAME)SERVICE/SECTION, (pointed-to by NAME)TEST THERAPY JSGT PHYSICAL THERAPY.OK? Yes// (Yes)Another one:Standard Captioned Output? Yes// (Yes)Include COMPUTED fields: (N/Y/R/B): NO// BOTH Computed Fields and Record Number (IEN)NUMBER: 4NAME (SRV): TEST THERAPYNAME: PATIENT DEMOGRAPHICS VALUE: 2,6,7,8,12,,5NAME: PATIENT DEMO PRINTLBL VALUE: 0NAME: MED DETAIL FLGVALUE: 0NAME: PRINT ORIENTATIONVALUE: LNAME: CONSULTSVALUE: 0NAME: LABS IMAGINGVALUE: 0NAME: MED EXCLUDE IVVALUE: 0NAME: ORDER BYVALUE: 0NAME: MULTI DNRVALUE: 0NAME: TEMP FLD COLORVALUE: 65535NAME: TEMP FLD FONTCOLOR VALUE: 0Select CRHD HANDOFF PARAMETERS NAME:October 2018Shift Handoff Tool Implementation Guide and Technical ManualPage 12
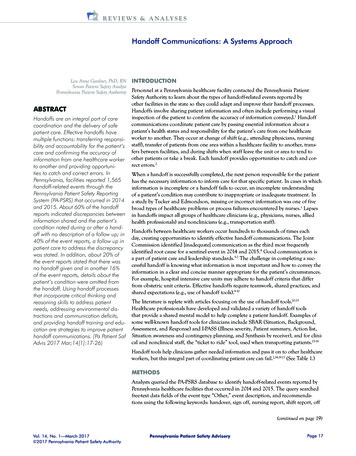
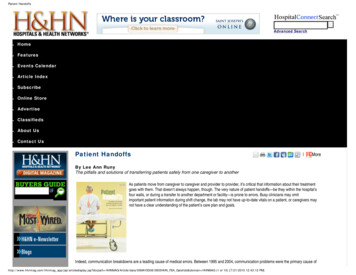
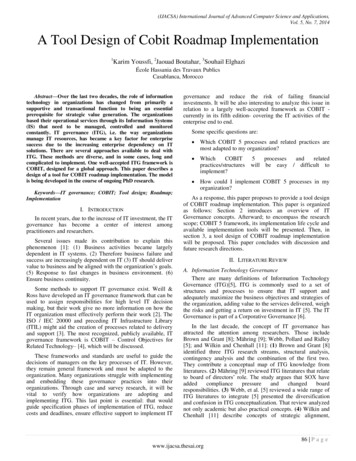
Preference ConfigurationThe Preference Configuration dialog has seven (7) tabs. They are Patient Demographics, Data Objects, TemporaryFields, Contact List, DNR Order, Print Option, and Team Information. The setting on each of these can be changedusing the parameters that are exported with this application. However, all settings can be completely controlled bythe Preference Configuration dialog.Patient DemographicsThe Patient Demographics tab looks like this:Name, Age, Sex, Ward, and Room/Bed are all mandatory and cannot be unchecked. Full SSN and Last 4 SSNrefers to what will print out on the report. The full SSN appears on the screen in either case. (We recommend thatyou select Last 4 SSN because it is more consistent with privacy considerations.) One or the other must bedisplayed. Displaying the Date of Birth, Attending, Primary Care Prv, Adm Date, Day of Adm, and Adm Dx are alloptional.Data ObjectsThe Data Objects control what data objects display on the screen and are printed on the report. The tab appears assuch:October 2018Shift Handoff Tool Implementation Guide and Technical ManualPage 13
Medications will display and be listed, the only option is whether a summary or detailed medication list is used. IVscan be excluded from the medication list (which, if chosen, excludes all IV medications including antibiotics). TheConsults and Labs/Imaging check boxes control whether these lists will be present on the screen or report. MultiDNR orders controls whether just the most recent DNR order appears, or all DNR orders are listed. Show Labelsfor Patient Demographics, if left unchecked, will not label this information on the printout.October 2018Shift Handoff Tool Implementation Guide and Technical ManualPage 14
Temporary FieldsYou can detail up to four additional fields for providers to enter context sensitive information about each patient. Inthe Patient Data dialog these fields appear with a different background indicating data can be entered. The defaultcolor is a deep yellow intended to suggest a Post-it note. This is because none of the information is keptpermanently as part of the patient record. The tab looks like this:The default is that the title of each field is blank. Blank fields do not appear on the Patient Data dialog, so if youwish to use these temporary fields you must enable them by assigning a name to them (like HPI, etc.)If you don’t like the bright yellow background, you can select a more preferred background color and font color touse for these fields with the controls in the lower right-hand corner of this tab. You must press both the Select Colorand then click on the Submit Data button to make a color change permanent.In the upper right-hand corner of the tab is a selection box marked Expiration. This is the number of days anyinformation entered in the temp fields is retained. This data is kept in the CRHD TEMPORARY DATA (#183.2)file. The count starts whenever data is entered or modified in one of the temp fields. Once expiration has beenreached, the information entered in each temporary field is deleted. The expiration can only be set on the Divisionlevel, all lists below Division inherit that value. The intention of this system is to provide a mechanism for thepassing of context sensitive information from shift to shift during an incidence of care. Any information that needsto be preserved in the patient record must be entered via CPRS and then signed.The maximum value of the Expiration field is 7 days. When temporary fields are accessed, the last date edited ischecked. If the day plus Expiration is less than the present date, the field is blanked out. This is done on a field byfield, patient by patient basis.Temporary field names are limited to 30 characters.October 2018Shift Handoff Tool Implementation Guide and Technical ManualPage 15
Contact ListThe contact list is only used if there is no defined contact list with the team. The recommendation it to make entriesat the Division level, that way all lists in the division inherit the contacts. This is an example of a possible divisionlevel contact list:As with other dialogs for maintaining lists in Shift Handoff Tool, items are deleted by double clicking or by rightclicking and selecting delete from the drop-down menu.October 2018Shift Handoff Tool Implementation Guide and Technical ManualPage 16
DNR OrderThe DNR Order tab is provided as a way to map local Do Not Resuscitate (DNR) order names. To this point, DNRorders are strictly controlled by the local medical center policy. In some cases, different terminology is used. Inother cases, more than one DNR order is present among the orderable items to cover varying situations, such asdifferentiating between cardiac and pulmonary DNR circumstances. The DNR Order tab looks like this:This tab gives you two ways to define DNR orders. The first, in the left hand box, allows you to type in strings andphrases that are typically present in a DNR order. Type the strings or phrases into the text box and press the Enterkey. What you type is added to the list. (As with many things in VistA, it is not case sensitive.) You can doubleclick on an item to remove it from the list.The second, in the remainder of the tab, is to specify specific items from the orderable items file to be included.Type search terms into the text box at the top of the center column. Select orderable items by double clicking onthem, or selecting them and hitting the Add key. The list of orderable items with their Internal Entry Numbers(IENs) is built in the right hand frame. To delete items from this list within the right window pane, either doubleclick on the item or select it and then click on the Remove key.October 2018Shift Handoff Tool Implementation Guide and Technical ManualPage 17
Print OptionThe Print Option tab allows you to specify preferences for the printout. It allows you to specify Portrait orLandscape orientation of the printing, and it allows you to select the print order, either alphabetically by patient, byroom number, or by patient location. The tab looks like this:October 2018Shift Handoff Tool Implementation Guide and Technical ManualPage 18
Team InformationThe Team Information tab specifies a file location to find text information files about the team. These files can beaccessed a number of places while running the application. The default location is the directory which theapplication is executed from. This is usually, but not always, C:\Program Files\Vista\ShiftHandoff\. Whenspecifying an alternate location be sure to use the backslash character “\” to separate fields and indicate the end ofthe address as in this example:These files can be created by you and must reside either on the workstation that will be used or on a Windowsserver accessible from a workstation. The naming convention is the name of the team followed by the .TXTextension. Notepad can be used to initially create these files. You can override the file name with the AssignProviders to Team/List dialog. Note:Back and front slashes (\ and /), asterisks (*), and question marks (?), as well as most otherpunctuation cannot be used as part of file name. Rather than require sites using this feature tochange team names, you can use the Assign Providers to Team/List dialog to supply an aliasthat the system will use as a file name.Once created, users with the CRHD HOT TEAM MGR key can edit the team information fromShiftHandoffTool.exe. Holders of this key get the following right-click menu: Note:October 2018This file is for team-centric information, not patient information. All users need to be cautionedthat no patient, individually identifiable information should be placed in this file.Shift Handoff Tool Implementation Guide and Technical ManualPage 19
Handoff (HOT) Team ManagerUsers with the CRHD HOT TEAM MGR key have access to the Handoff Tool (HOT) List creation andmanagement functions. HOT Lists are only maintained within the Shift Handoff application and have no relation tolists maintained in VistA. When this key is present in a user’s account, the File menu command HOT ListConfiguration becomes active.Selecting this command opens the TEAM dialog, that looks like this:From this dialog your can do three things:1. Create a new HOT List.2. Delete a HOT List.3. Configure a HOT List (i.e., add patients, delete patients, add provider information connected to a specificpatient, add providers, delete providers, add information about each provider on the team.The only constraint on HOT Lists is that they are for inpatients only. Patients cannot be added to HOT lists unlessthey have been admitted and a patient will be automatically removed when a discharge action is taken on thatpatient.Create new HOT ListTo create a new HOT List, simply type its name in the text box at the top of the dialog. When you press enter orclick the OK button, it asks, “Do you want to Save as a New Team?” If you answer yes, it goes on to thenext dialog.October 2018Shift Handoff Tool Implementation Guide and Technical ManualPage 20
Delete HOT ListTo delete a hot list, select it, right click, then select Delete from the drop-down menu. Here is an example:October 2018Shift Handoff Tool Implementation Guide and Technical ManualPage 21
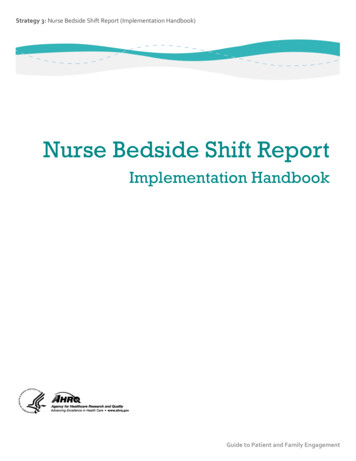
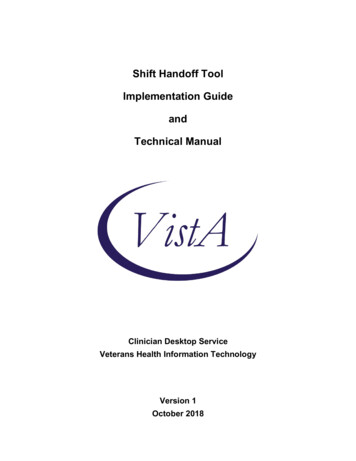
Configure HOT ListHere is an example of the HOT List configuration dialog:Patient ListProvider ListInformationadded tothese fieldsis for thehighlightedpatient.Doubleclick to addto patientlist.Fill in Classfor providersby selectingthem fromthis list.Doubleclick to addto providerlist.These phonenumberscome fromthe NewPerson file.Checking these boxes givesthe highlighted provider theindicated privilege.Changes do not take effectuntil you click here.Each HOT List has patients and providers associated with it. The providers can be assigned one of six roles: ATTN,RES, INTERN, FELLOW, MED STUDENT, or NURSE. The office phone and digital pager numbers come fromthe New Person file and are included on the HOT list. These numbers may be overridden from this dialog (but willnot update the New Person file). Also, privileges to modify this list can be granted by checking the appropriatebox(s) Modify Patient List or Modify Provider List.Each patient can have an Attending, Resident, Intern, Fellow, Med Student, and Nurse assigned separately to it.Patients are automatically deleted from the list when a discharge action is taken on them. Note:October 2018As with other parts of the Shift Handoff Tool, the information entered into this dialog is notkept in the VistA team files. Thus the assignments of providers is only for the purposes of theHOT list and do not impact team information within CPRS/VistA.Shift Handoff Tool Implementation Guide and Technical ManualPage 22
Exported ItemsAssign Menu to Secondary MenuCRHD SHIFT CHANGE HANDOFF must be assigned to a user to use the Shift Handoff Tool. If a usertries to execute the Shift Handoff Tool GUI (from either the tools menu or from an icon) and they havenot been assigned the CRHD SHIFT CHANGE HANDOFF option, the program immediately shuts down.The recommended placement for the CRHD SHIFT CHANGE HANDOFF option is to set it up as asecondary menu. This option can also be added to a provider’s primary menu.Security KeysCRHD SHIFT CHG HANDOFF MGR (Preference setup) (only a few should hold this key, maybe theClinical Application Coordinator)CRHD HOT TEAM MGR ( HOT Team manager)October 2018Shift Handoff Tool Implementation Guide and Technical ManualPage 23
FilesCRHD TEMPORARY DATA (#183.2)This file stores the temporary data entered for each patient. Data fields: Temporary field name, Patient, Author,Date Entered, Last Edit by, Date/Time of Last Edit, Private (not used), Read Only (not used).CRHD HANDOFF PARAMETERS (#183)Preference configuration parameters are stored in this file. The following files are pointed to files:Table 4: CRHD Handoff Configuration File ParametersFile NumberFile Name200USER100.21OE/RR TEAM45.7TREATING SPECIALTY (Not used)404.51SD TEAM (Not used)49SERVICE (Not used)44LOCATION4DIVISIONData fields: Name, Entity Name, Value, List ValueCRHD TEAM CONTACT LIST (#183.4)This file stores contact information for providers assigned to the selected list.Data fields: Team, Providers, Class, Pager, Office Phone, Filename.CRHD HOT TEAM PATIENT LIST (#183.3)This file stores a list of patients and providers for the lists created within the Shift Handoff Tool.Data fields: Team, Inactive (not used), Patients, Attending, Resident, Intern, Fellow, Med Student, Nurse,Providers, Class, Modify Patient List, Modify Provider List, Pager, Office Phone.Data DictionariesThe number-space for Shift Handoff Tool files is 183. A listing of these files can be obtained by using the VAFileMan option DILIST (List File Attributes). Depending on the FileMan template used to print the listing, thisoption will print out all or part of the data dictionary for the Shift Handoff Tool files.October 2018Shift Handoff Tool Implementation Guide and Technical ManualPage 24
RoutinesThe following routines are exported with the CRHD build:CRHDGET THE PATIENT DATA ELEMENTS FOR CHANGEOVER LISTCRHD1ADDED TO WORK WITH HAND OFF TEAM SECTIONCRHD10ASSIGN PROVIDERS TO A TEAM LISTCRHD11GET USERS PARAMETERSCRHD2GET DATA ITEMS FOR CHANGEOVER LISTCRHD3CRHD4GET USERS PARAMETERSCRHD5MISC ROUTINE FOR HAND-OFF TOOLCRHD6MISC ROUTINE FOR HAND-OFF TOOLCRHD7TEAM ROSTERCRHD8RETURNS THE TEXTS OF AND ORDERCRHD9HANDOFF TEAM LISTCRHDAMCRHDDNRGET ACTIVE DNR ORDERCRHDDRRETRIEVE DNR ORDERS USING ORDER DIALOGCRHDPLFind personal lists for changeover listCRHDUDNew Person general informationCRHDUTGET THE PATIENT DATA ELEMENTS FOR HANDOFF LISTCRHDUT2GET THE PATIENT DATA ELEMENTS FOR HANDOFF LIST CONTINUEDGlobalsThe shift Handoff Tool creates one global, CHRD(.October 2018Shift Handoff Tool Implementation Guide and Technical ManualPage 25
Application Programmer InterfacesThe following table shows Remote Procedure Calls (RPCs) that are exported with and used by the Shift HandoffTool along with the corresponding M code entry point:Table 5: RPC Exported with Shift Handoff ToolRemote Procedure CallM Entry PointCRHD ADDITIONAL USER INFOAUSRINFO CRHDUTCRHD ALL USER PARAMETERSGETALLP CRHD4CRHD AVAILABLE PARAMETERSGETALLPL CRHD11CRHD COMB TM LISTTMCOMB CRHD10CRHD DEFAULT PREFERENCEDEFPREF CRHD11CRHD DELETE A P
October 2018 Shift Handoff Tool Implementation Guide and Technical Manual Page 10 Preferences can only be named after providers, teams, service, or divisions that already exist in the system. Notice, for example, that all medical centers are listed. These are