Transcription
KeyboardingEssentialsLesson 1Lesson 2Lesson 3Lesson 4Lesson 5Lesson 6Lesson 7Lesson 8Lesson 9Lesson 10Lesson 11Lesson 12Lesson 13Learn the Home KeysReview the Home KeysLearn E and HLearn R and IReview E, H, R, and ILearn T and OLearn G and NLearn Left Shift and PeriodReview Left Shift T, O, G, N, and PeriodLearn C and ULearn W and Right ShiftLearn X and MReview C, U, W, X, M, and Right ShiftLesson 14 Learn B and YLesson 15 Learn V and PLesson 16 Learn Q and CommaLesson 17 Review B, Y, V, P, Q, and CommaLesson 18 Learn Z and ColonLesson 19 Learn Apostrophe andQuotation MarksLesson 20 Learn Hyphen and DiagonalLesson 21 Review Z, Colon, Apostrophe,Quotation Marks, Hyphen, and DiagonalLesson 22 Learn Caps Lock and Question MarkLesson 23 Learn TabLesson 24 Review Caps Lock, Question Mark,and TabLesson 25 Learn the Ten KeyKeyboarding Essentials 1
LEARNING TO KEY CORRECTLYThe human body is not designed for long sessions of repetitivemovement. You might even know someone who has strainedtheir hands and fingers by playing video games. Keyboardingcan present similar dangers. When you key, you repeat manysmall movements with your hands and fingers. You might bekeying for a long time. If you position yourself correctly, however, and use ergonomic tools and techniques, you can avoidstrain and fatigue.Even if you do not practice healthy, ergonomic keying techniques, you might not experience any problems while you areyoung and flexible. However, over the years, if you don’t beginto key correctly, you will repeat thousands of stressful movements. You risk painful long-lasting injury that can reduce thequality of your life and your ability to work. It pays to develophealthy, ergonomic keying habits now.ADJUSTING YOUR WORKSTATIONIn a classroom you do not usually have much choice in theequipment you must use. However, flexible equipment and alittle imagination can help you adjust your workstation.Adjusting Your Keyboard and Mouse You want your fingers to gently curve over the keys while your wrist is in a flat,neutral position. If wrist rests are available, place one in front of the keyboard as a guide. Never rest your arms, hands, or wristswhile you are keying. Place your mouse or trackball at the same height as yourkeyboard, in easy reach of your preferred hand.Figure 1 At the beginningof each class, adjust yourworkstation.TECHNIQUE TIPNever rest your arms, hands, orwrists on anything while you arekeying.2 Keyboarding EssentialsAdjusting the Slope of Your Keyboard If your keyboardslants toward you, you need to adjust it so it is flat or slopesdown away from you. Flatten the kickstand at the back of the keyboard. Alternatively, raise the front of the keyboard about ¾" byusing door wedges, a wood strip, or a box.Adjusting the Lighting It is important to arrange lightingso you can clearly see the images on your monitor without anyglare. Position your monitor at an angle to windows and brightlights, so reflections do not wash out the monitor image. Keep task lighting focused on your desk to illuminatereading and writing material, but use indirect light toilluminate your monitor. Adjust the monitor brightness based on the availablelight.
CORRECT KEYING POSTUREAfter you have adjusted your workstation, you need to maintainthe correct keying posture. Following are some guidelines forkeying correctly: Center your body on the J key, about a hand’s lengthfrom the keyboard and directly in front of the monitor. Hold your head straight over your shoulders, withoutstraining forward or backward. Position the monitor at eye level, about arm’s lengthaway, so you look down about 10 degrees. Elongate and relax your neck. Keep your shoulders down. Tilt your keyboard slightly down toward the monitor.This helps you keep your wrists neutral and your fingersrelaxed and curled. Adjust your chair and keyboard so your elbows bend atright angles. Keep your arms close to your sides, but free to moveslightly. Keep your wrists relaxed and straight in a “neutral”position. Keep your back upright or tilted slightly forward fromthe hips. Keep the slight natural curve of your lowerback. Use a cushion or adjust the chair to support yourlower back. Keep your knees slightly lower than your hips. Adjust your chair so your feet are well supported. Use afootrest, if needed.AVOIDING STRESS WHEN KEYINGThere are two ways to avoid stress when keying. First, you needto maintain the correct keying posture as you key. Second, youneed to take a short break every 20 to 30 minutes and performstretching exercises designed to help you avoid strain, fatigue,and injury.Maintaining a Correct Keying Position It’s easy to startkeying by using the correct keying position. As we key, however,many of us lose our focus, and bad habits begin to creep in. It’simportant to check your keying position to make sure you arestill keying correctly. The following figures show some guidelines for maintaining correct keying positions.Keyboarding Essentials 3
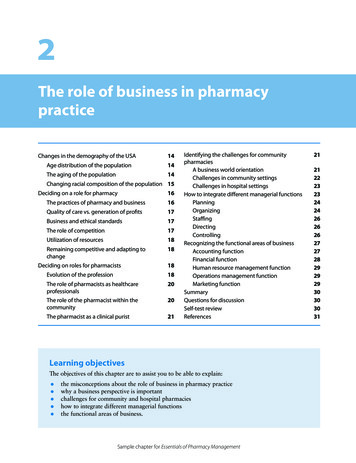
Figure 2 (Left) Maintaina correct upright posture.(Right) Avoid slouching,extending your elbows, orbending your wrists.Figure 3 (Left) Maintain a neutral position with your hands.(Right) Avoid twisting yourhands inward or outward.Figure 4 (Left) Maintain a neutral wrist position with gentlycurled fingers. (Right) Avoidbending your wrists or using anupward-sloping keyboard.Stretching and Resting When you key for a long time, yourmuscles stiffen. You become fatigued and risk injury. You buildtension in many parts of your body, including your neck, arms,and wrists. To relieve the tension and reduce the threat of injury,you should stretch before you start keying. You should also takeshort breaks from keying every 20 to 30 minutes and stretch.Stretch 1: Neck StretchSitting tall, bring your chin toward your chest, stretching theback of your neck. Slowly repeat two times. See Figure B-5.Figure 5 Neck stretch.4 Keyboarding Essentials
Stretch 2: Head TurnBegin with your head in a neutral position. Look all the way tothe right without moving your chest or upper back. Then, lookto the left. Slowly repeat two times. See Figure B-6.Figure 6 Head turn.Stretch 3: Head TiltBegin with your head in a neutral position. Bring your ear toward your shoulder without turning your head or lifting yourshoulder. Hold for a count of five. Reverse directions. See FigureB-7.Figure 7 Head tilt.Stretch 4: Downward Wrist StretchWith your left fingers pointing down and your palm in, placeyour right hand over your left knuckles. Extend your armsstraight out. Gently press back with your right hand to a countof ten. Reverse hands. Repeat the stretches using a fist. See Figure B-8.Figure 8 Downward wriststretch.Keyboarding Essentials 5
Stretch 5: Upward Wrist StretchWith your left fingers pointing up, place your right hand overyour left palm. Extend your arms straight out. Gently press backwith your right hand to a count of ten. Reverse hands. Repeatthe stretches with fingers pointing down and the palm out. SeeFigure B-9.Figure 9 Upward wrist stretch.BENEFITS OF KEYING CORRECTLYTraining takes effort and time. If you already use a keyboard,you might have to re-teach your body to use correct techniques.You might ask yourself “Why make the effort? I’m already keying fast enough.”Just imagine you will probably be using a computer for therest of your life. If you don’t learn now, you will probably needto learn later. There’s really no escaping it. Besides, if you learnto key correctly, you will: Increase your speed. Increase your efficiency, making fewer errors. Increase your effectiveness because you can see yourwork and screen while your hands are free to work. Stay healthy, avoid injury, and remain productive overyour lifetime.BREAKING BAD HABITSMany of you might have been keying for years. However, without any formal training, you could easily have developed badhabits.The best way to correct bad habits is to use natural breaks ascheckpoints. For instance, look at your own habits at the end ofeach exercise, paragraph, or page you type. Consider your posture, sitting position, hand position, keying technique, and workhabits.To help you break your bad habits, consult the following“Bad Habits Checklist.” Check it when you start keying andwhen you take a break. If you know you have a particular badhabit, try to focus on the correction at the beginning of everykeying session. Eventually the bad habit will be replaced by thegood habit. It takes work, but it’s worth it.6 Keyboarding Essentials
Bad Habits ChecklistBad HabitCorrectionSlouchingSit up straight with your feet flat and well supported.Reaching too far for thekeyboard or the mouseSit one hand’s length from the keyboard. Keep elbows atright angles.Leaning your hand on thekeyboard or the wrist supportHover your hands over the keyboard; curl your fingers slightly.Bending your wrists forward,back, left, or rightKeep your forearms and wrists straight and in the neutralposition.Pounding the keysStrike keys lightly.Looking at the keyboardPosition the workstand close to the monitor at eye level.Keep your eyes on your work.Raising your elbowsKeep your arms close to your body.Raising your shouldersKeep your shoulders relaxed, with your chest open and wide.Keying with the wrong fingersPractice with correct fingers until you establish the right habit.Your speed will then improve.Figure 10 Many of us havedeveloped bad habits that weneed to break.Keyboarding Essentials 7
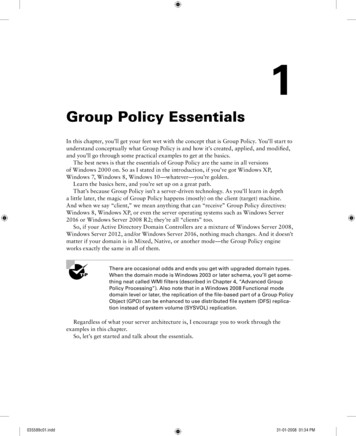
Lesson 1Learn the Home KeysLEARN AND PRACTICEBegin keying by placing your fingers on the eight keys—calledthe home keys— A S D F J K L and semicolonas shownbelow.HOME KEYSBackspaceA Use the A finger.S Use the S finger.D Use the D finger.F Use the F finger.TabCapsLockShiftCtrlQ W EA SZR TD FXYG HIUJO PK LEnterC V B N MAltShiftSpacebarAltCtrlJ Use the J finger.K Use the K finger.A SD FJK LL Use the L finger.Use thefinger.The semicolon (;) is typically usedbetween two independent clausesin a sentence. In a sentence, keyone space after a semicolon.KEYBOARDING TIPOnonly the semicolon iscolored. This is because the keyis used for two different characters. In this lesson, you learn howto key the semicolon. In a laterlesson you will learn how to key acolon.8 Keyboarding EssentialsThe index finger of your left hand should rest on F , yoursecond and third fingers rest on D and S , and the little fingerof your left hand rests on A . For your right hand, your indexfinger should rest on J , your second and third fingers rest on.K and L , and your little finger rests onFrom now on, the finger you use to press a key will be namedfor its home-key letter. For example, your left little finger is theA finger Your right index finger is the J finger.From the home keys, you can reach all the other keys on thekeyboard. The keyboard diagram shows which homekey fingeris used for each key. For example, you use the D finger to key allthe keys in the band of green on the left. You use the L finger tokey all the keys in the band of red on the right, and so on. Whenany finger is not actually pressing a key, you should keep it resting lightly on its home key.The row of keys containing the home keys is called the homerow. The row below the home row is the first row. The row abovethe home row is the third row.
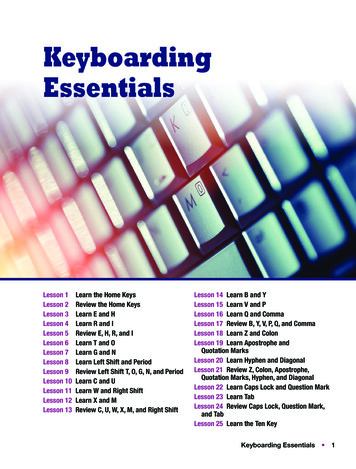
NEW KEYSBackspaceTabCapsLockShiftCtrlQ W EA SZR TD FXYG HIUJO PK LEnterC V B N MAltSpacebarShiftAltSpacebarUse the thumb of your writinghand.EnterUse thefinger.CtrlLearn and Practice the Spacebar Notice that on the keyboard diagram, the keys you have learned are darker and tintedwith their background color. Now locate the Spacebar on the diagram. You use the Spacebar to insert spaces between letters andwords. You press it by using the thumb of your writing hand(that is, the hand you use for writing). You do not use the thumbof your other hand.Key the home-key letters, inserting a space after each letter bypressing the Spacebar quickly and lightly. (Drill lines are numbered.Do not key the green numbers.)1 a s d f j k l ;Learn and Practice Enter You do not have to wait for a textline to be “full” before starting a new line. Pressing the Enter keystarts a new line of text whenever you need one. You press Enterby using thefinger. Try to keep the J finger on its home keywhen you press Enter.TECHNIQUE TIPBegin with your fingers curled andlightly touching the home keys.Now press Enter (8 ) to start a new line. Key each of the lines belowtwice. Press Enter (8 ) after each line.2345asdf jkl; asdf jkl;;lkj fdsa ;lkj fdsafd jk sa l; fds jkldfsa l;kj ddss kkllasdf jkl;8;lkj fdsa8dsa kl;8ffaa ;;jj fjdk ls;a8Learn and Practice Double-Space You can add a blankline between lines of text by pressing Enter twice. This is howyou double-space text. (Two consecutive Enters are sometimes referred to as a double line-space.)TECHNIQUE TIPMake sure your back is straightor tilted slightly forward from thehips.Key a line of text, press Enter, and then key it again. After you keya line the second time, press Enter twice before keying a new line.Using this method, key each line twice, and double-space after eachpair of lines.6789adfs jlk; aj sk dl f; aaa jjj sd kl ldsk8fjjf dkkd slsl da l; ks fj ;f sss lll dl8kkd dlk ds ddd ;f ff ;; fdl; sl f; ds kl8a as dad sad fads lads lass falls flasks8Keyboarding Essentials 9
Lesson 2Review the Home KeysREVIEWThe keyboard shows the keys you have learned so far. This lesson focuses on the keys highlighted in dark blue.BackspaceTabQ W ECapsLockShiftCtrlA SZR TD FXYG HIUJO PK LEnterC V B N MAltSpacebarShiftAltCtrlWARM UPTECHNIQUE TIPConcentrate on pressing the correct keys. Read silently letter-byletter as you key. In this Warm Updo not focus on your speed.Key each line twice. Double-space after each pair of lines (remember, that means pressing Enter after you key the line the first timeand pressing Enter twice after you key the line the second time).1234asdf jkl; asdf jkl;;lkj fdsa ;lkj fdsafk dk sl a; fds jklsdl fdk kls ad; jfdasdf jk l; a
is used for each key. For example, you use the D finger to key all home . Keyboarding Essentials Z X C V B N M Shift Shift REVIEW Lesson 2 Review the Home Keys Home Keys Z X C V B N M Shift Shift E H LEARN Learn E and H E and Z X C V B N M Shift Shift I LEARN Learn and Z X C V B N M Shift Shift Z X C V B N M Shift Shift Z X C V B N M Shift Shift F, N N Z X C V B N M