Transcription
Solar PV Training& Referral ManualDeveloped by SNV for the Rural Solar Market Development
ContentsAbout This ManualSection 1: Background onSolar TechnologyThis Pico PV Referral Manual has been developed by SNV Zimbabweto provide distributers, installers and users of PV systems with aquick reference and source of information. The manual coversthe following:What is Solar Energy?Solar HeatingSolar PV PhotovoltaicsWhy Solar Energy?Section 2: Solar SystemsElectricity Basics 10Solar PV Photovoltaic SystemPortable PV SystemSolar Home SystemsSolar Panel (Module)Solar ChargeRegulator/ControllerSolar BatteriesSolar InverterA summary of the CompleteSolar Home SystemSection 3: Basic System Sizing:Practical Exercises06060708101213151620232829Worksheets 1-6 & Note SpaceUseful Information: TypicalPower RatingsGeneral Troubleshooting Notes3240Frequently Asked Questions (FAQs)46Appendix 1:49505151Basic Anatomy of a MultimeterHow to Test Solar Panel OutputHot to Test a Solar Panel’sPolarityHow to Check the Voltage on aSolar Panel Affected by ShadeBattery Testing Using aMultimeterAppendix 2: Supporting BookletHandy Pull-Outs &Troubleshooting ListsSupporting Bookleta)b)c)d)e)Background on Solar TechnologySolar SystemsBasic System SizingTroubleshooting GuidanceSafety PrecautionsThe manual is designed for use by anyone who wishes to obtainquick, basic, technical information with regards to PV systems.However, it is particularly targeted at those who engage in thebusiness of distributing and installing PV products. This manualdoes not guarantee the quality of installations carried out byinstallers nor the quality of products supplied by distributers.It is recommended that all installations are carried out in aresponsible and professional way. All electrical work shouldbe performed by a qualified electrician to guarantee theinstallation and/or repairs.425252About SNVSNV is a not-for-profit international development organisation.Founded in the Netherlands nearly 50 years ago, we have built along-term, local presence in 38 of the poorest countries in Asia,Africa and Latin America. Our global team of local and internationaladvisors work with local partners to equip communities, businessesand organisations with the tools, knowledge and connections theyneed to increase their incomes and gain access to basic services– empowering them to break the cycle of poverty and guide theirown development.
ABBREVIATIONS03 CDegrees CelciusAAmperesACAlternating CurrentAhAmpere hoursDCDirect CurrentEEnergyFAQFrequently Asked QuestionGWhGigawatt hourICurrentkWKilowattkWhKilowatt hourm/sMetres per secondMJMegajouleMWMegawattNGONon-Governmental nceREARural Electrification AgencySHSSolar home systemSTCStandard Test ConditionsTVTelevisionVVoltsW/m2Watts per square metreWhWatt hourTraining & Referral Manual
SECTION 1:Backgroundon SolarTechnologyIn this Unit:What is Solar Energy?Solar HeatingSolar PV PhotovoltaicsWhy Solar Energy?
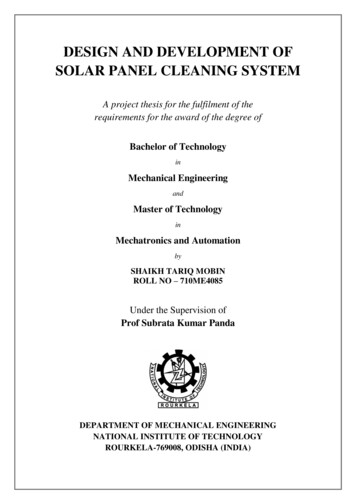
Section 1: Background on Solar TechnologyWhat is Solar Energy?Solar Energy” refers to radiant heat and light from the sun. It is renewable, which means it cannot be used up. It is harnessed and converted to heat or electricityusing various technologies such as Solar Heating andSolar Photovoltaics (conversion to electricity).Solar Heating - Solar Energy to ThermalSolar thermal systems operate when radiation/heat from the sun isdirected to a device which captures and concentrates the heat to acarrying media (air or water).APPLICATIONS OR USESSolar Panel to Heat Water1. Heating water2. Heating rooms3. Solar drying & pasteurisationSun Rays(Heat Energy)TRANSPARENT TOPCool Water InINLETWarm Water OutWATERPIPEBOX06Training & Referral ManualOUTLET
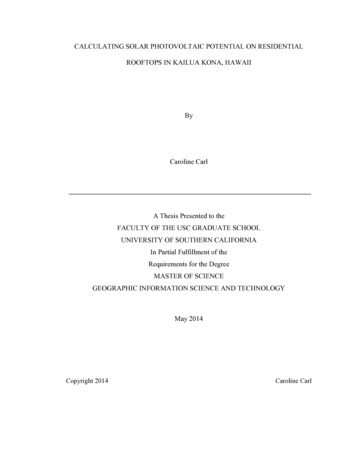
Section 1: Background on Solar TechnologySolar PV (Photovoltaics) - Solar Energy to ElectricityPhotovoltaic (PV) means electricity from the sun.Photovoltaic technology is used to convert light energy intoelectrical energy.This is based on the characteristic of some semiconductormaterials, such as silicon, which generate voltage and currentwhen exposed to light.LOADSunlightAPPLICATIONS OR USESCURRENT1.2.3.4.5.LightingCommunicationPowering electrical gadgetsWater pumpingCharging applicancesn-typesiliconjunctionp-typesiliconHow a SolarPanel WorksphotonselectronflowholeflowTraining & Referral Manual07
Section 1: Background on Solar TechnologyWhy Solar Energy?1. Reliability2. Durability3. Low maintenance costs4. No fuel costs5. Reduced pollution6. Flexibility due to modularity7. Safety8. Independence9. Grid decentralisation10. High Altitude performance08Training & Referral Manual
SECTION 2:SolarSystemsIn this Unit:Electricity BasicsSolar PV PhotovoltaicSystemPortable PV SystemSolar Home SystemsSolar Panel (Module)Solar ChargeRegulator/ControllerSolar BatteriesSolar InverterA summary of the CompleteSolar Home System
Section 2: Solar SystemsElectricity BasicsMeasuring ElectricityVoltage (V):the potential difference in electrical charge between twopoints measured in volts.Volts Power CurrentCurrent (I):V P IVoltsthe flow of electrons in a circuit/wire between two pointsmeasured in amperes.Current Power VoltsI P VVoltsAmperesAmperesThere are two types of current:1. Alternating Current (AC) is the type of current most commonlyused in households to power electrical appliances (for exampleTVs, refrigerators, radios and computers). Grid suppliedelectricity is alternating current.2. Direct Current (DC) is produced by PV modules and storedin e (R): the opposition to the flow of electrical current in the materialthrough which it is passing measured in ohms the potentialdifference in electrical charge between two points measuredin volts.Resistance Volts Current10Training & Referral ManualR V IOhms
Section 2: Solar SystemsPower (P):the rate of energy conversion measured in watts.Power Volts x CurrentP VXIWattsExample:If a solar panel produces 2 Amps of electricity at 12 volts, the totalpower it produces is 24 Watts. (2 Amps x 12 Volts 36 Watts)Energy (E):refers to the capacity for work i.e. the power used over time,measured in watt-hours.VoltsEnergy Power x TimeE PxtWatt-HoursWatts vs Watt-HoursWATTS (Power)WATT-HOURS (Energy)A watt is the amount of powerthat a solar panel can produce orthat a light bulb consumes.A watt-hour is the amount of energythat a solar panel can produce or a lightbulb can consume in a certain anumberof hours.Electrical CircuitsLoads and power sources in a circuit can be connected in series or parallel. Systems mayuse a mix of series and parallel wiring to achieve the required voltages and amperages.SeriesConnectionsincrease voltagebut does notincrease current.ParallelConnectionsincrease currentbut voltage is notaffected.Training & Referral Manual11
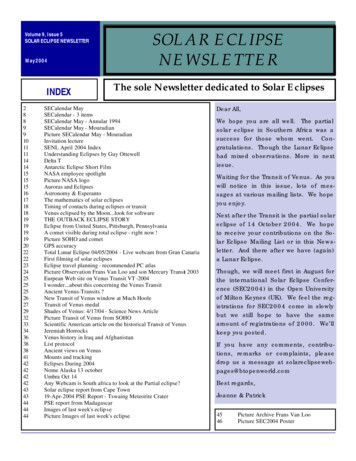
Section 2: Solar SystemsSolar Photovoltaic (PV) SystemA Solar PV System converts solar energy in form of lightto electrical energy by the use of a solar module (solarpanel).Solar Irradiancefrom the er(and/or)BatterySystemAC POWERDC POWERPhotovoltaic systems consist of some or all of the following components: Solar Panel - Converts sunlight to electricity Battery(s) - Store electricity Charge Controller - Manages the flow of electricity between the solarpanel battery and load12 Inverter - Converts DC power from the solar panel and battery to AC power. Load - Application for electricity, e.g. lights, computer, radio, TV Wires - Connect the otherTraining & Referral Manual
Section 2: Solar SystemsPortable PV SystemThese are portable lighting systems. They can be classified into classic and multifunctional: Classic systems provide lighting onlyMultifunctional provide lighting as well as facilities for mobile phone charging and radios.S300D20OvBeacon MB2 - 090Components of the System Solar panel [can be separate or inbuilt)Battery for electricity storage(often integrated in the lamp)LampMobile Phone charging UnitMain Uses To enlighten one single roomRecreational uses such as campingMobile phone charger (depending on the model)Radio (depending on the model)Advantages Loads can be carried elsewhere without the panelReplacing traditional light (kerosene/ paraffin lampsand candles)Easy installation (plug and play)User-friendly applicationLow investment costsLittle maintenance required (Refer to maintenance section)The prices are generally affordable and within the paymentcapacity of most rural people in developing countries.Mobiya TS120SMAINTENANCE & CARE Do not operate in explosive atmospheres such as in the presence offlammable liquids, gases or dust.Electrical products create sparks whichmay ignite the dust or fumes. Do not expose adapters to rain or wetconditions. Water entering an adapter willincrease the risk of electric shock. Do not abuse the power cord. Neveruse the power cord to carry the adapteror to pull the plug from an outlet. Keepthe cord away from heat, oil, sharo edgesor moving parts. Replace damagedpower cords immediately as theyincrease the risk of electric shock. Check for loose screws often. WARNING: Make sure the power switchof the solar lantern is in its ‘OFF’ positionand that the adapter is unplugged fromits electrical outlet before performing anyinspection, maintenance or cleaningprocedures.Training & Referral Manual13
Section 2: Solar SystemsTroubleshooting a Portable PV SystemIssueCausesSolutionsBattery only lastsa few hours1. Solar panel is dirty1. Clean the solar panel. Move the panelLamp does not workDim lightor in shadeso that it is not in shade.2. Bad Connection2. Check all wiring connections.3. Cloudy day3. Recharge the battery on sunny days.4. Old battery4. Test and replace battery.5. Battery misuse5. Test and replace battery.1. Not switched on1. Switch on the lamp.2. Bad connection2. Check all wiring connections.3. Incorrect wiring3. Check positive and negative connections.4. Lamp broken4. Replace lamp.1. Solar panel not charging1. Clean the solar panel and check if itproperly (dirt, shade)is not shaded during charging.2. Bad connection2. Check the connections.3. Battery misuse3. Test the battery and replace it if itno longer works.14Training & Referral Manual
Section 2: Solar SystemsSolar Home Systems (Plug & Play)These tendto be Pico PVSystems upto 500W incapacity.Components of the System Solar Panel - Converts sunlightto electricity Inverter - Converts DC power from thesolar panel and battery to AC power. Battery (s) - Store electricity Load - Application for electricity, e.g. lights,computer, radio, TV Charge Controller - Manages the flowof electricity between the solar panelbattery and load Wires - Connect the other variouscomponents togetherSolar Charge Controller12 VDCSolar erterTraining & Referral Manual15
Section 2: Solar SystemsSolar Panel (Solar Module)The solar panel produces electricity when there is sunlight byconverting it into DC. Photovoltaics (PV) or solar cells are thebuilding blocks of solar panels. They are made of semiconductormaterials and convert sunlight into direct current (DC) electricity. Every solar panel has a rated power output. The rated output of the panel is determined by the voltageand current that the solar panel can produce. Generally, solar panels produce electricity at either 12or 24 volts. The amount of current the solar panel produces determinesthe amount of power the solar panel produces.CellModuleArrayDifferent Types of Solar ining & Referral Manual
Section 2: Solar SystemsTesting & Certification of the Solar PanelTo ensure product quality the solar panel has to be tested andchecked for certification by recognised boards, for example:SAZ standards for PV: ZWS 322:1993: Applies to terrestrial photovoltaic modules used for converting solar radiation into electric energy and is limited tomobile applications producing up to a maximum of 300 V. ZWS 522:1999: Specifies the minimum requirements for batteries to be used in photovoltaic systems.ZWS 524:1998: Specifies the requirements for charge controllers which shall be fitted on all battery-based photovoltaic electric systems.Testing Procedure for Solar Panel Output &PolarityTo test the output of a solar panel you use a multimeter.A multimeter can also be used in the testing of polarity.Please refer to Appendix 1, page 50 for the Basic Anatomy of aMultimeter, and Appendix 1, page 51 for step by step instructionson How to Test the Solar Panel’s Output and How to Testthe Solar Panel’s Polarity.It is ideal to test the solarpanel before purchasing andbefore installing to ensure thequality of the product.MultimetersDigitalAnalogTraining & Referral Manual17
Section 2: Solar SystemsCare for the Solar Panel1. Protecting Your Panel from ShadeWhen part of the solar panel is shaded wholly or partly,for exampleby tree branches and/or building shadows, it captures less energyfrom the sun.Please refer to Appendix 1, page 52 for step by step instructionson How to Check the Voltage on a Panel Affected by Shade.DODO NOT Make sure that all objects that mightshade your panel are removed Concentrate torch, electrical or firelight directly onto your solar panelas it may cause damage Make sure that ONLY direct sunlightfalls on your panel2. Cleaning Your PanelThe solar panel must be kept clean at all times.DODO NOT Inspect your solar panel regularly fordirt such as dust or bird droppings. Use soap or detergent. Clean your solar panel once every3 months (or when dirty) usingclean water and a soft cloth. Tilt the panel when installing to enableself-cleaning (as dirt/grime simply slides off)3. Ensuring the Security of Your PanelDuring installation, the solar panel must be firmly fixed to the roof of the house.DO NOT Fix wire mesh around the solar panel as it is already secured during installation.The wire cast cast shadows that will cause the panel to produce less energy.18Training & Referral Manual* Artificial Light:1. Light from a bulb or LEDconcentrated or focused onthe panel using a mirror.2. Sunlight concentrated andfocused on the panel usinga mirror.
Section 2: Solar Systems4. General SafetyThe solar panel consists of a glass top which can easily break.DO NOT Throw objects at the solar panel. Stand or step on the panel. Try to repair your solar panel if it breaks becauseonce the panel is broken, it cannot be repaired. Carry out modifications on your system without technicalguidance from your system supplier or a qualified technician.How to Position the Solar Panel Once we know the solar resource, it is veryimportant to mount the panel correctly so thatwe capture as much sunlight as possible. Solar panels produce the most electricity whenthey are perpendicular to the sun. Since the sun moves all day, it is not practical tokeep moving the panel all day to keep itperpendicular to the sun. In general, the best average position formounting the panel is tilted towards the equator(facing northwards) at an angle approximatelyequal to the latitude of the location.Handling of the Solar Panel During Installation Make sure you read and understand the user manual which comes with each kit. Protect the solar panel, it should not fall or come into contact with hard surfaces during handling. Decide on where to mount the solar panel (on the ground or the roof). During wiring connections cover the solar panel. Make sure the wiring connections are secure (avoid naked wires). Make sure that positive and negative wires are connected correctly.Training & Referral Manual19
Section 2: Solar SystemsThe Charger Regulator / Charge ControllerThe solar charge regulator/ charge controller is a voltage and/orcurrent regulator which is connected between the solar panel, thebattery and the load. Its main job is to keep the batteries fromovercharging and over dischargin g.DODO NOT Ensure connections are firm. In caseof a problem, consult your solar installeror supplier. Tamper with the charge controller. Place it where water can penetrate.20Training & Referral Manual
Section 2: Solar SystemsConnecting a Charge Regulator / Controller to the Solar PanelSolar ChargeControllerBattery SystemSolar PanelCable Network Ensure that the collector (the solar panel) is shaded to avoidthe danger of electric shock. Using the right tools, loosen the screws at the correctterminals, below the solar panel picture, as shown in theimage below:Solar Panel Connection Fit the positive electrical cable from the solar panel to thepositive terminal of the charge controller. Some have colour coding:RED is postive ( )Connect the Positive(Solar Panel) to the Positive(Charge Controller)BLACK is negative (-)ANDConnect the Negative(Solar Panel) to Negative(Charge Controller)Training & Referral Manual21
Section 2: Solar SystemsWhy Use a Charge Controller? It monitors the battery voltageIt stops charging when the battery is fully chargedIt extends battery lifeIt regulates power from the solar panels, protecting thebattery from overcharging. Overcharging damages batteriesand reduces battery lifeIt prevents overly deep discharge which damages the batteriesIt protects your appliances and gadgetsDangers of Bypassing a Charge ControllerBypassing the charger controller will cause: damage of batteries because there is no regulation of powerdamage of electrical appliancesDOfor the Cable NetworkCareDO NOT Inspect the cable network every 3 to 5years to ensure ther are no exposed wires. Protect your solar wiring from damage asthis can result in the failure of your system. Avoid short-circuiting your cables as thiscan lead to system damage.22Training & Referral Manual Try to make connections when you arenot sure. Seek expert advice and help.
Section 2: Solar SystemsSolar BatteriesSolar batteries store electrical energy generatedby the solar panels. They are available in variousforms and designs depending on the use andalso on the maker.Types of BatteriesFlooded Type This is a lead acid type battery.While these are good batteries, this type needs to be storedoutside of your home or in an area with lots of air as they emitgas and can be dangerous in your home if not handled carefully.This type of battery is economical and will last for years ifmaintained properly.The most popular brands of this type of battery are Trojan,Surrette and Deka.Make sure to ventilate this type of battery if in an enclosure.Gel Type This type of battery does not have vents and will not emit gasso it is is safe to use indoors.Being able to use it where the temperature is ata constant isdefinitely a plus because it helps the battery to perform betterand last longer.Although this is a good battery for solar applications, it takes alow charge to recharge which may cost you more.Absorbed Glass Mat (AGM) Type This type of battery has a woven glass mat in between cellsto help sustain charging longer.This type is considered by most solar users to be the bestas it holds charges for longer and the battery lasts longer.They are leak proof, spill proof and do not emit gas, makingthem the safest and most easy to maintain.Even though this type is more expensive it is worth it.These types of batteries are used in airplanes, hospitalsand remote communication centres.The most sought after brand of this type are the SunXtender and the Concorde.Training & Referral Manual23
Section 2: Solar SystemsDissected BatteriesFlooded TypeGel TypeAbsorbed Glass Mat (AGM) Type24Training & Referral Manual
Section 2: Solar SystemsWhy Not Use the Car Battery? Its capacity is too small for continuous chargingso they would not last very long.It might seem like a good idea in the beginning becauseof cost, but you'll pay for it in 9 months or so.Car type batteries discharge too quickly and don't lastvery long. In addition, after they get discharged to acertain extent they don't work well at all.Conclusion: DO NOT USE CAR BATTERIES ON YOUR SOLAR SYSTEMBattery TestingPlease refer to Appendix 1, page 52 for step by step instructionson Battery Testing Using a Multimeter.Connecting a Battery to a Solar System Before you begin the process of connecting, pleaseensure that the panel is shaded/covered (no sunshinereaching the collector) to avoid danger of electrical shock. Using the right tools, loosen the screws for the battery connectionson the battery section as indicated by the arrow in the image below:Battery Connection Fit theand toFit theand tocable to the positive terminal of the charge controllerthe positive terminal of the battery.cable to the negative terminal of the charge controllerthe negative terminal of the battery.The connections are displayed on the diagram on the next page.Training & Referral Manual25
Section 2: Solar SystemsBattery Connection DiagramSolar ChargeControllerBattery SystemSolar PanelCable Network Ensure that the fitted cables are secured tightly ontothe terminals and that there are no naked wires.Troubleshootinga Solar BatteryDO26IssueCausesSolutionsBattery only lastsa few hours1. Solar panel is dirty1. Clean the solar panel. Move the panelTraining & Referral Manualor in shadeso that it is not in shade.2. Bad Connection2. Check all wiring connections.3. Cloudy day3. Recharge the battery on sunny days.4. Old battery4. Test and replace battery.5. Battery misuse5. Test and replace battery.
Section 2: Solar SystemsDODO NOT Keep the solar battery in a cleanenvironment. Short-circuit the terminals of yourbattery. Your solar battery stores hugeamounts of energy. If you connect theterminals directly, the stored energy willbe released in one go, causing the wiresto melt or fire to start. All power mustbe consumed through the installedregulator. This will protect your solarbattery for a long time. Place the solar battery on a stable surfaceto prevent it from falling or tilting. Keep the solar battery safely inside awell-ventilated wooden box. Always check the level of electrolyte inevery cell of your battery. If the level hasgone down, add some distilled (orde-ionized) water. Pour out the acid and fill with fresh acidas it damages the battery. Top up the solar battery with distilled waterfrom a good source, never use tap or rainwater since they have impurities which maydamage your battery. Add acid to your solar battery at ANY time. Apply Vaseline, not grease or oil, onto bothbattery terminals to prevent acid mist (awhite substance) forming on them. Accept advice on battery repairs fromunauthorized persons. Rather, contactbattery suppliers directly. Clean the terminals and battery’s topsurface regularly with hot water to preventaccumulation of acid mist which causesbatteries to self-discharge. Keep the solar battery near open flamesas there is danger of explosion. Take your old batteries for repair.Training & Referral Manual27
Section 2: Solar SystemsInverter Used when there are AC loads to be used in the solar system.It converts DC from the batteries to AC.Connecting the Inverter DC VoltageVoltageTIMEThe inverter is connected to the charge controller at theterminals indicated in the image belowe ( ) and (-).The terminals are loosened and the cable from the inverteris fitted with the same polarity:VoltageAC VoltageTIMEDC LoadingAC Loading (Inverter)Comparision of AC & DCIn electricity generation there are two distinct types of electricity which are directcurrent electricity (DC) and alternating current electricity (AC).Direct Current (DC) is used mostly in houses that are not connected to the grid, andare running with batteries.Alternating Current lectricity (AC) is the type of current most commonly used inhouseholds that are connected to the grid to power electrical appliances (for exampleTVs, refrigerators, radios, lighting and many others).Loading or the Load This is where the electrical energy is to be used.Solar energy can power both DC and AC appliances or gadgets.DC loads include: Radios Light bulbsAC Loads include: Refrigerators Televisions ComputersA bad installation can cause problems to the entire electrical system.28Training & Referral ManualVisual Representationdifference between AC & DCOn some electrical devicesDC and AC Voltage arerepresented by signs as follows(these are the signs that areused on most multimeters toindicate the two voltages):DirectCurrentAlternatingCurrent
Section 2: Solar SystemsA Summary of the Complete Solar SystemSolar Charge Controller12 VDCSolar erter TypeRadiation is converted into electrical energy (as DC) by the solar panels.Gel The solar panels are connected to the charge controller so as to regulatethe battery charging.Power is distributed from the charge controller to the inverter and alsoto DC loads.The battery is also connected to the charger controller and the inverter.AC loads are then connected to the inverter.The Solar Charge Controller thus forms the CENTRAL UNIT ofthe entire Solar System - protecting the whole system.Training & Referral Manual29
SECTION 3:Basic SystemSizing:PracticalExercisesIn this Unit:Worksheet 1: Systems LoadsWorksheet 2: Battery SizingWorksheet 3: Array SizingWorksheet 4: Charge Controller SizingWorksheet 5: Inverter SizingWorksheet 6: Wire SizingUseful Information:Typical Power Ratings onSelected Appliances & GadgetsAnswers to WorksheetsGeneral Troubleshooting Notes
Section 3: Basic System Sizing: Practical ExercisesWorked ExampleDesign a Stand Alone PV Systemfor the following householdelectrical appliances: 29 Inch Colour TVMultichoice Decoder2 15 W light bulbsLocation:AnswersPage 41 - 44MutareGeographical Coordinates19.0 S, 32.7 EWorksheet 1: System Loads (Practical)Use this worksheet to determine the total amp-hours per day used by all the loadsin your system.Step 1Calculate your AC loads. If no AC loads, skip to Step 2.1. List all AC loads, wattage and hours of use per week in the spaces below. Add upall the watt-hours per week to determineAC watt-hours per week (can also be doneper day).Description of Load Watts x Hrs/Wk WH/WKLine 1Line 2Line 3Line 4Line 5Total AC watt-hours per week:NOTE: Wattage of appliances can usually be determined from tags on the back ofthe appliance or from the owner’s manual. If an appliance is rated in amps,multiply amps by operating voltage (120 or 240) to find watts.2. Actual AC watt-hours per week:Multiply line 1 by 1.15 to correct for inverter loss.3. Inverter DC input voltage:Usually 12 or 24 volts. This is DC sytem voltage.4. Divide line 2 by line 3.This is total amp-hours per week used by AC loads.32Training & Referral Manual
Section 3: Basic System Sizing: Practical ExercisesStep 2Calculate your DC loads (Loads which use Direct Current)5. List all DC loads in the spaces below.Description of Load Watts x Hrs/Wk WH/WKLine 6Line 7Line 8Line 9Line 10Total watt-hours per week:6. DC system voltage. Usually 12 or 24 volts.7. Total amp-hours per week usedby DC loads. Divide line 5 by line 6.8. Total amp-hours per week usedby AC loads from line 4.9. Add lines 7 and 8. This is the totalamp-hours per week used by all loads.10. Divide line 9 by 7 days.This is the total average amp-hours per day.NOTESTraining & Referral Manual33
Section 3: Basic System Sizing: Practical ExercisesWorksheet 2: Battery SizingUse this worksheet to determine what size battery is required for your system.1. Total amp hours per day required fromSystems Load Worksheet, line 10.2. Maximum number of continuous days of cloudyweather expected in your area during one year.(5 to 10 days in most areas)3. Multiply line 1 by line 2.4. Divide line 3 by 0.8 to maintain a 20% reserveafter deep discharge period. If no special condition,skip to line 10.5. Select the multiplier below which corresponds withthe batteries’ wintertime average ambient temperature.Battery Temperature MultiplierBatteryTemperature 30-1.11.40-6.71.596. Multiply line 4 by line 5. This is your optimum battery size.7. Amp-hours of battery chosen (i.e. L16 is 360 amp hours).8. Divide line 6 by line 7. This is the total number of batteries in parallel required.9. Round off to the next highest whole number.10. Divide the system voltage by the battery voltage.11. Multiply line 9 by line 10.This is the total number of batteries required.34Training & Referral Manual
Section 3: Basic System Sizing: Practical ExercisesNOTESTraining & Referral Manual35
Section 3: Basic System Sizing: Practical ExercisesWorksheet 3: Array Sizing (Solar Panel Sizing)Use this worksheet to figure out the total number of solar panels required for yoursystem.1. Total average amp-hours per day fromthe Systems Loads Worksheet 1, line 10.2. Multiply line 1 by 1.2 to compensate forloss from battery charge/discharge.3. Average sun hours per day in your area.4. Divide line 2 by line 3. This is the totalsolar array amps required.5. OPtimum or peak amps of solar module used.See module specifications.6. Total number of solar modules in parallel required.Divide line 4 by 5.7. Round off to the next highest whole number.8. Number of modules in each series string toprovide DC battery voltage.DC BatteryVoltageNumber of Modulesin Each String1212423634849. Multiply line 7 by line 8.This is the total number of solar modules required.36Training & Referral Manual
Section 3: Basic System Sizing: Practical ExercisesNOTESTraining & Referral Manual37
Section 3: Basic System Sizing: Practical ExercisesWorksheet 4: Charge Controller SizingA charge controller with a higher current rating than the PV System’s maximum loadcurrent should be selected.1. System voltage (usually 12 or 24V).2. Divide line 5 in Worksheet 3 by line 1.3. Round up the result in line 2 to the nearest 10.This is the required amperage for the charge controllerWorksheet 5: Inverter SizingMost inverters have a DC to AC conversion
A Solar PV System converts solar energy in form of light to electrical energy by the use of a solar module (solar panel). Solar Irradiance from the Sun Solar Panel Charge Controller Battery System DC POWER AC POWER (and/or) Electric Current Inverter Photovoltaic systems consist of some or all of the