Transcription
6076Instruction Manual1
Sun WarningWARNING!o Always use the EclipseView Solar Filter when viewing at or nearthe Sun. When viewing a solar eclipse, always use this solar filterduring ALL phases of the eclipse.o Before use always check both sides of the solar filter for damage.Do not use if scratches, pin-holes, or the filter is separated from itsholder.o This item is not a toy and requires adult supervision.o Failure to use proper solar filtering can cause severe & permanenteye injury including blindness.o Do not attempt to clean or disinfect the filter material.Solar Filter Safety Compliance Information:o Meets the requirements for ISO 123112-2:2015o CE certified which meets the transmission requirements of scale 12-16 of EN 169/1992.o Meets the transmission requirements of EN 1836:2005 & AS/NZS 1338.1:1992 for Eclipse filters. (Queensland Directive).21Always use the EclipseView Solar Filter when viewing at or near the Sun or irreversible eye damage may occur.
Quick Start - Viewing the SunIn order to get started observing the Sun, you will need to do the following:1) Read the Instructions! Viewing the Sun can be dangerous. Read the instructions carefully.2) Setup the Tripod Expand the tripod legs. Adjust tripod leg height.3) Attach the Accessory Tray EclipseView 60: Use the threewingnuts and thread into bottom sideof tray. EclipseView 76: Thread tray intocenter nut between tripod legs.4) Attach Optical tube to Mount Remove yellow ota mounting knobs. Insert Slow-Motion control rod intoholder. Place Optical tube into mount. Reattach yellow ota mounting knobs.5) Confirm Solar Filter is not damagedand properly installed! Viewing the Sun can be dangerous. Always confirm the filter is goodbefore each use.6) Attach Accessories EclipseView60: Attach 90 diagonal & 26mm eyepiece. AttachSunFinder. EclipseView76: Attach 26mm eyepiece. Attach SunFinder.EclipseView767) Use the SunFinder to locate the Sun Use the Suns projection and place incenter area of SunFinder.8) Focus the telescope until image issharp. Only view the Sun with the properMeade solar filtering or permanent eyedamage can occur!Always use the EclipseView Solar Filter when viewing at or near the Sun or irreversible eye damage may occur.Projection ofSun32
Quick Start - Viewing at NightIn order to get started observing nighttime objects, you will need to do the following:1) Read the Instructions! Knowing how the telescope operates and what you will see is critical toenjoying the use of your telescope.5) Attach Accessories EclipseView60: Attach 90 diagonal & 26mm eyepiece. Attach Red-dotFinder. EclipseView76: Attach 26mm eyepiece. Attach Red-dot Finder.2) Setup the Tripod Expand the tripod legs. Adjust tripod leg height.3) Attach the Accessory Tray EclipseView 60: Use the threewingnuts and thread into bottom sideof tray. EclipseView 76: Thread tray intocenter nut between tripod legs.4) Attach Optical tube(ota) to Mount Remove yellow ota mounting knobs. Insert Slow-motion control rod intoholder. Place optical tube into mount arms. Reattach yellow ota mounting knobs.436) Align the Red-dot Finder Find a distant object and center in theeyepiece. A distant land object is idealfor this and can be done in daytime. Adjust Red-dot finder controls toalign red-dot over distant object.EclipseView767) Point the telescope at a bright object The Moon an ideal target for this.8) Focus the telescope until image issharp. Enjoy the view!Always use the EclipseView Solar Filter when viewing at or near the Sun or irreversible eye damage may occur.
Table Of ContentsSun Warning.1Quick Start – Viewing the Sun.2Quick Start – Viewing at Night.3Introduction.5Telescope Features – 60mm.6Telescope Features – 76mm.7Specifications.8About Your Telescope.9Assembling The Telescope.10Attaching The Optical Tube Assembly(OTA).11Remove The Dust Covers.12Insert The Erect-Image Prism (60mm Models).12Insert The Eyepiece.13Attaching the Finder.14DayTime Use of the Telescope.16Quick Start – Viewing the Sun.17Using the Solar Filter.18Installing the Solar Filter.20Installing the SunFinder.20Using the SunFinder.21Observing the Sun.22How to Observe a Solar Eclipse.24Solar Filter Maintenance.26Solar Filter Safety Compliance.26NightTime Use of the Telescope.27Quick Start – Viewing at Night.28Attaching The Accessories.29Installing The Red-Dot Finder.29Inserting The Eyepiece.30Aligning The Red-dot Viewfinder.31Moving The Telescope.33How To Use Your Telescope.34Observing at Night.35Resources.39Tip and Tricks.41Calculating Magnification.42Collimation.43Viewfinder Battery Replacement.49Care and Maintenance.50Accessories.51Recycling.52Customer Service and Warranty.5354
IntroductionCongratulations on getting a Meade EclipseView Telescope! Now you can setup and share the stargazing& solar viewing experience in seconds. Whether you are camping in the outdoors or relaxing in your backyard, grab your EclipseView Telescope and take it wherever life takes you. Your telescope is already partially assembled for you at our factory, so you only have to connect the optical tube to the mount, attachthe accessories to start viewing the sun, galaxies, planets, stars and more!Each telescope contains the following parts:EclipseView 60 65Optical TubeAlt-Az MountTripodSolar FilterTwo EyepiecesErect-ImagePrismSunFinderRed-dot FinderSoftware DVDEclipseView 76 Optical TubeAlt-Az MountTripodSolar FilterTwo EyepiecesSunFinderRed-dot FinderSoftware DVD
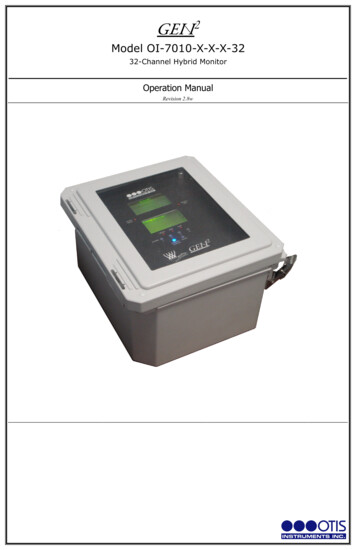
Telescope FeaturesEclipseView 60Image AImage B19 21812FIGURE 1A987186 11 14.15.20Tripod leg lockLeg brace supportsAccessory trayAlt-Az mountAzimuth lock knobAltitude lock knobsOptical tube assembly(OTA)Objective lensSolar Filter*Required for viewing theSun.SunFinderFinder mounting knobsRed-dot finderRed-dot finder On/OffswitchRed-dot finder .FocuserFocus knobsFocuser thumbscrewsSlow-motion control rodSlow-motion lock knobOTA mounting knobs(2)Front dust cap (not visible)Erect-image prismDew shieldImage C10Image D9Always use the EclipseView Solar Filter when viewing at or near the Sun or irreversible eye damage may occur.76
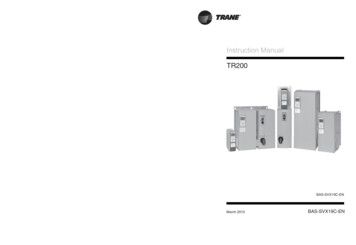
Telescope FeaturesEclipseView 76Image A21Image B241212FIGURE 1B13142291110 18 15 16 1719 .Tripod leg lockLeg brace supportsAccessory trayAlt-Az mountAzimuth motion lock knobAltitude lock knobsOptical tube assembly(OTA)Primary MirrorSolar Filter*Required for viewing theSun.SunFinderFinder mounting knobsRed-dot finderRed-dot finder On/OffswitchRed-dot finder serFocus knobsFocuser thumbscrewsSlow-motion control rodSlow-motion lock knobOTA mounting knobs(2)Front dust cap (not visible)Primary mirror adjustmentscrewsSecondary mirror adjustment screwsImage C10Image D9Always use the EclipseView Solar Filter when viewing at or near the Sun or irreversible eye damage may occur.
SpecificationsEclipseView 60EclipseView 76RefractorReflector800mm700mm60mm (2.4 in.)76mm (3 in.)Focal ratiof/13.3f/9.2ViewfinderSunFinder for DaytimeRed-dot for NighttimeSunFinder for DaytimeRed-dot for NighttimeTwo1.25” MA26mm, MA9mmTwo1.25” MA26mm, MA9mmWhite-Light Filter(Removable)White-Light Filter(Removable)Optical tube designOptical tube focal lengthLens/Mirror diameterEyepiecesSolar FilterErect-Image PrismIncludedN/A98
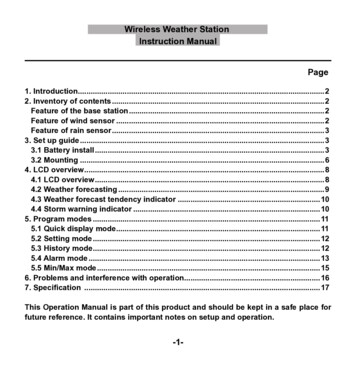
About The TelescopeThe EclipseView Telescopes are Alt-Az mounted telescopes. The word “Alt-Az” comes from the way the telescopemount moves. This mount style allows you to move the telescope both up/down (altitude) and left/right (azimuth), orAltitude-Azimuth directions. Hence, it’s called an Alt-Az telescope for short. This is the simplist type of mount sold.The EclispeView60 optical tubes are called refractors because they use lenses to refract, or bend, the incoming lightto the focal point. The light at the focal point is then magnified by the eyepiece to provide a larger viewing image.The EclipseView76 optical tubes are called reflectors because they use mirrors to focus incoming light. Inside thetelescope, there are two mirrors: a primary and a secondary mirror. The primary mirror is the largest of the two and islocated at the bottom of the tube. The secondary mirror is near the top of the tube. The large primary mirror collectslight from the object you’re looking at and bounces it forward to the secondary mirror which redirects it out the side ofthe tube. The reflecting telescope must have the mirrored elements aligned, or collimated, in order to get good imagequality.Refracting Telescope109Reflecting TelescopeAlways use the EclipseView Solar Filter when viewing at or near the Sun or irreversible eye damage may occur.
Assembling The TelescopeStep 1Tripod Assembly:The tripod is the basic support for your telescope and comes pre-assembled fromthe factory; except for the accessory tray. In order to use the scope a small amount ofassembly is required. Follow the below steps to assemble the telescope.STEP 1: To setup the tripod, spread the legs out evenly and place on solid ground.Loosen the leg lock knobs and extend the inner legs to desired height. Do this for eachleg until the top of the tripod is approximately level. Re-lock the leg lock knob.Step 2Step 2STEP 2:EclipseView 60 Models: Attach the accessory tray to the tripod by aligning thethree mounting hole at eacj corner with the slotted holes on each leg brace. Usethe included wing-nuts and thread into the tray from the bottom.EclipseView60Step 2EclipseView 76 Models: Attach the accessory tray to the tripod by threading itinto the center nut between the tripod legs.EclipseView761110
Attaching The Optical Tube Assembly (OTA):The optical tube gathers distant light which is focused in the eyepiece.STEP 1: Remove the two lock knobs from the optical tube mount.STEP 2: Slide the Slow-motion control rod into the slow-motion control lock knob hole.STEP 3: Place the optical tube between the forks of the mount, oriented as shown.STEP 4: Thread a lock knobs through each of the holes in the forks of the mount and tighten to a firm feel.place tubebetween forkslock knobslide rodthroughhole1211lock knob
Remove The Dust Covers:The dust covers located at the front and rear of the telesocpe protect the telescopeSTEP 1: Remove dust covers(6) at the front of the scope by pulling the cover away from the telescope. Set asideso you can re-install it after use.STEP 2: Remove the dustcover from the focuser by pulling it out of the focuser drawtube. Set aside so you canre-install it after use.Insert The Erect-Image Prism (EclipseView60 Models Only):The 90 Erect-Image Prism reflects the light from the optical tube to a more comfortable viewing position. It alsoreorients (corrects) the image so the object appears right side up and left-right correct. This makes the EclipseView60and ideal choice for both terrestrial viewing and night time observing.STEP 1: To install, slide the diagonal prism into the focuser draw tube.STEP 2: Tighten the draw tube thumbscrew to hold the diagonal prism securely.1312
Insert The Eyepiece:Step 1STEP 1:EclipseView60 Models: Slide the MA 26mm eyepiece into diagonal prism.EclipseView76 Models: Slide the MA 26mm eyepiece directly into the focuserdrawtube.EclipseView60STEP 2:EclipseView60 Models:Tighten the diagonal prism thumbscrew to hold theeyepiece securely.EclipseView76 Models: Tighten the focuser drawtube thumbscrew to hold theeyepiece securely.Step 1EclipseView761413
Attaching The Finder:An eyepiece has a narrow field of view. A viewfinder, or finder, has a wider field of view,which makes it easier to locate objects.SunFinderThe EclipseView telescopes comes with two different viewfinders. Each finder has adifferent use and should only be used as intended.Projection of SunSunFinder: Use only when trying to locate the Sun. This SunFinder uses the Suns brightlight to project a small dot onto the finders back plate. Center the projected white spot inthe centering circle on the back plate. The Sun should then be in the field of view of a lowpower eyepiece such as the 26mm MA eyepiece. Always use the included Solar Filterwhen looking at or near the Sun.Red-dot Finder: Use the Red-dot viewfinder only on the night time sky or daytime landobjects. Never use it to look at or near the Sun as permanent eye damage can occur. Thisfinder has a red dot projected onto a screen which makes it easier to line up more preciselywith the target. To install the finders do the following:Red-dot FinderSTEP 1:Note the two thumbscrews threaded onto two bolts on the optical tube.Remove the thumbscrews from the tube.STEP 2:Line up the two holes on the viewfinder bracket over the two bolts. Slide thebracket over the bolts.STEP 3: Replace the thumbscrews onto the bolts and tighten to a firm feel.1514
The telescope is now completely setup and ready for NIGHTTIME observing. Follow the instructions under thesection “NightTime Use of the EclipseView Telescope” for more information.If using the telescope for DAYTIME use, such as viewing the Sun, proceed to the section “DayTime Use of theEclipseView Telescope” for more information. Always use the included Solar Filter when looking at or nearthe Sun.1615
DAY TIME USEOF THEECLIPSEVIEWTELESCOPE1716
Quick Start - Viewing the SunIn order to get started observing the Sun, you will need to do the following:1) Read the Instructions! Viewing the Sun can be dangerous. Read the instructions carefully.2) Setup the Tripod Expand the tripod legs. Adjust tripod leg height.3) Attach the Accessory Tray EclipseView 60: Use the threewingnuts and thread into bottom sideof tray. EclipseView 76: Thread tray intocenter nut between tripod legs.4) Attach Optical tube to Mount Remove yellow ota mounting knobs. Insert Slow-Motion control rod intoholder. Place Optical tube into mount. Reattach yellow ota mounting knobs.18175) Confirm Solar Filter is not damagedand properly installed! Viewing the Sun can be dangerous. Always confirm the filter is goodbefore each use.6) Attach Accessories EclipseView60: Attach 90 diagonal & 26mm eyepiece. AttachSunFinder. EclipseView76: Attach 26mm eyepiece. Attach SunFinder.EclipseView767) Use the SunFinder to locate the Sun Use the Suns projection and place incenter area of SunFinder.Projection ofSun8) Focus the telescope until image issharp. Only view the Sun with the properMeade solar filtering or permanent eyedamage can occur!Always use the EclipseView Solar Filter when viewing at or near the Sun or irreversible eye damage may occur.
Using The Solar FilterCAUTION: NEVER look through your telescope at or near the Sun until thesolar filter is securely installed at the front of the telescope. Please read thefollowing instructions fully and keep them in mind when observing the Sun.Always use caution when viewing at or near the Sun. Adult Supervision isrequired.Step 1.Inspecting the Solar Filter:All filters are checked carefully before shipment. However, as the solar filtermaterial is delicate, be sure to check for any damage prior to each use.STEP 1: Before installing the solar filter, hold the solar filter up to the skyaway from the Sun or use a standard 60 to 100 watt light bulb.STEP 2: Examine the filter for any pin holes, scratches, tears, or signs thefilter material has separated from its holder. If any damage is seen, do not usethe solar filter. Replacement will be required.Installing the Solar Filter: The solar filter is pre-installed at our factory toallow use right out of the box. However, if the solar filter is removed from thetelescope make sure to reinstall the filter before looking at or near the Sun. To1918
install the filter, do the following.Step 2.STEP 1: Point the telescope upwards away from the Sun.STEP 2: Carefully slide the filter fully over the front end of the telescope.Never force the filter onto the optical tube or damage can occur.STEP 3: Tighten the thumb screw located on side the filter until firm. Do notovertighten the thumb screw.STEP 4: The solar filter is now installed and ready to use on the Sun. Alwaysuse caution when viewing at or near the Sun.STEP 5: When removing the solar filter, point the telescope away from theSun first, then remove the filter. Removing the filter while the telescope is stillpointed at the Sun is very dangerous and can cause serious damage to thetelescope or anyone that may unknowingly attempt to look through the nowunfiltered telescope.2019Step 3.
Installing the SunFinder:Step 1.The SunFinder is a pointing device that will allow you to easily locate the Sun.Follow the below instructions to install and use the SunFinder.STEP 1: Remove the two viewfinder mounting thumb screws from the opticaltube.STEP 2: Place the SunFinder mounting bracket onto the threaded screws,with the SunFinder pin hole pointed forward towards the front of the telescope.STEP 3: Use the two mounting thumb screws to secure the SunFinderbracket onto the optical tube. Tighten to a firm feel.Step 3.2120
Using The SunFinder:STEP 1: To use the SunFinder point the telescope toward the Sun. The small pinhole in the front of theSunFinder will act as a projector. As the telescope moves closer to the Sun, a projection of the Sun will bedisplayed on the back plate of the SunFinder.STEP 2: Center the projection in the middle to the finder viewing circle.STEP 3: We recommend using the lowest power eyepiece, such as the 26mm eyepiece to initially findthe Sun. You can then center the sun in the eyepiece, then switch to higher power eyepieces if desired tozoom in on detail such as Sunspots.This sidetoward Sun2221Step 1.Projectionof SunStep 2.
Observing The Sun:What makes our Sun so enjoyable to observe is that it’s an active star that’salways changing. When viewing the Sun through the EclipseView solar filter,the Sun will show up as a yellow-orange disk with possible Sunspots on itssurface.SunspotsSunspots are temporary dark regions on the Sun where the surface temperatureis cooler than the surrounding material. They are places where the Suns everchanging magnetic field prevents the hotter mater
o Always use the EclipseView Solar Filter when viewing at or near the Sun. When viewing a solar eclipse, always use this solar filter during ALL phases of the eclipse. o Before use always check both sides of the solar