Transcription
NVIDIA CUDA GETTINGSTARTED GUIDE FOR LINUXDU-05347-001 v03 March 2011Installation and Verification on Linux Systems
DOCUMENT CHANGE HISTORYDU-05347-001 v03VersionDateAuthorsDescription of Change01April 20, 2010CW, TSRelease02August 19, 2010CWUpdated for CUDA Toolkit 3.203March 3, 2011CWUpdated for CUDA Toolkit 4.0NVIDIA CUDA Getting Started Guide for LinuxDU-05347-001 v03 ii
TABLE OF CONTENTSIntroduction .1System Requirements. 2About This Document . 2Installing CUDA Development Tools .3Verify You Have a CUDA-Enabled System.Verify You Have a Supported Version of Linux .Verify That gcc Is Installed .Download the NVIDIA Driver and CUDA Software .Install the NVIDIA Driver .Install the CUDA Software .Verify the Installation .Compiling the Examples .Running the Binaries .344557888Additional Considerations . 11NVIDIA CUDA Getting Started Guide for LinuxDU-05347-001 v03 iii
LIST OF FIGURESFigure 1. Valid Results from SDK deviceQuery Program . 9Figure 2. Valid Results from SDK bandwidthTest Program . 10NVIDIA CUDA Getting Started Guide for LinuxDU-05347-001 v03 iv
INTRODUCTIONNVIDIA CUDATM is a general purpose parallel computing architecture introduced byNVIDIA. It includes the CUDA Instruction Set Architecture (ISA) and the parallelcompute engine in the GPU. To program to the CUDA architecture, developers can useC, one of the most widely used high-level programming languages, which can then berun at great performance on a CUDA-enabled processor.The CUDA architecture and its associated software were developed with several designgoals in mind: Provide a small set of extensions to standard programming languages, like C, thatenable a straightforward implementation of parallel algorithms. With CUDA and Cfor CUDA, programmers can focus on the task of parallelization of the algorithmsrather than spending time on their implementation. Support heterogeneous computation where applications use both the CPU and GPU.Serial portions of applications are run on the CPU, and parallel portions areoffloaded to the GPU. As such, CUDA can be incrementally applied to existingapplications. The CPU and GPU are treated as separate devices that have their ownmemory spaces. This configuration also allows simultaneous computation on boththe CPU and GPU without contention for memory resources.CUDA-enabled GPUs have hundreds of cores that can collectively run thousands ofcomputing threads. Each core has shared resources, including registers and memory.The on-chip shared memory allows parallel tasks running on these cores to share datawithout sending it over the system memory bus.This guide will show you how to install and check the correct operation of the CUDADevelopment Tools.NVIDIA CUDA Getting Started Guide for LinuxDU-05347-001 v03 1
IntroductionSYSTEM REQUIREMENTSTo use CUDA on your system, you will need the following installed: CUDA-enabled GPU Device driver A supported version of Linux with a gcc compiler and toolchain CUDA software (available at no cost from http://www.nvidia.com/cuda)ABOUT THIS DOCUMENTThis document is intended for readers familiar with the Linux environment and thecompilation of C programs from the command line. You do not need previousexperience with CUDA or experience with parallel computation. Note: This guide coversinstallation only on systems running X Windows. Note: Many commands in this document might require superuser privileges. Onmost distributions of Linux, this will require you to log in as root. For systems thathave enabled the sudo package, use the sudo prefix for all necessary commands.We will no longer remark on the matter of user privilege for the installationprocess except where critical to correct operation.NVIDIA CUDA Getting Started Guide for LinuxDU-05347-001 v03 2
INSTALLING CUDA DEVELOPMENT TOOLSThe installation of CUDA development tools on a system running the appropriateversion of Linux consists of four simple steps: Verify the system has a CUDA-enabled GPU and a supported version of Linux. Download the NVIDIA driver and the CUDA software. Install the NVIDIA driver. Install the CUDA software.Test your installation by compiling and running one of the sample programs in theCUDA software to validate that the hardware and software are running correctly andcommunicating with each other.VERIFY YOU HAVE A CUDA-ENABLED SYSTEMMany NVIDIA products today contain CUDA-enabled GPUs. These include: NVIDIA GeForce 8, 9, 200, 400, and 500 series GPUs NVIDIA Tesla computing solutions Many of the NVIDIA Quadro productsAn up-to-date list of CUDA-enabled GPUs can be found on the NVIDIA CUDA Website at http://www.nvidia.com/object/cuda gpus.htmlThe Release Notes for the CUDA Toolkit also contain a list of supported products.NVIDIA CUDA Getting Started Guide for LinuxDU-05347-001 v03 3
Installing CUDA Development ToolsTo verify which video adapter your system uses, find the model number by going toyour distribution's equivalent of System Properties, or, from the command line, enter:lspci grep -i nvidiaIf you do not see any settings, update the PCI hardware database that Linux maintainsby entering update-pciids (generally found in /sbin) at the command line and rerunthe previous lspci command.Verify You Have a Supported Version of LinuxThe CUDA Development Tools are only supported on some specific distributions ofLinux. These are listed in the CUDA Toolkit release notes.To determine which distribution and release number you're running, type the followingat the command line:uname -m && cat /etc/*releaseYou should see output similar to the following, modified for your particular system:i386Red Hat Enterprise Linux WS release 4 (Nahant Update 6)The i386 line indicates you are running on a 32-bit system. On 64-bit systems runningin 64-bit mode, this line will generally read: x86 64. The second line gives the versionnumber of the operating system.Verify That gcc Is InstalledThe gcc compiler and toolchain generally are installed as part of the Linux installation,and in most cases the version of gcc installed with a supported version of Linux willwork correctly.To verify the version of gcc installed on your system, type the following on thecommand line:gcc --versionIf an error message displays, you need to install the "development tools" from yourLinux distribution or obtain a version of gcc and its accompanying toolchain from theWeb.NVIDIA CUDA Getting Started Guide for LinuxDU-05347-001 v03 4
Installing CUDA Development ToolsDOWNLOAD THE NVIDIA DRIVER AND CUDASOFTWAREOnce you have verified that you have a supported NVIDIA processor and a supportedversion of Linux, you need to make sure you have a recent version of the NVIDIAdriver. The CUDA Toolkit release notes specify which minimum version of the NVIDIAdriver is required.On many distributions, the driver release number can be found in the graphical interfacemenus under Applications System Tools NVIDIA X Server Settings. Or, from thecommand line, run:/usr/bin/nvidia-settingsThe following CUDA software is required to run CUDA programs: The CUDA ToolkitThe CUDA Toolkit contains the tools needed to compile and build a CUDAapplication in conjunction with the compilation driver. It includes tools, libraries,header files, and other resources. The GPU Computing SDKThe GPU Computing SDK includes sample projects that provide source code andother resources for constructing CUDA programs.The NVIDIA driver and CUDA software are available at no cost from the main CUDAdownload site at http://www.nvidia.com/object/cuda get.html .Choose the Linux distribution you are using, click Search, and download the NVIDIAdriver. Save the driver file on your local system. Likewise, download and save the SDKand Toolkit.INSTALL THE NVIDIA DRIVERWith the NVIDIA driver and software downloaded, you need to install the driver. Usethe following procedure to install the driver:1.Exit the GUI if you are in a GUI environment by pressing Ctrl-Alt-Backspace. Somedistributions require you to press this sequence twice in a row; others have disabledit altogether in favor of a command such as sudo /etc/init.d/gdm stop .Still others require changing the system runlevel using a command such as/sbin/init 3 to exit the GUI.NVIDIA CUDA Getting Started Guide for LinuxDU-05347-001 v03 5
Installing CUDA Development Tools2.Run the driver installation package from the command line as a superuser.3.Verify that the correct version of the driver is installed. This can be done throughyour System Properties (or equivalent) or by executing the command cat/proc/driver/nvidia/version .4.If you do not use a GUI environment, ensure that the device files /dev/nvidia*exist and have the correct file permissions. (This would be done automatically wheninitializing a GUI environment.) This can be done creating a startup script like thefollowing to load the driver kernel module and create the entries as a superuser atboot time:#!/bin/bash/sbin/modprobe nvidiaif [ " ?" -eq 0 ]; then# Count the number of NVIDIA controllers found.NVDEVS lspci grep -i NVIDIA N3D echo " NVDEVS" grep "3D controller" wc -l NVGA echo " NVDEVS" grep "VGA compatible controller" wc -l N expr N3D NVGA - 1 for i in seq 0 N ; domknod -m 666 /dev/nvidia i c 195 idonemknod -m 666 /dev/nvidiactl c 195 255elseexit 1fi5.Restart the GUI environment (using the command startx or init 5 or sudo/etc/init.d/gdm start or the equivalent command on your system).More information on installing the driver is available 256.35/README/index.html. Note: New versions of CUDA software can require later versions of Linux and of theNVIDIA driver, so always verify that you are running the correct release for theversion of CUDA software you are using.NVIDIA CUDA Getting Started Guide for LinuxDU-05347-001 v03 6
Installing CUDA Development ToolsINSTALL THE CUDA SOFTWAREThis section describes the installation and configuration of the CUDA Toolkit and theGPU Computing SDK, which you previously downloaded.Before installing the CUDA software packages, you should read the Release Notesbundled with each, as those notes provide important details on installation and softwarefunctionality.Then, follow these few steps for a successful installation.1.Uninstall any previous versions of the CUDA Toolkit and the GPU Computing SDK.Do this by deleting the files from /usr/local/cuda and from /NVIDIA GPU Computing SDK, the default installation locations. (Note thatolder versions of the SDK installed into /NVIDIA CUDA SDK by default rather than /NVIDIA GPU Computing SDK.) Adjust accordingly if you placed the files innon-default directories. (If you wish to keep the files so you can compile for differentversions of CUDA software, then rename the existing directories before installing thenew version and modify your Makefile accordingly.)2.Install the CUDA Toolkit by running the downloaded .run file as a superuser.The CUDA Toolkit installation defaults to /usr/local/cuda.3.Define the environment variables. The PATH variable needs to include /usr/local/cuda/bin. LD LIBRARY PATH needs to contain either /usr/local/cuda/lib or/usr/local/cuda/lib64 for 32- or 64-bit operating systems, respectively.The typical way to place these values in your environment is with the followingcommands:export PATH /usr/local/cuda/bin: PATHexport LD LIBRARY PATH /usr/local/cuda/lib: LD LIBRARY PATHfor 32-bit operating systems, with lib64 replacing lib for 64-bit operating systems asmentioned above. To make such settings permanent, place them in /.bash profile.4.Install the SDK (located in the second .run file) as a regular user in the defaultlocation, (HOME)/NVIDIA GPU Computing SDK.Installing as a regular user avoids access issues.5.If you wish to build all of the SDK samples, including those with graphical ratherthan command-line interfaces, you may need to install additional system libraries orheaders if you have not done so before. While every Linux distribution is slightlydifferent with respect to package names and package installation procedures, theNVIDIA CUDA Getting Started Guide for LinuxDU-05347-001 v03 7
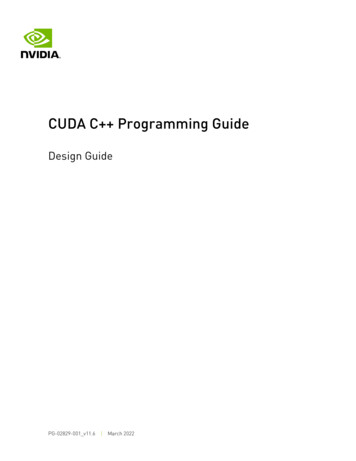
Installing CUDA Development Toolslibraries and headers most likely to be necessary are OpenGL (e.g., Mesa), GLU,GLUT, and X11 (including Xi, Xmu, and GLX). These can be installed on Ubuntu asfollows, for example:sudo apt-get install freeglut3-dev build-essential libx11-devlibxmu-dev libxi-dev libgl1-mesa-glx libglu1-mesa libglu1-mesa-devNote: installing Mesa may overwrite the /usr/lib/libGL.so that was previouslyinstalled by the NVIDIA driver, so a reinstallation of the NVIDIA driver might berequired after installing these libraries.!Important: Best practice for a multiuser Linux system is to also install a copy ofthe GPU Computing SDK as root that is accessible to users on a read-only basis.This pristine copy can then be copied to a user directory in the event users corrupttheir copy of the source code.VERIFY THE INSTALLATIONBefore continuing, it is important to verify that the CUDA programs can find andcommunicate correctly with the CUDA-enabled hardware. To do this, you need tocompile and run some of the included sample programs.Compiling the ExamplesThe version of the CUDA Toolkit can be checked by running nvcc -V in a terminalwindow. The nvcc command runs the compiler driver that compiles CUDA programs. Itcalls the gcc compiler for C code and the NVIDIA PTX compiler for the CUDA code.NVIDIA includes sample programs in source form in the GPU Computing SDK. Youshould compile them all by changing to /NVIDIA GPU Computing SDK/C andtyping make. The resulting binaries will be installed in /NVIDIA GPU Computing SDK/C/bin/linux/release.Running the BinariesThe sample projects use libraries pointed to by LD LIBRARY PATH, as describedearlier, so make sure it points to the right directory.After compilation, go to /NVIDIA GPU Computing SDK/C/bin/linux/releaseand run deviceQuery. If the CUDA software is installed and configured correctly, theoutput for deviceQuery should look similar to that shown in Figure 1. The exactappearance and the output lines might be different on your system. The importantoutcomes are that a device was found (the first highlighted line), that the device matchesNVIDIA CUDA Getting Started Guide for LinuxDU-05347-001 v03 8
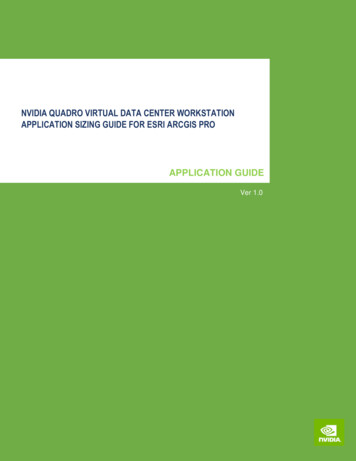
Installing CUDA Development Toolsthe one on your system (the second highlighted line), and that the test passed (the finalhighlighted line). If a CUDA-enabled device and the CUDA Driver are installed butdeviceQuery reports that no CUDA-capable devices are present, this likely means thatthe /dev/nvidia* files are missing or have the wrong permissions.On systems where SELinux is enabled, you might need to temporarily disable thissecurity feature to run deviceQuery. To do this, type:#setenforce 0from the command line as the superuser.Running the bandwidthTest program ensures that the system and the CUDA-enableddevice are able to communicate correctly. Its output is shown in Figure 2.Figure 1.Valid Results from SDK deviceQuery ProgramNVIDIA CUDA Getting Started Guide for LinuxDU-05347-001 v03 9
Installing CUDA Development ToolsFigure 2.Valid Results from SDK bandwidthTest ProgramNote that the measurements for your CUDA-enabled device description will vary fromsystem to system. The important point is that you obtain measurements, and that thesecond-to-last line (in Figure 2) confirms that all necessary tests passed.Should the tests not pass, make sure you have a CUDA-enabled NVIDIA GPU on yoursystem and make sure it is properly installed.If you run into difficulties with the link step (such as libraries not being found), consultthe Linux Release Notes found in the doc folder in the SDK directory.NVIDIA CUDA Getting Started Guide for LinuxDU-05347-001 v03 10
ADDITIONAL CONSIDERATIONSNow that you have CUDA-enabled hardware and the software installed, you canexamine and enjoy the numerous included programs. To begin using CUDA toaccelerate the performance of your own applications, consult the CUDA C ProgrammingGuide, located in /usr/local/cuda/doc.For technical support on programming questions, consult and participate in the bulletinboard and mailing list at http://forums.nvidia.com/index.php?showforum 71.NVIDIA CUDA Getting Started Guide for LinuxDU-05347-001 v03 11
NoticeALL NVIDIA DESIGN SPECIFICATIONS, REFERENCE BOARDS, FILES, DRAWINGS, DIAGNOSTICS, LISTS, AND OTHERDOCUMENTS (TOGETHER AND SEPARATELY, “MATERIALS”) ARE BEING PROVIDED “AS IS.” NVIDIA MAKES NOWARRANTIES, EXPRESSED, IMPLIED, STATUTORY, OR OTHERWISE WITH RESPECT TO THE MATERIALS, ANDEXPRESSLY DISCLAIMS ALL IMPLIED WARRANTIES OF NONINFRINGEMENT, MERCHANTABILITY, AND FITNESS FORA PARTICULAR PURPOSE.Information furnished is believed to be accurate and reliable. However, NVIDIA Corporation assumes noresponsibility for the consequences of use of such information or for any infringement of patents or otherrights of third parties that may result from its use. No license is granted by implication of otherwise underany patent rights of NVIDIA Corporation. Specifications mentioned in this publication are subject to changewithout notice. This publication supersedes and replaces all other information previously supplied. NVIDIACorporation products are not authorized as critical components in life support devices or systems withoutexpress written approval of NVIDIA Corporation.TrademarksNVIDIA, the NVIDIA logo, GeForce, Tesla, and Quadro are trademarks or registered trademarks of NVIDIACorporation in the U.S. and other countries. Other company and product names may be trademarks of therespective companies with which they are associated.Copyright 2011 NVIDIA Corporation. All rights reserved.www.nvidia.com
NVIDIA CUDA Getting Started Guide for Linux DU-05347-001_v03 5 DOWNLOAD THE NVIDIA DRIVER AND CUDA SOFTWARE Once you have verified that you have a supported NVIDIA processor and a supported version of Linux, you need to