Transcription
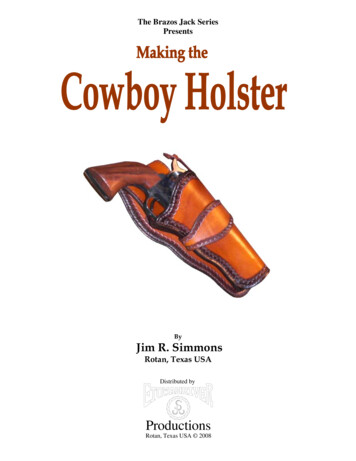
The Brazos Jack SeriesPresentsByJim R. SimmonsRotan, Texas USADistributed byProductionsRotan, Texas USA 2008
Tools & Materials ListToolsPencilSize 7 Maxi PunchRulerSize 12 Maxi PunchScratch Awl1" Oblong PunchStabbing Awl1/2" Oblong PunchUtility Knife1/4" Oval PunchSuper SkiverMalletScalpel Blade #1212Framing Square#2 Edge BevellerSlickerSize 4 Mini PunchStrap Cutter #1215Hardware3/4" Center Bar Buckles1/4" Chicago ScrewsMaterials8/9 ounce vegetable tanned leather for the Holster2/3 ounce vegetable tanned leather for the LinerRecommended Dye and FinishFiebing’s Oil Dye (Your choice of color)Fiebing’s Resolene
IntroductionThe following Instructions will take you step-by-step through the process of makingthe Cowboy Holster from patterns you have acquired or made from any one of HolsterMaking books currently in publication. Included are instructions on how to add a Liner tothe Holster and will demonstrate how to form and shape the Holster while adding theLiner - without having to wet mold the finished holster.That being said, it’s of the utmost importance to have a Holster Template madespecifically for the pistol the holster is intended for. Now, if you don’t have any existingholster templates or books, don’t worry – I thought of everything, I hope.I realize that some of you will want to carve a Design on your new Holster, and that’sa good thing. However, once the carving work is complete, allow the leather to dry andthen dye and finish the leather as you usually would. At this point, it will be possible tocomplete the Holster without having to wet the leather again, thereby preserving thedetails of your work.The methods shown in this Tutorial require that all the Stitch Placements betransferred to the leather from the Template. This is a relatively new concept and is notwidely practiced in certain circles of Leatherwork. But not having to “punch & sew asyou go” will save a lot of time and effort in the end. The accuracy of the PatternTemplate is critical to the assembly process, so be sure that everything on the Templatesis marked correctly. The instructions will give tips to ensure accuracy of the layout.An important issue to consider when making Gunleather is the use of QualityMaterials. I highly recommend the heavier 8/9 ounce Vegetable Tanned Leather for theHolster and I recommend using the lighter 2/3 ounce Vegetable Tanned Leather for theHolster Liner. Hermann Oak Leather is my first choice for both. I realize that this brandof leather is rather expensive, but keep in mind that Quality Gunleather is an investmentthat will last for many years to come.The Tools needed for this project are listed on the Tools and Materials List. Of courseyou will need a couple of size 1/0 Harness needles and a quality thread of your choosing.I hope you enjoy the following tutorial as I have made every effort to make it ascomplete and informative as possible.Enjoy!1
Alrighty then, let’s get started. Go get you pistol and take the bullets out! Then, fetcha pencil, a ruler and a 1" leather strap of the same leather you’re going to use for yourholster. I recommend 8 ounce. Take a strapof the 2-3 ounce lining leather and glue it tothe 8 ounce strap so the thickness of the“Strap” will be consistent with the weight ofthe finished Lined Holster. If you’re notgoing to line the holster, then omit this step.Now, measure 1/2" from one end anddraw a line on the inside of the strap with apencil. This will be used as a reference linehere in just a minute.Now, lay the strap on the bench andthen place the pistol on the strap so thetrigger guard lies right on the referenceline you made, as shown in Figure 1.Wrap the strap around the pistol andmake a pencil mark where it touches theother end, as shown in Figure 2. This markwill determine the overall width of theHolster Template.Use the ruler to measure from the endmarked with the 1/2" reference line to themark you just made. If the line happens tofall on a 1/6th of an inch, mark the nexthighest 1/8th to keep things simple.Write the measurement on a note pad soyou don’t forget it while you’re up gettinganother cup of coffee or something.2
Now that you have established the overallwidth for the holster template, let’s put it to use.Start with a 14" x 22" piece of white posterboard. Forget butcher paper, it’s too flimsy andharder to work with!If you don’t have one, get a large FramingSquare from your local Hardware store. I’ll wait.Okay, you back; let’s get going.Draw a line in the center of theposter board and then use the framingsquare to draw another perpendicularto this one. (That’s 90 degrees.) Drawthis line in the center of this side alsoto allow plenty of room for the holsterpouch and back skirt.Line “A” is the Center Line andLine “B” is the Top Reference Line forlaying out the template.Okay, remember that measurementyou wrote down? Well, now’s the time touse it. Divide the measurement in half andplace the ruler on the Center Line at halfthe overall width. For example; if say yourmeasurement is 9 5/8" then you will placethe ruler on the center line at 4 13/16".Make a mark on the Top Line to giveyou a reference for the next step.Mark the same distance on the bottomedge of the poster board and then draw adashed line from the mark on the centerline to this point, as shown in Figure 7.This will be the construction area ofthe template.3
Now, go get your unloaded pistol andlay it on the poster board as shown inFigure 8. You will need to place the pistolso the trigger guard is 1/2" from the outermark on the Top Line. See the arrows inthe photo.Follow up by making a series of marksabout 3/4" to 7/8" from the inner frame ofthe pistol in the areas shown in the photo.Then make a mark at the end of thebarrel for future reference.Okay, use the pencil to sketch a lightoutline of the holster using the referencemarks as a guide. You don’t have to getthe outline right on the reference marks asthey are only there to keep you frommaking the profile to narrow. Feel free toexperiment with some re-curve in theoutline to add a little flare to your holster.When you’re happy with the look of it,re-draw the outline so to make it darker.In Figure 10 you can see the drawnoutline of the holster pouch (B) as well asthe outline for the top of the holster (A).You will notice that the center edgeof the top dips below the Top Line a bit. Irecommend giving this at least a 1/2" dip.Now, look it over to be sure you’rehappy with the look of the profilebecause however the template looks sowill the finished holster.From here, use your scissors to gently cut outthis side of the template only. Notice that Istopped cutting right on the Center Line at thebottom and at the top while leaving a lot of roomat the top for the shape of the Back Skirt. It’s bestto leave as much pattern material on as possiblewherever possible so you don’t run out of roomand have to start over.4
You remember that Compass you had touse in art class back in the Third Grade? Wellnow you get to use it again.Set the compass to 3/16" and thencarefully follow the outer edge of the holsterprofile to mark your stitch line, as shown inFigure 12. If you wish to add a Liner to yourholster draw the stitch line all the way around(as far as you can at this point). As the Linerwill need to be sewn on around the edegs,this stitch line will be necessary later on.Looking closely you can see where I madeStitch Placement Marks from the top and allthe way along the stitch line. Now in thisphoto I was making an un-lined holster so thestitch line is not shown all the way around. Butit does give a good reference of where to stopthe stitch marks for the Main Seam. The TopStitch Mark and the Bottom Stitch Mark willneed to have a small circle drawn around themfor future reference when you add the Liner.Mark the Stitch Placement Marks at 3/16" all the way around. When you come to thecenter line at the holster’s toe you may have to “fudge” the distance between three or fourmarks to get them to come out even. Believe me, when you come to this it will becomequite clear what I’m talking about.By now you’re probably saying to yourself “Self, how he hasn’t drawn the otherside of the template yet?”Answer: I’m, going to show you how todo this so it will be perfectly matched onboth sides!Place your small framing square directlyon the center line and hold it firmly in placewith one hand. Use the other to lift thefinished side, as shown in Figure 14.5
Gently pull this side over to flushit with the edge of the square and thenuse your thumbnail to crease the foldagainst the edge of the square, asshown in Figure 15.Now, fold the finished side of thetemplate over to the other side with themarked stitch line showing, as seen here inFigure 16.You’re starting to see where I’m goingwith this, aren’t you?While you hold the finished side down; use a pencil to trace this outline to the otherside as shown if Figure 17-A. Figure 17-B shows the outline drawn on the other side.Now, place the template on a rubber punchpad and use your trusty scratch awl to markthe stitch placements by gently pushingthrough both sides of the template at one time.Push through just enough to make a smalllittle hole in the poster board. You will use thescratch awl to transfer these marks to theleather so they don’t have to be very big.6
Use the scissors to cut out the other sideand this is what you’ll have so far. Cool huh?Now you can move on the drawing out theback skirt.I would like to note that the holster beingmade here is going to be a Mexican LoopHolster. The Lining Instructions coming up arefor a Solid Panel Skirt. You can go either wayyou choose on this from here, I just wanted toclarify this so you know why the instructionschange from one to the other.With either style of back skirt you choose,they both start out the same way, so let’s get at it.Draw a dashed line about 1 1/2" up from theTop Line making sure it’s parallel. This will bethe holster skirt’s Fold Line.Place the square on this line and then fold thefinished end of the template over using the samemethod as before.Note: The distance between the Top Line andthe Fold Line can be as much or as little as youdesire, but this will work to get you through the first holster to show you how this works.Okay, with the template folded over asshown here, draw a reference line along thefolded edge of the holster, see the arrows.This line will only be needed if making theMexican Loop Holster. If you’re making a SolidBack Skirt, you can skip this part for now.Trace the outline of the upper part of theholster stopping at the points indicated by thearrows.7
Now, cut straight across and then cut out downto the finished side, as shown here in Figure 23.Note: You will follow the examples for ALLstyles of Back Skirts, or until I say not to.Now, sketch a light line out from the holsterat least 3/4" on both sides, as shown here. TheSkirt can extend below to toe of the holster ormay be flush with it. That is a matter of taste onyour part.The edge of the skirt on the front of theholster may be straight or curved out somewhatif you wish. (See the arrows.)Mexican Loop Holsters Only – to mark forthe Holster Loop(s) on the skirt, you will makesome reference marks on both sides of theholster as well as a short trace of the seam, asshown in Figure 25.You can make the Loop as wide as youwant, but I recommend at least 1-1/4" wide toallow for the width of the slots. This willbecome clear here in a minute.Looking closely you can see where Idrew lines across the skirt at the referencelines, as well as a tracing of the holster’soutline between them. These four pointswill be needed to correctly locate the Slotsfor the Loop here in a minute.8
Once you like the way skirtlooks, cut it out and this is whatyou’ll have so far. As you can seethe template is really taking shape.At this point, if you want to adda full liner to the holster, you willneed use the compass to mark astitch line all the way around thetemplate. Follow up by marking outthe stitch placement marks at 3/16".Be sure that the Top and Bottom Stitch Marks on both sides of the holster’s MainSeam are marked with a small circle so you don’t loose them in the shuffle. This willbecome clear as I get into the Lining Instructions.Alrighty, for an Un-lined Holsterplace the new template on the leather andinsert Push Pins into exsisting holeplacements to secure the template to theleather as shown here in Figure 28. Use atleast two of these, but three is better tokeep the template from moving aroundwhile it’s being traced.Use the scratch awl to trace the outlineof the holster to the leather and then premark every one of the stitch marks, asshown here.After you make sure that everything ismarked on the leather, I recommend using autility knife to cut out the holster leather.This type of knife gives a very clean andeven cut and reduces the need for a lot oftrimming after it’s cut.9
A simple and relatively easy way to cutout the slots for the holster loops is to startby using a Size 12 Maxi Punch to cut ahole where you marked the ends on theleather. Follow up by using the utility knifeand a metal straight edge to carefully cutout the leather between the holes, as shownin Figure 31.Remember I said to draw the lines for theslots at 1-1/4" apart? Okay, when you use themethods described the slots will be 1/4" wideand the loop will be about 1" wide. This is agood width to have for the loops so theywon’t look too wimpy.I would like to point out that whenmaking the Lined Mexican Loop Holster, youwill not be marking the stitches all the wayaround the skirt. Lining the entire skirt will cause more problems than you want becausethe lining will show on the inside of the loops when finished. It will also stiffen theleather significantly and make it difficult to insert the holster pouch through the loops.So, end the Lining about an inch or better from the top loop. Mark and punch the stitchholes along a line as shown in Figure 32, as well as along the rest of the leather towardsthe holster pouch. When you add the liner to this area, follow the instructions coming up,but stop the gluing at the line of stitch holes in the back skirt and trim the liner as needed.Okay, let’s go ahead and finish the unlined holster first. Fold the back skirt overthe holster pouch and press down on thefold to flatten it, as shown in Figure 33.Roll the holster up a bit to give theleather a sort of pre-rolled effect, as shown inFigure 34. DO NOT fold the leading edge ofthe holster. The whole idea of this process isto make the holster so it will stay opened upfor the pistol to be readily inserted without itflattening out when withdrawn.10
Take your Size 1/0 Harness Needleand some thread and tie the Main Seam ina couple of places to hold it in place forstitching. “Hey, why don’t I just glue thetwo sides together and then sew it?” youmight ask. Well, it’s because gluing theseam is unnecessary when you have prepunched stitch holes.Use the Saddle Stitch to sew the seamand then do any needed trimming. Followup by re-applying some oil dye to the edgeof the seam and rub to a shine while it’s stillwet. This will help smooth out the leatherand leave it neat and clean.Pull the loops open a bit as shown inFigure 37 to allow some room for theholster pouch to slide through. When youget to this point you will see what needs tobe done to fold the pouch and insert itthrough the loops to complete the holster.Here you see the finished Mexican Loop Holster. All there is left to do is insert yourpistol and go try this thing out.11
Now we come to adding a full liner toyour holster. The process for tracing thetemplate to the leather is the same asbefore. The only difference here is thatyou will insert the Push Pins through theholes marked with the little circles. Theseare the Start and Stop points for the mainseam of the holster.Pre-mark all the stitch placementswith the scratch awl as shown earlier.Then, turn the leather over and you willbe able to see the three holes in the leatherleft by the push pins. Use an ink pen to drawa circle around each of these for futurereference, as shown in Figure 40.Note: the photo shows the Suede Side ofthe holster leather. DO NOT draw the circleson the Grain Side.I would like to take a moment to showyou an added feature to your holster calledWelts. These will open up the TriggerGuard area to allow the pistol to slide inand out of the Lined Holster with greaterease and reducing the wear on the Bluing.Welts take a little extra time to makebut are well worth the effort. After all, youwant the holster to be as functional andeasy to use as possible.Place the Template on another piece of8 ounce leather and use the scratch awl to mark down the edge about 3" for the first welt.Move the template over a bit and trace out another one just a bit shorter. Once these aretraced, mark the stitch placements in the welts, as shown in Figure 41.12
Once the Welts are marked, cut away theoutline of the first welt and then set a pair ofWing Dividers to 3/8" and mark the inside ofthe welt, as shown in Figure 42. This willmake it wide enough so the stitches are in thecenter of the welt.Once marked, cut out the welt and do thesame to the shorter one.Pre-punch the Stitch Placements inboth welts and then use a Super Skiver toskive the ends down to a fine edge, asshown in Figure 43-A.This way, the welts will taper into eachother [as shown in Figure B] to create anice even flow down the seam of thefinished holster.It’s a good idea to pre-dye the welts thesame color as the edge of the holster leather,so when sewn into the Main Seam, it willtake less time to finish the seam.Figure 44 shows the cut outHolster Leather and the two welts.Pre-punch the stitch placementsall the way around the holster leatherbefore dyeing the leather. This willeliminate the possibility of having“white spots” in the finished seam.Always dye and finish the leatherprior to assembly.13
The following steps will help make addingthe Liner to your new holster a relativelypainless operation. The first step is to mark aCenter Line on the Suede Side of the holsterleather by folding the template on the centerline, match it up to one side of the leather, andthen use it as a guide to draw the line on theleather, as shown in Figure 45-A.Fold the template on the Fold Line ofthe Back Skirt and draw a line at this pointas well so you will have a reference ofwhere to fold the leather as well as where tostop the contact cement when bonding theLiner, as shown in Figure B.In Figure 46, you can see the CenterLine as well as Lines drawn down the edgeof the stitch lines of the main seam startingand ending at the Three Marked StitchPlacements marked on the Suede Side.Here in just a little bit, I’ll show youanother little trick I learned that will help alot when trimming away the excess linermaterial from the edge of the holster.Next, place the holster leather onthe liner leather Suede Side toSuede Side and use it as a guide forthe overall shape and size of theLiner leather, as shown in Figure 28.Cut the Line leather oversized toallow plenty of room, especially forthe back skirt. Trust me, you do notwant to run out of leather during thisprocess.14
Using the Template as a guide, mark theCenter Line on the Suede Side of the linerso it and the holster leather can be matchedup. Even though you will have some roomfor error, it is important to get the twopieces lined up with each other as much aspossible so that the Liner will cover theentire area of the holster. [See Figure 48.]Follow this by drawing a ReferenceLine around the Holster Template so thatyou will have a referrence of how far out toapply the contact cement.Figure 49 shows the Center Line andthe Holster Outline drawn on the SuedeSide of the Liner Leather.Note the Line across the top of theHolster. Draw a “wild” line here to give areferrence of how far out to apply thecement in this area. (See the arrows inFigures 48 & 49.)Also, note the Line drawn at the FoldLine of the back skirt.Once everything is marked on theLiner Leather, take a minute and trim awaysome of the excess, as shown in Figure 50.This will make things a little easier here ina minute.Now, match up the ends of the holsterleather as shown in Figure 51, and put acrease in the Fold Line of the back skirt topre-fold the leather. This will make thingsgo a little easier when the Liner is bondedto the back skirt here in a bit.15
Before you go any further; insert a pieceof thread into the First and Last StitchPlacements of the Main Seam, as shown inFigure 52. These threads will be used tolocate these Placements after the holster isbonded to the Liner Leather so it can betrimmed from the stitch line, later on.The following steps will demonstratehow to bond the Liner in stages so you willhave better control over the process. It is veryimportant that you do not rush this process.Take your time to ensure that the Liner getsbonded to the holster leather correctly.Once everything is cut and marked,apply the contact cement to the CenterLines of both pieces only, as shown inFigure 53. Trust me on this because youreally don’t want to do all of it at one time.Once the cement has set for a couple ofminutes, match up the Center Line of theHolster with the Liner and press the twopieces together, as shown in Figure 54.Flip the leather over and run yourfinger over the Center of the Liner to makesure the two pieces are well bonded on theCenter Line, as shown in Figure 55.16
Figure 56 shows the Holster Leather on the Liner Leather in its correct position. Keepin mind that only the Center Lines are bonded at this point.Now, use the 1/4" Oval Punch to punch theholes for the Hammer Loop, as shown in Figure57. Be sure to do this before you proceed with therest of the bonding process! The Hammer Loop isoptional, but highly recommended.Loosen up the Holster leather bypre-rolling it a bit so that it will have aslight curl to it, as shown in Figure 58.This will leave the leather rolled a bitand will be beneficial when bonding theliner to the holster leather.Apply the contact cement to one sideof the Holster leather and one side of theLiner leather only, as shown in Figure 59.Go slow along Stitch Lines so not to getany cement on them, and when applyingthe cement to the outer edges, use OneWay Strokes to keep the cement off therim of the holster. Notice there is nocement applied past the Fold Line on theBack Skirt yet. That’s because the cementwill be applied to the Back Skirt later.17
When applying the cement to the Liner, goahead and apply it beyond the reference lines,as shown in Figure 60. This will be trimmedoff in a little bit and the leather will not bondto the Stitch Lines because they don’t haveany cement applied to them . . . . . right?After the cement has set for acouple of minutes, hold the holster inone hand so you can keep it rolled up abit, and then [starting at the Toe,] usethe other to press the liner on, asshown in Figure 61.While keeping the leather slightly rolledup, bond the rest of the liner by running yourhand on the inside to press the liner onto theholster leather, as shown in Figure 62.It’s not easy to show this in a photograph,but believe me; when you get to this point,you will see what needs to be done to get theliner bonded to the holster leather.After the liner is in place on the one side,you will notice that the Reference Line youdrew is now past the edge of the holsterleather, as shown in Figure 63. This isnormal, so don’t think that something wentwrong. You see, when the holster leather isrolled, it shortens the Inside radius of theLiner leather as it’s bonded. This is whatkeeps the liner from wrinkling up on theinside of the finished holster.18
Now, place your Cutting Board on theedge of your work bench, and then placethe holster on it in such a way to be able touse a Utility Knife to cut along the edge ofthe holster, as shown in Figure 64.Be darn careful not to cut into theholster leather while doing this. Go slowand take your time!When you get down to the Curve of theToe, use the Scalpel Blade to trim this area upto the Center Line, as shown in Figure 46.Then, use the Scalpel Blade to trim theLiner leather from the center line at the Top upto the Fold Line of the skirt, as shown inFigure 66. You don’t have to trim right up tothe very edge of the holster at this point. Youshould only cut away enough to get rid ofsome of the bulk so that you will be able tomake a final trim later on.In Figure 67, you can see what I’mtalking about. Trim the excess Liner from theCenter Line up to the Fold at the Back Skirt,as shown in the photo. The rest will betrimmed after the other side of the Liner isbonded in place.19
Figure 68 shows the trimmed holster sofar. Notice the Marker Threads are still inplace. Do not remove these threads yet.Now, here’s a little something that is notabsolutely necessary when making this holster.But, some folks like to have the lip of the holsterrolled out a bit for easier re-holstering. So, I’mgoing to show you how to add the “Gamer Curl”to your holster.First, before you bond the liner to this side,roll the leather up a bit and trace the top edge ofthe holster to the liner, as shown in Figure 69.Now, apply the contact cementjust like you did for the other side. Besure the cement is applied beyond thetop edge line. Then use the leathershears to cut “fingers” in the liner upto no less than 1/8" from the line, asshown in Figure 70.Just like last time, start at the toeand bond the liner all the way up to thetop, but now; use one hand to sort ofroll the top edge out slightly, as shownin Figure 71.Don’t push out too hard because itwill wrinkle the holster at the top andlook downright tacky!20
Looking closely at Figure 72, you cansee how the profile of the holster curlsout at the top. Believe me when I say thatit doesn’t take much to clear the edgefrom the pistol, so don’t over do it.Alrighty then, let’s get on with it!Trim the excess from the edge just asbefore, and then use the scalpel blade togently cut away the excess liner from thetop edge, as shown in Figure 73.Like I said, you don’t have to make aperfect cut on the first run. You can goback a do a final trim later.Once the excess is out of the way, placethe holster on your punch pad and then markthe stitch line along the main seam only byrunning the awl back through the holes, asshown in Figure 74. Start at the Top StitchHole and End at the Last Stitch Hole where themarker threads are.Now you see why they’re there.Use a scalpel blade to carefully cutthe Liner at the Last Stitch Placement justabove the “Marker Thread.”Cut just enough to where you can liftthe edge of the Liner and see the Line youdrew at the Stitch Line, as shown inFigure 75.21
Now, use the Scalpel blade totrim away this strip as you keep thecut right on the edge of the holespunched in the liner. Keep the strippulled back, as shown in Figure 76so you can see the Line as youproceed. This cut does not have tobe “right on” the line just as long asyou clear the Liner away from theStitch Line.Figure 77 shows the inside of theHolster with the strip cut away fromthe Stitch Line. Repeat this process onthe other side of the seam.Now, lay the Back Skirt on the benchand trace a reference line around it, asshown in Figures 78.Apply the cement to theBack Skirt and the Liner, and letit set for a couple of minutes.Are you nervous? Don’t bebecause this part is a lot easierthan the last one.22
Okay, now we’re going to bond theLiner to the Back Skirt in a way thatwill keep the holster tight on the belt.Fold the Back Skirt over and holdit tight against the Holster with yourthumbs, as shown in Figure 80.Use your index fingers to press theLiner to the Skirt as you gently bring itover the Folded Leather.Once you get it started, grab the Foldwith one hand while using the other to curlthe top of the Skirt to the outside a bit as youpress the Liner with your arm, as shown here.Forming the Skirt in this way shapes it soit will contour with the body when worn.As you can see in Figure 82, thiscreates a nice tight fold at the top ofthe belt loop which is a highly desiredfeature for competition shooters. Thisfeature helps hold the holster tight onthe belt and keeps it from movingaround when the pistol is drawn.Alrighty then, take advantage of aflat surface again to use the UtilityKnife to cut a way the excess Lineraround the Skirt. And remember . . . .Oh, never mind. I’m sure you have thatpart figured out by now.(Don’t cut the Back Skirt!)23
In Figure 84, you can see how it will look. Theleather will stay rolled up like that which actuallymakes it easier to sew it together, not to mentionthe real reason for doing this, which is to make theHolster hold its shape, once completed.By the way, be sure the Liner is trimmed awayfrom the Stitch Lines on both sides.Take advantage of the edge of yourworkbench to punch the Stitch Holes inthe Liner by running the Awl backthrough the pre-punched stitch holesalong the edge, as shown in Figure 85.Okay, right about now you’re sayingto yourself, “Self, why don’t I just waitand punch these all at once?” Well, thereare two reasons for this. One is so thatyou can do away with the possibility ofany “white spots” in the seam . . . .and the other is because you will need touse a Double-layered Back-up to punchthem around the Curved Areas of theholster, as shown in Figure 86.Make one of these by pre-rolling twopieces of 8 ounce leather and bond themtogether with contact cement. It beingcurved will allow you to place it in thecurved areas of the holster without havingto force it in place.When you come to it, place the BackSkirt on a flat surface to re-punch all theStitch Placements, as shown in Figure 87.Right about now, I’ll bet you’re thinkingto yourself, “Self, there sure are a lot ofstitch holes.”Yeah . . . . there sure are!24
Alrighty then, sew the Liner around theToe by starting on the Front si
making the profile to narrow. Feel free to experiment with some re-curve in the outline to add a little flare to your holster. When you’re happy with the look of it, re-draw the outline so to make it darker. In Figure 10 you can see the drawn outline of the holster pouch (