Transcription
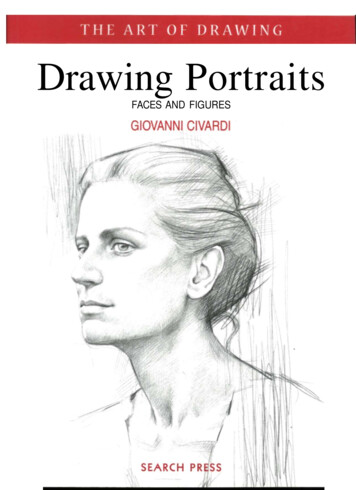
Drawing PortraitsFACES AND FIGURES
THE ART OF D R A W I N GDrawing PortraitsFACES AND FIGURESGiovanni CivardiSEARCH PRESS
First published in Great Britain 2002 by Search Press Limited,Wellwood, North Farm Road, Tunbridge Wells, KentTN2 3DROriginally published in Italy 1994 by II Castello CollaneTecniche,MilanoCopyright II Castello CollaneTecniche, Milano 1994English translation by Julie CarbonaraEnglish translation copyright Search Press Limited 2002All rights reserved. No part of this book, text, photographs orillustrations may be reproduced or transmitted in any form or byany means by print, photoprint, microfilm, microfiche,photocopier, internet or in any way known or as yet unknown, orstored in a retrieval system, without written permission obtainedbeforehand from Search Press.ISBN 1 903975 09 3Design by Grazia CorteseThe portraits in this book were done with the models' agreement:any resemblance to other people is incidental.
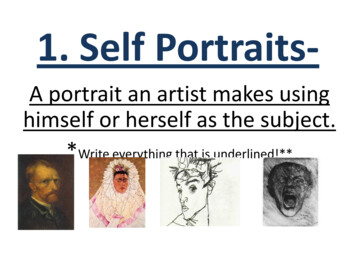
INTRODUCTIONA portrait is commonly perceived as the representation of a humanbeing's features, whether the face, head and shoulders or the wholebody. It has always been an important theme in figurative arts and afavourite with artists, who have found in it, not just a professionalgenre well rewarded and socially appreciated for its symbolic orcelebratory value, but also an interesting opportunity to investigatethe human condition in its physical and, most of all, psychologicalaspect. It is this latter aspect which tends to predominatenowadays, as photography has greatly undermined the function ofthe drawn and painted portrait as the only way to reproduce andhand down for posterity an individual's physiognomic features.But this 'documentary' aspect was, of course, only one of thefeatures of the artistic portrait.Using my experience as a portrait painter, illustrator and teacher,I have tried to simplify and sum up the main problems one usuallycomes across when first tackling a 'generic' head drawing and,subsequently, an actual portrait or likeness. Some subjects ofparticular importance, e.g. drawing hands, portraits of children andelderly people, the full figure portrait, and heads with unusualfeatures have to be dealt with in more detail and are covered inmore advanced books.I have divided the short chapters and the accompanyingsketches according to a sequence which I have found of practicalhelp in teaching the rudiments of portrait 'technique'. I have foundthis approach quickly leads to satisfying results. The book coverstools, techniques, practical considerations, anatomy, details of theface, composition, lighting and actual method, stressing the'overall' view of the head.These basic technical principles can only direct you in your firstexperiences and should be seen as suggestions on which to buildyour own study. Your subsequent artistic development will dependon how committed you are to observation and how regularly youpractise drawing. To this purpose, you can, when you approachyour first drawings resort to observing drawings done by otherartists and taking photographs of your subject. However, as soon asyou feel confident in sketching the basic outlines of the head,I advise you to try and draw from life, getting a patient friend to sitfor you. In the last section of this book I have put together someportrait studies which I have drawn at different times and whichgive an indication of how to go about tackling different subjects.
TOOLS A N D TECHNIQUESYou can draw a portrait using any of the popular media: pencil, charcoal, pastel, penand ink, watercolour, felt-pen, etc. Each one of them, however, will produce differenteffects, not only due to the specific characteristics of the medium and the techniqueused, but also in relation to the characteristics of the surface on which it is drawn:smooth or rough-textured paper, card, white or coloured paper, etc. The drawings shownon these two pages demonstrate how different media effectively render the complextonal values of the human face and body.Pen and black Indian ink on smooth paperInk is widely used by artists. It can be appliedeither with a brush or with a pen, but specialeffects can be achieved using bamboo reeds,large nibs, fountain pens, technical pens,felt-pens, or ball-point pens. Tones can usually begraded by drawing more or less dense lines overone another at right angles (cross-hatching). It isadvisable to draw on smooth, good quality paperor card, so that the surface won't fray or absorbink irregularly.Pencil (B and 2B) on rough-textured paperPencil is the most widely used medium for anytype of drawing and, in figures and portraits,it allows you to be spontaneous and isconvenient to use. It can be used for verycomplex drawings or for small studies and quickreference sketches: for the latter very fine leadsare suitable, while for the former you can usethicker and softer-grade graphites. Graphites(leads that are held in mechanical, clutchpencils) as well as pencils (wood-encasedgraphites) are graded according to theirconsistency: from 9H, the hardest, which tracesthin and faint lines, to 6B, very soft, which tracesthick and dark lines with ease.4
Compressed charcoal on paperCharcoal is perhaps the ideal medium for portraitstudy as it is very easy to control when applyingtones but also allows you to achieve fairly sharpdetail. It should, however, be used 'broadly',concentrating on the overall rendering of the'shapes': this exploits its greatest assets, as it isboth versatile and evocative. You can use eithercompressed charcoal or willow charcoal but becareful, in either case, not to smudge the sheet.Charcoal strokes can be blended and smudged bygently rubbing with a finger, and tones can besoftened by blotting with a soft eraser (kneadableputty eraser). The finished drawing should beprotected by spraying with fixative.Monochromatic watercolour on medium-texturedpaperWatercolours, water-soluble inks, andwater-diluted Indian ink are ideal for portrait study,although they are closer to painting than todrawing, as they are applied with a brush andrequire a tonal vision which is both concise andexpressive. For quick studies you can usewater-soluble graphites or colour pencils (to blendstrokes easily, wipe them with a water-soakedbrush) and it is advisable to use heavy card so thatthe moisture will not cause the surface to cockleand become irregular.Pen and ink, watercolour, white pastel oncoloured paper'Mixed' media involves using different materialsto achieve a drawing with unusual effects.Although still 'graphic' materials, their morecomplex application requires good control and agood knowledge of the media themselves if weare to avoid muddled results of little aestheticmeaning. Mixed media are very effective ontextured and coloured, or dark, supports.
PRACTICAL ADVICEIt is useful to outline very briefly someadvice on portrait 'practice'. In thesubsequent chapters some of thesesubjects will be developed with the helpof diagrams and graphic examples.TYPES OF PORTRAITGiven the great variety of poses ahuman being can take on and thepsychological wealth whichcharacterizes every personality, theartist has to assess what 'pose' tosuggest to the model so that theseelements are displayed in the mostsuitable way to achieve a likeness.In addition, all individuals havetheir own characteristic posture andtypical movements which are part oftheir 'being'. On the other hand, thereare elements of physical behaviourand social convention which allow usto place the subject in the professionand 'status' they belong to or aim for.One can therefore differentiatebetween two types of portrait:'formal', where the subject's posefollows traditional patterns, and wherea lot of attention is paid tocomposition, the environment and the,at times symbolic, decor; and'informal', where the model's pose isspontaneous as he or she is captured ina casual pose or while carrying outsome regular activity in a normalenvironment. It is an effective andmodern way of portraying peoplewhich is a legacy of 'instant'photography and requires a lot of skilland good taste from the artist. To thiscategory belong also 'expressive'portraits, that is those where thesubject is, for instance, caught smilingor in motion.monotonous. Avoid dispersing thevisual interest of the viewer and bear inmind that the focal point will have tobe the face and, above all, the eyes.Note that the hands can be asexpressive as the face, because of their'movement', as well as their shape andtheir role in the composition. Therefore,if you think your model's hands havecharacter, do not hesitate to includethem in the drawing.SUBJECTSTo portray a human being you neednot just to be able to capture and drawtheir features, but also to hint at thecharacter and the mood of the model:this encapsulates the artistic quality ofa portrait. I thought it useful toinclude some advice specific to thedifferent types of subjects you willoften draw. Always obtain from yoursubject permission to portray them or,if need be, to exhibit the drawings youhave done.Children (See page 47). A child'shead is proportionally bigger than thatof an adult, especially in the skullwhich is far bulkier than the face.Eyes and ears look big but the nose issmall and upturned; the bone structureis minute and the jaw rounded.Drawing children is difficult becausethey are restless and don't like beingwatched. In many instances you willfind a photograph taken by surprise toavoid 'grimaces', useful. Children'sdelicate features need weak anddiffused lighting: strong artificial lightor direct sunlight create strongshadows which may alter thephysiognomy and cause them tohalf-close their eyes.FRAMINGWhatever type of portrait, you need tochoose how to represent the subject.You can, in fact, draw just the head (orpart of the face) or the whole figure.To make the portrait more expressive itcan be useful to draw just part of thebody including, for instance, not justthe head but also the shoulders, thetorso and the hands. Draw a lot ofsketches to find the best pose (see page24) and a composition which iseffective, well balanced, and not6Women In portraits of women, as wellas searching for the subject's personalitythere is also a tendency to enhance theaesthetic aspect. Choose informal poses,spontaneous if the subject is young ormore austere and serene if she is moremature. Avoid, however, affected orexcessively 'theatrical' poses. In manycases you will find it useful to draw thewhole figure so that clothes andbackground can help to convey thesubject's personality.Men The male portrait wastraditionally more formal, representingan 'official' image linked not just tothe subject's physical features, butalso to their social standing.Sometimes side lighting, with itsinteresting contrasts, helpscharacterise the features and shapes ofthe male face. Young subjects oftenturn out better if drawn in spontaneousposes and expressions, while maturemen are better suited to morecomposed and 'dignified' poses. Makesure that the model does not cross hisarms in front of him or appearauthoritarian and off-putting.Self portrait (See page 44). Almost allartists have drawn, painted or sculptedtheir own portrait. If you do the same,you will find that it will help toconsiderably improve your portraitureskills. Position yourself in front of amirror and study your reflected faceexperimenting with different types oflighting and poses and then choose thepose you find most comfortable andwhich shows the 'real you'. Follow theprocedure I outline on page 32.The elderly Elderly people, both menand women, are very interesting todraw because their faces, marked bythe passage of time and characterisedby their everyday expressions, tell a'story' of life and experiences. For thisreason it is easier to capture theirphysiognomic traits, than it is withyoung people, and achieve a truelikeness. Choose poses suited to thewisdom and tolerance which shouldcome with old age.Avoid strong and direct light on themodel. Even if effective, it can easilylead you to draw an unflatteringportrait and can unpleasantlyemphasize any irregularities of theskin. Note the 'anatomic' changes inelderly people's heads: wrinkles on theforehead, near the eyes and themouth, and on the neck; whiteningand thinning of the hair; hollowing ofthe eyeballs; lengthening of the ears,and so on.
THE SIZE OF THE DRAWINGCLOTHINGTHE BACKGROUNDIn a portrait drawing the dimensions ofthe face should not be more than twothirds of the real face to avoid alteringthe proportions. You should use amaximum size of 40 x 50cm(16 x 20in) for the drawing surface,when portraying just the head, and50 x 70cm (20 x 271/2in) for the wholefigure. Make sure the face is not at thevery centre of the drawing surface, butslightly higher and to one side (seepage 24).Clothes have considerableimportance, particularly in afull-figure portrait, both for theircompositional and aesthetic function,and because they not only supplyinformation about the personality,social status, and emotional state ofthe subject, but also about the era andbackground. Therefore, leave yourmodel free to choose what to wearand limit yourself to suggesting someitems of clothing which, because oftheir shape and arrangement, canmake the composition of the drawingmore effective. Arrange the folds andnotice how different they lookdepending on whether the fabric islight and soft (lots of little folds) orheavy and stiff (a few thick folds),although in both cases they radiatefrom the top of the 'centres of tension':shoulders, elbows, knees, etc. Drawthe folds which, due to their directionand size, are the most significant andignore the minor ones which couldcreate confusion. In somecircumstances, partial nudity(shoulders, breast or back, forinstance) can enhance the portrait offemale subjects with a particularlyvivid and strong personality (seepage 56).A portrait requires a background whichis plain and unobtrusive, in shadeswhich don't clash with one another orweaken the subject's appearance.Before you start, decide whether alight background (the white of thepaper, for instance) or a dark one issuitable. In some cases the subject'ssurroundings (workplace, house,garden, etc.) can act as background treat it as if it were a landscape or aninterior - making sure, however, that itdoesn't overshadow the face or thefigure.CHOOSING THE POSE(See page 25). Usually, a portraitreproduces head and shoulders, i.e.the torso, but it could also include thearms, the hands or the whole body.If you draw from life make surethe model sits in a natural andcomfortable position, and that theirface is more or less level with yours.The pose should be relaxed, butclearly convey the subject's characterto enable you to capture thepsychological, as well as the physicallikeness. It's better to choose a posewhich highlights the somaticcharacteristics of the subject, soplace yourself at a distance of about2m (6V2 ft) to offset any foreshorteningeffects. As a rule, the three-quarterview is considered the mosteffective but profile or full face canalso be interesting.LIGHTING(See page 30). Lighting should begently diffused, and from just onesource (window or lamp) positionedslightly higher than the subject andfrom the side. This will highlight facialfeatures, but will do so gently,preventing the formation of uglyshadows under the nose, the lips andaround the eyes. Avoid intenseartificial light (for instance, from aspotlight) as well as direct sunlightwhich create such effects; theyemphasize the tiniest creases in theskin and affect the subtlety of themodelling. In addition, they force themodel to contract their facial musclesgiving a frozen, unnatural expression.HAIRHair (as a whole and in relation tocolour, quantity, and quality of thecut) is essential to characterise a face.The artist can use its look to improvethe composition of a portrait, byweakening or enhancing, by contrast,the model's physiognomic traits.If you draw female subjects (whosehair is usually thick) go for simple,tidy, well-cut hair. Hair should betreated as a whole. Capture its colourand overall form and try to pick outthe most significant locks. Of these,assess areas of shadow and light, andlines of separation and disregardsmall, insignificant highlights andsingle hairs - you will need just a fewfine and sharp strokes to suggest them.Use a fairly soft pencil to draw thickconfident strokes, in variousdirections, to achieve unusual 'weavelike' effects. Draw the hairline verycarefully, making it irregular and softand pay particular attention to theforehead and the temples.H O W TO GET A LIKENESSAs we know, portraying a humansubject means perceiving andrepresenting both the physical and thepsychological aspect of the model.To achieve a physical likeness (seepage 32), pay particular attention tothe overall shape of the head (drawing'from the general to the particular')and exactly evaluate your subject'sproportions, both in the face as awhole and between its elements (eyes,nose, mouth, etc). To achieve apsychological likeness, converse withyour model, try to understand theircharacter, preferences, habits, andobserve the environment where theylive and work. Of course this is notalways possible, but it can be veryuseful to give you an idea of the mostsuitable pose and which aspects of their character are worth highlightingor bringing to the fore.
TECHNICAL AIDSPhotographyPhotography is useful to recordspontaneous and fleeting images of thesubject, to have a point of referencewhen it isn't possible to organisesittings, and to portray children.Take photographs yourself (modernautomatic cameras make this easyeven if you are not an expert) as theyshould be a term of reference ratherthan images to copy passively. Allowfor perspective distortion and, to avoidor reduce it, do not get too close tothe subject. Use, if possible, naturallighting and avoid flash which isunsuitable for portraiture.Alternatively, you can use anepiscope: an optical tool which allowsyou to enlarge and project imagesfrom opaque supports (photographicprints, sketches or reducedphotocopies of drawings and paintings,etc.). These are practical devices,almost 'tricks' which may even harmone's artistic growth if one becomesdependent on them. More appropriate,therefore, is the 'grid of squares'method, which is well known even atschool level. Draw a grid of squareson the image to be enlarged (whethera drawing or photograph) and thentransfer that same grid, with the samenumber of squares, enlarged, on to thelarger surface.You can then easilytransfer strokes within individualsquares keeping them in proportion.SketchesThe working environmentGet used to doing plenty of littlesketches to study the main lines of theface and figure of the subject you aredrawing (especially if you are workingfrom life). Gauge the bestcomposition, the most suitablelighting, the most convenientdimensions, etc. by walking aroundyour subject. These sketches, even ifdone quickly, require carefulobservation, almost a commitment to'explore' the aesthetic possibilitiesoffered by the model. It may be fromthem that a successful portraitdepends. After you have become moreexperienced at drawing the face, youmay want to start painting it; then youwill find it useful to do a preliminarystudy, more complex than thesketches, to help you sort out anyaesthetic problems and to note downall the information which you willneed for the definitive work.EnlargingWhether you are planning an accuratedrawing, or you are attempting topaint a colour portrait, you will needto trace on the definitive support(paper, canvas, card, etc.) the outlinewhich will serve as a base for thework. To this effect, you can, at leastto start with, take advantage of anumber of devices to effortlesslyenlarge a sketch or even a photographto the desired dimensions. You can usean ordinary slide projector to magnifythe image on to the support and tracethe face or figure's main contours.8If you have your own studio, or atleast, a room in the place where youlive and you are determined to devoteyourself body and soul to portraiture,you will find some furnishingaccessories rather useful. For example:a chair, an armchair or a small couchfor the subject to be comfortable andrelaxed on while posing; a lampwhich will allow you to adjust theintensity of the lighting so that themodel is properly lit; a radio or asmall TV to make posing less of aburden for your sitter (and for you).Remember to allow for frequent breaksand to take advantage of theseintervals to study your subject indifferent expressions and poses.You can place your support on aneasel or the tilting surface of a specialtable but, more often, it will besufficient to place it on a stiff board(made of wood, cardboard or MDF),50 x 60cm (20 x 231/2 in), and whichyou can rest on your knees. Thissimple equipment, together with yourfavourite drawing media, will come inuseful when working outdoors, inpublic places or (and I hope this willhappen soon) when going to the houseof someone who has commissionedyou to do a portrait.
Portrait study, oil on canvas, 30 x 40cm (12 x 16in).This portrait was not drawn from life but from the photograph on the left. Look carefully at thetwo images to find out to what extent the photographic information has been adhered to,highlighted or disregarded in the drawing.
D R A W I N G THE HEADPROPORTIONSWhen drawing the head it is necessary to make sure that the proportions, i.e. the relativedimensions between its various constituent elements (eyes, ears, nose, mouth - which wewill examine one by one later on) are indicated correctly and precisely. Of course, headsvary greatly in size and in the combination of characteristics, but they can all be reducedto a proportional diagram which helps to simplify the shapes, to recognise their peculiarthree-dimensional aspect, and also to position details correctly in relation to one another.When drawing a portrait pay close attention to the overall structure of the head andevaluate its main characteristics as it is mainly from these that a good likeness depends.Details alone, even if minutely reproduced, almost invariably result in a vague andunsatisfactory portrait, when placed in a general context which lacks accuracy.The diagrams shown here, if studied carefully, will provideyou with the simple and essential elements of reference andproportion of a 'typical' head seen in frontal and lateralprojections. Compare them with those of your model andassess whether they correspond or differ. The height of theface can be divided into three portions of equal size, whichcorrespond to the height of the forehead (up to the hairline),that of the nose, and that of the lower part of the face.In addition, note that if you join the three points locatedabove the bridge of the nose, on the chin and at the cornerof the jaw (near the earlobe), you have an equilateraltriangle. The same figure is obtained if you join together theouter corners of the eyes and the base of the- lower lip. Thewidth of the eye viewed from the front is a useful referencefor measuring the distance between the eyes (according toan old academic maxim 'between eye and eye there is aneye') and the width of the base of the nose level with thenostrils. Notice how, viewed from the top, the head's shapeis an oval, broader at the back.10
PERSPECTIVEPerspective is a graphic method which helps to represent spatial depth on a flat surface. Therefore, tobe represented correctly, the head too needs to be drawn (like any other object) bearing in mind therules of perspective.The diagrams shown below will be enough, I think, to remind you of some of the basic principles,such as the horizon line, the viewpoint and the vanishing points. If you imagine the head within acube whose edges touch its most protruding points, you will find it easy to 'put in perspective', fairlycorrectly the details of the face. You can then conduct a more accurate study considering the'geometrised' head represented by two ovoids and a cylinder (see diagrams on page 12).
CONSTRUCTIVE SKETCHESThe head can be compared to the geometric shape of an ovoid and this, at the beginning at least, makes drawing it simpler,as far as proportions, as well as light and shadows are concerned. Notice how the two ovoids which represent the face andthe skull can be superimposed. However, the roughly round shape of the head can also be divided into flat areas. As awhole, these 'surface planes', are useful for concisely shaping areas of light and shadow. Try drawing surface planes on tophotographs which show heads in a variety of positions, and learn to recognize diagrams similar to the ones above.When you first start drawing the head, which is a very complex shape, you are likely to encounter great difficulties andwon't know where to start from. A traditional and scholastic, but very useful, approach is the one mentioned on these pagesand which is developed further in chapter 12 (see page 32). Bear in mind that in portraiture it is essential, first of all, tocapture the overall individual characteristics of the model's head and then study the characteristics of the details and howthey relate to one another.12
Stage- 4In these diagrams, limited to the front and sideprojections of a man's head, I have illustrated thevarious stages of construction.Stage 1Outline on the page the area you expect the headto occupy: draw a simple oval shape.Stage 2Indicate the proportions by way of four horizontalparallel lines more or less equidistant to suggest thethree parts in which the face can be divided.Stage 3Carefully work out the position of the eyes, nose,mouth and ears by measuring their relativedistances.Stage 4Thoroughly study how the elements of the headrelate to one another, hinting at the 'planes', thehair, etc., coming close, little by little, to thenatural shapes.Stage 5Continue to elaborate assessing also the lighteffects, that is, applying the 'chiaroscuro'.13
ANATOMYA basic knowledge of the anatomy of the head and adjoining areas (and, ifpossible, the hands, too) is useful to help fully comprehend the external shapeseven if it is not, by itself, enough to guarantee the successful rendition of adrawing.THE BONESThe shape of the skull determines by and large the external morphology of thehead and can be divided into two parts: the brain case and the facial block,which comprises several bones tightly joined together to achieve a solid structure.The only mobile bone is the jaw.If you get the opportunity to observe a real skull or to buy a plastic one, practise drawingits main outline. Render it from different visual angles, as I have shown in these quicksketches, and apply the principles of perspective and structural simplification.14
THE MUSCLESThe muscles of the head are divided into two groups: the muscles of facial expression, responsiblefor physiognomic expressions; and the muscles of mastication, which move the jaw. They becomestratified on the cranial bones whose external shape they follow pretty closely, as they are verythin. Also study the main neck muscles because, inevitably, they appear in nearly all portraits.TRAPEZIUSTRAPEZIUSHere I show the connection between thebone structure and the external morphologyof the male head. Carefully examine theposition of the ear, the eye and the lips. Thethickness of the section between the bonesurface and the external surface of the headis determined by the layer of muscle, theadipose tissue and the skin.15
THE EYEOnce you have examined the overall structure of the head, you need to analysecarefully the individual details of the face, i.e. the nose, mouth, eyes and ears.It makes sense to be able to recognise the basic morphological, i.e. 'constructive'characteristics of each one, as by following them and precisely reproducingindividual variations you will obtain a very good likeness.The eye is, perhaps, the most expressive element and it is therefore essential todraw it in the correct position and to the exact shape. Notice that the white sectionof the eyeball (the sclera) is not pure white but actually changes colour due to theeffect of its own shadow and the one cast by the eyelid. Be careful to draw botheyeballs (and therefore both pupils) looking in the same direction as theexpressiveness of the eyes depends on this.The diagrams below should be sufficient to show the spherical structure of the eye, how the eyelids rest on it and, finally,the stages to go through to draw it correctly.
Practise drawing eyes in various positions and from different viewpoints, as shown by theexamples on this page. The female eye usually has long and thick eyelashes, while eyebrowsare well outlined and thin. The iris of a child looks very big compared to the eyelids.Elderly people show several deep wrinkles radiating from the corners of the eyes, the lowereyelids become 'baggy', and eyebrows become irregularly thick and bushy.
THE EARThe ear is supported mainly by thin cartilage arranged incircumvolutions. Although its morphological characteristics varygreatly, its overall shape recalls a seashell and is fairly similar in bothsexes. Ears are often partly hidden by one's hair and their expressivecharacter depends on their precise position on the sides of the head, asI have shown in the sketches below.18
In an adult, the height of the ear corresponds, on average, to that of the nose; in a child it looksrather big in relation to the head; and in an elderly person it tends to lengthen because of thethinning and weakening of the cartilage tissue.19
THE NOSEThe nose is rather difficult to represent as it sticks out of the face and therefore itsappearance varies depending on the viewpoint. Its pyramid-like shape is partly dueto two small, close together bones and partly to cartilages, and this can be seenclearly on its dorsum. Observe the sketches shown on these two pages and practisedrawing the nose in various positions, referring to photographs if it makes it easier toundersta
comes across when first tackling a 'generic' head drawing and, subsequently, an actual portrait or likeness. Some subjects of particular importance, e.g. drawing hands, portraits of children and elderly people, the full figure portrait, and heads with unusual features have to be dealt wi