Transcription
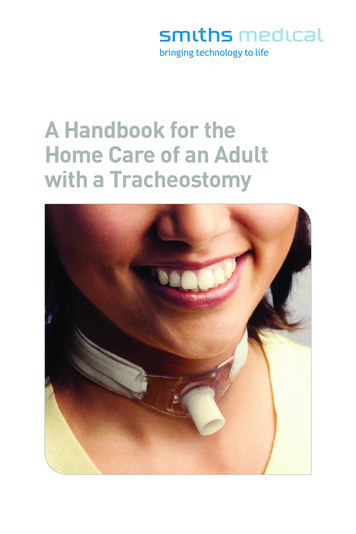
Tracheostomydischarge instructionsand home care
You are being discharged from UC Davis MedicalCenter with an artificial airway, known as atracheostomy or “trach.” Going home with atracheostomy is not unusual. We expect that you willbe able to resume most of your normal activities, whichmay include going to school, working or traveling.The following information will help you learn abouttracheostomy care at home. This material is additionalto any handouts or instruction you receive from yourcare team at UC Davis Medical Center.To breathe without problems, you must learn totake care of your new airway. Failure to keep yourairway clean may result in serious illness or death.Tracheostomy care should be done routinely asoutlined in this booklet. You should feel comfortablecaring for your tracheostomy before you go home.The care required can differ depending on your typeof tracheostomy tube and health condition. This issomething you will discuss with your care team beforeyou leave the hospital. If you have any questions,please ask the nursing staff or your physicians beforedischarge.My tracheostomy tube is manufactured by:My tracheostomy tube is a size:2
Learning checklistWhat is a tracheostomy . . . . . . . . . . . . . . . . . . . . . . . . . . . . . . . . 4Tracheostomy parts and purposes. . . . . . . . . . . . . . . . . . . . . .5Humidity. . . . . . . . . . . . . . . . . . . . . . . . . . . . . . . . . . . . . . . . . . . . . 6Tracheostomy skin care. . . . . . . . . . . . . . . . . . . . . . . . . . . . . . . . 7Suctioning . . . . . . . . . . . . . . . . . . . . . . . . . . . . . . . . . . . . . . . . . . . 8Inner cannula care . . . . . . . . . . . . . . . . . . . . . . . . . . . . . . . . . . . . 9Securing your tracheostomy . . . . . . . . . . . . . . . . . . . . . . . . . . . 10Changing your tracheostomy tube. . . . . . . . . . . . . . . . . . . . . . 10Home care supplies . . . . . . . . . . . . . . . . . . . . . . . . . . . . . . . . . . . 11Resuming normal activities . . . . . . . . . . . . . . . . . . . . . . . . . . . . 12Traveling. . . . . . . . . . . . . . . . . . . . . . . . . . . . . . . . . . . . . . . . . . . . 12Safety tips . . . . . . . . . . . . . . . . . . . . . . . . . . . . . . . . . . . . . . . . . . 13Emergency instructions . . . . . . . . . . . . . . . . . . . . . . . . . . . . . . . 14If you cannot breathe. . . . . . . . . . . . . . . . . . . . . . . . . . . . . . . . . 14If your tracheostomy comes out. . . . . . . . . . . . . . . . . . . . . . . . 14To replace your tracheostomy. . . . . . . . . . . . . . . . . . . . . . . . . . 153
You have had a total laryngectomy — a surgeryto remove your voice box (larynx). Your trachea, orbreathing tube, is now connected to a hole in yourneck called a stoma, a nickel-size opening in the frontof your neck that connects directly to your lungs. Younow breathe through your stoma (often called “neckbreathing”).What is a tracheostomyA tracheostomy is an artificial opening into your trachea orwindpipe that you breathe into directly. The hole in your neck iscalled a stoma and a tube is placed in it to keep it open. Usuallyyour voice box, or larynx, is not changed by a tracheostomy. Youmay still be able to swallow, depending on your other medicalconditions.A tracheostomy is a surgical procedure usually done under anesthesia. The procedure takes about 15 to 30 minutes and may bedone at the same time as your major surgery.4U C DAV I S M E D I C A L C E N T E R
Tracheostomy parts andpurposesTracheostomy tubes can be made from different materials andcome in different sizes. They may have disposable (can bethrown away) or reusable (can be used again) inner cannulas orno inner cannula at all. They also may or may not have a “cuff.”Cuffed tracheostomy tubes are usually needed if you will beon a ventilator (a machine that helps you breathe) at home. Youshould know who made the tracheostomy, its size, and the partsof your tracheostomy tube.GlossaryFlange — Also referred to as a faceplate or trach plate. Theflange sits against your neck and has holes on the sides throughwhich ties help hold the tube in place.Outer cannula — The outer cannula stays in your windpipe fordays at a time, and is removed only for scheduled changes.Inner cannula — If you have an inner cannula, it fits inside theouter cannula and is changed or cleaned frequently dependingon whether it is disposable or reusable.Obturator — Inserted in place of the inner cannula whenchanging or reinserting your tracheostomy tube in order tosmooth the passage.Cuff — Internal balloon that helps seal the space between yourtracheostomy tube and trachea when inflated.Pilot balloon — Small balloon attached to a thin tube thatattaches to the cuff inside your tracheostomy tube. A syringe isattached to the end of the balloon and used to inflate or deflatethe internal cuff.Stoma — The hole in your neck made during surgery where thetracheostomy tube sits.See the manufacturer’s handout for pictures specific to yourtype of tracheostomy. Discuss these with your doctor or nurse.M E D I C A LC E N T E R .U C DAV I S . E D U 8 0 0 - 2 - U C DAV I S5
HumidityYour nose and mouth warm and humidify the air you breathe.When you breathe through a tracheostomy tube directly into yourairway, you must replace this humidification. Without added moisture your secretions may become thick and hard to cough out,making it difficult to breathe. If your secretions become so thickthat you cannot clear your airway, you will not be able to breathe.To maintain moisture and help clear secretions:1.Drink plenty of fluids to keep your secretions thin, about 10glasses of water or juice a day.2. Keep a humidifier in your main living area during the day.It can be a warm or cold mist humidifier and must be cleanedevery week to prevent infections.3. Use a small bedside humidifier at night.4. Humidity monitors can help determine whether your homehas enough humidification.6
5. In the hospital you may receive humidification through tubingthat sits over your tracheostomy tube. This may be orderedfor home use depending on your condition.6. Use a Heat Moisture Exchanger (HME) as prescribed. Refer toseparate handout with education and instructions.Tracheostomy skin careYour surgical incision needs to be cleaned frequently as itheals — possibly four or five times a day until the skin is entirelyhealed under the tracheostomy tube. When your skin is healed,clean the incision area twice a day. Use sterile normal saline orsterile water to clean the site. If there is a lot of crusting at theincision site, hydrogen peroxide can be used but must be rinsedoff as it can irritate the skin.7
SuctioningIn the hospital, your nurses will perform suctioning to help clearsecretions from your airway until you are able to clear themyourself by coughing. You may or may not need to suction yourairway at home. You should know how to suction yourself if you areunable to cough your secretions out.If your secretions are difficult to cough up, you may need tospray sterile normal saline (not sterile water) into your tracheostomy when suctioning yourself. You will be given normal saline“pillows” — pink plastic tubes filled with sterile normal saline thatcan easily be squirted into your tracheostomy.The saline should be sprayed slowly while you are taking adeep breath. The saline should then be held in the airway untilthe secretions are loosened and easily coughed out. Coughingshould not be tiresome. One or two good coughs should clearyour airway.Inspect your secretions. They should be clear or white with noodor. If they are yellow, green or smell foul these are signs of aninfection and you should contact your doctor. Small streaks ofblood in your secretions can be normal, but call your doctor if thereis more than a small amount of blood.Supplies8 Suction machine Suction catheters Small container filled withsterile normal saline orsterile water for rinsing thesuction tubing Sterile normal saline“pillows,” if needed Good lighting Mirror
Procedure1.Wash your hands with soapand water2. Position a mirror andlighting so you can seeyour airway3. Turn on the suctionmachine4. Connect the adapter of thecatheter to the tubing ofyour suction machine5. Spray sterile normal salineusing the “pillow” into yourairway, if needed6. Gently insert the catheter4 to 5 inches into yourtracheostomy tube7.Cover the suction controlport with your thumb andwithdraw the catheter in arotating motion8. Breathe deeply five orsix times9. Rinse the catheter bysuctioning the sterilenormal saline or sterilewater10. Re-insert the suctioncatheter and suction againif needed to clear moresecretionsInner cannula careInner cannulas are an important component of managing yourtracheostomy safely. They help keep your airway clear and freeof secretions, and are either disposable or reusable. They canbe changed or cleaned as needed without changing the entiretracheostomy tube. If your tracheostomy has an inner cannula,it should always be worn to ensure that your tracheostomy tubeis kept mucus-free and that you are able to breathe easily. Makesure you have enough spare disposable inner cannulas to last youthrough the month until you are able to get more supplies.Not all tracheostomy tubes have inner cannulas. If your tracheostomy tube does not have an inner cannula you will need to closelymonitor your airway for buildup of secretions. The entire tubemay need to be changed more frequently and you may need tosuction yourself more often to keep the tube clean.See the manufacturer’s handout for care specific to your type ofinner cannula. Discuss the procedure for maintenance with yourdoctor or nurse.M E D I C A LC E N T E R .U C DAV I S . E D U 8 0 0 - 2 - U C DAV I S9
Securing your tracheostomytubeYour tracheostomy tube should be secured in place with Velcrotracheostomy ties or cloth string ties, called twill ties. Sometimesit is difficult to loop the new ties through the holes in the tracheostomy faceplate, also called a flange. You may need someone tohelp you until you are comfortable changing the ties yourself.If the ties are not in place the tracheostomy tube can easily fall orbe coughed out. The ties should be tight enough to prevent yourtube from accidentally slipping out, but should not be uncomfortable. The ties should be snug but not loose, and you should beable to slip one finger underneath the tie. Change your tracheostomy ties as needed to keep your skin clean and dry.Changing a tracheostomy tubeTracheostomy tubes need to be replaced periodically, usuallyevery 30 days though your provider may recommend replacingthe tube more or less often. You may be instructed to change thetracheostomy tube at home, or your provider may do it duringyour follow-up clinic appointments.If you are told to change your tracheostomy tube at home seethe manufacturer’s handout specific to your type of tracheostomy tube. Discuss the procedure with your doctor or nurse.You will need to be trained on the procedure and practiceperforming on your own.10U C DAV I S M E D I C A L C E N T E R
Home care suppliesThe UC Davis Health discharge planner will arrange your suppliesthrough your insurance company prior to you leaving the hospital.You will be given a spare tracheostomy tube of the same size, onethat is one size smaller and a suction machine with correspondingparts. You will also need to have hydrogen peroxide and sterilenormal saline or sterile water on hand.Each month, you should receive the following additional supplies: Suction catheters Yankauer suction catheters 3cc sterile normal saline pillows Cotton tip applicators Tracheostomy tube Tracheostomy tube inner cannulas (if needed) Tracheostomy ties Tracheostomy kits Tracheostomy dressingsM E D I C A LC E N T E R .U C DAV I S . E D U 8 0 0 - 2 - U C DAV I S11
Resuming normal activitiesMany people resume a normal lifestyle after having a tracheostomy. You should be able to continue with your usual activities,hobbies and interests, depending on your condition. Outdooractivities such as walking, gardening and golfing are encouraged.Water-related activities — such as boating, fishing and swimming — can be hazardous and should be avoided. You have noway to hold your breath underwater with a tracheostomy. Watercan freely enter your lungs and you may drown.Foreign particles can irritate your airway and cause excessivecoughing. Cotton covers or scarfs are excellent protection foryour tracheostomy. Showers may be taken with special care toshield the tracheostomy tube opening from water. If you have amovable showerhead, adjust it so the stream of water hits yourbody well below the neck area. A protective shower guard can bepurchased online or you can wrap a cotton towel loosely aroundyour neck.TravelingWhen traveling, bring the following supplies for safety:12 Portable suction machine Suction catheters Spare tracheosomty tube, one the same size and one that’sone size smaller Obturator Spare tracheostomy tie Sterile normal saline pillows for instillation in your airwayif you have thick secretions Scissors to cut tracheostomy ties if neededU C DAV I S M E D I C A L C E N T E R
Safety tips Have a plan for communication.If you are not able to speak withyour tracheostomy then discussoptions with your provider Do not wear clothes that coveryour tracheostomy or that havesmall fibers that could enteryour airway. Call 1-800-432-5378 fora MedicAlert bracelet thatincludes “Tracheostomy.” Review and understand theinstructions included withyour particular brand oftracheostomy.If you are unable to removeinner cannula or tracheostomytube easily, do not force it out.Call your doctor’s office. Call your doctor or nurse if younotice red, inflamed skin atthe stoma site or foul-smellingmucus, as these may be signsof an infection. Visit the nearest fire station andintroduce yourself as a tracheostomy patient Avoid dust, mold, fumes, spraysand smoke. Do not swim. You will not beable to breathe if your tracheostomy is under water.13
Emergency instructionsIf you cannot breathe Remove any caps, HMEs,or speaking valvesSpray sterile normal salineinto your tracheostomy andcough Change your inner cannula Suction yourself Change your tracheostomytube if you have been trainedon how to do itIf your breathing does not improve, call 911. The operator will instructyou on basic life support measures. You or your caregiver can alsotake a class on basic life support. Sources are available online.If your tracheostomy tube comes outReplace your tracheostomy immediately if it falls out or if you coughit out. The stoma can shrink quickly, making it difficult to replace thetracheostomy tube. You should receive instruction on the procedurebefore leaving the hospital.Always have a spare tracheostomy tube the same size and one a sizesmaller nearby. If you have to place the smaller size tube becauseyou had difficulty placing the same size, call your doctor’s officeimmediately as you will need to be seen. Call 911 if you are unableto place the tracheostomy tube back in place. If you are unable toreplace the tracheostomy tube you may not be able to breathe.14U C DAV I S M E D I C A L C E N T E R
To replace your tracheostomySupplies Same size tracheostomy tube and one size smaller,with obturator Velcro or twill ties KY jelly (if available) Mirror (if available) Good lighting (if available)Procedure1.Wash your hands with soap and water2. If available, position a mirror and lighting so you can seeyour airway well3. Prepare your new tracheostomy tube for insertion4. Remove the inner cannula and insert the obturator– Coat the end of the tube with KY jelly, if available–P lace the Velcro or twill ties through one side of theflange holes5. Insert the new tracheostomy tube (with the obturator in place)approaching your stoma from the side6. Once the tube is inserted about an inch, turn the tube soit curves downward and insert the rest of the way until theflange is sitting against your neck7.Remove the obturator and replace the inner cannula(you will not be able to breathe with the obturator in place)8. If you are unable to breathe after placing the new tube takeit out and try again9. If you are unable to fit the new tube in your stoma, try thesmaller size10. Secure the Velcro or twill ties15
2315 Stockton Blvd., Sacramento, CA 95817Tracheostomy Nurse 0-0411 (MPEC: 6/20)
Tracheostomy skin care Your surgical incision needs to be cleaned often as it heals – possibly four or five times a day until the skin is entirely healed under the tracheostomy tube. When your skin is healed, c