Transcription
MACHINE DRAWING THROUGH CADLAB MANUALYear:2018 - 2019Subject Code:AME105Regulations:IARE-R16Class:III SemesterBranch:MEPrepared ByMr. G.V.R. Seshagiri Rao, Associate ProfessorMr. M. Sunil Kumar, Assistant ProfessorMECHANICAL ENGINEERINGINSTITUTE OF AERONAUTICAL ENGINEERING(Autonomous)Dundigal, Hyderabad - 500 043
INSTITUTE OF AERONAUTICAL ENGINEERING(Autonomous)Dundigal, Hyderabad – 500 043, TelanganaCertificateThis is to certify that Mr. / Ms.bearing roll noof B. Techsemesterbranch hassatisfactorily completedthe academic yearlaboratory during.Signature of HODSignature of FacultySignature of Internal ExaminerSignature of External Examiner2 Page
INSTITUTE OF AERONAUTICAL ENGINEERING(Autonomous)Dundigal, Hyderabad - 500 043Program ineering Knowledge: Capability to apply knowledge of Mathematics, Science Engineering in thefield of Mechanical EngineeringProblem Analysis: An ability to analyze complex engineering problems to arrive at relevant conclusionusing knowledge of Mathematics, Science and Engineering.Design/ Development of solution: Competence to design a system, component or process to meetsocietal needs within realistic constants.Conduct investigation of complex problems: To design and conduct research oriented experiments aswell as to analyze and implement data using research methodologies.Modern Tool usage: An ability to formulate, solve complex engineering problems using modernengineering and information technology tools.The Engineer society: To utilize the engineering practices, techniques, skills to meet needs of health,safety legal, cultural and societal issues.Environment and Sustainability: To understand the impact of engineering solution in the societalcontext and demonstrate the knowledge for sustainable development.Ethics: An understanding and implementation of professional and Ethical responsibilities.Individual Team work: To function as an effective individual and as a member or leader in multidisciplinary environment and adopt in diverse teams.Communication: An ability to assimilate, comprehends, communicate, give and receive instructions topresent effectively with engineering community and society.Project Management and Finance: An ability to provide leadership in managing complex engineeringproject at multi-disciplinary environment and to become a professional engineer.Life-Long learning: Recognition of the need and an ability to engage in lifelong learning to keep abreastwith technological changes.Program Specific OutcomesPSO1 Professional Skills: To produce engineering professional capable of synthesizing and analyzingmechanical system including allied engineering streams.PSO2 Design/ Analysis: An ability to adapt and integrate current technologies in the design and manufacturingdomain to enhance the employability.PSO3 Successful Career and Entrepreneurship: To build the nation by imparting technological inputs andmanagerial skills to become a technocrats.3 Page
ATTAINMENT OF PROGRAM OUTCOMESAND PROGRAM SPECIFICOUTCOMESWeekNo.Experiment1Conventional representation2Sectional views3Dimensioning4Working drawings5Machine elements6Keys and cotter joints7Riveted joints8Couplings9Bearings10Assembly drawings-Engine parts : Stuffing box11121314Assembly drawings : Connecting rod and eccentricAssembly drawings: Screw jackAssembly drawings: Machine vice and tailstockAssembly drawings Rams-bottom Safety Valve, feed check valveProgramOutcomesAttainedPO1, PO2, PO3,PO5PO1, PO2, PO3,PO5PO1, PO2, PO3,PO5PO1, PO2, PO3,PO5PO1, PO2, PO3,PO5PO1, PO2, PO3,PO5PO1, PO2, PO3,PO5PO1, PO2, PO3,PO5PO1, PO2, PO3,PO5PO1, PO2, PO3,PO5ProgramSpecificOutcomesAttainedPSO1, PSO2PSO1, PSO2PSO1, PSO2PSO1, PSO2PSO1, PSO2PSO1, PSO2PSO1, PSO2PSO1, PSO2PSO1, PSO2PSO1, PSO2PO1, PO2, PO3,PO5PSO1, PSO2PO1, PO2, PO3,PO5PSO1, PSO2PO1, PO2, PO3,PO5PSO1, PSO2PO1, PO2, PO3,PO5PSO1, PSO24 Page
INDEXEx.NoDateName of the ExperimentPageNo12345678910Staff Signature
INDEXEx.NoDateName of the ExperimentPageStaff SignatureNo11121314Signature of Faculty – in-charge5 Page
MACHINE DRAWING THROUGH CAD LABORATORYIII Semester: MECourse CodeCategoryAME105CoreContact Classes: NilTutorial Classes: NilHours / WeekL-CreditsCPT32Practical Classes: 42Maximum MarksCIASEETotal3070100Total Classes: 42OBJECTIVES:The course should enable students toI. Understand Code of drawing practice as per BIS conventions for mechanical elements usingAutoCAD.II. Practice the drawing methods for sectioning of joints, couplings, bearings, keys.III. Prepare assembly drawings, sectional views and bill of materials for selected assemblies.LIST OF EXERCISESWeek-1CONVENTIONAL REPRESENTATIONConventional representation of materials, common machine elements and parts such as screws, nuts,bolts, keys, gears, webs and ribs; Introduction to AutoCAD.Week-2SECTIONAL VIEWSTypes of sections, selection of section planes and drawing of sections and auxiliary sectional views, partsnot usually sectioned.Week-3DIMENSIONINGMethods of dimensioning, general rules for sizes, and placement of dimensions for holes, centers, andcurved and tapered features.Week-4WORKING DRAWINGSTypes of drawings–working drawings for machine parts.Week-5MACHINE ELEMENTSDrawing of machine elements and simple parts; Selection of orthogonal views and additional views for thefollowing machine elements and parts with every drawing proportion, popular forms of screw threads,bolts, nuts, stud bolts.Week-6KEYS AND COTTER JOINTSKeys, cotter joints, and knuckle joint.Week-7RIVETED JOINTSRiveted joints for plates.Week-8COUPLINGSShaft coupling and spigot joint.Week-9BEARINGSJournal, pivot, and collar bearing.Week-10 ASSEMBLY DRAWINGS-ENGINE PARTS6 Page
Assembly drawings for the following, using conventions and parametric drawing practice:Engine parts, stuffing box.Week-11 CONNECTING ROD AND ECCENTRICEccentrics, I.C. engine connecting rod.WeeK-12 SCREW JACKScrew jack.Week-13 TAIL STOCK AND MACHINE VICEMachine vice and tailstock.Week-14 SAFETY VALVESRams-bottom Safety Valve, feed check valve.Text Books:1.K.L. Narayana, P. Kannaiah, K. Venkata Reddy, “Machine Drawing”, New Age Publishers, 3rdEdition, 2012.2. K.C. John, “Text book of Machine Drawing”, PHI Eastern Economy, 1st Edition, 2010.3. P.S Gill, “Machine Drawing”, S.K Kataria & Sons, 1stEdition, 2013.4. Junnarkar N.D, “Machine Drawing”, Pearson Edu, 1st Edition, 2007.5. Basudeb Bhattacharya, “Machine Drawing”, Oxford University Press, 1st Edition, 2011.6. N. D. Bhatt, V. M Pancahal, “Machine Drawing”, Charotar, 2014.7. R. K. Dhavan, “A Text book of Machine Drawing”, S.Chand Publication & Co, New Delhi,2nd Edition, 2008.Web References:1. http://web.iitd.ac.in/ achawla/public html/201/sheets/sheet5/sheet5.pdf2. https://drive.google.com/file/d/0B GCh7LMfHf6Z0VNWTNHU3pMSTg/view?pref 2&pli 13. hine20Drawing.pdf4. lCourse Home Page:SOFTWARE AND HARDWARE REQUIREMENTS FOR A BATCH OF 36 STUDENTS:SOFTWARE: System Software: Microsoft Windows 7.Application Software: AutoCAD.HARDWARE: 36 numbers of Desktop Computer Systems7 Page
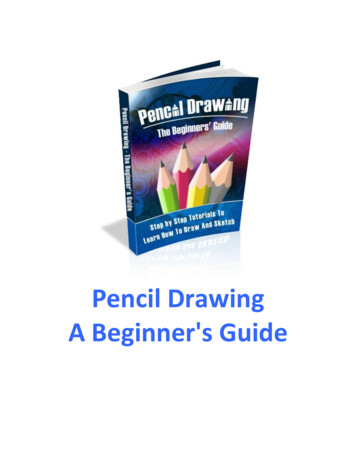
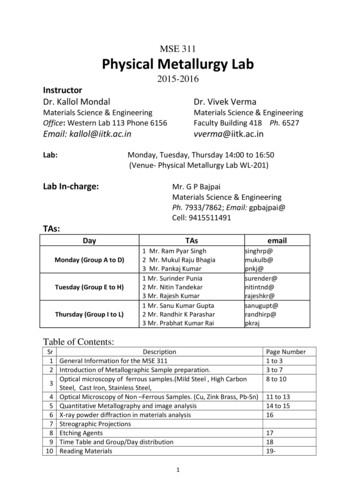
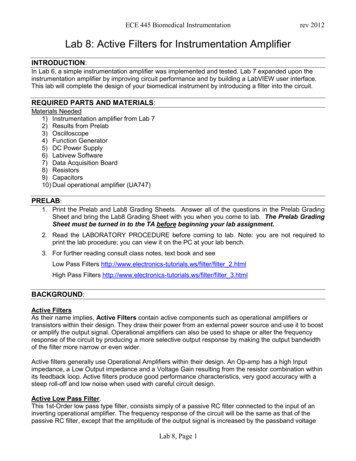
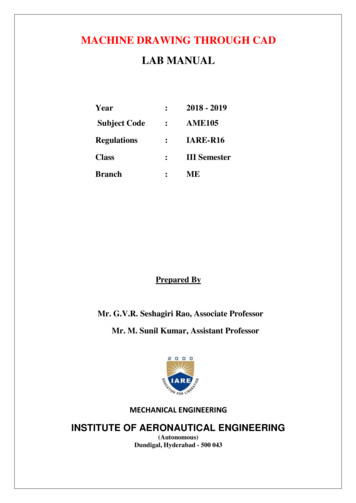
DESIGNATION AND RELATIVE POSITIONS OF VIEWSAn object positioned in space may be imagined as surrounded by six mutually perpendicularplanes. So, for any object, six different views may be obtained by viewing at it along the sixdirections, normal to these planes. Figure 1.0 shows an object with six possible directions to obtainthe different views which are designated as follows:View in the direction a view from the frontView in the direction b view from aboveFig. 1.0View in the direction c view from the leftView in the direction d view from the rightView in the direction e view from belowView in the direction f view from the rearFigure 1.1 a shows the relative positions of the above six views in the first angle projection and Fig.1.1 b,the distinguishing symbol of this method of projection. Figure 1.2 a shows the relative position of theviews in the third angle projection and Fig. 1.2b, the distinguishing symbol of this method of projection8 Page
Fig. 1.1Fig. 1.2TYPES OF LINES9 Page
WEEK-I-CONVENTIONAL REPRESENTATIONExercise No. 1 Conventional Representation of Materials10 P a g e
Exercise No. 2 Conventional Representation of Common Machine Elements11 P a g e
Exercise No. 3 Conventional Representation of Machine Parts(c)12 P a g e
Exercise No. 4 Conventional Representation Of Screws.13 P a g e
Exercise No. 5 Conventional Representation of Nuts And Bolts14 P a g e
HEXAGONAL HEADED BOLT WITH NUT AND WASHER15 P a g e
Exercise No. 6 Conventional Representation of Webs and RibsRIBWEBExercise No. 7 Introduction to AutoCAD Commands16 P a g e
CommandLineCircleErasePrintKeystrokeIconLine / LMenuResultDraw LineDraw a straight line segmentfrom one point to the nextCircle / CDraw Circle Center,RadiusErase / EModify ErasePrint / Plot Cntl PFile PrintDraws a circle based on acenter point and radius.Erases an object.Enables the Print/PlotConfiguration DialogBoxUUndoes the last command.UndoEdit Undo(Don't use 'Undo' for now)RECTANGLE / RECDraw RectangleRectangleMulti LinesMLINE / MLDraws a rectangle after youenter one corner and thenthe second.MultilineDraw parallel lines basedon the parameters youdefine.Trims objects to a selectedcutting edge.Draw No IconTrimTRIM / TRModify TrimExtendEXTEND / EXExtends objects to aModify Extend selected boundary edge.OffsetOFFSET / OObjectSnapsOSNAP / OS / F3ICON17 P a g eSETTINGModify OffsetCLICKTools Object SnapSettingsICONOffsets an object (parallel)by a set distance.Brings up the OSNAPdialog box.SETTING
pparent tensionOsnap SettingTemporary TrackingPointInsertion PointSnap FromRIGHT TOLEFTLEFT TO RIGHT18 P a g eCROSSINGSELECTIONWINDOWSELCTIONGREEN(with adottedoutline)BLUESECLECTS ANY OBJECT THAT EITHERCROSSES THE BOUNDARY OR ISINSIDE ITSELECTS ON OBJECTS THATCOMPLETELY WITHIN THE BOXARE
CommandKeystrokeIconMenuResultMoveMove / MModify MoveMoves an object orobjectsCopyCopy / CPModify CopyCopies object(s) onceor multiple timesStretchMirrorRotateFilletChamferStretch / SModify StretchMirror / MICreates a mirror imageof an object orModify Mirrorselection setRotate / RORotates objects to aModify Rotate certain angleFillet / FModify FilletChamfer / CHAModify ChamferArray / ARArrayModify ArrayLayerLayer / LATextTextNo IconDimensionDimManyScaleScale / SC19 P a g eStretches an objectafteryouhaveselected a portion of itCreates a round cornerbetween two linesCreates an angledcorner between twolinesCreates a repeatingpattern of the selectedobjectsFormat LayerStarts the Layer andLinetypepropertydialog boxDraw SingleLine TextCreates a single line oftextDimension (pick one)Dimensions previouslydrawn objectsModify ScaleProportionatelyresizes (or scales)objects
COMMANDOPTIONZoom AllZoom CenterZoom DynamicZoom ExtentsZoom PreviousZoom Scale20 P a g eICONDESCRIPTIONThis option causes AutoCAD to display the whole drawing as far as itsdrawing limits (whichever is the greater of the two).This option requires two things: a point that is to be the center of the newdisplay and a value to be its new height in drawing units. The existingheight is the default for the new height to allow for panning across thedrawing. If the new height value is followed by "X" (eg. 2x), then it istaken as a magnification factor relative to the current height. If followedby "XP", then it is taken as a scale factor relative to paper space and canbe used for scaling the contents of paper space viewports.This is a very useful ZOOM option once it is understood. It permits veryquick movement around the drawing. Once selected, this option redrawsthe graphics area of the screen and displays two rectangles. The largerbox shows the extents of the current drawing. The smaller box shows thecurrent view with an "X" in the middle. This moves with the mouse. Thisview box should be positioned so that its lower left corner is at the lowerleft corner of the view required. By pressing the left button on the mouse,the "X" is replaced by an " " pointing to the right side of the view box.This allows you to change the magnification. As the mouse is moved, theview box shrinks and expands so that the size of the required view can beset. The left mouse button toggles between PAN "X" and ZOOM " "mode so that fine adjustments can be achieved. When the view requiredhas been selected, press ENTER or right click to cause AutoCAD todisplay it.This option will display all the graphics that are contained in the drawing(referred to as the drawing extents) with the largest image possible.This option restores the displayed view prior to the current one. For thepurpose of this option, up to 10 views are saved so that the last ten viewscan be recalled. This option includes every time you use the scroll bar,which is one reason to avoid the scroll bars for panning a lot in yourdrawing.This is a 'hidden' default option. You do not have to type "S" to choosethis option. It simply requires the entry of a number that represents amagnification factor. Note that the factor is applied to the entire drawing(as defined by the drawing's limits).Numbers less than 1 will reduce the displayed size of the drawing, whilenumbers greater than 1 will enlarge it. If "X" is inserted after the number(eg. 0.8x) then the factor is applied to the current view. If "XP" is insertedafter the scale factor, then the view is scaled relative to paper space. Thisis useful for zooming a view within a paper space viewport to a specificscale, for example, "1/48XP" will produce a view of model space at ascale of ¼" 1' relative to paper space.
COMMANDOPTIONICONDESCRIPTIONThis option (also a 'hidden' default) prompts the user to pick two cornersof a box on the existing view in order to enlarge that area to fill thedisplay.Zoom WindowZoom Real time provides interactive zooming capability. Pressing ENTER (after entering zoom) on the command line automaticallyplaces you in Real time mode. Hold the left mouse button down at themidpoint of the drawing and move the cursor vertically to the top(positive direction) of the window to zoom in up to 100% (2xmagnification). Hold the left mouse button down at the midpoint of thedrawing and move the cursor vertically to the bottom (negative direction)of the window to zoom out to100% (.5x magnification). You cannot zoomout beyond the extents of the current view.Zoom RealtimeWhen you release the pick button, zooming stops. You can release thepick button, move the cursor to another location in the drawing, and thenpress the pick button again and continue zooming from that location. Toexit Real time Zoom mode, press ENTER or (ESC).Aerial Viewcommand:DSVIEWERAerial View is a zooming tool that displays a view of the drawing in aseparate window so that you can quickly move to that area. If you keepthe Aerial View window open as you work, you can zoom and panwithout choosing a menu option or entering a command. You can changethe view by creating a new view box in the Aerial View window. Tozoom in to the drawing, make the view box smaller by left clicking aNonerectangle. To zoom out of the drawing, make the view box larger. As youzoom in or out of the drawing, a real-time view of the current zoomlocation is displayed in the graphics area. The screenshot shows how theview box looks. Right click in the box and you can move the box towhere you want to zoom to.This option asks you to select an object or objects, then press ENTER and the screen will zoom to those objects only. This is greatfor when you want to work on object.Zoom ObjectZoom InClicking this icon will zoom in to the drawing by about 50%. This optionis only available as an icon and cannot be invoked by the command line.Zoom OutSimilar to 'Zoom In' - this icon will zoom out of your drawing and allowyou to see about 50% more of your drawing space.Mouse ScrollIf you have a scrolling wheel on your mouse, you can use it to zoom inand out of your drawing. Scroll towards you to zoom out and away fromyou to zoom in. You have the option to change the amount of zoom perwheel click with the Zoom factor system variable. Keep in mind that youwill zoom in and out using your mouse location as a 'centre point'.21 P a g e-
COMMAND OPTIONPANCommandICONDESCRIPTIONPanning allows you to quickly move around the drawing area at the samemagnification you currently have set. Type in PAN(orP) ENTER and a hand will appear on the screen. Left click and holdto move around your drawing.KeystrokeIconMenuBoundary HatchBhatch / HDraw HatchHatch EditHatchEdit /HEModify Object Hatch.22 P a g eResultCovers an area with apredefined patternEdits an existing Hatch
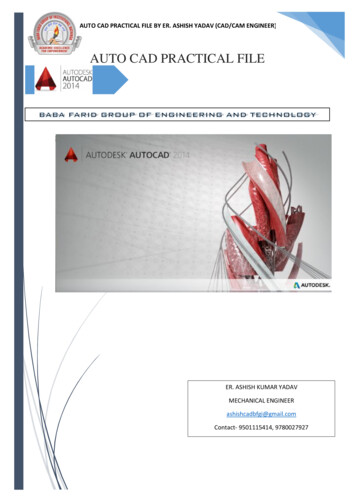
WEEK-IISECTIONAL VIEWSOrthographic views when carefully selected may reveal the external features of even the most complicated objects.However, there are objects with complicated interior details and when represented by hidden lines, may not effectivelyreveal the true interior details. This may be overcome by representing one or more of the views ‘in section’.A sectional view is obtained by imagining the object, as if cut by a cutting plane and the portion between the observerand the section plane being removed. Figure. 1 (a) shows an object, with the cutting plane passing through it and Fig.1(b), the two halves drawn apart, exposing the interior details.Fig 1 (a)Fig 1(b)Fig.1.0 Principles of sectioning23 P a g e
[Type text]In order to show such features clearly, one or more views are drawn as if a portion had been cut away to reveal theinterior This procedure is called sectioning and the view showing the cut away picture is called section view.A section is an imaginary cut taken through an object to reveal the shape or interior construction.Fig. 2a shows the imaginary cutting plane in perspective view.The imaginary cutting plane is projected on a standard view so that the sectional view with orthographicrepresentation is obtained as shown in Fig. 2 b .A sectional view must show which portions of the object are solid material and which are spaces. This is doneby section lining (cross-hatching) the solid parts with uniformly spaced thin lines generally at 45º.(a)(b)Fig. 2 sectional view
Types of SectionsDepending on the number of cutting planes, sectional views can be simple with one cutting plane (Fig. 3) orcomplex with two or more cutting planes (Fig.4).If the cutting plane-line cuts entirely across the object, it is called a full section.If the cutting plane cuts halfway through the object, it is a half section.In addition to these, there are broken-out sections, rotated sections, removed sections, auxiliary sections, andassembly sections.Fig.3 sectional views can be simple with one cutting planeFig.4 sectional views can be complex with two or more cutting planes
Exercise No. 8Full SectionA sectional view obtained by assuming that the object is completely cut by a plane is called a full section orsectional view. shown in Fig. 5.1a, in full section. The sectioned view provides all the inner details, better thanthe unsectioned view with dotted lines for inner details (Fig. 5.1b). The cutting plane is represented by its trace(V.T) in the view from the front (Fig. 5.1c) and the direction of sight to obtain the sectional view isrepresented by the arrows.When cutting plane passes fully through an object, it is called full sectionFig. 5 Sectioned and un-sectioned viewsIt may be noted that, in order to obtain a sectional view, only one half of the object is imagined to beremoved, but is not actually shown removed anywhere except in the sectional view. Further, in a sectionalview, the portions of the object that have been cut by the plane are represented by section lining or hatching.The view should also contain the visible parts behind the cutting plane.Figure.6 Full Sectional View
Exercise No. 9Half SectionA half sectional view is preferred for symmetrical objects. For a half section, the cutting plane removes only onequarter of an object. For a symmetrical object, a half sectional view is used to indicate both interior and exteriordetails in the same view.A half section is made by cutting halfway through an object (Fig. 7). Thus, one half is drawn in section andthe other half is a side view, usually, hidden lines are not used (inside details are visible on the section view).Fig. 7 Half SectionAuxiliary sections may be used to supplement the principal views used in orthographic projections. A sectional viewprojected on an auxiliary plane, inclined to the principal planes of projection, shows the cross-sectional shapes offeatures such as arms, ribs and so on. In Fig.8, auxiliary cutting plane X-X is used to obtain the auxiliary section X-X.Fig. 8 Auxiliary section
Exercise No. 10Assembly SectionsAssembly sections consist of a combination of parts.The purpose of an assembly section is to reveal the interior of a machine or structure so that the separate partscan be clearly shown and identified. However, the separate parts do not need to be described.In assembly drawing, only such hidden details (as needed for part identification or dimensioning) are drawn.Fig. 9 Assembly section
Exercise No. 11Hidden Edges and Surface in SectionSections are primarily used to replace hidden lines with visible lines. As a rule, hidden lines and surfaces shouldbe omitted in sectional views.Thus, preferred sectional view should be as in Fig. 10.In some cases, hidden edges and surfaces can be shown for describing the objectFig .10 Hidden Edges and surfaces in section
Section Lining (Cross Hatching)Section lining of a cut surface is indicated by fine lines, which are drawn as continuous lines usually at anangle of 45º with uniform distance (about 2 mm). For smaller or larger areas, distance between lines can befrom 1 mm to 4 mm.Section lining or cross-hatching lines should not be parallel or perpendicular to any main visible linebounding the sectioned area.Fig. 11 Cross HatchingRibs and webs are used to strengthen the parts. When the cutting plane passes through the ribs lengthwise,cross-hatching would give the misleading impression that the section was conical (Fig.12).Therefore, cross-hatching is eliminated from the ribs and webs (as if the cutting plane was just in front ofthem) when the cutting plane passes longitudinally through them (Fig. 12and 13).Fig. 12WebFig. 13 Ribs
Exercise No. 12SPOKES AND ARMS IN SECTIONWhen a cutting plane passes through pulley spokes or arms, cross-hatching is eliminated where theplane is thoughtof as being just in front of the spokes.Even though the cutting plane passes through two of the spokes in Fig. 14, the sectional view in Fig. 14a must be made without cross-hatching the spokes in order to avoid the appearance of a solid web as inFig. 1 4 b.Fig 14 Spokes and Arms
Various cutting planes can be selected for obtaining clear sectional viewsThe plane may cut straight across (Fig.15) or be offset (changing direction forward andbackward) to pass through features.Fig. 15 : Various cutting planes obtaining clear sectional views.
Exercise No. 13Draw (i) sectional view from the front, (ii) the view from above and (iii) the view from the right of theshaft support
Exercise No. 14Draw the (i) the sectional view from the front, (ii) the view from above and (iii) the sectional view fromthe left Of the given Machine block.Isometric View of Machine BlockSectional Views
Exercise No. 15Week-IIIDimensioningA drawing of a component, in addition to providing complete shape description, must also furnishinformation regarding the size description. These are provided through the distances between thesurfaces, location of holes, nature of surface finsih, type of material, etc. The expression of thesefeatures on a drawing, using lines, symbols, figures and notes is called dimensioning.BASIC DIMENSIONINGIn many applications, a drawing should contain annotations showing lengths or distances orangles between objects to convey the desired information. Dimensioning is the process of addingthese annotations to a drawing. AutoCAD provides four basic types of dimensioning; linear,angular, diameter and radius.DIM and DIMI Commands—DIMI command allows executing one dimensioningcommand and then returns to the normal command mode. If several dimensioning commands areto be executed, DIM command should be used. In this mode, the normal set of AutoCADcommands is replaced by a special set of dimensioning commands. To end the process ofdimensioning, EXIT command has to be used.The elements of dimensioning include the projection line, dimension line, leader line, dimensionline termination, the origin indication and the dimension itself. The various elements ofdimensioning are shown in Figs. 1 and 2. The following are some of the principles to be adoptedduring execution of dimensioning:Fig. 1 Elements of dimensioning
Fig. 2 Elements of dimensioningProjection and dimension lines should be drawn as thin continuous lines.Projection lines should extend slightly beyond the respective dimension lines.Projection lines should be drawn perpendicular to the feature being dimensioned. Where necessary,they may be drawn obliquely, but parallel to each other (Fig. 2). However, they must be in contactwith the feature.Projection lines and dimension lines should not cross each other, unless it is unavoidable (Fig.4)A dimension line should be shown unbroken, even where the feature to which it refers, is shownbroken (Fig. 5).A centre line or the outline of a part should not be used as a dimension line, but may be used in placeof projection line (Fig. 6).Fig. 4Fig. 5Fig. 6
Dimension lines should show distinct termination, in the form of arrow heads or oblique strokes or whereapplicable, an origin indication. Two dimension line terminations and an origin indication are shown inFig. 7.Arrow headOblique strokeOrigin indicationFig. 8METHOD–1 (Aligned System)Dimensions should be placed parallel to their dimension lines and preferably near the middle,above and clear-off the dimension line (Fig. 9). An exception may be made where super-imposedrunning dimensions are used (Fig. 15 )Dimensions may be written so that they can be read from the bottom or from the right sideof the drawing. Dimensions on oblique dimension lines should be oriented as shown in Fig. 10.Angular dimensions may be oriented as shown in Fig. 11.Fig. 9Fig. 10 Oblique dimensioningFig. 11 Angular dimensioning
METHOD–2 (Uni-directional System)Dimensions should be indicated so that they can be read from the bottom of the drawing only.Non-horizontal dimension lines are interrupted, preferably near the middle, for insertion of thedimension (Fig. 12). Angular dimensions may be oriented as in Fig. 13Fig. 12Fig. 13 Angular dimensioningArrangement of DimensionsThe arrangement of dimensions on a drawing must indicate clearly the design purpose. Thefollowing are the ways of arranging the dimensions.Chain DimensionsChains of single dimensions should be used only where the possible accumulation of tolerances doesnot endanger the functional requirement of the part (Fig. 14).Fig. 14 Chain dimensioning
Parallel DimensionsIn parallel dimensioning, a number of dimension lines, parallel to one another and spaced -out areused. This method is used where a number of dimensions have a common datum feature (Fig. 15)Fig. 15 Parallel dimensioningCombined DimensionsThese are the result of simultaneous use of chain and parallel dimensions (Fig. 16).Fig. 16 Combined dimensioning
Exercise No. 16DiametersDiameters should be dimensioned on the most appropriate view to ensure clarity. The dimensionvalue should be preceded by φ. Figure 17 shows the method of dimensioning diameters.Chords, Arcs, Angles and RadiiThe dimensioning of chords, arcs and angles should be as shown in Fig. 18. Where the centre ofan arc falls outside the limits of the space available, the dimension line of the radius should bebroken or interrupted according to whether or not it is necessary to locate the centre (Fig. 19).Fig. 18 Dimensioning of chords, arcs and anglesFig. 19 Dimensioning of radius
Equi-distant FeaturesLinear spacings with equi-distant features may be dimensioned as shown in Fig. 20.Fig. 20 Dimensioning equi-distant featuresTapered FeaturesTapered features are dimensioned, either by specifying the diameters at either end and the length,or the length, one of the diameters and the taper or the taper angle (Fig. 21 a).A slope or flat taperis defined as the rise per unit length and is dimensioned by the ratio of the difference between theheights to its length (Fig 21 b).Fig. 21 Dimensioning tapered features
Exercise No. 17EXAMPLESViolations of some of the principles of drawing are indicated in Fig. 22 a. The corrected versionof the same as per the BIS, SP–46: 1988 is given in Fig. 22 b and the reasons are given below:1. Dimension should follow the shape symbol (Fig. 22).2. and 3. As far as possible, features should not be used as extension lines for dimensioning.4. Extension line should touch the feature.5. Extension line should project beyond the dimension line.6. Writing the dimension is not as per the aligned system.7. Hidden lines should meet without a gap8. Centre line representation is wrong. Dot should be replaced by a small dash.9. Horizontal dimension line should not be broken to insert the value of the dimension10. Dimension should be placed above the dimension line11. Radius symbol should precede the dimension12. Centre lines should cross at long dashes13. Dimension should be written by symbol (not abbreviation) followed by its value14. Note with dimensions should be written in capitals.15. Elevation is not the correct usage.16.Usage of the term ‘‘plan’’ is o
AutoCAD. II. Practice the drawing methods for sectioning of joints, couplings, bearings, keys. III. Prepare assembly drawings, sectional views and bill of materials for selected assemblies. LIST OF EXERCISES Week-1 CONVENTIONAL REPRESENTATION Conventional representation of materials