Transcription
Deployment Guide forMicrosoft Exchange 2010Securing and Accelerating Microsoft Exchange withPalo Alto Networks Next-Generation Firewall andCitrix NetScaler Joint Solution
Table of Contents1. Overview. 31.1 Best-in-Class Solution for Microsoft Exchange 2010 . 32. Requirements . 43. Microsoft Exchange Server Network Topology. 43.1 Environment diagram. 43.2 IP allocations. 54. Microsoft Exchange Installation and Configurations . 54.1 NetScaler Configuration . 64.2 Step –by-Step Installation . 75. Deployment Instructions . 85.1.1 Add NSIP, Subnet Mask, and Default Gateway on NetScaler: . 85.1.2 NetScaler Configuration by Using the Configuration Utility . 85.1.3 Setup Wizard . 95.2 NetScaler License installation . 115.3 NetScaler Basic Feature Setting . 125.3.1 Systems Settings . 125.3.2 Basic Features . 125.4 NetScaler AppExpert Outlook Web Access Template Install. 135.5 NetScaler SSL Security Certificate installation (Self-Signed Certificate example) . 175.5.1 Root-CA Certificate . 175.5.2 Server Certificate . 215.6 Creating virtual servers (VIP) . 255.6.1 HTTP VIP . 255.6.2 HTTPS VIP . 275.7 Creating a Service Group . 305.8 IMAP4 installation . 335.9 POP3 installation . 365.10 SMTP installation . 405.11 Outlook Anywhere, ActiveSync confirmation . 426. Services Verifications . 426.1 Network IPs and Virtual IPs . 426.2 SSL Offload – Servers, Service Groups . 436.3 Load Balancing – Servers, Service Group . 466.4 Content Switching . 497. Monitoring – NetScaler Dashboard . 507.1 By Service Groups . 507.2 Per Server . 538. Palo Alto Networks Next-Generation Firewall Deployment . 568.1 Data Center Segmentation . 568.2 Security Policy . 578.3 User Identification . 638.4 Threat Protection . 639. References . 66 2012 Palo Alto Networks 2012 Citrix Systems, Inc.Page 2
1. OverviewBusiness productivity hinges on providing users of IT resources secure access to the rightapplications and the right content – on demand. Enterprise IT strategies are rapidly evolving tosupport a world in which any user can safely access any application or data, using any device, fromany location.One of the biggest impediments in achieving this degree of flexibility is the enterprise network.Legacy networks were built to provide highly reliable connectivity between users, hosts, andnetworks, but with no awareness or context of application-layer traffic. This inherently limits theability of the network to deliver to users the secure and transparent access to apps, data and virtualdesktops they need to be productive, and to protect the organization from attack. What is requiredis a new approach – a next-generation cloud network that safely enables applications with the bestin-class performance and availability.Palo Alto Networks and Citrix have come together to deliver best-in-class functionality upon whichenterprises can build next-generation cloud networks. In addition to sharing a common vision ofwhich networks must evolve, each company is delivering best-in-class solutions that already meetthese requirements.1.1 Best-in-Class Solution for Microsoft Exchange 2010Citrix NetScaler and Palo Alto Networks take a best-in-class approach to optimizing andsecuring applications. This approach ensures the best total cost of ownership (TCO), security,availability, and performance for enterprise applications. The combined solution is acomprehensive network system that takes the best of high-speed load balancing, content switching,state-of-the-art application acceleration, layer 4-7 traffic management, data compression, dynamiccontent caching, SSL acceleration, network optimization, deep packet inspection, and nextgeneration network security to provide a robust, tightly integrated solution. Deployed in front ofapplication servers, the NetScaler and Palo Alto Networks firewalls significantly reduce processingoverhead on application and database servers and improves securityThe purpose of this guide is to help organizations deploy NetScaler and Palo Alto Networks nextgeneration firewalls for securing and load balancing Microsoft Exchange 2010 Client Accessservers. Inside this guide you will find a concise set of step-by-step deployment instructionsrequired to configure both devices to accelerate and safely enable a Microsoft Exchange 2010OWA application.Within the Exchange 2010 server architecture, a NetScaler and next generation firewall is locatedin front of the Client Access Servers (CAS) with one single Virtual IP (VIP) address. The nextgeneration firewall secures the CAS systems and the NetScaler provides load balancing and trafficoptimization. Exchange client traffic is bound to a Client Access Server through NetScaler. EachCAS system within the server pool handles the server applications, security, authentication, andconnection and protocol processing. The Mailbox server at the back end handles the mailbox data,such as mail and contacts.For readers less familiar with the architecture of Exchange 2010, Microsoft provides a usefuloverview at -exchange-server-2010architecture.aspx. 2012 Palo Alto Networks 2012 Citrix Systems, Inc.Page 3
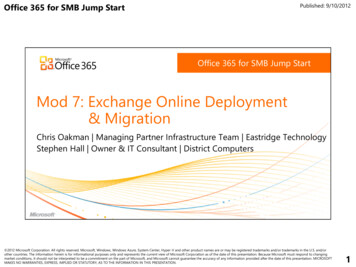
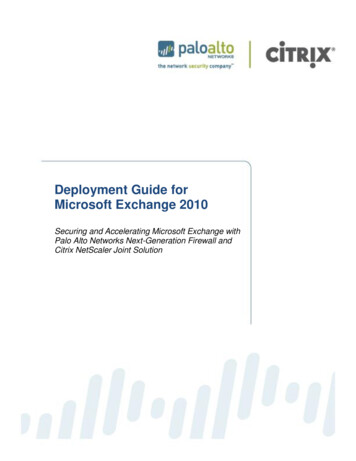
2. RequirementsRequired ComponentCitrix NetScalerPalo Alto Networks NextGeneration FirewallMicrosoft Exchange 2010 ServersAppExpert Microsoft Outlook WebAccess TemplateUsed in this DocumentNS 10.0 VPX Build 69.4.nc withPlatinum LicensePAN-OS 4.1Note6 Physical/VM servers2x CAS (Web); 1x EdgeTransport; 1x Mailboxes; 1xHub Transport; 1x oad/attachments/49186776/OWA deployment.xmlTemplate FileDeployment File3. Microsoft Exchange Server Network Topology3.1 Environment diagramClient Access Zone 1 –Front-End(CAS)EdgeTransport(ET)Zone 2 –DMZMailboxesZone 3 –Back-EndHubTransport(HT)Zone 4 –Mid-tierZone 5 –DirectoryInfrastructure(AD) 2012 Palo Alto Networks 2012 Citrix Systems, Inc.Page 4
3.2 IP allocationsFunctional DeviceNetScaler IP (NSIP)NetScaler Subnet IP (SNIP)Exchange OWA (VIP) – WebExchange OA (VIP) –OutlookExchange AS (VIP) – MobileExchange IMAP4 – IMAPClientExchange POP3 – POPClientExchange SMAP RelayExchange CAS Server 1Exchange CAS Server 2Exchange ET ServerExchange Mailbox ServerExchange HT ServerActive Directory 44310.5.172.165:443Subnet 55.255.0255.255.255.04. Microsoft Exchange Installation and ConfigurationsThe configuration of Citrix NetScaler for Microsoft Exchange 2010 is made up of 5 key steps:1.2.3.4.5.Setup the underlying networkLicense the systemConfigure the policies for Microsoft Exchange 2010Setup SSLSetup which servers will receive traffic from the NetScalerThe third step in particular is noteworthy.Traditionally, there are numerous policies that must beconfigured to correctly enable all of the features for optimal traffic management for MicrosoftExchange. Everything from traffic switching to optimization is affected in this step. With CitrixNetScaler, we are able to leverage the AppExpert AppTemplate for Microsoft Exchange 2010which provides a single configuration file to load in order to get all of the correct settings configured.For additional AppExpert Templates for other applications, ert Templates.The AppExpert Templates published by Citrix do not contain certain application- and customenvironment-specific parameter settings. Elements which are not predefined include IP addresses,number of servers, SSL parameters and others. Since the AppExpert Template for Exchange 2010only supports Microsoft Outlook Web Access (OWA), there will be separate steps to manuallyconfigure the rest of Exchange services such as Outlook Anywhere (OA, i.e., Outlook client),ActiveSync (AS, i.e., mobile client), IMAP4, POP3 and external SMTP relay services. The followingsteps guide where and how each custom data will be added. 2012 Palo Alto Networks 2012 Citrix Systems, Inc.Page 5
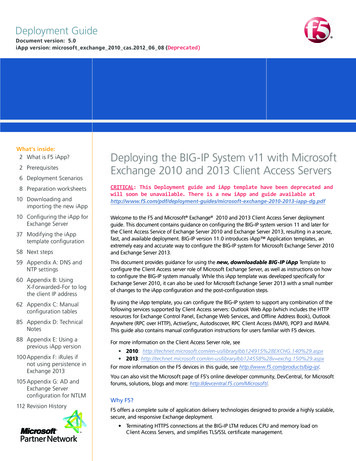
4.1 NetScaler ConfigurationDuring the installation and configuration process, from the main NetScaler screen, administratorswill be able to navigate the menu (in red) panel to configure application-specific parameters or toconfirm the data already populated by the template.The table below summarizes the specific menu and actions within NetScaler which need to beconfigured properly in order to complete the Exchange configuration:ServiceNetScaler MenuNetScaler SubActionCommentMenuAllSystemLicensesManage LicensesCustomadded*SettingsConfigure basicCustomfeaturesadded*AllNetworkIPsNetScaler IP, SubnetCustomIPadded*Virtual IPAuto added **AllSSLCertificateRoot-CA, ServerCustomadded*AllSSL OffloadServersPer VM/PhysicalAuto addedServerService GroupPer PortAuto addedVirtual ServersVIP per PortAuto figure PublicCustom 2012 Palo Alto Networks 2012 Citrix Systems, Inc.Page 6
OWALoad BalancingServersIMAP4Load BalancingService GroupsService GroupsEndpointsConfigure BackendServicesPer VM/PhysicalServerPer PortPer PortVirtual ServersVIP per PortServersService GroupsPer VM/PhysicalServerPer PortVirtual ServersVIP per PortServersService GroupsPer VM/PhysicalServerPer PortVirtual ServersVIP per PortServersPer VM/PhysicalServerPer VM/PhysicalServerService confirmationPOP3SMTPOWAOA/ASLoad BalancingLoad BalancingContentSwitchingAppExpertVirtual ServersApplicationsadded*Customadded*Auto addedAuto addedCustomadded*Customadded*Auto addedCustomadded*Customadded*Auto addedCustomadded*Customadded*Auto addedAuto addedAuto added**** Please refer below 4.2 Step-by-step Installation for custom environment setup** Auto added –The data will be populated automatically when the template is installed and ‘Custom added’data is added (Please do not modify manually ‘Auto added’ data)*** Auto added – The Exchange environment in this deployment doc shares the same CAS servers for OA/ASservices with OWA, and sharing same port numbers. Therefore, no additional service configuration is required.4.2 Step –by-Step InstallationThe following steps are required to get the downloaded Exchange AppExpert template installedand operational.Step ActionDetailCustom Data1NetScaler IP, Subnet IP NetScaler initial ConfigurationNetScaler IP (NSIP), Subnet(by Setup Wizard)IP (SNIP)2Manage LicensesNetScaler license installation.lic license file3Configure basicNetScaler basic feature settings Feature settingsfeatures4ImportTemplate ImportTemplate, Deployment files(XML format)5Root-CA, ServerSecurity Certificate Installation6Configure PublicCreating virtual servers (IP) toOWA Virtual IP (VIP)Endpointstalk to multiple backend servers7Configure BackendCreating a Service GroupIPs for Web Server 1 andServicesWeb Server 28Per Port, VIP/PortIMAP4 Service InstallationIMAP4 port 2012 Palo Alto Networks 2012 Citrix Systems, Inc.Page 7
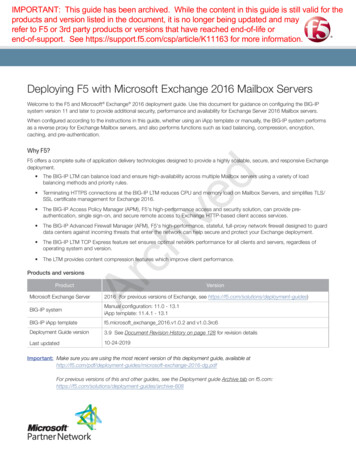
91011Per Port, VIP/PortPer Port, VIP/PortService confirmationPOP3 Service InstallationSMTP Service InstallationOA/AS service confirmationPOP3 portSMTP VIP and PortOWA data5. Deployment InstructionsThis section will describe details of the NetScaler VPX installation and initial configuration,Exchange AppExpert template download, and full SharePoint service configuration withinNetScaler.Administrators can use the NetScaler command-line to set up the initial NSIP, Mapped IP (MIP),and Subnet IP (SNIP). Administrators can also configure advanced network settings and changethe time zone.For information about MIP, SNIP, other NetScaler-owned IP addresses, and network settings, seethe “Citrix NetScaler Networking Guide” at http://support.citrix.com/article/CTX132369.5.1.1 Add NSIP, Subnet Mask, and Default Gateway on NetScaler:At the Console prompt from XenCenter or vSphere client, enter the NSIP address, subnet mask,and then save the configuration. Use either the SSH client or the NetScaler VPX Console to accessthe NetScaler command line to complete initial configuration with default gateway. add route 0.0.0.0 0.0.0.0 gateway ip show route save ns config5.1.2 NetScaler Configuration by Using the Configuration UtilityOnce the network connectivity to NetScaler is established, the Configuration Utility can beaccessed from a browser to complete the rest of the Microsoft Exchange configuration.Connect to NetScaler on a web browser: http:// NSIP address . In Start in, selectConfiguration, and then click Login. Setup Wizard should start up automatically. Otherwise,Setup Wizard can be started from menu under Netscaler System Information: 2012 Palo Alto Networks 2012 Citrix Systems, Inc.Page 8
5.1.3 Setup WizardClick Next to follow the instructions. Confirm the pre-populated NSIP, Netmask and Gatewayaddresses. 2012 Palo Alto Networks 2012 Citrix Systems, Inc.Page 9
Choose Subnet IP (SNIP) to add SNIP address and its subnet mask (Netmask) and Click Next.Choose Skip this Step for now. AppExpert Template can be added in another step. 2012 Palo Alto Networks 2012 Citrix Systems, Inc.Page 10
5.2 NetScaler License installationProper licenses are required in order to enable necessary services for the Exchange configuration.Refer to the “Citrix NetScaler VPX Licensing Guide” at http://support.citrix.com/article/CTX122426.Click Manage License to install the downloaded license. 2012 Palo Alto Networks 2012 Citrix Systems, Inc.Page 11
5.3 NetScaler Basic Feature Setting5.3.1 Systems SettingsOnce a proper license is installed, administrator can select the available features to enable themfrom Systems Settings. Choose Configure basic features.5.3.2 Basic FeaturesThe following services are the minimal services required in order to enable and complete theExchange configuration. 2012 Palo Alto Networks 2012 Citrix Systems, Inc.Page 12
5.4 NetScaler AppExpert Outlook Web Access Template InstallAppExpert Outlook Web Access template can be imported under AppExpert navigation panel thenchoose Import AppExpert Template. 2012 Palo Alto Networks 2012 Citrix Systems, Inc.Page 13
Click Next to bring AppExpert Template Wizard to upload the downloaded templates.Choose Browse (Local) if the files were downloaded to local system, then choose the properTemplate and Deployment files for Exchange. Then, click Next. 2012 Palo Alto Networks 2012 Citrix Systems, Inc.Page 14
AppExpert Template Wizard will confirm with the Name then click Finish to complete.If any of required services for OWA were not enabled, the following Warning will guide through toenable those features. Click Yes.By default, the memory usage limit was set to 0. Proceed message will prompt to change the valueof memory limit parameter. Click Yes.Set Memory Usage Limit (MB) to 300. Then click OK. 2012 Palo Alto Networks 2012 Citrix Systems, Inc.Page 15
Confirm enabled Basic Features. Click OK. 2012 Palo Alto Networks 2012 Citrix Systems, Inc.Page 16
5.5 NetScaler SSL Security Certificate installation (Self-Signed Certificateexample)If production certificates are available, these can be imported through the processes within theNetScaler management interface. Consult Chapter 11 , “Securing Load Balanced Traffic by UsingSSL” of the NetScaler product documentation entitled “NetScaler VPX Getting Started Guide” fordetails pertaining to the user of existing certificate/key pairs.The following steps were used in this reference environment to create of self-signed certificatesused to implement the HTTP to HTTPS rewrite.5.5.1 Root-CA CertificateUnder SSL navigation panel, choose Root-CA Certificate Wizard. 2012 Palo Alto Networks 2012 Citrix Systems, Inc.Page 17
Click Next.Set the Key Filename to Exchange-CA-Key. And set Key Size to 1024 or any value that reflectscustomized datacenter’s standard. Then click Next. 2012 Palo Alto Networks 2012 Citrix Systems, Inc.Page 18
Set the Request File Name to Exchange-CA-CSR. And set City and State or Province,Organization Name to appropriate values. Then click Next.Set the Certificate File Name to Exchange-CA-Certificate. Then click Next. 2012 Palo Alto Networks 2012 Citrix Systems, Inc.Page 19
Set the Certificate-Key Pair Name to Exchange-CA-CertKey. Then click Next.Click Finish then Exit. 2012 Palo Alto Networks 2012 Citrix Systems, Inc.Page 20
5.5.2 Server CertificateUnder SSL navigation panel, choose Server Certificate Wizard.Click Next. 2012 Palo Alto Networks 2012 Citrix Systems, Inc.Page 21
Set the Key Filename to Exchange-Server-Key. And set Key Size to 1024 or any value thatreflects customized datacenter’s standard. Then click Next.Set the Request File Name to Exchange-Server-CSR. And set City and State or Province,Organization Name to appropriate values. Then click Next. 2012 Palo Alto Networks 2012 Citrix Systems, Inc.Page 22
Set the Certificate File Name to Exchange-Server-Certificate. And set CA Certificate FileName to Exchange-CA-Certificate. Set CA Key File Name to Exchange-CA-Key. And CA SerialNumber File to CAExchange. Then click Next.Set the Certificate-Key Pair Name to Exchange-Server-CertKey. Then click Next. 2012 Palo Alto Networks 2012 Citrix Systems, Inc.Page 23
Click Finish.Click Exit. 2012 Palo Alto Networks 2012 Citrix Systems, Inc.Page 24
5.6 Creating virtual servers (VIP)Virtual servers (or Virtual IP, VIP) will be used for users to connect to Exchange service. Oncecompleted, users will be able to access their SharePoint environment to http(s):// VIP orhttp(s):// VIP /owa depending on their configuration.5.6.1 HTTP VIPUnder AppExpert navigation panel, choose Applications to view those installed templates. UnderOWA, all the pre-defined Exchange service components will be listed. Choose Configure PublicEndpoints to set public virtual server name and ip address according to section 3.2.Choose Add. 2012 Palo Alto Networks 2012 Citrix Systems, Inc.Page 25
Set Name, IP Address, Port, and Protocol. Click Create.Set Persistence Time-out (min) to 2. Then click OK. 2012 Palo Alto Networks 2012 Citrix Systems, Inc.Page 26
5.6.2 HTTPS VIPFrom the main NetScaler Configuration Utility screen, under AppExpert and Applications, andOWA, choose Configure Public Endpoints to set public virtual server name and ip addressaccording to section 3.2. (Note. This IP address will be the same as HTTP VIP which was justcreated in previous section. It will just use a different port.). Set Name to CASSe FE SSL ormeaningful name. Set IP Address, Port 443 and Protocal as HTTPS. Then click Create.Highlight CAS FE SSL then click Open 2012 Palo Alto Networks 2012 Citrix Systems, Inc.Page 27
Set Persistence Time-out (min) to 2. Click SSL Settings.Choose the Certificates which were created in previous section 5.5. Click the arrow button underAdd to choose as CA to add CA CertKey. 2012 Palo Alto Networks 2012 Citrix Systems, Inc.Page 28
Click OK. 2012 Palo Alto Networks 2012 Citrix Systems, Inc.Page 29
5.7 Creating a Service GroupFrom the main NetScaler Configuration Utility screen, under AppExpert and Applications, andOWA, choose Configure Backend Services to set Service Groups to add physical/VM serverIP addresses.Click Add 2012 Palo Alto Networks 2012 Citrix Systems, Inc.Page 30
Set Service Group Name to CASServers-SSL or proper meaningful name. Set IP address underSpecify Member(s). Then Add.Choose Monitor. Then add http-env . 2012 Palo Alto Networks 2012 Citrix Systems, Inc.Page 31
Select CASServers-SSL which was just created under Configure Backend Services.Choose Method and Persistence to set Round Robin under Method. And set Persistence toSSLSESSION. 2012 Palo Alto Networks 2012 Citrix Systems, Inc.Page 32
5.8 IMAP4 installationIMAP4 service was not added as part of Exchange (OWA) AppExpert Template. In order to installand configure the service, a service group needs to be created with physical/VM servers to be loadbalanced. Then a virtual server will be created using the service group.From main NetScaler navigation panel, choose Service Groups under Load Balancing. ClickAdd Set Service Group Name to Exchange IMAP4 and add designated physical/VM servers underSpecify Members(s) with 993 Port. Click Create. 2012 Palo Alto Networks 2012 Citrix Systems, Inc.Page 33
Under Load Balancing navigation panel, choose Virtual Servers. Click Add Set Name to Exchange IMAP4 VIP and IP Address. Protocol to SSL TCP. Choose Methodand Persistence tab. Set Round Robin Method and SSLSESSION Persistence.Binding Exchange IMAP4 service group under Service Groups tab. 2012 Palo Alto Networks 2012 Citrix Systems, Inc.Page 34
2012 Palo Alto Networks 2012 Citrix Systems, Inc.Page 35
Add Certificates under SSL Settings. Then click Create.5.9 POP3 installationPOP3 service was not added as part of Exchange (OWA) AppExpert Template. In order to installand configure the service, a service group needs to be created with physical/VM servers to be loadbalanced. Then a virtual server will be created using the service group. 2012 Palo Alto Networks 2012 Citrix Systems, Inc.Page 36
From main NetScaler navigation panel, choose Service Groups under Load Balancing. ClickAdd Set Service Group Name to Exchange POP3 and add designated physical/VM servers underSpecify Members(s) with 110 Port. Click Create. 2012 Palo Alto Networks 2012 Citrix Systems, Inc.Page 37
Under Load Balancing navigation panel, choose Virtual Servers. Click Add Set Name to Exchange POP3 VIP and IP Address. Protocol to SSL TCP. Choose Methodand Persistence tab. Set Round Robin Method and SSLSESSION Persistence. BindingExchange POP3 service group under Service Groups tab. 2012 Palo Alto Networks 2012 Citrix Systems, Inc.Page 38
Add Certificates under SSL Settings. Then click Create. 2012 Palo Alto Networks 2012 Citrix Systems, Inc.Page 39
5.10 SMTP installationSMTP service was not added as part of Exchange (OWA) AppExpert Template. In order to installand configure the service, a service group needs to be created with physical/VM servers to be loadbalanced. Then a virtual server will be created using the service group.From main NetScaler navigation panel, choose Service Groups under Load Balancing. ClickAdd 2012 Palo Alto Networks 2012 Citrix Systems, Inc.Page 40
Set Service Group Name to Exchange SMTP and add designated physical/VM servers underSpecify Members(s) with 25 Port. Click Create.Under Load Balancing navigation panel, choose Virtual Servers. Click Add Set Name to Exchange SMTP VIP and IP Address. Pr
generation firewalls for securing and load balancing Microsoft Exchange 2010 Client Access servers. Inside this guide you will find a concise set of step