Transcription
onsbyLizKatsuro
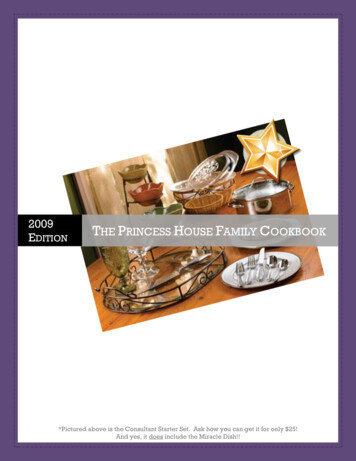
4 Easy, Impressive Jelly Roll Quilt Patterns and InstructionsIf you’re new to the jelly roll fabric phenomenon – you’re in for a treat (andmaybe a small addiction)! Jelly rolls make quilting super fast and easy, andthey are the primary components in a number of stunning quilt designs.They’re extremely versatile, and you’ll be able to make hundreds of uniquequilts with them, from the instructions in this e-book alone!First – what is a jelly roll? Coined by Moda, the term “jelly roll” refers to anumber of strips of quilting fabric, 2.5-inches wide by the width of the bolt(usually 40-45 inches). Rolled into a small bundle, from the top, the differentcolors make a swirl and look like a jelly roll cake. Jelly rolls have differingamounts of strips, depending on the manufacturer. Be sure to always readthe description on any jelly roll you’re purchasing to make sure you knowhow many strips it has.Cute, right?What you’re going to love about your jelly rolls is how much time they saveyou in the tedious cutting process – and the pain it saves the joints in yourhands! Not only that, but the variety of fabrics you’ll get when purchasing ajelly roll (usually at least 5, but sometimes 10 or more fabrics) is a hugetime-saver. Jelly rolls make quilting easy and fun, and make it a snap forbeginners to make a stunning quilt on their first try.Now, onward and upward – what can we DO with these awesome littlebundles?1
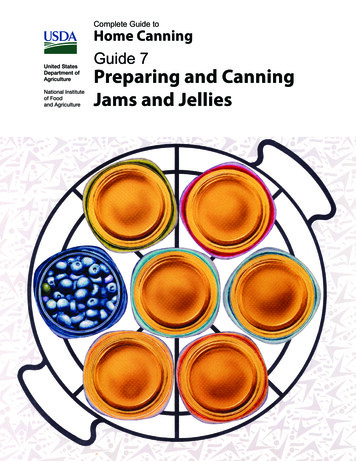
The Simplest Way to Make a Stunning Quilt Using Jelly RollsYou’ll be able to make this scrappy stripy quilt top in just a few hours andyou’ll be surprised just how pretty it is. The instructions for this one are verysimple: sew your strips together length-wise to make a striped quilt. Youprobably could have figured this one out on your own, but what you mightnot have banked on is how gorgeous this simple piecing can turn out:This extremely easy design looks gorgeous using multi-color assorted rolls.To make a large quilt top like the one above, you’d want to sew two stripstogether end to end to make each strip approx. 80” wide. So if you’re anewbie, why not try this simple pattern for your first jelly roll quilt? It’sguaranteed to impress.2
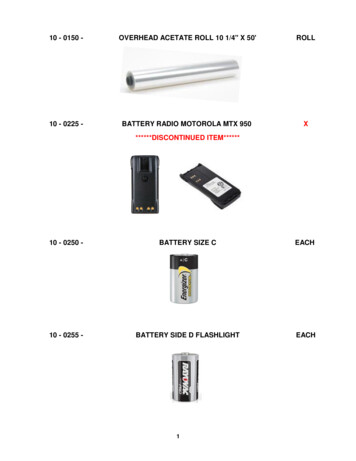
A variation on the simple strip-piecing technique is to stagger your strips.This will only add about a half hour onto your total piecing time, but yourfinished product will look like you spent days on it! Using assorted/scrappyfabrics, it will turn out like the following:So how to make this scrappy wonder? It’s so simple, you won’t believe it.What you will need: at least 40 jelly roll strips and a pair of scissors1. Sew all your strips end to end in random order. Make sure to cut thebolt-ends (the white strip with the fabric brand name) off as you goalong. You will end up with one very long strip of fabric – about 1600inches long! Don’t worry. You’ll only have had to sew 39 - 2.5” seamsto get there 2. Cut approx. 20” off one end of the strip. This will ensure that yourstrips are staggered when your top is completed.3. Fold your strip in half, putting the right/good sides together. Sew downthe long side of the strip until you get all the way to the end. Cut theend of your strip, and press open. You’ll now have a long strip that is 2jelly roll widths wide.3
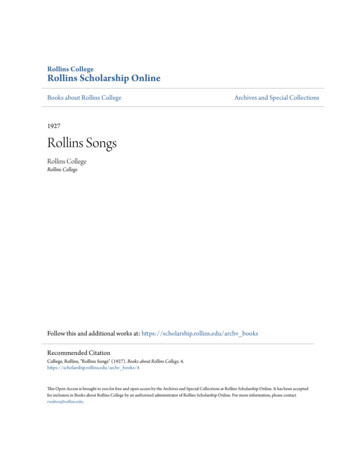
4. Fold and repeat again and again until you have a pieced top that is 32jelly roll widths wide. It’s as simple as that! Your finished staggeredjelly roll quilt top will be approximately 50” x 64”. For a larger quilt start out with more strips!You can add your own variation to this quilt by cutting all your strips in twopieces at different places, and starting with that many more pieces at stepone.Simple for anyone – even children – to make in an afternoon! Best of all,quilting these babies is a cinch. Just back, bat, baste, and then stitch-in-theditch (in the seams) and you will have this entire project pieced and quiltedin a day.The Second Easiest Way to Make a Stunning Quilt Using Jelly RollsThe “rail fence” quilt block is another pattern that is incredibly easy to pieceand complete, even for someone who has never picked up a needle before. Itrequires nothing more than sewing your strips together in a certainsequence, cutting blocks from the strips, and then arranging them in an eyecatching pattern, like so:4
This pattern leaves room for a lot of personalization and creativity in how youput your fabrics together, but it’s nearly impossible to make a mess of thispattern! The general idea is to put together your fabrics using hues thatgrade from light to dark, creating the “bolts of lightning” you can see in thepicture above. But variations on this block even remove the need for that!(See the photo below of the dark florals separated by thin white strips.)The instructions for the rail fence block are SUPER easy. You can add asmany strips to your block as you like, just as long as you cut the blocks to besquare. The instructions below use 3 different fabrics.Rail Fence Quilt Block Instructions1. Putting the print side of the fabrics together-- so that the wrong sidesare facing outward-- sew the lightest value fabric to the medium valuefabric, lengthwise. Then sew the darkest value fabric to the mediumfabric. Press open, and repeat for however many units you’d like tomake. The quilt top shown below uses 18 strips, 6 each of light,medium and dark fabrics, and 4 strips for the borders. You can easilymodify this by using 4 or 5 strips which will make bigger squares.2. Trim one edge of each unit. Using your ruler, measure 6.5” and cutyour rail fence blocks. You’ll get 6 (and some excess) from each unit,and you’ll end up with 36 blocks measuring 6.5” square.3. Sew the blocks together as follows:make 9 unitsmake 9 units5
4. Sew the units you made in #3 together as follows:Make 3.Make 3.5. Now sew your six long units together in the order shown below, attachyour borders, and you’re finished!6
Tip: Many jelly rolls come with lots of different shades of one color fabric.You don’t have to choose only 3 fabrics to create the above look. Theimportant thing is to make all of your blocks gradient – moving from light atone end, to dark on the other. Putting together blocks with some lighter huegradients and darker hue gradients will result in your quilt having a reallycool scrappy watercolor look.These blocks are very easy to make – so experiment! Put together fabricsyou like and try new combinations. I think you’ll be pleased with the endresult.7
The Queen of All Jelly Roll Quilt Block Patterns: The Log CabinThe log cabin quilt block pattern is arguably THE most versatile block you cancreate with jelly rolls. You’re probably familiar with the traditional log cabinblock, but you may be unaware of all the amazing things you do with theexact same piecing technique. Because the log cabin block uses contrast andplacement to create depth, you can really make some breathtaking designswith this simple block.Stay tuned, because I’m going to go through 4 different ways you can piecea log cabin block, and give you plenty of pictorial evidence of how stunningthey are! First, let’s look at the gorgeous tradition log cabin block.My prized log cabin!8
How to Piece the Traditional Log Cabin BlockMany of the log cabin photos shown in this ebook use a larger, 4” centerstarting block. This is unnecessary, but does balance the log cabin block out.A variety of 4” patchwork squares are available in my store – click here tosee them.When piecing the log cabin, the logs are joined to the block in a circularfashion, starting with shorter logs and working out to the longer ones, withthe block being rotated 90 clockwise after each log is joined. The current logbeing joined is always started on the log that was just joined to the block.1. Choose your fabrics. They will need to contrast with each other tocreate the different halves of the block. For example, you may want touse creams or whites for one half, and colors/assorted fabrics for theother.2. Start by making the centers for all of your blocks. Take one strip ofyour darker fabric and one strip of contrast, and sew them togetherdown the long side. You’ll get about 16 centers per strip unit, so makeas many of these strip units as you’ll need for the desired number ofblocks.3. Press open, and using scissors or a rotary cutter, cut 2.5” segments ofyour newly sewn strips.9
4. Now, using the same contrasting fabric (or a different contrast, ifyou’re making a scrappy quilt), attach the second “log” to yoursegment from #3. The easiest way to do it is to “chain piece” yoursegments, rather than making one whole block at once. So continuesewing the second “log” onto the rest of your segments. You’ll end upwith a bunch of squares that look like this:5. Next, take your main color, and attach it to the other side of yourcenter square. You’ll end up with your blocks looking like this:6. Now, flip the block, and go back to your contrasting color. Make sureyou’re always attaching contrasting to contrasting, and main to main.It’s that simple!However many “logs” you want to add to your block is up to you, but I’drecommend at least 3 “logs” on each side of your center square. In thisinstance, using 2.5” strips, your blocks will finish at 14.5”.To make a throw that will finish (without borders) at around 55” x 55”,you’ll need at least 40 strips of main color fabric, and 20 strips of yourcontrast fabric. (You should have enough in scraps to make at least onescrappy border.) 16 blocks total.10
To make a full/queen that will finish (without borders) at around 84” x84”, you will need at least 60 strips of main color fabric, and 45 ofcontrast fabric. 36 blocks total.To make a king that will finish (without borders) at around 97” x 97”,you’ll need at least 90 strips of main color fabric, and at least 65 strips ofcontrast fabric. 49 blocks total.There are so many design options for how you can lay out your traditionallog cabin blocks. If you’re a symmetry freak like I am, always make yourblocks in even numbers squared– 16, 36, 64, 100 – for the mostsymmetrical design layout results. (If you lay out a quilt 5 blocks by fiveblocks, “straight furrows” will be the only option for barn raising, star, etc.that doesn’t end up lopsided. Count the blocks in the photos below andyou’ll see what I mean.)Here are a few to get your mind working!Red/white/blue Americana color scheme, in the “star” layout perfect forany patriot!11
Diamond within a square. (I made that up, but that’s what it looks like, right?Many of the log cabin photos shown in this ebook use a larger, 4” centerstarting block. This is unnecessary, but does balance the log cabin block out.A variety of 4” patchwork squares are available in my store – click here tosee them.12
Purple against lavender – one of my favorite color combinations, set instraight furrows.Variations on the Log Cabin Block: Courthouse Steps, Squarein-Square, Spiral Log Cabin, and Bento BoxThere are four variations on the log cabin block that can create someimpressive results – but they’re no more complicated to make that theoriginal log cabin block! You sew the same number of pieces of fabrictogether just in a different order. Are you beginning to see just how manythings you can do with those jelly rolls of yours?13
Variation 1 – Courthouse Steps14
The courthouse steps block is made almost exactly the same way as thetraditional block, only in step one where you put together two strips, andthen cut a bunch of centers, we will make one important change – you willput together THREE strips – contrast, main, and contrast – to make a center“strip” instead of a center rectangle unit. Once you put together your threestrips, and cut them across at 2.5” intervals, you will have a bunch of piecesthat look like this:Then, instead of sewing logs onto one side of your block, rotating 90 degreesas you go, for the courthouse steps block, you will sew your contrastingfabrics on opposite sides of each other, like this:Then, just continue in the same fashion, attaching contrast fabric to contrastfabric and main to main, until you have your finished courthouse steps block!Your finished block will turn out like this one. See the pictures below forlayout ideas!15
Some gorgeous courthouse steps quilts:16
Gorgeous in classic red and white!Many of the log cabin photos shown in this ebook use a larger, 4” centerstarting block. This is unnecessary, but does balance the log cabin block out.A variety of 4” patchwork squares are available in my store – click here tosee them.17
Variation 2 – Square-in-SquareSo, excited to start your project yet? I love the square in square pattern. It’sso simple and yet the use of color and contrast, like the rest of these simpleblocks, can really make some awesome effects! As I’m putting together thise-book for you, I’m getting so inspired to sew. I can’t wait to get my sewingmachine out and work on my next project I’m thinking maybe one just likethe one above!To make this block, as you can probably tell, you’ll be starting with a centersquare and sewing a new square around it, as many times as you like. Again,I’d recommend at least 3 squares around the center square. To make thingseasier on yourself, you’ll start by doing the same little variation as in thecourthouse steps – sewing three long strips together, and then slicing them18
at 2.5” intervals so your center square and the first two “logs” are done foryou. Then you’ll sew logs 3 and 4, same fabric as your outer 2 strips in your3 strip combo, to make your first square, like this:Then, just continue adding logs 4 at a time to make more squares around thecenter! Alternating main colors and contrasting colors is a great idea, and willadd balance and interest to your quilt.Many of the log cabin photos shown in this ebook use a larger, 4” centerstarting block. This is unnecessary, but does balance the log cabin block out.A variety of 4” patchwork squares are available in my store – click here tosee them.19
Variation 3 – Spiral Log CabinAt first glance, this pattern seems complicated! Good! That’s what we wantthem to think. It’s actually just another variation on the good ole’ log cabin.You’ll start off just like a traditional log cabin – sewing together two strips ofcontrasting fabric, and then slicing them at 2.5” intervals to make yourcenter square and first “log.” This time, we’ll be sewing one contrasting fabricand one main color fabric to our first unit, one on each of the long sides.So you’ll start with this:And you’ll end up with this:20
Then, you’ll attach another contrast and main color strip to your block. Thecontrast fabric will get attached to the long end that has the least amount ofcontrast fabric. (When in doubt, LAY IT OUT!)So next you’ll have this, when you add your contrast:And then you’ll add another main color fabric piece to the bottom, like this:21
See the spiral starting to form? You’ll continue on – next would be a contraston the right side of the block, and after that a main color on the left side ofthe block. Again, if you’re not sure, lay it out!22
Next will be main color on the top, and contrast on the bottom Next is a contrast on the left, and a main color on the right 23
Then a contrast on top, a main on bottom And finally, one last main color log attached to the left side to complete yoursquare!24
Variation 4 – Bento BoxYou’re really going to love this one. Of all the log cabin patterns, this onelooks like you’d have to spend the most time on it. Surprise! It takes exactlythe same amount of time as the others.What you’ll do for this quilt is make your blocks the same way you did for thesquare-in-square blocks. Once you have your blocks completed, using aruler, white pencil and scissors (or a rotary cutter if you’ve got one), you’regoing to cut your blocks into quarters making lots of smaller blocks.Big thanks to whoever created this photo. I can’t find a credit to give. Boy isthis picture handy!25
Many of the log cabin photos shown in this ebook use a larger, 4” centerstarting block. This is unnecessary, but does balance the log cabin block out.A variety of 4” patchwork squares are available in my store – click here tosee them.Another gorgeous Bento whose artist remains unknown - if this is your quilt,contact me for credit!26
Last But Not Least Simple 2.5” PatchworkOne of my favorite things to do with jelly rolls is simply to create a beautifulpatchwork quilt top. Using strip piecing, it’s really easy. Recently I foundmyself with a lot of different striped fabrics and I wanted to use them alltogether in something, but there they sat month after month. Finally Idecided to just mash them all together and see what happened.Here is the result:I ended up quite liking the finished product! The instructions are quitesimple, because this isn’t an exact science. The quilt above used about 20different fabrics. Cut each strip into 4 pieces just over 10” long, and then27
attach lengthwise to another 10” long contrasting strip, in a random fashion,making as many different combinations as possible. Slice the new 2-stripsegments into 4 pieces, 2.5” each, which creates all the 2-square segmentsin the top. After that, join 2-square segments to other 2-square segments tocreate 4-square blocks, setting the contrasting colors across from each other(like a checkerboard).At this point, it’s a good idea to lay out all your 4-square blocks on the bed orfloor to make sure you have a layout that doesn’t pair together two of thesame fabric anywhere. That way, you can step back and decide if you like thearrangement and make any changes before you sew. If there is an easierway to do this that still pulls off a haphazard, thrown-together look, I haven’tfound it!Once you’ve got your whole top laid out, you can sew the blocks togetherone row at a time to keep organized. In the end, you’ll have a gorgeouspatchwork!Using jelly roll strips, I made my stripe-y patchwork in one afternoon.The Easy-Peasy Jelly Roll Why Didn’t Someone Think of ThisSooner?If this is your first-ever quilt making experience, I hate to be the one tobreak it to you, but you’re probably about to become a hard-core quilter forlife. Especially when you see how easy it is to create something amazing, inso little time. With the patterns in this ebook alone, you could create uniqueand beautiful quilt patterns for a lifetime, and never run out of new ideas.And I’m always around to help, if you need it! If you have any questionsabout anything you’ve read here, I’d be happy to answer them. Email me atjellyrollfabrics@gmail.com. And my store, where you can buy just aboutevery color combination of jelly rolls you think of, is http://jellyrollfabric.net.If you recognize any of the uncredited quilts here, please let me know whothe artists are! Most are my own quilts, but a few I’ve snagged for inspirationover the years, and have no idea who their creators are.Our Jelly Roll Gallery is Below 28
Click Here to see all our solid and print color collection jelly rolls!29
Click here to visit our ever-changing Jelly Roll Clearance Section!30
To make a full/queen that will finish (without borders) at around 84” x 84”, you will need at least 60 strips of main color fabric, and 45 of contrast fabric. 36 blocks total. To make a king that will finish (without borders) at around 97” x 97”, you’ll need at least