Transcription
Power-AssistedBicycleOfficial Handbook for MandatoryTheory TestVersion 1.0 April 20211
DisclaimerNo part of this publication may be reproduced or transmitted inany forms or by any means, in parts or whole, without the priorwritten permission of the publisher:Land Transport Authority1 Hampshire RoadSingapore 219428Hotline: 1800 2255 582Published online by Land Transport AuthorityLast updated 28 Apr 2021. The information in this handbook isaccurate at the time of publication.2
ContentsINTRODUCTION5MODULE 1: General Information on Active MobilityDevices in 1.61.71.8IntroductionTypes of Active Mobility DevicesPersonal Mobility Devices (PMDs)Types of Personal Mobility Devices (PMDs)E-ScootersBicyclesNon-Motorised BicyclesPower-Assisted Bicycles (PABs)Personal Mobility Aids (PMAs)Types of PathsPre-Ride PreparationGuidelines for Riding on Public PathsGuidelines for Riding on RoadsMODULE 2: Pre-Journey and Equipment Check forPAB Riders2.12.22.32.42.52.62.72.8Device Criteria for PABsDevice Standards (EN15194) and FireSafetyMaintenance of a PABPre-Ride Equipment Check on PABsSafety Gear and AttireParking, Security and Storage of DevicePlanning Your JourneyThird-Party Liability Insurance3899101111121315161718192124262630313233
MODULE 3: Rules and Code of Conduct for Using 3.53.43.53.63.73.8PAB Handling SkillsStarting and StoppingMoving in a Straight LineHand SignalsTurning Left or RightRiding at Low SpeedsRiding Uphill or DownhillTypes of Paths, Signs and PathInfrastructureRecognising Footpaths and Cycling PathsSpecial ZonesPath Signs and MarkingsTypes of Road CrossingsOn-Road Traffic SignsOn-Road Ground MarkingsRoad Crossings from an On-RoadPerspectiveRules and Regulations for PABsCan You Ride a PAB?Where Can You Ride a PAB?Other Off-Road Regulations on RidingOther On-Road Regulations on RidingOther Regulations on Riding for Both Pathsand RoadsNavigating Off-Road ScenariosNavigating On-Road ScenariosGood Practices and Code of Conduct –Riding a PAB on Cycling Paths and RoadsIdentification of Potential HazardsWhat to Do in an AccidentAPPENDIX 09293954
IntroductionThis handbook aims to provide the necessary information forusers of power-assisted bicycles (PABs) to ride these deviceson paths and roads in a safe and responsible manner. Knowingand applying the safety guidelines will help to reduce accidentsand cultivate a gracious active mobility culture. In addition, userswho do not comply with the rules may face prosecutorial action.The handbook will cover the following modules:Module 1General Information on Active Mobility Devicesin SingaporeModule 2Pre-Journey and Equipment Check for PABRidersModule 3Rules and Code of Conduct for Using a PAB5
Module 1MODULE 1General Information on ActiveMobility Devices in Singapore6
Module 1Learning OutcomesIdentify four active mobility devices.List the types of paths where each device can be ridden.List at least five guidelines for riding on public paths.List at least five guidelines for riding on roads.1.2.3.4.Topics1.1Introduction1.2Personal Mobility Devices (PMDs)1.3Bicycles1.4Personal Mobility Aids (PMAs)1.5Types of Paths1.6Pre-Ride Preparation1.7Guidelines for Riding on Public Paths1.8Guidelines for Riding on Roads7
Module 11.1 IntroductionThis module introduces the different types of active mobilitydevices and provides an overview of the rules pertaining tousage and ownership of active mobility devices, active mobilitycode of conduct and safe riding tips.1.1.1 Types of Active Mobility DevicesActive mobility devices can be broadly categorised intothe following types:a)Personal Mobility Devices (PMDs)Motorised PMDs:Electric scooters(e-scooters),hoverboards etc.Non-motorisedPMDs: Kick-scooters,skateboards etc.b)BicyclesPedal bicyclesPower-assistedbicycles (PAB)c)Personal Mobility Aids (PMAs)8
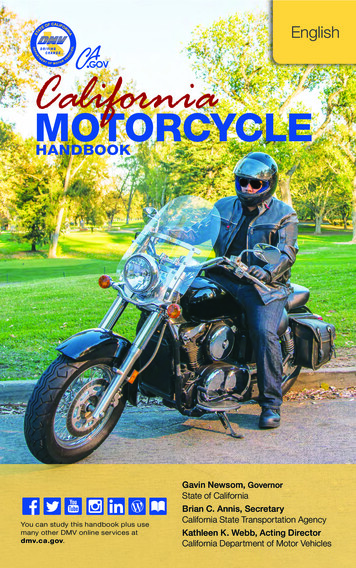
Module 11.2 Personal Mobility Devices (PMDs)This group of devices covers a variety of wheeled vehicles builtto transport people. They may be propelled by an electric motor,human power or both. This does not include PMAs, bicycles,inline skates or roller-skates.All PMDs can be ridden on cycling paths but only non-motorisedPMDs can be ridden on footpaths. All PMDs cannot be riddenon roads.1.2.1 Types of Personal Mobility Devices(PMDs)Examples of motorised PMDs include hoverboards, unicyclesand motorised thersExamples of non-motorised PMDs include skateboards andkick-scooters.SkateboardKick Scooter9
Module 11.2.2 E-ScootersE-scooters are motorised PMDs with handlebars. Ownersshould take note of the following information:a)E-scooters must be registered withLTA.b)E-scooters must be inspectedfor device compliance by LTAauthorised E-Scooter InspectionCentres.c)E-scooters must be affixed with a registration mark andidentification mark. The registration mark is a stickerissued by the inspection centre bearing LTA’s logo andthe registration number.d)You need an E-Scooter Theory Test Certificate to ride ane-scooter*.e)E-scooters can only be ridden on cycling paths.f)All motorised PMDs, including e-scooters, must becertified to the UL2272 fire safety standard. You shouldadopt proper and safe handling habits, to minimise therisk of fire incidents.g)The minimum age to ride an e-scooter is 16 years old.Under-aged riders can ride under supervision by an adult(at least 21 years old) who has obtained an E-ScooterTheory Test Certificate*.*Only applicable when theory test requirement is implemented.10
Module 11.3 BicyclesA bicycle, also called a bike or cycle, is a human-poweredor motor-powered, pedal-driven vehicle, having two wheelsattached to a frame, one behind the other.1.3.1 Non-Motorised BicyclesTypes of non-motorised bicycles:a)b)c)d)e)Road BicyclesMountain BicyclesTrack Bicycles / Fixed Gear BicyclesHybrid BicyclesFoldable Bicycles11
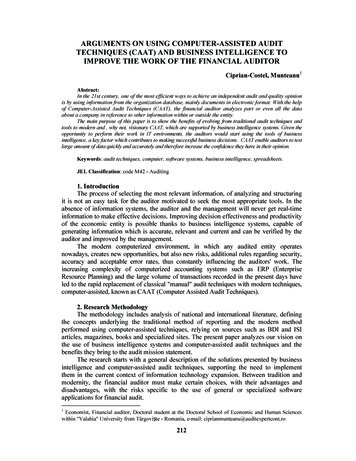
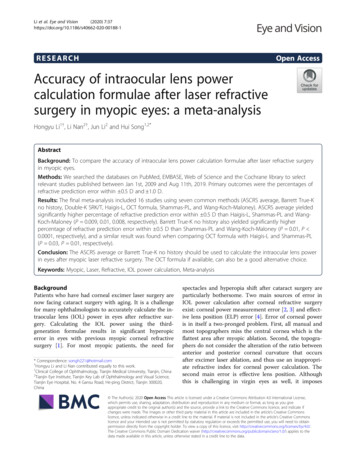
Module 11.3.2 Power-Assisted Bicycles (PABs)A Power-Assisted Bicycle(PAB), also commonlyknown as an e-bike, lookslike a conventional bicycle,except that it is equippedwith an electric motor toassist with pedalling.Important Information on PABsa)PABs need to be type-approved, sealedand registered at an LTA-authorisedInspection Centre before use.b)PABs should have a clearly visiblenumber plate affixed on the rear of thedevice.c)You need a PAB Theory Test Certificateto ride a PAB*.d)PABs can be ridden on cycling pathsand on roads.e)The minimum age for riding a PAB is 16years old; the same age limit is appliedfor pillion passengers on PABs.*Only applicable when theory test requirement is implemented.12
Module 11.4 Personal Mobility Aids (PMAs)Personal Mobility Aids (PMAs) include wheelchairs, motorisedwheelchairs or mobility scooters which are designed to carry anindividual who is unable to walk or has walking difficulties. PMAscan be ridden on cycling paths and footpaths.13
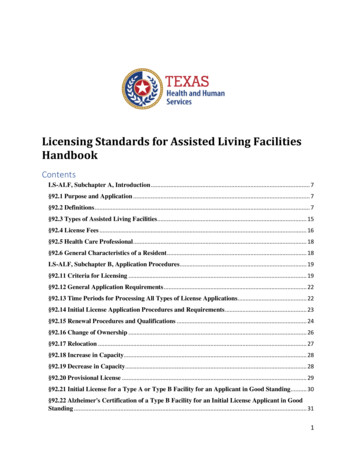
Module 1TYPES OF ACTIVE MOBILITY DEVICESPMD PMD motorised rd, skateboard,motorised kick-scooter)skateboard)Where to ride?RULESPMD e-scooterRegisterwith LTA?YesNoNoCycling Theory sNoNoYesYesNoMax unladen wt. - 20kgMax unladenwt. - 20kg(on paths)Max width 70 cmMax width 70 cm(on paths)Certified to UL2272fire safety standardEN15194compliantMax speed 25km/hMaxMotordeviceassistmust cut speed of10km/h foroff at25km/h motorisedPMAs16 yrs old. 16 yrs,must besupervisedby anadult whopassed theE-scooterTheoryTest*Yes*Rider: 16yrs old16 yrs oldNoNoNoNoNoPillion: 16yrs oldYes**Only applicable when theory test requirement is implemented.14NoNo
Module 1The chart below summarises the types of paths and roads, andthe types of devices allowed on them.1.5 Types of Pathsa)Cycling Paths have markings on theground. These paths have a speedlimit of 25km/h and can be used by allactive mobility devices.b)Footpaths do not have any ‘Cyclist’or ‘PCN’ path markings. The speedlimit for footpaths is 10km/h. Nonmotorised devices and PMAs can beused on footpaths.15
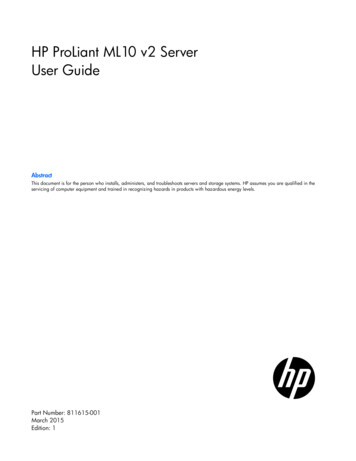
Module 11.6 Pre-Ride Preparationa)Wear bright-coloured clothing to increase your visibility toother vehicles and pedestrians.b)Check that your lights, brakes and tyres are in goodworking condition before setting off.c)Check that you are comfortable and in full control of yourdevice. Adjust your seat or handlebars before setting off.d)Check that all loads and accessories are properly securedand do not affect your ability to control the device.e)Plan your ride ahead of time and pick the safest route.On paths, choose a route with cycling paths as much aspossible. For bicycles and PABs on roads, avoid heavytraffic for your own safety.HELMETBRIGHT COLOUREDCLOTHINGCOVERED SHOESNO LOOSE LOADS16
Module 11.7 Guidelines for Riding on Public PathsBe gracious to other users to keep everyone safe. When ridingon paths, always give way to more vulnerable users such aspedestrians. Riders are encouraged to adopt the followingguidelines when riding on public paths:a)Always give way to pedestrians.b)Watch your speed and go slow around others.c)Slow down when approaching bus stops and/orintersections of public paths.d)Dismount and walk your device in crowded areas.e)Gently alert others before overtaking.f)Keep left on paths unless overtaking.g)Keep a safe distance from other path users, especiallywhen overtaking, to avoid a collision.h)Avoid shining your lights onto the face of other pathusers.i)Keep both hands on the handlebars. Signal your intentionto change course or make a turn ahead of time.j)Ride on cycling paths and bicycle crossings whenavailable.k)Park your device at designated parking places such asbicycle racks and yellow boxes.17
Module 11.8 Guidelines for Riding on RoadsRoad safety is a shared responsibility. Cyclists and PAB ridersshould adopt the following practices to safeguard themselvesand share the roads safely with motorists.a)Always ride as close as practicable to the left-hand edgeof roads, and allow traffic to overtake you safely. Keep astraight course, do not weave through traffic and avoidsudden swerves.b)Obey all traffic signals and travel in the same direction asthe flow of traffic.c)Always use bicycle lanes when available.d)Keep a safe distance behind moving vehicles andmaintain awareness of traffic when riding.e)Do not squeeze between the kerb and a bus that hasstopped at a bus stop, or between a turning vehicle andthe kerb.f)Slow down and look out for other road users whenapproaching bends, junctions, bus stops and pedestriancrossings or when passing a parked car.g)If a hill is too steep, get off and walk your device. Controlyour speed when riding downhill.18
Module 2MODULE 2Pre-Journey and Equipment Checkfor PAB Riders19
Module 2Learning Outcomes1.2.3.4.5.List the PAB device criteria.Explain the safety reasons for the device criteria.List at least 4 guidelines in preventing device fires.Describe at least 3 pre-ride checks on a PAB.Be able to plan your journey using a PAB.Topics2.1Device Criteria for PABs2.2Device Standards (EN15194) and Fire Safety2.3Maintenance of a PAB2.4Pre-Ride Equipment Check on PABs2.5Safety Gear and Attire2.6Parking, Security and Storage of PABs2.7Planning Your Journey2.8Third Party-Liability Insurance20
Module 22.1 Device Criteria for PABsPAB Device Criteria and Illegal Modificationa)All bicycles and PABs must comply with the followingdevice criteria while travelling on public paths. Do notmodify your device.Maximum unladen weight of 20kg to reduce therisk of serious injuries in the event of collision.Unladen weight refers to the device’s weightbefore any additional loads, but includes attachedaccessories (e.g. a water bottle holder countstowards the unladen weight, but a water bottledoes not).Maximum width of 70cm to allow devices to crosseach other safely on public paths.b)The following table summarises the device requirementsfor PABs to be type approved and registered.21
Module 2PAB (blue seal)PAB (orange seal)Can no longer be registeredMaximum unladen weight of 20kg(applies only on public paths)Maximum unladen weight of 20kgMaximum width of 70cm (applies only on public paths) to allow devicesto cross each other safely on public pathsPABs must not be equipped with any start-up assistance features orthrottlesThe motor power of the PAB can only cut in when the rider starts topedalThe motor power of the PAB must cut off when the PAB rider stopspedallingThe electric motor must stop providing further power assistancewhen the PAB attains a speed of 25 km/h, or the speed at which thePAB’s electric motor is designed to stop providing power assistance,whichever is lowerThe aggregate maximum poweroutput rating of the electric motorof the PAB must not exceed 200watts-The maximum continuous ratedpower of the PAB’s electric motormust not exceed 250 wattsMust comply with EN15194, aEuropean safety standard forelectrical power-assisted bicycles22
Module 2c)When purchasing a PAB, verify that it is installed andsupplied with an original battery model. You can comparethe battery specifications against the list of approved PABmodels on LTA’s One Motoring website.d)Do not modify or tamper with a PAB’s original electrical ormechanical components. Examples of such componentsinclude, but are not limited to:BatteriesElectric cables/connections and wiringsMotorHandlebar, frame and suspensionSaddle and seat postPAB Registrationa)PABs must be approved, sealed and registered at anLTA-Authorised Inspection Centre before use. The typeapproval process will check for compliance with thedevice criteria.b)All PABs must be affixed with a blue ororange seal bearing LTA’s logo and aserialised number. Do not tamper with orremove the seal.23
Module 2c)The number plate bearing the registration number mustbe permanently affixed on the rear of the PAB and clearlyvisible.2.2 Device Standards (EN15194) and FireSafetya)PABs must comply with EN15194, a European safetystandard for electrical power-assisted bicycles.b)Owners should practise proper and safe handlingto prevent overheating and minimise the risk of fireincidents, such as:Charge on hard, open and flat surfaces away fromcombustible materials.Charge in a cool room and away from heat.Do not cover the device with any fabric duringcharging as it slows heat dissipation.Avoid overcharging. Do not leave batteries ordevices to charge overnight. Overcharging thebattery could result in overheating that may resultin a fire.24
Module 2Allow for heat dissipation. Avoid charging thedevice when it is hot (e.g. immediately afteruse) as it may lead to unforeseen damage thatcompromises the safety of the device.Avoid charging the battery when wet. Allow thedevice to dry before charging it to preventshort circuits.Check batteries for any damage or deformities(e.g. corroded or powdery batteries) regularly.Keep and store devices properly. Batteries shouldbe stored at room temperature.Do not modify or tamper with the device’s originalelectrical components, such as retrofittingadditional lights and electrical/ electronicaccessories that draw power from the PABelectrical system.Only use power adaptors that are recommendedby the PAB manufacturer and have aSAFETY MARK.25
Module 22.3 Maintenance of a PABa)PABs should be maintained about once a month to keepthe device in good riding condition. Refer to the devicemanual for instructions.b)You should bring your PAB for servicing at least onceevery 3 to 6 months.c)Do not replace any PAB parts with third-party parts, as itposes a fire risk. Replacement of parts should be doneby an authorised retailer who can replace the worn-outparts with the original manufacturer’s parts. For example,worn-out batteries should only be replaced with anoriginal battery according to the approved specifications.2.4 Pre-Ride Equipment Check on PABsBefore riding a PAB, you should check that the PAB is:In Good Working Conditiona)Check that the brakes are working properly and are notworn out. Squeeze the brake levers to check that theyare working properly and that they provide resistive forceon the wheels.b)Check that wheels are properly inflated. They shouldbe hard to squeeze. There should be no visible cracksor tears on the tyre rubber, and tire grooves should beclearly visible. Also check for cracks on the body frame.26
Module 2c)For foldable devices, check that all latches are lockedproperly.d)Ensure that the seat is at a comfortable height. If youcannot touch the ground with your feet on either sideof the PAB, you will not have full control of your devicewhen stopping.e)Adjust the height of the seat such that there will be aslight bend at the knee on the extended leg (about 20degrees) when your foot is on the pedal at the lowestposition.f)The seat angle can also be adjusted to your comfort.If it is tilted too far forward or backward, it can causenumbness or injury.27
Module 2Managing Loadsa)Loads and accessories (e.g. saddle bags, phone mountetc.) must be properly secured.b)They should not block your view or affect your steering.Heavy loads can make it hard to control your device.They also should not block your lights or number plate.c)Only carry passengers if your device has proper seats forpassengers. Passengers should not block your view.d)Pillion riding is only allowed if the PAB is originallydesigned for it. Pillion seats should not be retrofitted onyour PAB. Pillion riders must be minimally 16 years old.28
Module 2Checking on Lightsa)Bicycles and PABs should be equipped with a front whitelight and rear red light.b)Lights must be turned on when riding between 7 p.m.to 7 a.m. for visibility. Check that the lights are workingbefore starting a ride. It is an offence to ride without lightsat night.c)Your lights should not be too bright or projected into theface of others as they may cause momentary blindness.d)Do not retrofit your device with lights that tap onthe battery of the device. This is considered illegalmodification.29
Module 22.5Safety Gear and Attirea)Wearing of helmets is compulsory on roads andencouraged on paths for safety. A helmet reducesthe chance of severe head injuries in the event of anaccident.Ensure that your helmet fits well and secure itproperly.Do not use a cracked or damaged helmet. Youshould replace a helmet that has been in anaccident as it may be damaged.You should use a helmet approved by recognisedtesting standards.b)Wear bright coloured, fluorescent or reflective clothing toincrease visibility.c)You should carry an In Case of Emergency (ICE) card oran ID tag containing information such as name, NRIC,blood group, emergency contact and drug allergies (ifany) which may be needed in an emergency.d)Do not wear loose clothing, such as ponchos, that mayget caught in the wheels.30
Module 22.6 Parking, Security and Storageof Devicea)Park your deviceresponsibly and donot cause obstructionor inconvenience toothers. Do not park onwalkways, at bus stopsor by trees and lampposts.b)You should park atdesignated parkingspaces such as yellowboxes or bicycle racksin a neat and orderlyfashion. You can usethe MyTransport.SGmobile app to searchfor public bicycleparking spaces nearyou.c)If your parked device causes obstruction orinconvenience, you may be fined and your device may beimpounded.d)Secure your device to prevent theft.31
Module 22.7 Planning Your JourneyMoving on Cycling Paths and Roadsa)PABs are not allowed on footpaths. They are allowed onroads and cycling paths.b)Riding on expressways or in tunnels is strictly prohibitedfor riders’ safety. A list of expressways and tunnels canbe found on LTA’s One Motoring website.c)If part of the route is on footpaths, PAB riders mustdismount and push their PABs or move to the road whentraversing across such sections.d)You should plan your route before riding on roads orcycling paths. A map of the cycling path networks isavailable on the LTA website on the MyTransport.SGmobile app.e)Avoid roads with fast-moving vehicles.Bringing PABs on Public Transporta)PABs and bicyclesare allowed on publicbuses and trains ifthey do not exceed thesize limit (120cm by70cm by 40cm). Usethe size checkers atMRT stations and businterchanges.32
Module 2b)Foldable devices must be kept folded as protruding partsmay injure others or damage property.c)Motorised devices must be switched off on boardbuses and trains.d)Devices are not allowed on the staircase or upper deck ofbuses.e)Do not ride in MRT/LRT stations, bus interchanges/terminals, or on trains and buses. Dismount and push,wheel or carry your devices at these areas.f)Do not block aisles and doors. You should move towardsless crowded train cars.2.8 Third-Party Liability Insurancea)Third-party liability insurance covers claims against youin the event of an accident (e.g. costs results from injuriesto others or property damage). Some products also coveryour personal accident expenses.b)If you ride any active mobility devices in the course ofyour work, you must be covered by third party liabilityinsurance. Please refer to go.gov.sg/am-insurance formore information about approved products.c)Even if you are riding for leisure, you are encouraged tobuy third-party liability insurance.33
Module 3MODULE 3Rules and Code of Conduct forUsing a PAB34
Module 3Learning Outcomes1.Describe briefly how to handle a PAB.2.Recognise different path types, signs and infrastructureand explain the appropriate actions to take whenencountering them.3.List at least 3 rules for riding a PAB on paths.4.List at least 3 rules for riding a PAB on roads.5.Describe the steps to take in 3 different off-roadscenarios.6.Describe the steps to take in 9 different on-roadscenarios.7.Recognise different hazards when riding and explain howto react to them.8.Describe the actions to take in an accident.35
Module 3Topics3.1PAB Handling Skills3.2Types of Paths, Signs and Infrastructure3.3Rules and Regulations for PABs3.4Navigating Off-Road Scenarios3.5Navigating On-Road Scenarios3.6Good Practices and Code of Conduct – Riding aPAB on Paths and Roads3.7Identification of Potential Hazards3.8What to Do in an Accident36
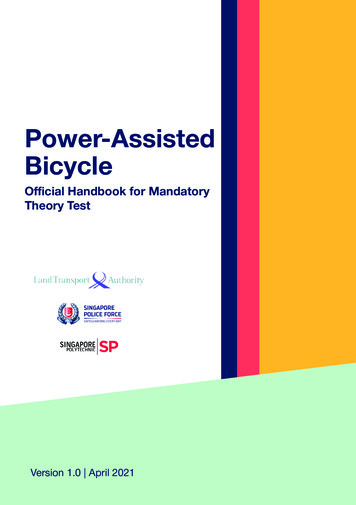
Module 33.1 PAB Handling Skills3.1.1 Starting and Stoppinga)Maintain control of handlebars.b)When stopping, come to a gradual stop by brakinggently. Avoid braking suddenly as you may lose control.c)Do not swerve from side to side.3.1.2 Moving in a Straight Linea)Look forward and ahead rather than down.b)Keep your shoulders relaxed when steering.c)Do not jerk the handlebars.3.1.3 Hand Signalsa)Raise your hand early to indicate which direction you areturning to.I intend tomove out tothe right or turnright.I intend tomove out tothe left or turnleft.I intend toslow down.I intend tostop.37
Module 3b)Maintain control of your handlebars when signalling.c)Do not swerve from side to side while signalling.3.1.4 Turning Left or Righta)Keep pedalling to manoeuvre smoothly when turning.b)Look out for oncoming path users behind you beforeturning.c)Inform nearby path users of the direction you are turningto by using the hand signals. Ring your bell or call out ifneeded.3.1.5 Riding at Low Speedsa)Keep your shoulders relaxed and do not jerk thehandlebars.b)Dismount and push the device if you feel unstable oruneasy.3.1.6 Riding Uphill or Downhilla)If you are not confident of controlling your device whengoing uphill or downhill, dismount and push instead.b)Brake gently while going downhill to control your speed.c)Do not brake suddenly or jerk the handlebars as you maylose control.38
Module 33.2 Types of Paths, Signs and PathInfrastructurea)There are 2 types of public paths: footpaths andcycling paths.b)PABs can only be ridden on cycling paths and roads(except expressways, expressway tunnels and roadtunnels).c)Dismount and push your PAB when on footpaths.d)Obey all path markings, signs and traffic signals.3.2.1 Recognising Footpaths and CyclingPathsFootpathsa)Footpaths are generallygrey and do not havemarkings or treatments.b)Open spacesconnected to paths,e.g. courtyards,community/ townplazas and squares arealso footpaths.39
Module 3c)Only PMAs, bicycles and non-motorised PMDs areallowed on footpaths.d)The speed limit on footpaths is 10km/h.Cycling Pathsa)Cycling paths can be identified by the cyclist, bicycle,pedestrian and bicycle or “PCN” logos painted at thestart of the cycling path. All active mobility devices areallowed on these paths.b)Cycling paths along the road are generally grey or red.Some cycling paths in public housing estates may comein a variety of colours (e.g. blue, green and orange).40
Module 33.2.2 Special Zones PathsPedestrian Priority Zonesa)Pedestrian Priority Zone is applied on cycling pathswhere conflicts between riders and pedestrians oftenoccur (e.g. pedestrian crossings, behind bus stops). Theyare marked by a break in the coloured cycling paths andred dashed lines.b)Watch out for other path users and slow down towalking speed or dismount and push if there are manypedestrians.School Zonesa)School Zone is appliedon footpaths outsidesome schools to createa safer environmentfor children. They aremarked by a “SchoolZone” logo, “Slow”markings and rumblingstrips on the ground toremind path users toslow down.41
Module 3b)Motorised PMDs(including e-scooters)and PABs are notallowed in these zonesas they are footpaths.Pedestrian-Only Zonesa)Pedestrian-only zonesare marked by “NoRiding” signs andred triangle markingson the ground. Forexample, parts ofBedok town centreare designated aspedestrian-only zones.b)Only PMAs can beridden in these zones.Riding other devicesin these zones is anoffence.42
Module 33.2.3 Path Signs and MarkingsTypes of Path SignsProhibitory SignsPedestrian or CyclistCrossing ProhibitionNo RidingRiding is not allowedin this area. All deviceusers (except PMAusers) are required todismount and push.Pedestrians and riders arenot allowed to cross at thislocation. Use the crossingahead instead.These signs can befound at pedestrianoverhead bridges andpedestrian-only zones.It is an offence to ride inareas or paths with “NoRiding” signs.43
Module 3Warning SignsGo Slow and Give Way toPedestriansWatch Out for VehiclesSlow down and look out forapproaching vehicles.Slow down and give wayto pedestrians.SlowCaution – Low HeadroomSlow down and ridecautiously beyond the sign.Be cautious of the lowheadroom ahead.Slope Ahead – Slow DownSlow down and takecaution on the slope ahead.44
Module 3Advisory SignsStay on TrackShared TrackSegregatedpedestrian andcycling pathsprovided. Stay onyour respectivepaths and keep left.The path is sharedby both riders andpedestrians.Keep left and giveway to pedestrianswhen riding.Typically denotesthe start of a cyclingpath.Typically denotesthe start of a cyclingpath.Information Signs/ Markings/ SignalsCyclist logoPCN logoPedestrianand cyclistlogoBicycle logo45
Module 3Information Signs/ Markings/ SignalsPedestrian-Only MarkingsRiding is not allowed inareas marked by thesered triangles. The redtriangles point towards thepedestrian-only area.Bicycle CrossingRiders are to use thebicycle crossing provided.All device users (exceptPMA users) must dismountand push.Bicycle Crossing with‘Stop’ or ‘Look’ boxRiders should use thebicycle crossing provided.Wait behind the solidyellow line for the lights toturn green.46
Module 33.2.4 Types of Road CrossingsUse proper crossings as much as possible. All riders mustslow down, stop and look out for approaching vehicles beforecrossing the road at walking speed. It is an offence not to stopbefore crossing the road.Signalised CrossingsBicycle CrossingsPedestrian CrossingsRiders should keepleft and stay withinthe dedicated cyclinglane.These crossings donot have dedicatedcycling lanes.Riders should keepto the left and ride inan orderly manner.Do not attempt tocross when the “RedBicycle” lights upor when the “GreenBicycle” light isflashing.Always look outfor and give way topedestrians.47
Module 3Non-Signalised CrossingsMarked CrossingsInformal CrossingsThese crossings are alsoknown as zebra crossings.They are indicated bythick solid white lineson the road and flashingyellow beacons.These crossings do nothave any indications ormarkings. They can be foundat junctions where the pathintersects with a road suchas carpark accesses andminor road junctions.UnderpassesUnderpasses with ‘GiveWay to Pedestrian’ signs areconsidered footpaths.Users of motorised PMDs(including e-scooters) andPABs must dismount andpush.Riding is prohibitedin underpasses withthe ‘No Riding’ sign.All device users,except PMA users,must dismount andpush.48
Module 3Overhead BridgesPedestrian OverheadBridgesRiding is not allowedon all pedestrianoverhead bridgesand their connectingramps unless theyare marked with thebicycle logo.Do not ride acrossoverhead bridges.Pedestrian OverheadBridges with WheelingRampsWheeling rampsmake it easier tobring devices acrossoverhead bridges.Use the wheelingramp to push yourdevice up the stairs.Do not ride acrossoverhead bridges.49
Module 3Pedestrian OverheadBridges WithoutWheeling RampsYou should carryyour device up thestairs. If you areunable to do so, usethe next availableroad crossing.Do not ride acrossoverhead bridges.Bicycle BridgesThese havededicated pedestrianand bicycle lanemarkings.Ride within thedemarcated bicyclelanes in an orderlymanner.50
Module 33.2.5 On-Road Traffic SignsPAB riders must obey all mandatory and prohibitory signs. Noncompliance is an offence.Mandatory SignsSTOPGIVE WAYStop before theWHITE line. Giveway to trafficfrom the rightand the left.Slow downand stop ifnecessary. Giveway to traffic onmajor road.LEFT TURN ON REDIndicate yourintention to turn.STOP-CHILDRENStop and look out forpedestrians crossing theroad.Stop at the red lightand give way topedestrians crossing.Gi
1.6 Pre-Ride Preparation 1.7 Guidelines for Riding on Public Paths 1.8 Guidelines for Riding on Roads 2.1 Device Criteria for PABs 2.2 Device Standards (EN15194) and Fire Safety 2.3 Maintenance of a PAB 2.4 Pre-Ride Equipment Check on PABs 2.5 Safety Gear and Attire 2.6 Parking, Security and Sto