Transcription
6 Qt. Stainless SteelPressure CookerUSER GUIDE
Thank you for choosing a Calphalon 6 Qt. Stainless Steel Pressure Cooker,designed to cook foods approximately 50 percent faster -- saving you energyand time.We know you are excited to begin using your pressure cooker; this User Guide isprovided to help you make the most of your new appliance. Use it to learn the stepsfor operating your pressure cooker, including the unique one-button locking lid thatattaches to the base without any aligning or threading.Be sure to carefully review this guide before using your pressure cooker and keepit handy for future reference should you have any questions about your pressurecooker’s operation.Table of ContentsSafety Instructions.page 2Getting to Know Your 6 Qt. Stainless Steel Pressure Cooker.page 4Parts and FeaturesOperating Your 6 Qt. Stainless Steel Pressure Cooker.page 5Before First UseLoading the Pressure CookerOperating the ControlsReleasing Pressure After CookingTips for Successful Operation.page 10Adapting Traditional RecipesCanningCooking Guide.page 12Cleaning and Care.page 15Before CleaningDisassembling the Pressure CookerCleaning the Pressure CookerStorage.page 15Frequently Asked Questions.page 15Warranty .page 17Customer Service.page 18Recipes.page 19NOTE: If you have additional questions or concerns, or wish to return product(s), pleasecontact Calphalon Customer Service at 1-800-809-7267. Please do not return thisproduct to the store.1
Safety InstructionsThe safety instructions appearing in this guide are not meant to cover all possiblesituations that may occur. Caution must be exercised when installing, maintaining oroperating this product. Contact Calphalon Customer Service with any issues you donot understand.Recognize Safety Symbols, Words & LabelsAlways read and obey the safety messages included in this guide. Look for thefollowing safety symbols, which will alert you to potential hazards:WARNINGWARNING – Hazards or unsafe practices which COULD result in severepersonal injury or death.CAUTIONCAUTION – Hazards or unsafe practices which COULD result in minorpersonal injury.IMPORTANT SAFEGUARDSWhen using your pressure cooker, basic safety precautions should always beobserved, including the following:1. READ ALL INSTRUCTIONS in this guide before attempting to operatethe pressure cooker.2. Do not touch hot surfaces. Use handles or knobs.3. Close supervision is necessary when the pressure cooker is usednear children.4. Do not place the pressure cooker in a heated oven.5. Extreme caution must be used when moving a pressure cookercontaining hot liquids.6. Do not use pressure cooker for other than intended use.7. This product cooks under pressure. Improper use may result in scaldinginjury. Make certain unit is properly closed before operating. SeeLoading the Pressure Cooker on page 5.8. Do not fill the unit over 2/3 full. When cooking foods that expand duringcooking such as rice or dried vegetables, do not fill the unit over ½ full.Over filling may cause a risk of clogging the vent pipe and developingexcess pressure. See Loading the Pressure Cooker on page 5.2
9. Be aware that certain foods, such as applesauce, cranberries, pearlbarley, oatmeal or other cereals, split peas, noodles, macaroni,rhubarb or spaghetti can foam, froth and sputter, and clog the pressurerelease device (steam vent). These foods should not be cooked in apressure cooker.10. Always check the pressure release devices for clogging before use.11. Do not open the pressure cooker until the unit has cooled and allinternal pressure has been released. If the Open button is difficult topush, this indicates that the cooker is still pressurized – do not force itopen. Any pressure in the cooker can be hazardous. See ReleasingPressure after Cooking on page 8.12. Do not use this pressure cooker for pressure frying with oil.13. When the normal operating pressure is reached (between 8 and 15psi), turn the heat down so all the liquid, which creates the steam, doesnot evaporate.14. Do not use (or not recommended for use) on an open fire (campfires),barbeque grills or charcoal fires.15. Always lift pressure cooker vessel securely with both loop handles.Never attempt to lift pressure cooker with only the cover handle.If this pressure cooker malfunctions during use, immediately discontinueuse and remove from heat. Do not use or attempt to repair the unit. ContactCalphalon Customer Service at 1-800-809-PANS (7267) forexamination, repair or adjustment.SAVE THESE INSTRUCTIONSFOR FUTURE REFERENCE.3
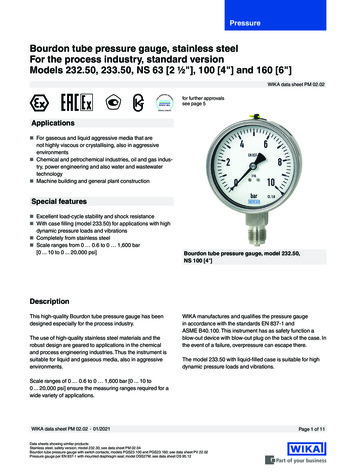
Getting to Know Your6 Qt. STAINLESS STEEL PRESSURE COOKER543267Quar ts15Maximum - 2/343Minimum - 1/3218Parts and Features1.Stay-Cool Handles – Wrapped in silicone for comfort and safety and weldedto the base for durability2. One Button Lock & Unlock – Easily opens (or securely locks) the lid in placewith one touch of a button3. Pressure Indicator – Raises up when pressure builds inside the pressurecooker, releasing a small amount of steam, to signal the beginning of thecooking time4. Pressure Valve – May be turned to select the desired pressure setting forcooking or to release steam after cooking is complete5. Safety Valve – This valve releases excess pressure if it builds up inside thepressure cooker6. Lid – The unique locking rim secures the lid in any position with no threading oraligning needed7. Gasket – This silicone ring provides an airtight seal between the lid and the base8. Base – Features a beautiful and durable heavy duty stainless steel exterior withan impact bonded base that is suitable for gas, electric, and induction cook tops4
Operating Your 6 Qt.STAINLESS STEEL PRESSURE COOKERPressure cooking offers several advantages over traditional cooking methods. Itsaves time (up to approximately 50 percent) and it tenderizes foods in the process.Foods typically made using moist heat cooking methods, such as those simmered ina slow cooker, adapt well to pressure cooking.The Calphalon 6 Qt. Stainless Steel Pressure Cooker is designed for your safetyand convenience. Remember, the contents inside the base are under pressure, soreleasing the pressure before opening the lid is critical.Thanks to the uniquely designed lid with its one button locking system and the easyto-use pressure regulating controls, operating a pressure cooker is easier than everbefore. Simply use the following steps as your guide.Before the First Use1. Place the pressure cooker on a dry, level, stable surface such as a countertop.2. Remove all packing material.3. Carefully wash the base in the dishwasher or in warm, sudsy water with a nonabrasive sponge. Rinse and dry thoroughly.4. Wash the lid and the silicone gasket in warm sudsy water. Ensure the lid is“open” when cleaning to avoid water accumulation in the lid. Always removethe gasket when hand washing the components of the pressure cooker lid.Rinse and dry thoroughly.5. Lightly coat the entire gasket with cooking oil, such as olive oil or vegetableoil, after every time you wash the pressure cooker. This extends the life of thegasket and also helps seal the gasket between the lid and the base.Loading the Pressure CookerStep 1: PREPARE THE INGREDIENTSIn general, for even cooking results, cut quicker-cooking ingredients into largerpieces and slower-cooking ingredients into smaller pieces. Use the following tips forspecific types of ingredients.Dried Beans/Legumes Rinse dried beans or legumes (except dried split lentils) with warm water andremove any foreign particles. Soak the beans in four times their volume of warm water for at least four hoursor overnight. Remove any floating beans and shells from the water. Drain the water from the beans.5
Fruits Wash and core fresh fruit. If desired, peel and cut into pieces. If using dried fruit, add 1 cup of water or fruit juice for each cup of dried fruit. Add seasonings and/or sugar.Grains Rinse whole grains with warm water and remove any foreign particles. Soak the grains (except rice) in four times their volume of warm water for at leastfour hours or overnight. Remove any floating grains and shells from the water. Drain the water. Rinse the grains with warm water.Meats/Poultry Trim away visible fat. Cut meat/poultry into pieces that will fit into the pressure cooker base withouttouching the sides of the pan. Brown the meat/poultry in a couple tablespoons of vegetable oil in the base(without the lid) on the stovetop. Cook in batches, if needed, to brown themeat/poultry evenly and quickly.Seafood/Fish Clean the fish and remove any visible bone. Rinse shellfish under cold water and scrub. Place clams and mussels in a combination of cold water and the juice of onelemon. Soak about one hour to remove any sand.Vegetables Wash fresh vegetables. Peel root vegetables, such as potatoes and carrots, and pierce any large piecesseveral times with a fork. When using frozen vegetables, extend the cooking time by 1 to 2 minutes.Step 2: PLACE FOOD IN BASE Fill the pressure cooker base no more than 2/3 full. The maximum fill line in thepressure cooker should never be exceeded. When cooking foods that expand during cooking such as rice or driedvegetables, or when making soups or stocks, do not fill over ½ full. The pressure cooker does not work well for foods that foam or froth whilecooking. Do not use the pressure cooker to cook foods such as pasta,applesauce, cranberries, pearl barley, oatmeal or other cereals, split peas,noodles, macaroni, rhubarb or spaghetti.Step 3: ADD LIQUID Follow your recipe regarding how much liquid to add. NEVER use less than½ cup liquid. If the approximate cooking time is more than 10 minutes, use 2 cups of liquid.6
WARNINGOver filling the pressure cooker base may cause a risk of clogging the vent pipeand developing excess pressure. Excess steam may cause burns if the pressurecooker is overfilled.Step 4: SECURE THE LID ON THE BASE.Make sure the silicone gasket is positioned around the underside of the lid. Centerthe lid on the base and press the One Button Lock to attach the two pieces together.(Note: The lid does not need to thread into place or be positioned using a certainorientation to attach securely.)Never use the pressure cooker without the gasket in place. If the gasket is wornor damaged and does not create a proper seal between the lid and the base,replace it. Contact Calphalon Customer Service at 1-800-809-7267 orvisit www.calphalon.com to purchase a replacement gasket.Operating the ControlsStep 1: SELECT THE PRESSURE LEVELTurn the Pressure Valve to the desired setting. Referto the Cooking Guide on pages 12-14 forsuggested settings.Choose from the following options:High Pressure – 2 to 15 psi*Low Pressure – 1 to 8 psiRelease – to release steam fromthe pressure cooker* Pounds of pressure per square inchStep 2: HEAT THE PRESSURE COOKER ON THE COOK TOPCenter the pressure cooker on a gas, electric (coil or ceramic) or induction cooktop element. Choose a cooking surface that matches the diameter of the pressure7
cooker base or is slightly smaller. Avoid sliding the pressure cooker on glass-topceramic surfaces.Heat the pressure cooker on medium-high heat until the Pressure Indicator pops upand begins to release a small amount of steam.Step 3: ONCE STEAMING BEGINS, REDUCE HEAT TO SIMMERWhen the pressure cooker warms up, the contents inside willbegin to boil and generate steam. The Pressure Indicator willpop up and release steam. When this occurs, reduce the heatto medium low to maintain a steady level of pressure.Note: A hissing sound during cooking is completely normal, andnot an indication of a malfunction with the pressure cooker.If the temperature drops too much and the pressure indicatordrops back down, increase the heat slightly to maintain asteady simmer.If at any time during the cooking process an excessive amount of steam is beingreleased, adjust the heat under the pressure cooker by turning it down to maintain asteady, gentle release of steam. Also, do not shake the pressure cooker at any time,as this may cause a drop in pressure.WARNINGOnce the Pressure Indicator activates (by popping up), this indicates there ispressure built up inside the pressure cooker. The lid may not be opened at this time.Removing the lid may result in burns and serious injury.Electric cook top users: Electric cook top elements hold their heat more thangas or induction during this process, making it take longer to reduce from high heatto a simmer.So, use medium heat (instead of high) for warming the pressure cooker contents tothe point of steaming. Continue, as directed, by reducing to a lower temperaturethat maintains a steady level of steam.Step 4: START COOKING TIMEOnce the Pressure Indicator pops up and steam is releasing in a steady stream,begin the cooking time. Refer to the Cooking Guide on pages 12-14 forsuggested cooking times.Releasing Pressure after CookingRefer to your recipe (or the Cooking Guide on pages 12-14) for therecommended release method. There are two basic methods:8
Method 1 – NATURAL RELEASE:Carefully remove the pressure cooker from the hot cook top and allow it to coolnaturally. Depending on the volume of food and liquid in the pressure cooker, thistakes approximately 10 to 15 minutes.Once the pressure is released, the Pressure Indicator is down, and the PressureValve is no longer emitting steam, the lid is ready to be removed.Press the One Button Unlock to release the lid from the base. Lift the lid, beingcareful to direct any residual heat and steam away from your face.Method 2 – QUICK RELEASE:To automatically release pressure from the pressure cooker, turn the Pressure Valveslowly and incrementally to the release position. Steam will loudly escape from thepressure cooker through the valve, so be careful to keep your hands away from thetop of the valve, or use an oven mitt for protection.Once the steam is completely released, the Pressure Indicator is down, and thePressure Valve is no longer emitting steam, the lid is ready to be removed.Press the One Button Unlock to release the lid from the base. Lift the lid beingcareful to direct any residual heat and steam away from your face.CAUTIONSome residual heat and steam may be released when opening the pressure cooker.Prevent potential burns by protecting your hands with oven mitts and using the lid asa shield to direct the steam away from your face and hands. If the lid is adhering tothe base and won’t come off easily, it is a sign there may still be pressure built upinside. Do not force it open. Allow more time for the unit to cool before attemptingto remove the lid.9
Tips for Successful OperationAdapting Traditional RecipesTraditional recipes using moist heat methods of cookery (such as braising, stewingor slow cooking) are often easily adapted to pressure cooking.In general, the Calphalon 6 Qt. Stainless Steel Pressure Cooker reduces traditionalcooking times by approximately 50 percent. As a starting point refer to theCooking Guide on pages 12-14. It provides a list of common ingredients andtheir suggested cooking times.Doubling or Tripling RecipesWhen doubling or tripling a recipe for the pressure cooker, keep a couple of thingsin mind. First, fill the pressure cooker NO MORE than 2/3 full. When cooking foodsthat expand during cooking, such as rice or dried vegetables, or when makingsoups or stocks, DO NOT fill more than ½ full.Secondly, cooking times for doubled or tripled recipes are the same as the originalrecipe. However, the time it takes to heat the pressure cooker up (to the point ofsteaming) and cool it down takes longer. Be sure to begin timing recipes once thesteaming begins.Here are a few general pressure cooker tips: Cut ingredients into uniform pieces for even cooking. Consider cutting slower-cooking ingredients into smaller pieces and longercooking ingredients into larger pieces. Brown ingredients before adding them to the pressure cooker, if desired, tocaramelize and add flavor. The pressure cooker is a moist heat cooking method,so it does not tend to brown ingredients during the cooking process. When cooking delicate, tender ingredients (such as seafood, fresh fruits, andvegetables) use the Quick Release Method for releasing the steam toavoid overcooking. If foods are not tender enough at the end of the cooking time, you may simmeringredients in the base on the cook top with the lid removed. Cook until tender. When cooking dried beans and legumes, add a tablespoon of vegetable oil foreach cup of water to prevent any potential foaming. Beans and rice expand to approximately double in volume as they cook. So, ifyou start with 1 cup of rice, the recipe will yield approximately two cups.Pot Roast and Vegetables Look at the Cooking Guide on pages 12-14. Find the cooking time for themeat you are preparing. Next, find the cooking time for your longest cookingvegetable (such as potatoes). Subtract the cooking time for the vegetable fromthe cooking time for the meat. This is your adjusted cooking time for the first stageof cooking.10
Insert the meat and at least 2 cups cooking liquid in the pressure cooker, lock lidin place, and cook for the adjusted cooking time. Use the Quick Release Method. Add the longer cooking vegetable(s), lock lid in place, and continue cookingfor the recommended time. Use the Quick Release Method and add anyquick cooking vegetables. Simmer, with the lid removed, on the stove top untilcomplete.Meats Brown the meat in a couple of tablespoons of oil. Briefly remove the meat andbrown the aromatic vegetables (i.e., onion, celery, garlic) in the pan drippings, ifdesired. Return the meat to the pan and add at least 2 cups of cooking liquid. Refer to the Cooking Guide on pages 12-14 for suggested cooking timesand settings.Tomato Sauce Brown the aromatic vegetables (i.e., onion, garlic) in a couple of tablespoons ofoil. Add the pureed tomatoes. Fill the pressure cooker only ½ full. Lock lid in place. Cook for approximately 20 minutes on Low. Use the Natural Release method of releasing steam. Season, as desired.Fruit Preserves Place the fruit pieces in the pressure cooker base along with the sugar. Set aside for one hour to release the natural juices of the fruit. Bring to a boil, uncovered. Stir in remaining ingredients. Lock lid in place and cook for 8 minutes on Low. Use the Natural Release method of releasing steam.CanningThe Calphalon 6 Qt. Stainless Steel Pressure Cooker is primarily designed for mealpreparation rather than canning. The pressure cooker base accommodates up to 4(½-quart) canning jars.For complete pressure canning guidelines, contact the National Center for HomeFood Preservation at http://nchfp.uga.edu/.Or, reference the “USDA Complete Guide to Home Canning” which is a spiralbound book available for purchase via The Education Store, Purdue Extension,700 Ahlers Road, West LaFayette, IN 47907, (765) 494-6794. The content is alsoposted on-line at the web site listed above.11
Cooking GuideFoodPressureLevelApprox.Type ofCooking Time Steam ReleaseDried Beans/Legumes*Beans (black)HighBeans (colored)HighBeans (red)HighBeans (white)HighChick peasHighLentils (green)HighLentils (red)HighLentil soupHigh* Beans are soaked before cooking.8 to 10 minutes Natural release4 to 6 minutes Natural release10 to 12 minutes Natural release5 to 7 minutes Natural release10 to 12 minutes Natural release8 to 10 minutes Natural release7 to 9 minutes Natural release8 to 10 minutes Natural releaseFresh/Dried FruitsApples (dried)High3 minutesQuick releaseApples (slices or pieces)Low2 to 3 minutesQuick release ORNatural release (forpuree or conserve)Apricots (dried)High4 minutesQuick releaseApricots (freshLow2 to 3 minutesQuick release ORwhole/halves) Natural release (forpuree or conserve)Peaches (dried)High4 to 5 minutesQuick releasePeaches (fresh halves)Low3 minutesQuick release ORNatural release (forpuree or conserve)Pears (dried)High4 to 5 minutesQuick releasePears (fresh halves)Low3 to 4 minutesQuick release ORNatural release (forpuree or conserve)PrunesHigh4 to 5 minutesQuick releaseRaisinsHigh4 to 5 minutesQuick releaseGrainsRice (1 c. basmati plus1½ c. water)Rice (1 c. brown plus1½ c. water)Rice (1 c. long grain plus1½ c. water)Rice (1 c. wild rice plus3 cups water)Continued next page.High5 to 7 minutes Natural releaseHigh15 to 20 minutes Natural releaseHigh5 to 7 minutes Natural releaseHigh22 to 25 minutes Natural release12
Cooking Guide - continuedFoodPressureLevelMeats/PoultryBeef (cured)Beef (2 lbs., dressed)Beef/veal roast or brisketBeef/veal shanks(1½ in. wide)Beef/veal (1½ lb.,1 in. cubes)Chicken (3 lb., pieces)Chicken (2 to 3 lb.,whole)Cornish game hens (2)Ham (pieces)Lamb (1½ lb.,1 in. cubes)Lamb (leg)Meatballs (1 to 2 lb.)Pork (2 lb. smoked leg)Pork (3 lb. ribs)Pork (roast)Approx.Type ofCooking Time Steam ReleaseHighLowHighHigh50 to 60 minutes Natural release10 to 15 minutes Natural release40 to 45 minutes Natural release25 to 30 minutes Natural releaseHigh10 to 15 minutes Natural releaseHighHigh10 minutes Natural release12 to 18 minutes Natural releaseHighHighHigh10 to 12 minutes Natural release20 to 25 minutes Natural release10 to 18 minutes Natural releaseHighLowHighHighHigh35 to 40 minutes Natural release5 to 10 minutes Natural release20 to 25 minutes Natural release25 minutes Natural release40 to 45 minutes Natural releaseSoup/StockHigh10 to 15 minutes Natural releaseSeafood/FishCrabFish filet (1½ to 2 lb.)Fish soup/stockFish (whole, gutted)Lobster (1½ to 2 lb.)MusselsPrawns/shrimpLowLowHighLowLowLowLow2 to 3 minutes2 to 3 minutes5 to 6 minutes5 to 6 minutes2 to 3 minutes2 to 3 minutes1 to 2 minutesQuick releaseQuick releaseQuick releaseQuick releaseQuick releaseQuick releaseQuick releaseNote: Cooking times will vary depending on the size and thickness of the food.Adjust cooking times, as needed, to make sure foods are thoroughly cooked.13
Cooking Guide - continuedFoodPressureLevelVegetablesAcorn squash (half)Artichoke (large,no leaves)Artichoke (medium,no leaves)Asparagus spearsBeets (¼ in. slices)Beets (small whole)Broccoli (florets)Broccoli (stalks)Brussels sprouts (whole)Cabbage (¼ in. slices)Cabbage (quartered)Carrots (¼ in. slices)Carrots (1 in. slices)Cauliflower (florets)CollardCorn (kernels)Corn (on the cob)Endive (coarsely cut)Fresh spinachGreen beans (whole)Kale (coarsely cut)Okra (pods)Onion (medium)Peas (in pod)Potatoes (1½ in. slices)Potatoes (small whole)Pumpkin (2 in. slices)Spinach (fresh)Summer squash(1 in. slices)Sweet potato(1½ in. slices)Swiss chard (thick slices)Tomatoes (quartered)Turnip (1½ in. slices)Approx.Type ofCooking Time Steam ReleaseHighHigh7 minutes Quick release9 to 11 minutes Quick releaseHigh6 to 8 minutes Quick ighLowHigh1 to 2 minutes4 minutes12 minutes2 minutes5 to 6 minutes4 minutes1 to 2 minutes3 to 4 minutes1 minute4 minutes2 to 3 minutes5 minutes1 minute3 minutes1 to 2 minutes2 minutes2 to 3 minutes3 to 5 minutes2 to 3 minutes2 to 3 minutes1 minute6 minutes5 minutes3 to 4 minutes2 minutes8 minutesHigh5 minutes Quick releaseHighHighHigh2 minutes Quick release2 minutes Quick release3 minutes Quick releaseQuick releaseQuick releaseQuick releaseQuick releaseQuick releaseQuick releaseQuick releaseQuick releaseQuick releaseQuick releaseQuick releaseQuick releaseQuick releaseQuick releaseQuick releaseQuick releaseQuick releaseQuick releaseQuick releaseQuick releaseQuick releaseQuick releaseQuick releaseQuick releaseQuick releaseQuick release14
CLEANING AND CAREBefore Cleaning Cool the pressure cooker completely. Once the steam is completely released, the Pressure Indicator is down, and thePressure Valve is no longer emitting steam, the lid is ready to be removed.Disassembling the Pressure Cooker Press the One Button Unlock to release the lid from the base. Lift the lid beingcareful to direct any residual heat and steam away from your face. Store or discard the remaining contents in the pressure cooker.Cleaning the Pressure Cooker Carefully wash the base in the dishwasher OR in warm, sudsy water. Rinse anddry thoroughly. Hand wash the lid and the silicone gasket in warm sudsy water. Always removethe gasket when washing the components of the pressure cooker lid. Rinse anddry thoroughly. Lightly coat the entire gasket with cooking oil, such as olive oil or vegetable oil,after every time you wash the pressure cooker. This extends the life of the gasketand also helps seal the gasket between the lid and the base. To maintain the look of the stainless steel, and remove cooked-on grease, werecommend using Bar Keeper’s Friend with a non-abrasive sponge or cloth.STORAGE Make sure the pressure cooker is clean and dry. Invert the lid and place it upside down on top of the base for storage. Storing the pressure cooker sealed with the gasket in place could cause odors.Frequently Asked Questions1. My pressure cooker is not emitting any steam; what am I doingwrong? Check to make sure you have added enough liquid to the pressurecooker. Use a minimum of ½ cup liquid. If the cooking time is more than10 minutes, use at least 2 cups liquid. Liquid is needed to form the steam forcooking. Also, ensure the lid is locked, and that the pressure level is set on thepressure valve.15Also, verify that the size of the cook top element matches the diameter of yourbase. If the element is several inches smaller, choose a larger element thatbetter suits your pressure cooker. Finally, make sure your cooking surface is seton medium or high to generate enough heat to boil the liquid in the base andcreate steam.
2. My pressure cooker is sputtering and emitting a generous amountof steam. What should I do? Begin by turning off or turning down the heaton the cook top. This should slow the rate of steam. It is ideal to have a gentle,steady release of steam through the Pressure Valve throughout the cookingprocess.If this does not work, verify that you have not overloaded the pressure cooker.Refer to page 5 for tips on Loading the Pressure Cooker. Depending onthe ingredients being used, the pressure cooker should be NO MORE than ½to 2/3 full.If your pressure cooker is properly loaded, next determine if you areinadvertently using ingredients that create excessive foaming and frothing, suchas applesauce, cranberries, pearl barley, oatmeal or other cereals, split peas,rhubarb, or pasta.3. My pressure cooker started emitting steam through the safetyvalve while I was cooking. Do I need to remove the pressurecooker from the heat source? What should I do? It is not necessaryto remove the pressure cooker from the heat source. Simply turn the heat downslightly. The pressure cooker will adjust and the amount of steam being releasedwill reduce, as well. This release of excess pressure (and steam) is built in as asafety precaution.4. Is it okay to use frozen vegetables in the pressure cooker? Yes.When using frozen vegetables in place of fresh, add 1 to 2 minutes to theoverall cooking time.5. I would like to cook both meat and vegetables in the pressurecooker. How do I determine the cooking time? Look at the CookingGuide on pages 12-14. Find the cooking time for the meat you arepreparing. Next, find the cooking time for your longest cooking vegetable (suchas potatoes). Subtract the cooking time for the vegetable from the cooking timefor the meat. This is your adjusted cooking time for the first stage of cooking.Insert the meat and at least 2 cups of cooking liquid in the pressure cooker, lockthe lid in place and cook for the adjusted cooking time. Use the Quick ReleaseMethod. Add the longer cooking vegetable(s), lock the lid in place and continuecooking for the recommended time. Use the Quick Release Method and addany quick cooking vegetables. Simmer, with the lid removed, until complete.6. I used my pressure cooker to cook dried beans. When I openedthe pressure cooker, they were not soft enough for serving. Whatshould I do? Not soaking the beans before cooking them could be the culprit.Refer to the instructions for Loading the Pressure Cooker on page 5 forspecific tips related to dried beans and legumes.16
If you already soaked the beans, you may simply need to cook the beans a bitlonger. Place the pressure cooker base on the cook top (with the lid removed)and simmer the beans until tender. Add water, if needed.7. Are there any foods NOT suitable for the pressure cooker? Yes.There are a few foods that tend to foam, froth and sputter in the pressure cooker.Therefore, we recommend that you avoid applesauce, cranberries, pearl barley,oatmeal and other cereals, split peas, rhubarb or pasta.WarrantyRegister your 6 Qt. Stainless Steel Pressure Cooker - It’s Easy!Please register your product to ensure that we have the correct information in oursystem for any warranty inquiries. Retain the original sales receipt.Without registering your product or having the original sales
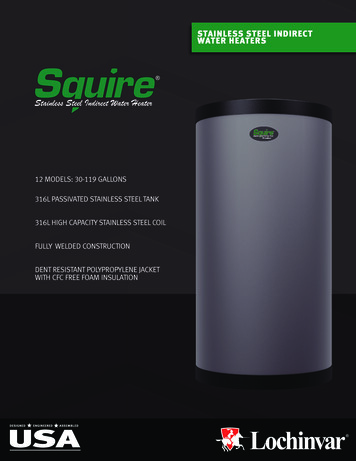
7 GETTInG TO KnOW yOUR 6 QT. STAInLESS STEEL PRESSURE COOKER r s 5 4 3 2 1 M a x i mu - 2/3 M i n i m u m - 1 / 3 4 Parts and features 1. stay-Cool Handles – Wrapped in silicone for comfort and safety and welded to the base for durabilityFile Size: 885KB