Transcription
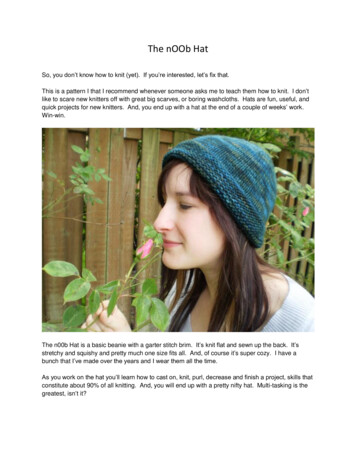
The nOOb HatSo, you don’t know how to knit (yet). If you’re interested, let’s fix that.This is a pattern I that I recommend whenever someone asks me to teach them how to knit. I don’tlike to scare new knitters off with great big scarves, or boring washcloths. Hats are fun, useful, andquick projects for new knitters. And, you end up with a hat at the end of a couple of weeks’ work.Win-win.The n00b Hat is a basic beanie with a garter stitch brim. It’s knit flat and sewn up the back. It’sstretchy and squishy and pretty much one size fits all. And, of course it’s super cozy. I have abunch that I’ve made over the years and I wear them all the time.As you work on the hat you’ll learn how to cast on, knit, purl, decrease and finish a project, skills thatconstitute about 90% of all knitting. And, you will end up with a pretty nifty hat. Multi-tasking is thegreatest, isn’t it?
“Yes!” you say. “I want to do this! What do I need?”Well, dear reader, you don’t need much:-1 skein of worsted weight yarn. You can go luxurious or cheap, or somewhere in between. If youwant to go the cheap route, Red Heart SuperSaver costs about two bucks and can be found literallyeverywhere. If you want to go the luxurious route, find an independent yarn store and ask the clerkto get you something fancy for a worsted weight hat. I’m using a Stitch Nation Full o’ Sheep, a midrange yarn that I found buried in my yarn stash. I think I bought it from my local Jo-Ann’s.-1 pair of size 8 knitting needles. Whatever kind you like. I recommend straight needles for ultrabeginners. Wood or metal, doesn’t matter.-1 tapestry needle. I forgot to take a picture of this. It’s a big sewing needle. Sometimes they aremetal, sometimes they are plastic. You’ll use this at the very end to finish your hat.-1 pair of scissors (or really strong teeth, I suppose). You won’t need these until the very end.
Casting OnKnitted fabric (unlike woven fabric) is made of a whole series of interlocking loops. These loops givethe finished fabric stretch, which is what makes knitting so awesome for making sweaters, socks,and hats. The first row of loops is created by casting on, and the rest of the loops are made byknitting and purling. We’ll be doing a long-tail cast on, since it’s the most versatile way to do a caston. (I use it on 90% of all my projects).Start by measuring out a long tail (duh) that is about 4 times as long as your finished project. (Sincethis is a hat, you can wrap your yarn around your head 4 times to estimate your length. But youprobably want to do that in private, or people will look at you weird.) Then, make a slip knot at thepoint that you measured. In this case, you’ll have your ball of yarn on one side of the slip knot, andabout 6 or 7 feet of yarn on the other end. Slip the slip knot on your needle and tighten the loop sothat it won’t fall off the needle.Now, with your left hand, grab both the ball yarn and the tail yarn with your pinky and ringfinger. Then, slip your thumb and index finger between the two ends of yarn. Make sure that the tailyarn is the one wrapped around your thumb.
Use the point of the needle to slide from the bottom of your thumb to the top, picking up a loop ofyarn. Don’t let the yarn slip off your thumb. Your pinky and ring fingers should keep tension on youryarn, which can help this.Then, move the point of the needle over to the tip of your index finger.
Slide the point of the needle down your index finger, then down your thumb, too. This will hook theloop of yarn from your index finger, and pull it through the thumb loop.Now, here’s the scary part. Drop the yarn from your left hand. I promise you won’t lose your work.Pull on the yarn tails to snug up your new stitch. Now you have two stitches! Huzzah!
And now, you keep going. Grab the yarn again in your left hand, with your thumb and index fingerbetween the tail and the ball yarn. Use the tip of the needle to slide up your thumb, over to yourindex finger, and back down your thumb, pulling the index finger loop through the thumb loop.
Then, drop the yarn, and tighten up your third stitch.Keep on going, repeating these steps until you end up with 80 stitches on your needle. (I know itseems like a lot, but practice makes perfect. You’ll be burning through them before you knowit.) When you get all 80 stitches, tie up any remaining tail yarn into a little bundle to keep it out ofyour way. You won’t do anything else with the tail until you’re done with all the knitting on thisproject.
The Knit StitchDid you get your 80 stitches all cast on? Awesome! Now it’s time to really start knitting.Whenever you knit, you’re going to have the “old” stitches on your left-hand needle, and you willmake the new stitches on your right-hand needle. So, that’s how we’re going to start. Hold your fullneedle in your left hand, and your empty needle in your right hand. Keep your ball of yarn on yourright side.Are you ready to start your first knit stitch? Yes!Insert the point of your right needle into the front of the first stitch, with your yarn held behind yourknitting. (The “front” of your knitting is the side that faces you as you work on it. The “back” of yourknitting is the side that faces away from you.) It should look like this:
Then, wrap the yarn around the tip of the right-hand needle.Pull the new loop carefully through the old stitch. This is tricky at first, so keep trying. If you keep alittle tension on your yarn, it makes it easier. I like to wrap the yarn around my index finger to helpkeep tension, but if you don’t like that, try holding the yarn between your index an thumb, orwrapping it around your whole hand. Every knitter holds their yarn a little differently. Find what feelsgood to you.
You’ve made your new stitch (the loop you just made on your right-hand needle). Now it’s time toget rid of your old stitch. To do this, simply slip it off the end of the left-hand needle. Easy.You’ve finished your first stitch! Congrats! Now you just need to make approximately 1 billionmore. (Not really. Although sometimes I wonder about how many stitches there are in a hat, or asweater or something. I’ve never actually sat down to do the math. That would be a little nuts.)
Now, let’s knit the next stitch: Insert your right-hand needle into the front of the next stitch, wrapyour yarn around the tip of the needle, pull the new stitch through, and then drop the old stitch off theend of the left-hand needle.
Two stitches done! Keep going like this until you reach the end of the row.When you get to the end, swap your needles, so that your empty needle is in your right hand, andyour needle with stitches on it is in your left hand. Then, keep knitting away!Keep going, switching your needles around at the end of each row, and soon enough you’ll seesome awesome squishy fabric start growing off your needles. (If your stitches aren’t as even asmine, that’s OK. It adds character! And, if you think it’s too bad to actually wear, you can alwaysframe the finished hat as a piece of modern art or something.)
The texture pattern you have been working is called “Garter Stitch.” It’s made when you knit everysingle row. This is the brim of the hat we’re working on. I worked my garter stitch for about 2inches. You can make your garter stitch brim wider or narrower by knitting more or fewer rows.
The Purl StitchHave you got your garter stitch brim done? Awesome!So, your hat should look something like this:If it’s a little longer or shorter, no worries. If it’s a little lumpier, also no worries.The next part we’ll work on is the body of the hat, which we’ll make using the texture pattern“Stockinet Stitch”. When you imagine a basic knit sweater, the smooth-looking parts are stockinetstitch. It’s made by alternately knitting one row and purling one row.You already know how to do knit stitches, so I guess it’s time to learn how to do purl stitches. Thepurl stitch is worked very similarly to the knit stitch, except that it’s backwards (don’t worry itsounds worse than it is).Just like before, you’re going to start with your full needle on your left side and your empty needle onyour right. Take the tip of your right-hand needle, and poke it through the back of the firststitch. Hold your yarn in front of your knitting. (See how it’s backwards from working a knit stitch?)
Then, wrap your yarn around the tip of your right-hand needle.And pull the new stitch through the old stitch, from front to back.
And, just like before, you slip the old stitch off the left needle.Does that make sense? Let’s try it again.Keep your yarn in front of your knitting. Insert the tip of your needle into the back of the next stitch.Wrap your yarn around the tip of your needle, and pull the new stitch through. Drop your old stitchoff the left-hand needle.
Keep going! Purl the whole row.Now that you’ve purled a whole row, do you see how knitting and purling are very similar? For both,you insert your right-hand needle, wrap your yarn around, pull the new stitch through, and then dropthe old stitch off. Here’s a quick summary of the differences between knitting and purling:Knitting: Insert your needle into the front of the stitch, keeping your yarn behind the knitting. Wrapyour yarn around the needle tip, and pull the new stitch through from back to front.Purling: Insert your needle into the back of the stitch, keeping your yarn in front of theknitting. Wrap your yarn around the needle tip, and pull the new stitch through from front to back.OK, so, since we’re doing the stockinet stitch pattern, it’s time for another knit row. (Remember, knitone row, purl one row.) So, turn your knitting around and knit back.Then purl a row.Then knit a row.Then purl a row.
But, what if you have to (I don’t know) sleep or something? How will you remember what to donext? Easy; just “read” your knitting. “Reading” your knitting means looking at the stitches you’vealready worked to figure out what to do next.After a few rows of stockinet stitch, you’ll see that your hat now has two different textures. Thebumpy and squishy garter stitch at the bottom, and the smooth stockinet at the top.Stockinet has two different sides. The “right side” is the side with the little V-shaped stitches. Whenyou see this side facing you, it’s time to knit.
The “wrong side” is the side with little bumps. When you see this side, it’s time to purl. (You canthink of the bumps as “pearls,” if that helps. Get it? Pearls purl. Clever clever.)Keep going, knitting one row and purling one row until your whole hat measures about 5 inches fromthe cast-on edge. If you have a smaller head, you can make your hat a little shorter, if you have abigger head (or lots of hair) you can make your hat a little longer. I like to err on the too long side,since you can always roll up the brim, if it’s too big.
DecreasingHow’s your hat going? Mine’s looking pretty good, and I bet yours it too.But, you’ve probably noticed, that this hat is a big flatty-flat piece of knitting. And, I don’t know aboutyou, but my head is not flat. It is nice and round, like a melon.So, we probably need to make our hats a little more head-shaped. We’ll do that by adding some“shaping” to our knitting. Shaping is a generic term for using special stitches to give your knitting a3D shape. I’ll show you how to do a simple knit two together decrease (which is usually shortenedto ‘k2tog’).We’re going to do 8 k2togs across each knit row of the hat for the rest of the project. Make sure youare working on a knit row (not a purl row), and start following along.Knit 8 stitches regularly. Then, get ready for a k2tog.k2togs are super easy to do. It’s exactly like doing a knit, but instead of poking your right needlethrough a single stitch, you poke it through two stitches. Like this:
Then, wrap your yarn around the tip of your needle.And pull your new stitch through both old stitches.Then drop the old stitches off your left-hand needle. See how you’ve decreased the number ofstitches by one? (2 old stitches 1 new stitch)
Keep working in the established pattern: Knit 8 stitches, then k2tog. Knit 8, k2tog, knit 8, k2tog, overand over. You should end the row with a k2tog.The next row is a purl row, so purl all stitches (don’t do any decreases).The following row is a knit row, so you’ll do decreases again. But, this time, knit 7 stitches, k2tog,knit 7 stitches, k2tog, etc.Then purl a row.Then work a knit/decrease row. Knit 6, k2tog, knit 6, k2tog, etc.Then purl a row.Then do another knit/decrease row. Knit 5, k2tog, knit 5, k2tog, etc.Then purl a row.See how the pattern goes? All purl rows are worked like normal (no decreases). All knit rowsinclude decreases. Every time you do a decrease row, you knit 1 less stitch between each k2tog. (Ifyou find yourself getting confused, make notes on a post-it to help you keep track of where you are.)If you keep working in this pattern, your decreases will end up lining up nicely. Kind of pretty, right?
Keep going until you only have 8 stitches left on your needle, finishing with a knit row. See how itactually kind of looks like a hat now? Exciting!
FinishingYou’re so close to completing you hat, I can smell it. (Or maybe that’s the wool fumes getting to mybrain.) In fact, you are totally done with your knitting, and all that’s left is to do your finishing. In thiscase, that means sewing up the seam along the back of the hat, so that it ends up well hatshaped.Start out by cutting your working yarn, leaving a good 18-inch tail on your project. Thread this tailonto your tapestry needle.Then, turn your hat over, so that you can see the purl side facing up. Carefully use your tapestryneedle to thread your tail from the left, through the 8 remaining stitches.
Once you have your last stitches safely contained on your tail, you can remove your knitting needle(So long, knitting needle!) and pull the tail snug. This makes a nice little rosette-dealie at the top ofyour hat. See?Now, sew the two edges of your knitting together, using your yarn tail. I like to use a mattress stitch,but feel free to use whatever you are most comfortable with (whip stitch will also work well). Try tomake your seam as neat as possible, but don’t worry too much (since the seam is worked with thesame yarn as the rest of the hat, even messy stitching won’t show up too much).
When you’ve finished sewing up the hat, it should look like this. Very hat-like. (Hattish? Hatesque?)See how you still have those two pesky ends? We have to do something with them (unless you likebig hunks of yarn hanging down off your hat, I suppose). So, turn your hat inside-out. See the seamallowance that you made by sewing the two sides of your hat together? Sew your yarn up throughthat for a couple inches. (Throw in a knot or a securing stitch, if you want.) Then, cut your tails,leaving a 1-2 inches hanging inside the hat.And that’s it! You’re done! You have a great knitted cap! Congratulations!
Questions? Comments? Mistakes? Contact me through my blog: www.ontheneedles.com, or via email:knittingontheneedles@gmail.com 2013 Allison Griffith
-1 tapestry needle. I forgot to take a picture of this. It’s a big sewing needle. Sometimes they are metal, sometimes they are plastic. You’ll use this at the very end to finish your hat. -1 pair of scissors (or really strong teeth, I suppose).