Transcription
ACCUTRACE DOCUMENTATIONAbstractInstructions on using ACCUTRACE with AccuZIP6 including definitions of the ACCUTRACE MailTracking Reports for new usersAccuZIP, Inc.support@accuzp.com
Table of ContentsGetting Started. 1Setup and Activation . 2Logging Into the Portal. 3Tracking Progress .Dashboard . 4Mail Tracking Reports . 5-10QR Codes and ACCUTRACE . 11-15Branding Your Portal . 16Tracking Usage and Support . 17Thank you for purchasing ACCUTRACE. We at AccuZIP Inc. want your experience with our products, servicesand customer support to be the best in the industry. Please send all correspondence regarding ACCUTRACEto support@accuzip.comIt’s Simple!In a nutshell, you activate ACCUTRACE and process files as normal. Through the Activation Process, you willenter your Mailer ID and Serial Number Range. When you are ready to print labels or disk, simply check the“Print Barcode”, “Intelligent Mail” and “Upload to ACCUTRACE” boxes in the Print Settings window, thenclick Print or Continue to upload the tracking codes to our ACCUTRACE server.
ACCUTRACE Setup Procedures1. Activate ACCUTRACE using the Registration Serial Number and instructions provided in an emailedfrom activate@accuzip.com.- When you click the ‘Activate’ button in the Activate Product window, you will be prompted to entera Mailer ID and Serial Number Range. You can find this information in email fromnoreply@accuzip.com.2. From the Additions Menu choose ACCUTRACE Setup - If you use our Licensed NCOALink , the username and password information will already appearin their respective fields, otherwise check for an email from ncoalink@accuzip.com for thisinformation.3. Copy the ‘Customer ID’ from the noreply@accuzip.com email and paste this 36-character ID intothe ‘Customer ID’ box.4. Click ‘Test Connection’. A test file will be uploaded to the ACCUTRACE server so you can login andsee it in your ACCUTRACE portal. If you see a “Testing was successful!” message in the ‘ConnectionStatus:’ area, you are good to go and can click Save.5. Login to ACCUTRACE using your credentials from the email sent to you from noreply@accuzip.com.- The Job Summary List is updated automatically every 5-minutes, on the 5-minute mark, so youmay have to wait up to five minutes to see the Test Job.IMPORTANT: Before you can begin using ACCUTRACE, please complete this Informed Visibility MailTracking Data Delegation Request form and email it to iv@accuzip.com. We’ll send this to the USPSInformed Visibility Department, who will authorize scans from your Mailer ID to be pushed toACCUTRACE. At that point, scanned IM Barcodes containing your Mailer ID should start appearing inACCUTRACE.View the Featured Webinar on the AccuZIP6 MID Setup process.
You are ready to begin processing files and tracking 100% of your trackable mail, 100% of thetime.Login or Click on JOB GUID LinkLogin to the ACCUTRACE portal Once logged in, you will see all of the jobs uploaded within the last year,ordered by the Date Mailed. You can alternatively click on the Job GUID provided by the ACCUTRACEadministrator for your account to securely view a particular jobWhen you login to the ACCUTRACE portal, the most recent mailing will appear first. Select the mailing youwould like to track by clicking anywhere on the row.
Tracking Progress – It’s Simple!Once you drop the mail at the Post Office and they scan the first container or mail piece, ACCUTRACE comesto life so you can track 100% of your trackable mail in real-time. Your job results are available 24/7 andupdated each hour. Job reports auto refresh every 60 seconds!DashboardThe Dashboard displays four (4) charts that update every 60-seconds with new scans (if applicable) for real-timetracking.The following reports are displayed on the Dashboard by default:1) In Home Delivery report2) Results by State report3) By First Scan report4) Out for Delivery report
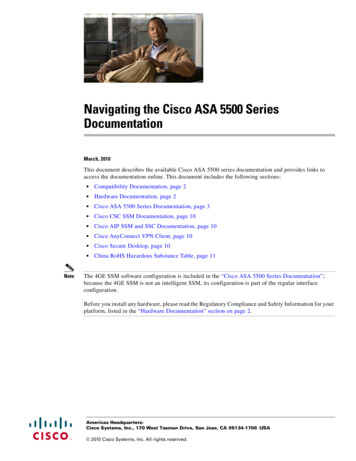
The Detail button at the bottom-left of each report can be used to see the Job Report Details and export thereport to a CSV. Below are pictures and definitions of the interactive charts and maps you can select from theACCUTRACE Dashboard.In Home Delivery Performance report:This report will show 100% of the USPS scans that are categorized as Early, On Time, Late, En route orReturns, along with Not Scanned mail-pieces. Scans that are considered Early, On Time or Late are based onthe default 3 to 7 day delivery window that is set in the Job Start and Job End Date in your dashboard. You canmodify the Job Start Date and Job End Date in the dashboard (if you have Administrative access) and the “InHome Delivery Performance” graphic will update accordingly. For instance, if you mailed your promotion onMonday (Job Mailed Date) for an event the following Monday (Job End Date), then any mail delivered afterthe following Monday would be considered “Late”.
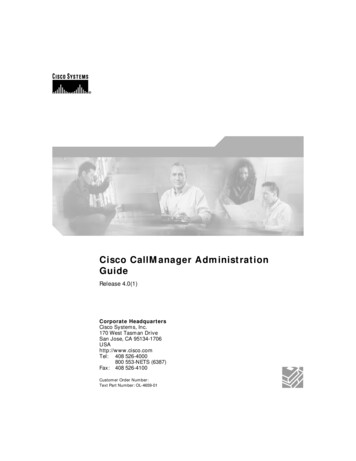
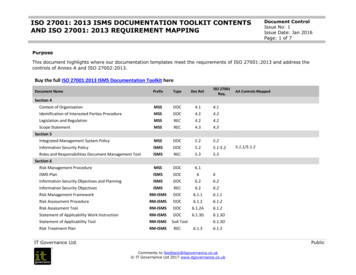
Results by State report:This report is a global view of all 50 states and the percentage of mail that has received at least one (1) scan.The lighter the shading of color, the fewer pieces in that state have received at least one scan. Click on a Stateto see all of the Counties for that State. Click on a County to see a list of ZIP Codes within that County. Click ona ZIP Code to see a list of mail-pieces within that ZIP Code and the final click on the mail piece will show you allof the USPS scans for the mail piece.First Scan report:This report charts all of the mail-pieces that received their initial scan. The initial scan will indicate that themail is now in the hands of the USPS and is going to begin processing through the mail facilities on its way tothe final destination.
Out for Delivery:This report indicates the mail-pieces that are on the mail carriers’ truck, and scheduled for delivery. Thisinformation is based on a final “physical” or “logical” scan from the USPS, that the mail was put on the mailcarrier truck that day (final physical scan) or is about to be delivered (final logical scan).
Logical Delivery Events and Predicted Delivery reported on the Out forDelivery ReportsACCUTRACE has integrated USPS Logical Delivery Events and Predictive Delivery Data into the ACCUTRACE UIand Reports. The Logical Delivery Events and Predictive Delivery Events bars are located on the “Out forDelivery” Report and will soon be added to the “Results by First Scan Date” Report so that ACCUTRACEcustomer partners can see when mailpieces are predicted to be delivered from the very first scan.LOGICAL DELIVERY EVENTS:Definition: Leverages GPS tracking information from USPS carrier hand-held scanners to create logical deliveryevents.ACCUTRACE End-User Advantage: Gives insight into when your mail is delivered without the need for aphysical scan. This helps fill in visibility gaps, giving you powerful end-to-end tracking capabilities.PREDICTIVE DELIVERY:Definition: USPS calculated date that predicts when the mail-piece is likely to go out for delivery based onhistorical and recent service performance data for that mail profile (mail class and shape) for that origin anddestination pair. It will be calculated when the first manifest or scan is available to the USPS and updated witha revised prediction for each subsequent visibility event.ACCUTRACE End-User Advantage: USPS accumulated historical performance results build predictive deliveryevents which can become a great planning tool to aid meeting in-home delivery targets and be valuable inmaking adjustments to mail plans due to last minute changes to production schedules. Predictive DeliveryEvents are based on published service standards for the particular class and size of mail.These new data points give mailers unprecedented visibility into jobs and opportunities to better plan theirmailings ahead of time and to coordinate other channels to arrive before the mail, as well as after it.
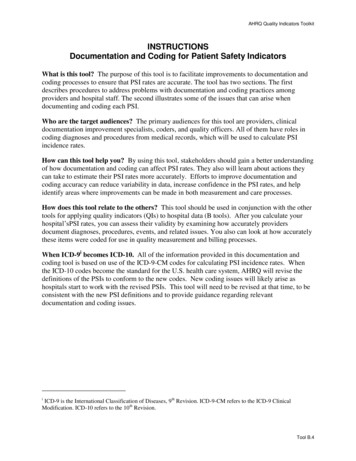
Drill Down to the Piece Level and Map it!Free Google Maps IM Barcode Scan LocationsWatch the mail piece as it travels across the United States to its final destination. ACCUTRACE plots all scanpoints from the BMEU drop to the Delivery Point of the Final Destination.After logging into your portal and selecting a job from the Job List Summary, the Job Detail window willdisplay the “In Home Delivery Performance” report.1. Select “Results by State” from the “Job Reports” drop down.2. Click on one of the States that appear in a darker green color. You can also click on the Report icon to the leftof the State abbreviation.3. The click-action will force ACCUTRACE to “drill-down” one level, from the State level to the 3-Digit ZIP Codesin the State. The 3-Digit ZIP Codes listed represent mail pieces in your mailing.4. Click on the Report icon next to the 3-Digit ZIP Code to drill down to the 5-Digit level.5. Click on the Report icon next to the 5-Digit ZIP Code to drill down to all of the mail-pieces that were mailedto the same 5-Digit ZIP Code.6. Click on the Report icon next to the mail-pieces delivery point barcode to see all of the IM Barcode Scans forthat particular mail-piece. Here you can see all of the Scan Date & Time, District Name and ZIP Code of thefacility that scanned the mail-piece, the type of equipment that scanned the mail-piece and if the mail-piece isout for delivery or not. If the Status is equal to 1, the mail-piece is out for delivery because the 1 represents a“Stop Scan” which is typically the last scan before the mail carrier receives the mail-piece.Notice that each time you clicked to “drill-down” a breadcrumb was placed above the view. This allows you toquickly go back to a previous drill-down quickly.7. Click on the 5-Digit ZIP code breadcrumb to see the mail-pieces again.8. Click on the Map icon to see all of the USPS Scans and QR Code Scans plotted on a free Google Map .Note: Green pins indicate USPS Scans while Yellow pins indicate QR Code scans.If the mail-piece contained a QR Code that was created by ACCUTRACE and the mail recipient scanned it,the QR Code Scan icon (located between the Report icon and Map icon) would eliminate Red.
These are just a few of the reports in the powerful ACCUTRACE Mail Tracking and Reporting system. If youwould like to learn more about these or other reports and capabilities of ACCUTRACE, please do not hesitateto contact us! www.accuzip.com/support
The ACCUTRACE QR Code (a.k.a. 2D Barcode)Generate “Piece Level” QR Codes easily with ACCUTRACE. Piece level QR Codes allow you to track the actual piece ofmail or contact that was scanned. The scan triggers an immediate ping to your ACCUTRACE account so you have virtualreal- time notification of 100% of each QR Code scan. Follow these steps to Create a “Piece Level” QR Code string andadd this string to the AccuZIP6 5.0 database so you can print the QR Code in AccuZIP6 5.0 or Export the string to printthe QR Code in other applications.1.2.3.4.5.6.7.8.Login to your ACCUTRACE portal.Click on the icon to the left of the job you want to create QR Codes for and the Job Detail view will appear.Select “Create Tracking URLs” from the Job Reports drop down.Enter the Default URL for the Website or YouTube , or whatever default re-direct you want to use , e.g.,http://www.accuzip.com- This is the default redirect for the QR Code. If the Tracking Codes file do not contain “Piece Level” RedirectURLs, then this URL will be used for the redirect.Check “Request Location” to create the QR Code string.- Request Location will prompt the mobile phone customer with a Allow/Don’t Allow message for theirGeocode Location.- If Request Location is not checked, or if the mobile phone user presses “Don’t Allow” when prompted,ACCUTRACE will still return the Geocode location for their IP Address for an approximate QR Codelocation.Click Export and choose CSV from the popup that appears.A file named “export.csv” will be created.- If an export.csv file already exists, the new export.csv will be named “export (1).csv”, “export (2).csv”, etc Choose an option below:11 P a g e
- Option A: The Tracking Codes were uploaded as a result of a Presort by clicking Labels from the Print Presortwindow:o Move the “export.csv” file to the Presort Folder and rename it to “presort.qrc”. *o From the Print Presort window click Print Labelso The QR Code String from ACCUTRACE is automatically added to the AccuZIP6 5.0 presorteddatabase. You should see the new field named “userpcqr”.- Option B: The Tracking Codes were uploaded by choosing File Print Labels.o Move the “export.csv” file to the original database folder and rename it to “databasename.qrc”. * Note: “databasename.qrc” should be changed to the exact name of your database name,just use “.qrc” as the extension.o From the File Menu, choose Print Labelso The QR Code String from ACCUTRACE is automatically added to the AccuZIP6 5.0 presorteddatabase. You should see the new field named “userpcqr”.*For those who have file extensions hidden (Tools menu Folder Options Hide Extensions View tab HideExtensions for Known File Types) , I’ve found that when someone tries to rename export.csv to databasename.qrc orpresort.qrc, they don’t end up changing the extension of the file, because the extension isn’t displayed. Therefore, thechange causes the file to be named presort.qrc.csv, leaving it as a .qrc file, and not having the populated userpcqr fieldadded to the file.You can now Print the QR Code with AccuZIP6 5.0 or Export the QR Code String and use it with other applications thathave a QR Code Encoder and Font.Print the QR Code with AccuZIP6 5.0AccuZIP6 5.0 can create a static or variable QR Code image and print it on a Report or Label.1. Before you can Print the QR Code with AccuZIP6 5.0, you must create and merge the QR Code with the AccuZIP65.0 database or presort by following the Steps (above).2. Choose an option below to open the Print Settings window:- Option A: From the Print Presort window click Labels- Option B: From the File menu, choose Print Labels3. Select “Label Format” from the Output drop down4. Select “5164 with QR Code.lbx” from the Template drop down5. Click PrintYou can Edit this template and copy the QR Code box and paste the box into any Label or Report Template to print theQR Code using the data in the “userpcqr” field. If you have another field in the AccuZIP6 5.0 database that you want toprint the QR Code from, double-click on the QR Code box and change “userpcqr” to the field name you want togenerate the QR Code from.Always verify the QR Code before printing all of your mail pieces using aSmartPhone or QR Code Scanner.12 P a g e
Piece Level URL RedirectsThis unique and powerful feature gives you the ultimate control for what the mail recipient sees on theirmobile phone when they scan the ACCUTRACE QR Code.Each mail piece in ACCUTRACE can have its own redirect URL!! All of the redirects are handled byACCUTRACE. The redirect information is NOT in the printed ACCUTRACE QR Code. This allows you to changethe redirect at any time, even after the mailing has been printed and dropped at the post office.If you want to use the same URL redirect for the entire mailing, then you can ignore this section. Instead, afterthe job is uploaded, you can enter the Job Default Redirect URL from the Job Detail view in the ACCUTRACEPortal by selecting the “Create Tracking URLs” from the Job Reports drop down. Enter the job level redirect inthe URL: text box. This URL is used anytime the “Piece Redirect URL” column is empty for a given mail piece.Setup 1. From the Edit menu, choose Fields 2. Insert a new field and name it “USERPCURL”. Set the field type to Character with a width up to 254, orset the field type to Memo for longer URL’s.3. Enter a URL specific to the mail recipient into the USERPCURL, e.g., http://www.accuzip.comScenarios-Real Estate Agents - Each mail piece could have a specific redirect to a specific Real Estate AgentPizza Restaurant – Each mail piece could have a specific redirect to the closest Pizza Restaurant tothe mail recipient’s mailing address.Discount Coupon – Each mail piece could have a specific redirect for a varying discount based onthe distance from the mailing address and the store location.YouTube video – Each mail piece could have a specific redirect to a certain YouTube video basedon the industry type.Customer Relationship Management – Each mail piece could have a specific redirect based on ifthey are a current or potential customer.Setup “Alerts” from the ACCUTRACE Portal in the Job Detail view. Alerts can be immediate upon an IMBarcode or QR Code scan, or setup to alert every hour or once a day.13 P a g e
Piece Level Email and TextingThis unique and powerful feature gives the mailer the ultimate control on who receives the email or text alertnotifications when an IM Barcode is scanned by the USPS or ACCUTRACE QR Code is scanned with a mobilephone.Each mail piece in ACCUTRACE can have a unique email and/or text phone number to whom will receivethe alert notifications.If you want to use the same Email and/or Text phone number for the entire mailing, then you can ignore thissection. Instead, after the job is uploaded, you can enter the Job Email(s) from the Job Detail view in theACCUTRACE Portal. Enter the job level Email and/or Text numbers, separated by a comma in the JobEmail(s): text box. This information is used anytime the “Piece Email and/or Text” column is empty for agiven mail piece.Setup 1. From the Edit menu, choose Fields 2. Insert a new field and name it “USERPCTXT”. Set the field type to Character with a width up to 254, orset the field type to Memo for longer email and text phone number strings.3. Enter Email addresses and/or Text phone numbers separated by a semicolon specific to the mailrecipient into the USERPCTXT, e.g., noreply@accuzip.com; 8059999999@txt.att.netNow each time an IM Barcode is scanned and/or a QR Code is scanned by a smart phone, an Alert messagecan be sent via email and/or text message immediately!14 P a g e
Piece Level User IDThis unique and powerful feature provides the mailer with the ultimate visibility when an IM Barcode isscanned by the USPS or ACCUTRACE QR Code is scanned with a mobile phone.Each mail piece in ACCUTRACE can have a unique User ID that can be used to identify the mail recipient tothe mailer when an IM Barcode is scanned by the USPS or ACCUTRACE QR Code is scanned with a mobilephone. The User ID field can contain information such as the mail recipients name and phone, or mailerspiece ID or whatever value you want to identify the mail piece when it is scanned and the Alert is received.If the User ID field contained the mail r
Note: Green pins indicate USPS Scans while Yellow pins indicate QR Code scans. If the mail-piece contained a QR Code that was created by ACCUTRACE and the mail recipient scanned it, the QR Code Scan icon (located b