Transcription
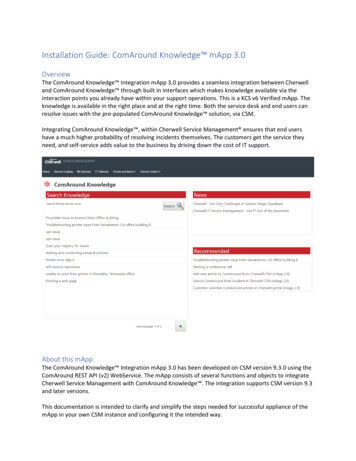
Installation Guide: ComAround Knowledge mApp 3.0OverviewThe ComAround Knowledge Integration mApp 3.0 provides a seamless integration between Cherwelland ComAround Knowledge through built in interfaces which makes knowledge available via theinteraction points you already have within your support operations. This is a KCS v6 Verified mApp. Theknowledge is available in the right place and at the right time. Both the service desk and end users canresolve issues with the pre-populated ComAround Knowledge solution, via CSM.Integrating ComAround Knowledge , within Cherwell Service Management ensures that end usershave a much higher probability of resolving incidents themselves. The customers get the service theyneed, and self-service adds value to the business by driving down the cost of IT support.About this mAppThe ComAround Knowledge Integration mApp 3.0 has been developed on CSM version 9.3.0 using theComAround REST API (v2) WebService. The mApp consists of several functions and objects to integrateCherwell Service Management with ComAround Knowledge . The integration supports CSM version 9.3and later versions.This documentation is intended to clarify and simplify the steps needed for successful appliance of themApp in your own CSM instance and configuring it the intended way.
*If you are running a version of CSM earlier than 9.3, contact ComAround and we can assist you infinding a solution.Intended audienceThis mApp is easily installed and configured by your Cherwell Administration team. This mApp providesall the objects, one steps, expressions, and dashboards that are needed to perform a basic integration.New featuresThe 3.0 version of the mApp is all new with feature enhancements based on the feedback fromcustomers. A few of these improvements are listed below.Codeless and simplified configuration – Using the new ComAround Settings, you have full control of theintegration settings in one place. Also, most of the setup is pre-built so it requires minimal effort fromcustomers to get it up and running. Benefit: Quick and effortless to setup.Generic or personalized authentication – You are now able to use your personal ComAround accountand connect it to your Cherwell profile. Enabling individual reporting, metrics, and so on. Benefit: Betteroverview and easier to keep track and manage reporting.API v2 – the new mApp uses ComAround’s new API with more features and capabilities. Benefit:Enhanced capabilities allowing customers to extend the mApp integration if they want to.Flexible ComAround Search – Allow customers to show the ComAround search results either in theincident view or in a tab below the incident for agents. You can now use the results in an embeddedcontrol which allows a more consistent user experience when used in multiple places. Searchsuggestions are shown, when misspellings are detected, and are clickable to adjust the search query.Benefit: No matter how your incident forms look, there is a ready-made solution you can use.ComAround History – Automatically tracks all ComAround interactions from both the agent and portal.Enabling you to pull reports and information on the usage in Cherwell. Benefit: Easier work for coachesand managers to stay on top of the performance and usage.Link Incidents to ComAround articles – When using articles to resolve incidents we utilize the “LinkIndicator” feature in ComAround to show which incidents were resolved by specific ComAround articles.These can be found in ComAround Knowledge . Benefit: Helps coaches and managers easier identifyhigh value articles and make sure the organization spends time and resources on the right tasks.Enhanced Cherwell portal functionality – You are now able to place Recommended and News articleslists in the Cherwell portal for users. Benefit: Improved user experience and satisfaction.Knowledge State visibility – You can choose which articles, based on knowledge states, should show upin Cherwell for the agents when referencing ComAround. Benefit: Greater control and better workflowfor the agents using Cherwell, resulting in more correct and consistent responses.Share articles via built-in email feature in Cherwell Incidents – Agents now have the capability to sharean article from ComAround with customers by clicking a button from a Cherwell incident. Benefit: Fasterand more efficient agent workflow, resulting in faster response times to customers.
Steps to Implement the ComAround Knowledge Integration 3.0 mAppThis is a step by step instruction on how to successfully implement the ComAround KnowledgeIntegration in your Cherwell Service Management Platform instance. This assumes that your system isclose to the out of the box experience.1. Download the ComAround Knowledge mApp 3.0 from the Cherwell mApp Exchange.2. Obtain ComAround Knowledge credentials.To set up the integration to work with your Organization's ComAround Portal, you need toprovide your specific credentials for this portal.a. You need to create a free account at https://connect.comaround.com/, and subscribe tothe Basic Product. Once approved you will get the ComAround Subscription Keysneeded for the setup.b. You will also need a username and a password for access to your specific ComAroundKnowledge portal. One set of credentials with knowledge worker access, and anotherset of credentials with reader access. This can be obtained from your internalComAround Admin.c. If you have issues obtaining these credentials, please contact ComAround Support andrequest those credentials.3. Back up your system if you prefer. According to Cherwell Best Practice, it is recommended thatorganizations perform a system backup, and appropriately test new mApps in adevelopment/test environment before using them in a production environment (optional).4. Apply the mApp by following the mApp Wizard and have it create a blueprint (if it promptsyou about name conflicts, click next to continue).5. In the blueprint, add the controls to the incident forms in default and portal views from theComAroundControls form on the Incident Object. Use copy paste from ComAroundControlsinto your Incident form for example. Position the “Search” button and “Create ComAroundArticle from ticket” link as appropriate. Remove the “Submit to knowledge base” link if desired.6. Add the search results display to the incident forms in the default and portal views from theComAroundResults form on the Incident Object.We recommend you add this as an embedded form control rather than copying the individualpieces to the main forms. To do this, in the left column titled Controls click Special, and thenEmbedded Form. Use the Expression radio button and type in the exact name(ComAroundResults). Make sure to uncheck the read-only check box. If you do not have muchspace on the incident form to position the search results, you can place the ComAroundResultsin the tab section if that makes more sense.7. Update the portal dashboards. You should update your portal to use the new ComArounddashboard, found under Global- ComAround Knowledge Integration v3- ComAroundKnowledge. On this dashboard you will find both the Search and Search Results for the portalside, as well as the News and Recommended lists from your ComAround instance. There arewidgets here that you can edit if you want to view more detail about associated One-steps andhow they work.8. Publish the blueprint.9. Grant security rights to portal users on ComAround History, as they need the ability to add andview records. Open the Admin client of Cherwell again. Go to Security. Click Edit Security groups.Update your portal user security groups. As an example, click in the drop down next to Groupand choose Portal Customer. Go to Business Objects. In the Business Object drop down, choose
ComAround History. Check the boxes under General titled View and Add. Click on New Field inthe left list. Check the View and edit boxes. Depending on your setup, you may want to do thesame for several groups (any portal groups that need to use ComAround).10. Log into the Cherwell client.11. Create a ComAround Settings record. Log in as an admin in the blue client. Go to Tools TableManagement. Where it says Type, choose “ComAround Setting”. Create a new record. Fill inboth the ComAround API keys (Primary and Secondary). For the Technician side, choose thelogin method. You may either choose individual logins per agent (which they will only need to fillin once), or choose one generic account for all to use. Fill in an admin username and passwordfor ComAround Knowledge . If you are using a generic account, this will be used for allsearching and article usage. If you are using a “per user login”, the credentials are used for theNews and Recommended widgets. You can choose to enable sharing Published ComAroundarticle links via email. You can choose to display the search results in a tab. Choose the numberof search results to display. Choose which article knowledge states to display as well. For theCustomer portal side, fill in an end user username and password for ComAround Knowledge .For paging through search results, set the navigation orientation as either left/right or up/down.Once complete, remember to save and then activate it at the top of the settings.12. Close the Cherwell client, very important!!
13. Create two scheduled jobs to enable updates to the ComAround lists for News andRecommended articles. Go to Scheduling Edit Schedule. Click Add. Under General, type in aName (ex. ComAround News). Under Schedule, click the Recurring radio button, choose whattime you want this to update (we recommend once per day). Click the No end date radio button.Under Action, choose One-Step in the drop down. Locate the pre-configured One-Step asdescribed below:a. Update the ComAround News articles nightly, call one-step (None)- Global ComAround Knowledge Integration v3- CKI Load News.b. Update the ComAround Recommended articles nightly, call one-step (None)- Global ComAround Knowledge Integration v3- CKI Load Recommended.The last step is to go to Error Handling. Here you check the box called “If scheduled item fails,still schedule next run”. This makes sure the updates do not stop if an error should occur.This should complete the setup. You are now ready to test the integration. From here you can customizeit to better suit your needs and environment.Tips and recommendations We recommend you use both the primary and secondary ComAround API Subscription keys inthe ComAround Settings. The primary key from the rich/browser clients, and the secondary keyfrom the portal. Although, you could put the same key in both.In the ComAround Settings, clients can choose to either use a single login account to do allsearches, link articles and create articles, or use a different login Per User for tech users. Thiswill impact the metrics logged in ComAround’s Business Intelligence reporting.
and connect it to your Cherwell profile. Enabling individual reporting, metrics, and so on. Benefit: Better overview and easier to keep track and manage reporting. API v2 – the new mApp uses ComAround’s new API with more features and capabilities. enefit: Enhanced capabilities allowing