Transcription
Gateway3.0BUSINESS SERVICES GATEWAYVersion 3.0 Release 8.1.2011GatewayUser’s Manual
Table of Contents –Gateway – Getting Started. 1System Requirements . 1Gateway Login . 2The Menu System . 4Using Data Grids. 7Using Reports . 14Summary. 16Gateway – Account (Menu) . 17Account Status . 18Account Manager . 19User Logins . 20Account Utilities . 21Gateway – Credit Cards (Menu). 22Virtual Terminal (Credit Card Transactions) . 23Virtual Terminal Settings . 34Credit Card Transaction - Example . 35Holding Queue . 39Authorized Queue . 40Batch Transactions . 41Batch Groups . 41Batch Queue . 43Settlement Queue . 45Settlement History. 47Transaction History . 48Reports. 49
Table of Contents (Continued )Gateway – Checks (Menu). 50Virtual Terminal (Check Transactions) . 51Virtual Terminal Settings . 60Credit Card Transaction - Example . 61Settlement Queue . 64Transaction History . 65Reports. 66Gateway – Rolodex (Menu). 67Rolodex Records . 68Adding a new customer . 69Adding Credit Cards. 72Adding Checks . 74Transaction from a Rolodex Record . 76Rolodex Reports . 77Gateway – Help. 78Frequently Asked Questions . 79User’s Manual . 80Support Options . 81
G E T T I N G1SectionS T A R T E DGateway -- Getting StartedThis section will help you get started using the Business Services Gateway, with information aboutusing the secure online system and an overview of functions that are available once you’re loggedinto the system. The Business Services Gateway is designed to enforce security; PCI standardsare strictly followed. One main part of the security system in place is the user login. Along withdefining which merchant account is to be used, specific user logins can allow or restrict certain activitiesand options available to the user.System RequirementsThe Business Services Gateway (Gateway) is fully browser based. Any computer system equipped withthe ability to reach the website has the minimum requirements for usage. The Gateway supports thefollowing browser applications: Microsoft Internet Explorer, Google Chrome, Mozilla Firefox, andApple Safari. These are the preferred browsers of 98% of Internet users. Certain older versions of thesebrowsers may not be supported due to unsupported security or usage features. The Gateway will notifythe user if an outdated or unsupported browser is detected.A high-speed Internet connection is strongly recommended. Dial-up access is a feasible option, but thestability and speed limits the user's ability and experience when using the system. Dial-up access is alsoextremely slow with many of the advanced Gateway features.All browsers that are used to access the system should be configured to allow secured site access (oftenreferred to as SSL—Secure Socket Layer) and have cookies and Java script enabled. These are commonsettings with most of the recent browsers.Pop-up blockers should be disabled when accessing this site. These pop-up settings are commonly setwhen the user first uses the Website. By answering ―Allow‖ to the pop-up blocking prompts when usingthis site, these blocking systems learn that the Gateway is a trusted site.Additional hardware may be used in conjunction with this site. These items include magnetic stripereaders, receipt printers etc. and are available through the Gateway supply store.Copyright 2011, Synapse Corporation. All Rights Reserved.1
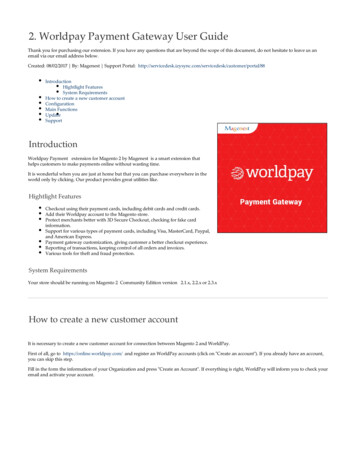
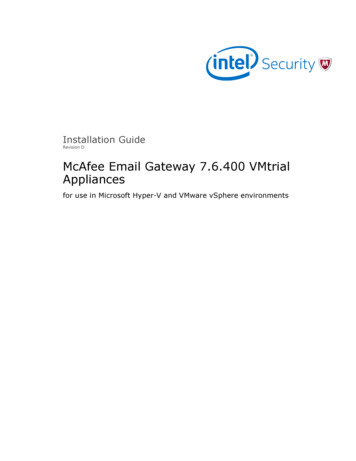
G E T T I N GS T A R T E DGateway LoginThe secure Web address for logging into the system is www.SynapseGateway.net.When you go tothis Web address (or a specific Web Address supplied by your processor), the Business Services Gatewaylogin screen will be displayed in your browser.Header / ContactGateway LoginAnnouncementsLogin Page AreasThe login page consists of three areas: Header / Contact Area – Depending on the website address used (supplied to you by yourprocessor), the header and contact section will display information for your account. Thisinformation can include processor name/logo and phone/email contact information.Copyright 2011, Synapse Corporation. All Rights Reserved.2
G E T T I N G S T A R T E DGateway Login Area - The login consists of theuser’s IP Address display (which the system willdetect, so it should automatically appear in the IPAddress box), and entry boxes for your unique userAccount ID, Username and Password, which youwill need to type in each box in order to log into thesystem.Before pressing Login, please read the ―GatewayTerm of Usage Agreement‖ by clicking on the link(of the same name) located above the Login button.Once you have read and agree to the terms of usage,you will need to click the ―I Agree ‖ checkbox.This checkbox setting will automatically beremembered the next time you login. The user canalso instruct the site to also save the Account ID andUsername by checking the ―Remember ‖ checkboxes. (The Password cannot be saved in thismanner.)The Gateway also includes user assistance for forgotten login information. Simply click one ofthe ―I forgot ‖ options and follow the process.NoteThe Account ID, Username and Password boxes can be case-sensitive; make sure you havethe correct case for each letter typed in these entry boxes, otherwise you will get an errormessage saying the login information is incorrect. Announcements Area – Messagesfrom your processor and Gateway aredisplayed in this area. Messages areoften related to information aboutupdates and new features in theGateway, scheduled maintenance for theGateway, and important PCI (PaymentCard Industry) rules that have/arechanging.Information about special services andproducts pricing will also be displayed inthis screen section.Copyright 2011, Synapse Corporation. All Rights Reserved.3
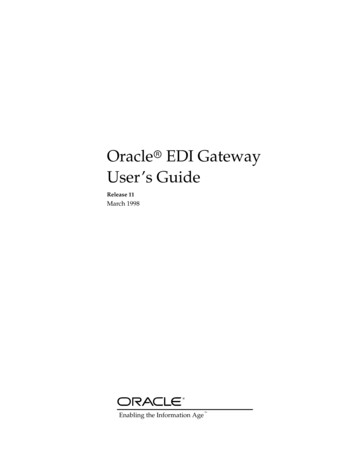
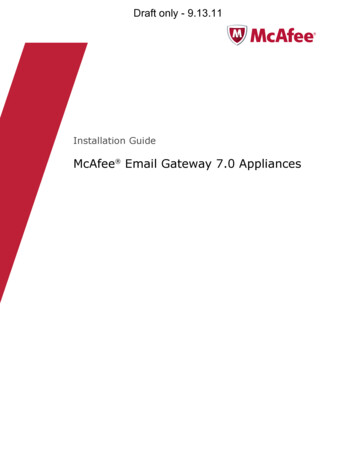
G E T T I N GS T A R T E DThe Menu System –Once you have successfully logged in, the Menu System screen will be displayed. Based on your login andthe account settings established for your account by your processor, specific menu options will appear.The system is also configured to start your gateway session at a selected default screen. Defaults screens(functions) include the Account Status, Virtual Terminal, Settlement Queue, or the Rolodex Records.(The usage for each of these screen functions will be discussed later in this manual.)Menu System InformationThe default menu option (first screen shown after login) in this example is the customer Rolodex Recordsscreen. Before we discuss how this screen is used, we will first discuss the other general functions of themenu system.Menu SystemSelected Menu OptionCopyright 2011, Synapse Corporation. All Rights Reserved.4
G E T T I N GS T A R T E DThe menu system display items include: Dropdown Menu – Main menu items for the dropdown menu include the Account, CreditCards, Checks, Rolodex, Reports and Help menus. (These will be discussed in more detail later inthis manual.) Header / Login Display – The information displayed in this area includes the user’s AccountName (Business Name in most cases), name of the user that is currently logged in, and the nameof the merchant service provider. Logout & Timer – The menu system also includes a Log Out button that when clicked endsthe user’s session and returns the user to the Login screen. Directly above the Log Out button isa timer. It counts down (from a starting period of 20 minutes) how long it has been since the userhas used the gateway. For security purposes and to free forgotten user sessions from theprocessing servers, the user will automatically be logged out of the system after 20 minutes ofnon-use. The timer indicates how much time is remaining before the user is logged out for nonusage.The user is warned when log outis approaching due to non-usage.A message is displayed 30 secondsprior to log out. By clicking on―Continue‖ the session timerreverts back to 20 minutes beforetime out / log out.Session Timeout WarningCopyright 2011, Synapse Corporation. All Rights Reserved.5
G E T T I N GS T A R T E DMenu OptionsThe dropdown menu system navigates the user to all configured Web pages within the Gateway. Eachuser and account type may have different menu options, which will change based on the user’s accountsettings and login. Below is a quick overview of the menu options: (Described in full detail later in thismanual.)Account Status: Displays gateway account informationfor the merchant account and user that is logged in.Account Account Manager:Allows users withassigned administrative privileges, add additional users andmodify account settings and options.Account Utilities: Selection of utilities for importingand exporting transaction related data.Credit Cards Virtual Terminal: Entry form for creatingand processing a credit card transaction.Credit Cards Holding Queue: List of transactionsplaced on hold and to be processed at a later time.Credit Cards Authorized Queue: List of transactionscurrently authorized for an initial amount, but the amountmay change and the transaction is not yet ready to settle.Credit Cards Batch:Entry and processing ofpredetermined transactions in groups. (i.e. monthly billings)Credit Cards Settlement Queue: List of processedtransactions waiting to be settled (either manually settled bythe user or automatically settled by the Gateway nightly).Credit Cards Settlement History: List of historicalbatches of transactions settled.Credit Cards Transaction History: Historical list offully settled transactions (also declines and voids).Checks Virtual Terminal: Entry form for creating andprocessing a check transaction.Checks Settlement Queue:transactions waiting to be settled.List of processedChecks Transaction History: Historical list of fullysettled transactions.Rolodex Records: List of customer accounts withinthe rolodex. (Used for an easy and fast method ofcreating new credit card or check transactions.)Help Options: A listing of frequently asked questions,the user’s manual, and support information.Additional Services: A listing of other servicesincluding Gateway compatible devices, softwareand more Log Out: Ends the users login session in theGateway. This will require the user to sign/logback in to use the Gateway again.(Each menu option will be described in detail in the next sections of this manual.)Copyright 2011, Synapse Corporation. All Rights Reserved.6
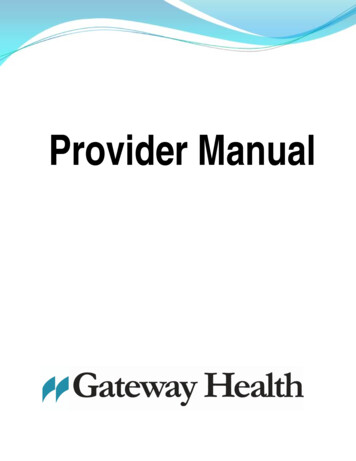
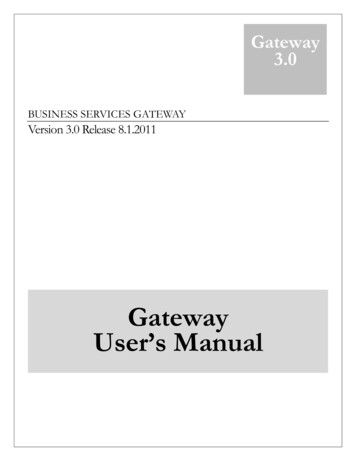
G E T T I N GS T A R T E DUsing Data Grids (Lists/Queues)As the user accumulates transaction data within their Gateway account, the ability to search for specifictransactions (or customer rolodex records) would become harder and harder without the ability to sortand filter the long listings of data. This section describes the general use of Data Grids used throughoutthe Business Services Gateway.Each Data Grid in different parts of the Gateway is used to display specific information. For example –the Transaction History menu option is a list of all the past transactions processed using the Gateway.When the Transaction History option is pressed, a Data Grid displaying all the past transaction historywill be displayed for the user to review. The general use for finding particular records in the TransactionHistory (or any other menu option using a Data Grid) will be described in this section.For this example we will be using the Customer Rolodex Grid, which is generally used to store contact,address, and credit card data that will be frequently used to create new transactions.Data Grid Controls – (Customer Rolodex Example)Rolodex GridAll Data Grids have many characteristics in common. Studying these Data Grid usage features willshorten the user’s learning curve. Much of what is learned by operating any one Data Grid within theGateway can be applied to all other grids.Copyright 2011, Synapse Corporation. All Rights Reserved.7
G E T T I N GS T A R T E D(Rolodex Grid continued )Grid TitleRecord ControlsAction ControlsNavigation ControlsGrid SettingsAgain, all Data Grids have many characteristics in common. Studying these Data Grid usage features willshorten the user’s learning curve. Much of what is learned by operating any one Data Grid within theGateway can be applied to all other grids. Some grids have slightly different controls than others, but allcontrols are grouped in similar locations for the user’s convenience.Grid TitleThe Grid Title area describes the general content of the data displayed in the DataGrid. In this example, the grid is displaying customers saved to the Rolodex Recordlist.Record ControlsThis group of controls allows the user to perform record-related tasks. In thisexample the user can Add a new rolodex record, Edit an existing record, or Deletean existing record. When Add or Edit is selected, the detail information screen isdisplayed for adding/editing. (Discussed in a later section of this manual.) OtherGrids (i.e. Transaction History) may have different record controls (like reprintingreceipts).Action ControlsThis group of controls allows the user to perform tasks with the selected record. Inthis example, the selected rolodex record can be used to populate data into a newTransaction or Batch transaction record.NavigationThis group of controls allows the user to navigate though the multiple pages ofrecords that are stored in each grid. First, Prior, Next, Last page movements (or amove to a specific page number) can be performed.Grid SettingsThis group of controls allows the user to specify the number of rows to display in thegrid, specify the column data to be displayed, and save the settings selected.(Following is an example of different grid settings.)Copyright 2011, Synapse Corporation. All Rights Reserved.8
G E T T I N GS T A R T E DGrid SettingsCustomization of data grids is a very convenient featureincluded in the Gateway system. Manipulation of thenumber of rows displayed on a grid and the columns ofinformation fields (along with their order and size) canboth be accomplished and saved for future visits usingthe Grid System controls.ColumnsWhen the user selects the Columns settings, a smallwindow will appear showing all columns that are notcurrently displayed on the grid.To add one of the fields (columns) to the grid display, theuser can simply drag the column from the ―Chooser‖window onto the grid in the position the user would like itdisplayed. To remove a grid column, the user drags thecolumn back to the ―Chooser.‖Moving and sizing columns can be done in a similarmanner, but there is no need to open the field chooser.Remember to save your layout to retain the column configuration chosen.Copyright 2011, Synapse Corporation. All Rights Reserved.9
G E T T I N GS T A R T E D(Grid Settings continued )RecordsWhen the user selects the Records settings, a smallwindow will appear showing available numbers for rowson the grid. (10 is the default.)By selecting a different number of rows (records per page),the user can view more information per screen.The examples below show 10 and 20 records per page.Remember to save your layout to retain the row configuration chosen.LayoutWhen the user selects the Layout settings, a small windowwill appear allowing the user to Save the current way thegrid is set up, Delete the settings, or revert back to theDefault settings defined by the system.The settings are saved on the user’s computer as acookie; thus permission to save cookies must beturned on within the browser.Copyright 2011, Synapse Corporation. All Rights Reserved.10
G E T T I N GS T A R T E DGrid SortingThe user can sort the information contained in the grid by clicking on the column header (field) that theywish the sort to be performed on. For example, if the user wants the Customer Rolodex to be sorted bythe contacts’ last names, then the user will click on that column’s header box. To reverse the sort (Z to Ainstead of A to Z), the user just clicks the column header again. A secondary sort (i.e. first sort by statethen by zip code) can be accomplished by holding down the shift key and selecting multiple columns inthe order needed.Note - Remember to save your layout to retain the columns configuration chosen.Copyright 2011, Synapse Corporation. All Rights Reserved.11
G E T T I N GS T A R T E DGrid FilteringThe user can find a desired record by filtering all the records within the Data Grid using the entry boxeslocated just below each field header (column title). Filters can be applied to one or multiple data columns.For example, to find a particular record (let’s say we only remember that the contact’s first name startswith a ―J‖), the user would type ―J‖ (or ―j‖ – it is not case-sensitive) in the filter box just below the FirstName Field Header. The Grid will then show only accounts where the customer’s first name begins with―J.‖ Depending on the number of records in your Cu
Credit Cards Virtual Terminal: Entry form for creating and processing a credit card transaction. Credit Cards Holding Queue: List of transactions placed on hold and to be processed at a later time. Credit Cards Authorized Queue: List of transactions c