Transcription
SCANNING / INDEXINGUSER REFERENCE GUIDEThis guide can be found at: aspx
ContentsScanningAccessing the Document Imaging WindowDocument Imaging Window OverviewRight-Click MenusDocument PreparationScanningIndexing Dialog Box OverviewCreate a Scan FormatScanner Properties Dialog BoxDocument Setup Dialog BoxFile Format SetupImage Processing SetupIndexingIndexing a BatchAdding Multiple Keyword ValuesIndexing ToolbarScan Additional Pages into a DocumentDelete Reorder PagesDelete Reorder toolbarCreate New DocumentZoomCommittingCommitting BatchesModifying Keyword ValuesModifying Document Type Value (Re-index)
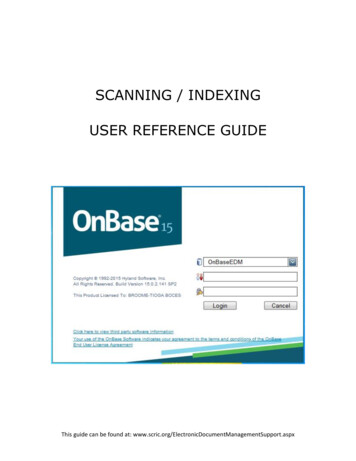
Double click the OnBase Client icon to open OnBaseEnter your user name (email address) and your password then click the Login buttonOn first login OnBase will default to the Document Retrieval window.
Accessing the Document Image WindowFor scanning we’ll need to access the Document Imaging Window.From the top menu bar click Processing then Scan/Index to open the Document Imaging window.OR to make the Document Imaging window open automatically open when you loginClick User, User OptionsClick the Startup tabCheck the box next to Scan & un-check the box next to Iconized (so window won’t open in a minimized state)Now the next time you login to the scan station the Document Imaging widow will automatically open.
Document Imaging WindowQueue List Window displays the status of your batches.Awaiting Index: contains batches that are ready to be indexed.Index in Progress: contains batches that are in the process of being indexed.Awaiting Commit: contains batches that have been completely processed and are awaiting verification.Committed: contains batches that have been verified and have been written to the 2nd copy of OnBase.Indexing Dialog Box displays scanning & indexing options for batches & documents.Indexing Status Window displays messages regarding scanning & indexing.Working Window displays scanned document images.Scan Queues: Lists scan queues available to you.Queue List WindowWorking WindowIndexing Dialog BoxIndexing Status Window
Right-click MenusQueue List Window right-click menu options:Refresh: updates the Document Imaging Window with the latest scan queue and batch information.Automatically Refresh: with automatically refresh the Document Imaging Window every 30 seconds with thelatest scan queue and batch information.Working Window right-click menu options:Scan: Pulls documents from feeder tray though scanner and creates image copies in OnBaseScan From Disk: allows you to browse to file, folder, or removable disk. The selected document is imported intoOnBase.Sweep Directory: allows you to browse to file, folder, or removable disk. The selected documents are importedinto OnBase.Index Batch: allows you to select batch within the Scan Queue and index it from there rather than going to theAwaiting Index Queue.Scan Format Setup: used to specify scanner and document settings and preferences.Select Scan Source: used to select the scanner to be used.View Documents: displays list of documents in the batch. Double-click a document to view it in the WorkingWindow.Show Batch Summary: allows you to select a batch and view it’s Batch Summary Report which lists currentbatch status, number of indexed and un-indexed documents, and the time and date each action was performed.Clear Selected: de-selects highlighted item.Refresh: updates the Document Imaging Window with the latest scan queue and batch information.Batch Status Queue right-click menu options: available when working in Awaiting Index, Index In Progress, etc. queues.Availability of options depends on user rights and where you’re at in the process ie. you can’t commit a batch until it’sbeen indexed.Commit Selected: writes the data to the 2nd copy of OnBase.Index Documents: displays document in Working Window and activates the Indexing Dialog Box allowing you toenter Document Type and Keyword values for the documents scanned.Locate Batch: opens a search box and allows you to search the Batch Queue for a specific batch by number orname.Rename Batch: allows you to change the name of your batch.Create List Report: generates a text file with keyword and processing info for each document in a batch.Create Keyword List: generates a text file with keywords from each document in the batch.Show Batch Summary: displays a Batch Summary Report which lists current batch status, number of indexedand un-indexed documents, and the time and date each action was performed.Change Scan Queue: changes scan queue that batch is assigned to.View Documents: displays list of documents in the batch.Clear Selected: de-selects highlighted item.Select Batch Range: allows you to select a range of batches, by batch number, that appear in the WorkingWindow.Purge Selected: only RMO’s (Records Management Officer’s) have the ability to purge. Purged documents aredeleted from the server and are NOT recoverable.Refresh: updates the Document Imaging Window with the latest scan queue and batch information.
Document PreparationMake sure all the documents are complete with no pages missing.Count the number of documents you are planning to scan. After you scan the documents you’ll see a documentcount on the scanning screen. Confirm that the number of documents you counted matches the number ofdocuments scanned.Scan small manageable stacks at a time scanning too many items at once makes the scanner more likely to grab twoor more pages at once causing some pages not to be imaged. You will have the option to click Add More Pagesbutton once scanning is complete.Fan the pages after removing staples to make sure they don’t stick together.When preparing documents it is VERY important to remove all staples, clips, etc. If any have been forgotten it willcause the scanner to jam.The scanner works fastest in portrait mode.Documents should be placed in the scanner face down with the top of the document in first so when scanning iscomplete the pages will be right side up.
ScanningScanning allows you to scan paper documents and convert the captured images into electronic image documents.To scan into OnBase you need to open a Scan Queue. Select Scan Queues: in the Queue List Window. All scan queuesavailable to you will be displayed in the Working Window on the right. Double click appropriate the Scan Queue to openit.Note: Your personal configuration will determine what Scan Queues are available to you.The Scan Queue is now opened and displayed in the Queue List WindowAny existing batches associated with the Scan Queue will be displayed in the Working Window.
Indexing Dialog BoxAfter the Scan Queue has been opened the Indexing Dialog Box becomes active. From here you’ll choose your scanningoptions.Scan Format: Contains information about the scanner settings, size of documents, and the file compression for thescanned documents.Duplex: scans both sides of each page and places each page (front & back) into a single document.Duplex Patch Code (Multiple pages): scans both sides of each page and places all pages into a single documentuntil the you indicate otherwise either with patch code pages or by clicking New Document in the ScanningComplete Dialog Box.Simplex: scans only the front side of the page and places each page (front only) into a single document.Simplex Patch Code (Multiple pages): scans only the front side of the page and places all pages into a singledocument until the you indicate otherwise either with patch code pages or by clicking New Document in theScanning Complete Dialog Box.Scan Mode: Provides various indexing options.No Index: allows you to perform manual indexing after documents have been scanned into OnBase. Thedocuments will be sent to the Awaiting Index queue where indexing can be completed.Pre-Index: activates Document Type drop down list and allows you to specify the Document Type and anycommon Keywords among the documents being scanned. The documents will be sent to the Awaiting IndexQueue where indexing can be completed.Full-Index: activates the Document Type drop down list and allows you to specify the Document Type and alldocument Keywords. The documents will be sent to the Awaiting Commit queue once scanning is complete.Once you’ve chosen your Scan Format and Scan Mode click Scan.
OnBase will prompt you for a batch name. By default it will be the date and username but you can name the batchwhatever you like. Click OK to start scanning the documents. (Remember to load the scanner face down/top in)Once the automatic document feeder has emptied the Scanning Complete dialog will display and offer a number ofprocessing options.Scan More Pages: will add additional pages to the end of the document just scanned.New Document: will start a new document in the batch (same as the system finding a patch code)New Document Type: allows you to scan a new document into the batch using a different Document Type.Click drop down select list to choose new Document Type then click New Document Type to start scanner.Change Format: allows you to change a different scan format for the batch or document.Discard Pages: deletes ALL pages/documents scanned into the batch.Done: closes the batch and sends it to the Awaiting Index queue. (Should be used when you’re done scanningfor the day or a long period of time not after every document you scan.)Delete Last Page: deletes the last page scanned (Helpful when scanner jams)Delete Last Document: deletes the last scanned document (back to previous patch code if more than onedocument in batch.) Click Retry to re-scan the last document or click Cancel to cancel scanning.When you’re finished scanning your documents for the day click Done to close the batch and send it to the AwaitingIndex queue.
Creating a Scan FormatA Scan format provides information to the scanner about the documents being scanned, e.g. Duplex (Double Sided),Simplex (Single Sided), document size, the number of pages in a document (duplex is considered 2 pages), etc.In the Document Imaging window right click and choose Scan Format Setup from the menu.The Scan Format Setup dialog box will be displayed. Any of the existing formats can be modified if necessary by clickingthe Scanner Setup, Document Setup, File Format Setup, and Image Processing (if applicable) buttons.Or you can create a new one. Enter the name of the scan format in the field at the bottom of the dialog box can clickCreate. The following dialog boxes (Scanner Setup, Document Setup, and File Format Setup) are displayed in succession.
Scanner Properties Dialog BoxScanner specific configuration options will be displayed in this dialog box where you can configure how many sides of adocument to scan, image resolution, and color mode. It’s considered best practice to scan in Black & White (bi-tonal)with a resolution of 200 – 300 dpi. Click OK to save your changes or the Options (see below) or Advanced (refer to vrssoftware manual) button to make other changes.Clicking the Options button opens the Source Properties Dialog Box.These are the Kofax Image Controls. These properties will be applied to the document before the Scan Format Settingsor Process Options take effect.Front/Back Picking Rectangle: used to define a specific area to be scanned. When scanning in duplex you candefine two different areas for the front and back of the document.
Top: Top of the rectangle relative to the top of the document being scanned.Left: Left side of the rectangle relative to the left side of the document being scanned.Width: the width of your picking rectangleHeight: the height of your picking rectangleFront/Back Rotation: Rotates document x degrees clockwise. The rotation can be specified individually for thefront and back of the document.Front/Back Delete Page Threshold: used to specify the compressed file size threshold to determine if a page isblank or not. Note: Generally this is already set in the Scan Queue process settings. Only one setting should be used ata time!Prescan (cache): identifies number of temporarily stored images on the Kofax hardware accelerator. The size ofcache is limited by the amount of memory on the Kofax accelerator. This allows for continuous scanning untilthe cache is full.Page Timeout (secs): number of seconds the scanner waits to see if more paper is fed in the scanner.Click OK to save your settings. You’ll be returned to the Scan Format Setup Box. Click the Document Setup button toconfigure document and rotation options for the documents being scanned.Document Setup Dialog BoxDuplex Emulation: allows non-duplexing (double-sided) scanning to be emulated by the user. It requires theoperator, when prompted, to flip the document after all the front pages are scanned and run all the back sidesof the documents through the scanner. The back of each document scanned will appear right after its front sideso the document is in order when scanning is complete.One Document: When selected all pages placed in the scanner will be scanned into a single document until apatch code is scanned or the user selects New Document from the Scanning Complete dialog box.Break on new file (scan from disk): Used when bringing files in from a disk. All files in the directory willbe brought in as one document.
Multiple Documents: Used to identify documents with multiple pages. Use in conjunction with the pages perdocument setting.Pages per document: Enter number of pages per document. Use arrows to scroll through numbers.Adjust for Duplex: Use in conjunction with Multi Page Documents. Ensure that both sides of a 2-sideddocument are saved to the same document. It forces the 2nd page of a 2-sided document to appendeven if the number of pages per document states otherwise.No Rotation: pages are not rotated as they’re scanned.Rotate Left 90 degrees: pages are rotated one turn left as they’re scanned.Rotate Right 90 degrees: pages are rotated one turn right as they’re scanned.Rotate 180 degrees: pages are rotated two turns as they’re scanned.Click Save to maintain settings.File Format SetupThe system defaults to the preferred file format storage setting of TIFF Group 4 images. If documents must be stored ascolor or grayscale it’s considered best practice to store them as JPEG files.File Type: select file format documents will be stored in.Compression: select compression to be used w/file type selected.
Image Processing SetupBorder Removal: changes black border on scanned images to white.Enable: changes black boarder to white and keeps the original size of the documentCrop: removes black boarder from the images which reduces the size of the image by the amount ofborder removedWhite Noise Gap:Deshade: removes grey or shaded areas (groups of speckles) from an image w/out affecting the text in thoseareas. (ie. removes green bar from scanned reports)Detection Enable: monitors images for shaded areasRemoval Enable: removes shaded areas based on parameters configured.Minimum Width of Area: minimum width of shaded area to be removedMinimum Height of Area: minimum height of shaded area to be removed.Maximum Speckle Width: width of an individual shaded area.Maximum Speckle Height: height of an individual shaded area.Speckle Width Compensation: number of pixels to add to the Maximum Speckle Widthto detect variable speckle sizes.Speckle Height Compensation: number of pixels to add to the Maximum Speckle Heightto detect variable speckle sizes.Deskew: straightens out misaligned images to improve readability.Detection Enable: Activates skew detection.Use Scanner: instructs scanner to deskew before sending images to Kofax engine.Correction Enable: activates skew correction.Minimum Angle: defines minimum angle, from vertical axis, to correct.Maximum Angle: defines the maximum angle, from vertical axis, to correct.Despeckle: removes groups of black pixels (background noise) from an image.Removal Enable: activates despeckle.
Height: maximum height of unwanted specklesWidth: maximum width of unwanted specklesEdge Enhancement: opens Image Filter Properties dialog box that provides options for smoothing the edges ofcharacters and lines to provide readability. Selecting one or more to apply to the imageCharacter Smoothing: smooths out the edges of lines or characters to improve readability for OCR.Changes colors around edge to match surrounding pixels.Thinning Filter: changes black pixels to white to thin lines and characters. Sometimes used to removespeckling or shading. Used for images or characters that are ballooned or blend together.Thicken Filter: changes white pixels to black thickening lines. Sometimes it exaggerates the backgroundshading and speckling.Smooth and Clean: smooths characters and might remove lines. Changes black pixels to white if notpart of 2x2 or greater block of black pixels. Combine w/Deshading, Despeckling, and Line Removal forbest results.Fill Line Breaks: fills and smooths lines by changing black pixels to white if not part of a 2x2 or greaterwhite block of white pixels. May merge horizontal or vertical lines depending on proximity to eachother.Smooth, Clean preserve h&v lines: like Smooth and Clean but preserves horizontal and vertical lines.Fill Line Breaks preserve h&v lines: like Fill Line Breaks but preserves horizontal and vertical lines.Use for images w/parallel lines that are close together.Lighten Thicken Filter: thickens lines and characters but to a lesser degree than Thicken Filter. Use onlyafter Deshading and Despeckling have taken place. Improves dot matrix printing and facsimiles.Outline: preservers only outer edge of line, character, or image.Streak Removal: eliminates marks on original document or created during scanning.Enable: activates streak removalStreak Width (pixels): maximum width of streak to remove.Line Removal: eliminates horizontal and vertical lines and repairs characters affected by line removal.Horizontal Enable: activates horizontal line removal.Minimum Length (pixels): minimum horizontal line length to remove.Maximum Height (pixels): maximum horizontal line thickness to remove.Maximum Break (pixels): maximum number of consecutive white pixels that are consideredpart of the horizontal line.Edge Clean Factor (pixels): number of pixels to clean up after removing horizontal line.Horizontal Character Reconstruction Enable: activates horizontal character repair process.Minimum Repair Height: minimum horizontal character height to reconstruct.Maximum Repair Width: maximum horizontal character width to reconstruct.Vertical Enable: activates vertical line removal.Minimum Length (pixels): minimum vertical line length to remove.Maximum Width (pixels): maximum vertical line width to remove.Maximum Break (pixels): maximum number of consecutive white pixels that are consideredpart of the vertical line.Edge Clean Factor (pixels): number of pixels to clean up after removing vertical lineVertical Character Reconstruction Enable: activates vertical character repair process.Minimum Repair Height: minimum vertical character height to reconstruct.Maximum Repair Width: maximum vertical character width to reconstruct.Endorser: N/A - if equipped would imprint a text string on the front of each document.
Indexing a BatchOnce your documents have been scanned in they’ll need to be indexed so that they can be retrieved. Indexingdocuments is the process of assigning Document Types and keywords to the scanned documents for the purpose ofretrieval. Note: Indexing does not have to be performed from scanning stations. Indexing can be done from any computerconfigured with the OnBase Web Client.Click on the Awaiting Index (#) queue in the Queue List Window to open it up.All scanned batches will appear on the right in the Working Window in order of oldest to newest.Click to select one or more (using the Shift or Crtl key) batches, right click and choose Index Documents from the menu.
The Indexing Dialog Box will now be active and the first
Accessing the Document Image Window For scanning well need to access the Document Imaging Window. From the top menu bar click Processing then Scan/Index to open the Document Imaging window. OR to make the Document Imaging window open automatically open when you login Click User, User Options Click the Startup tab Ch