Transcription
Oracle Enterprise GatewayAn Oracle White PaperJune 2011WebSphere MQ – Oracle EnterpriseGateway Integration Guide1 / 30
Oracle Enterprise GatewayDisclaimerThe following is intended to outline our general product direction. It is intended for informationpurposes only, and may not be incorporated into any contract. It is not a commitment to deliverany material, code, or functionality, and should not be relied upon in making purchasingdecisions. The development, release, and timing of any features or functionality described forOracle’s products remains at the sole discretion of Oracle.2 / 30
Oracle Enterprise Gateway1. Introduction . 41.1. Purpose . 41.2. JMS Architecture . 51.3. Prerequisites . 51.4. Setup Used for this Guide: . 51.5. Configuration Steps . 52. Setting up the WebSphere MQ environment . 62.1. Download WebSphere MQ . 62.2. Installation of WebSphere MQ . 62.3. Configure JMS Administered objects . 62.4. Configuring WebSphere MQ . 103. Setting up the OEG environment . 123.1. Download OEG Gateway software . 123.2. Load WebSphere MQ Provider files onto the OEG Gateway . 123.2.1 Instructions for Software install .124. Configuring the Gateway to place messages on WebSphere MQ Queue .134.1. Creating a JMS Session: . 134.2. Create a “Route to WebSphere” Policy . 154.3. Ensure policies are updated on the Gateway . 184.4. Test the configuration to place message on WebSphere Queue .184.5. Load a sample message into OEG Service Explorer . 194.6. Send Message and check WebSphere MQ queue . 205. Configuring the Gateway to read from an WebSphere MQ queue . 225.1. Create Policy that will be invoked with message read from WebSphereMQ queue . 225.2. Creating a JMS Session: . 245.3. Ensure policies are updated on the Gateway . 265.4. Testing to read messages from a queue . 266. Conclusion . 293 / 30
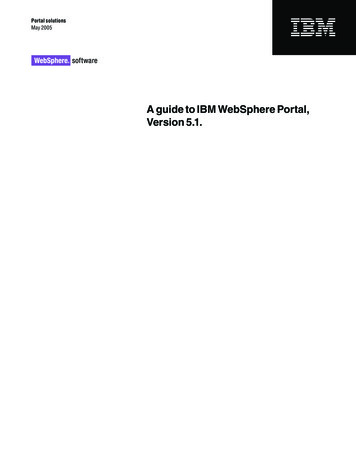
Oracle Enterprise Gateway1. Introduction1.1. PurposeThis document describes how to configure the Gateway to performprotocol translation. This will be demonstrated by the following:1. The Gateway will listen for messages on a HTTP interface.Messages read from this interface will be placed on a messagequeue.2. The Gateway will listen for messages on a message queue.Messages read from the queue will be sent to an email account viaSMTP.The message flow is as follows:This guide applies to software products, from version 6.0 upwards.In this guide the message queuing system that will be used is IBMWebSphere MQ.4 / 30
Oracle Enterprise Gateway1.2. JMS ArchitectureThe Gateway utilises JMS (Java Message Service) for sending andreceiving messages from messaging systems. JMS API which wasdeveloped by Sun defines a common set of interfaces and associatedsemantics that allow the Gateway to communicate with variousmessaging applications in a standard way.Messaging system products (IBM WebSphere MQ, JBossMQ, SonicMQ,Fiorano, and OpenJMS) provide implementations of JMS which can beplugged into the Gateway.The Gateway has been designed to allow 3rd party JMS providers tobe "plugged in". To plug in new JMS providers, you must install theJMS provider on the Gateway machine.The messaging system vendors can provide an implementation of theJMS provider which is normally in the form of jar files andconfiguration settings to be entered in the OEG Policy Studio.1.3. Prerequisites1. IBM WebSphere MQ is available from http://www.ibm.com2. OEG GatewaySoftware available from http://www.oracle.com3. Java Virtual Machine. WebSphere MQ will run on any platformwhere there is a suitable Java 2 runtime environment1.4. Setup Used for this Guide: WebSphere installed on Windows to D:\IBM\WebSphere MQ OEG Gateway 6.0 software installed toC:\OEG\gateway-6.0.0 on Windows JMS and JNDI subfolder and .bindings file created in D:\JMS\JNDI onWindows1.5. Configuration Steps1. Download and install WebSphere MQ2. Configure WebSphere MQ3. Install OEG Gateway5 / 30
Oracle Enterprise Gateway4. Configure Gateway to send messages to WebSphere MQ5. Configure Gateway to listen for messages from WebSphere MQqueue6. Test Setup2. Setting up the WebSphere MQ environment2.1. Download WebSphere MQWebSphere MQ is available from http://www.ibm.comThe version (at time of writing) was IBM WebSphere V7.02.2. Installation of WebSphere MQOnce WebSphere MQ has been downloaded install it to a desiredlocationPlease refer to WebSphere documentation for more information oninstalling WebSphere MQ.For the purpose of this guide default options were used except theinstallation directory. A Windows platform was used.2.3. Configure JMS Administered objectsEvery connection factory or destination used by the OEG server must be registeredin a JNDI directory with a unique name.In this particular case a Sun File System context JNDI provider will be used. JNDIdata will be stored in the file system directory in the .bindings file.Using tools from the WebSphere MQ installation a .bindings file needsto be created. To do this the JMSAdmin tool will be used which isfound in the following location of the WebSphere MQ installation:/WebSphereMQ Install Dir/Java/binIf no queues exist:Create the .bindings file:1.2.3.Create a new directory (for this guide D:\JMS was used)Create a subfolder called ‘JNDI’ in the folder created aboveCopy the JMSAdmin.config file into the newly created ‘JMS’directory JMSAdmin.config is found in the/WebSphereMQ Install Dir/Java/bin directory6 / 30
Oracle Enterprise Gateway4.Edit the JMSAdmin.config so that it instructs JMSAdmin to create.bindings file in the "JNDI" subfolder of the current directory, dothis by editing the contents of JMSAdmin.config to read thefollowing:INITIAL CONTEXT FACTORY com.sun.jndi.fscontext.RefFSContextFactoryPROVIDER URL file:./JNDIThe JMSAdmin tool needs an additional file to tell it which JMS queueto configure.1. Create a file called JNDIclient.scp in the ‘JMS’ folder,2. Edit this file with a text editor. JMSAdmin will be instructed tocreate "JMSDEMOCF" connection factory with connection to"Insert Host Name Here" port 1414 and queue called"JMSDEMOQueue" that maps to "QM websphere mq.QL" queueon the WebSphere MQ.3. Enter the following text in the file ------------------------------# Connection Factory for Client mode# Delete the Connection Factory if it existsDELETE CF(JMSDEMOCF)# Define the Connection FactoryDEFINE CF(JMSDEMOCF) SYNCPOINTALLGETS(YES) TRAN(client) HOST(Insert Host Name Here) CHAN(SYSTEM.DEF.SVRCONN)PORT(1414) QMGR( ----------------# Queue Object# Delete the Queue if it existsDELETE Q(JMSDEMOQueue)# Define the QueueDEFINE Q(JMSDEMOQueue) QUEUE(QM websphere mq.QL)End4. Run the JMSAdmin tool with the following arguments:7 / 30
Oracle Enterprise GatewayJMSAdmin.bat JNDIClient.scp.Below is an example of the successful running of the JMSAdmin tool D:\JMS dirVolume in drive D has no label.Volume Serial Number is 9C54-4566Directory of 8/200812:00 DIR .12:00 DIR .12:0094 JMSAdmin.config12:02 DIR JNDI12:02613 JNDIClient.scp2 File(s)707 bytes3 Dir(s) 12,119,982,080 bytes freeD:\JMS "D:\IBM\WebSphere MQ\Java\bin\JMSAdmin.bat" JNDIClient.scp5724-H72, 5655-L82, 5724-L26 (c) Copyright IBM Corp. 2002,2005. AllRights Reserved.Starting Websphere MQ classes for Java(tm) Message ServiceAdministrationInitCtx InitCtx InitCtx InitCtx Binding non-administerable or notfoundInitCtx InitCtx InitCtx InitCtx InitCtx InitCtx InitCtx InitCtx InitCtx Binding nonadministerable or not foundInitCtx InitCtx InitCtx InitCtx InitCtx Stopping Websphere MQ classes for Java(tm) Message ServiceAdministrationD:\JMS -------------------8 / 30
Oracle Enterprise Gateway5. Upon completion a .bindings file is created in JNDI subdirectory ofthe directory created in the first step (i.e. D:\JMS). These fileneeds to be copied to a host running the OEG server where theGateway is installed.If queues exist already:Create the .bindings file:1. Create a new directory (for this guide D:\JMS was used)2. Create a subfolder called ‘JNDI’ in the folder created above3. Copy the JMSAdmin.config file into the newly created ‘JMS’directory JMSAdmin.config is found in the/WebSphereMQ Install Dir/Java/bin directory4. Edit the JMSAdmin.config so that it instructs JMSAdmin to create.bindings file in the "JNDI" subfolder of the current directory, dothis by editing the contents of JMSAdmin.config to read thefollowing:INITIAL CONTEXT FACTORY com.sun.jndi.fscontext.RefFSContextFactoryPROVIDER URL file:./JNDIThe JMSAdmin tool needs an additional file to tell it which JMS queueto configure.1. Create a file called JNDIclient.scp in the ‘JMS’ folder,2. Edit this file with a text editor. JMSAdmin will be instructed tocreate "JMSDEMOCF" connection factory with connection to"Insert Host Name Here" port 1414 and queue called"JMSDEMOQueue" that maps to "QM websphere mq.QL" queueon the WebSphere MQ.3. Enter the following text in the file ------------------------------9 / 30
Oracle Enterprise Gateway# Connection Factory for Client mode# Delete the Connection Factory if it existsDELETE CF(JMSDEMOCF)# Define the Connection FactoryDEFINE CF(JMSDEMOCF) SYNCPOINTALLGETS(YES) TRAN(client) HOST(Insert Host Name Here) CHAN(SYSTEM.DEF.SVRCONN)PORT(1414) QMGR( -----------------4. Run the JMSAdmin tool with the following arguments:JMSAdmin.bat JNDIClient.scp.After the .bindings file has been created successfully do the following:5. After you create the .bindings file , run (using JMSAdmin):alter q(JMSQueueName) targclient(MQ)for each queue (out, response, logging, etc). Where"JMSQueueName" is the name of the existing queue.This will modify the .bindings file with the information of theexisting queues.6. This step sets up all the correct parameters for WebSphere MQfor the existing queues.2.4. Configuring WebSphere MQA Queue needs to be configured in WebSphere MQ. WebSphere MQ Explorer will beused to create the required queues.1. Open "WebSphere MQ Explorer", this can be found at Start menu, and navigateto All Programs IBM WebSphere MQ WebSphere MQ Explorer.10 / 30
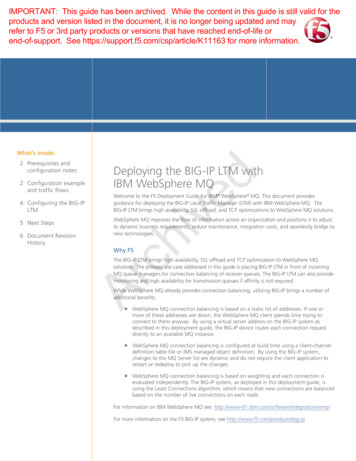
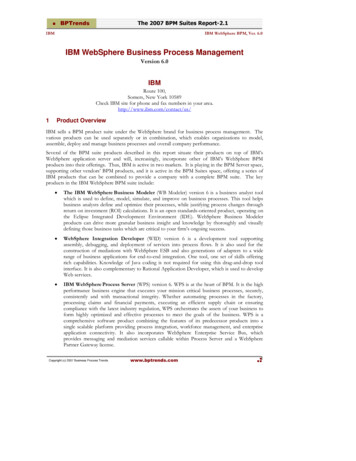
Oracle Enterprise Gateway2. Create a Queue underneath Queue Manager. To do this, expand the "QueueManager" and right mouse click on the "Queues" node and select "New" "Local Queue".3. Enter the name of the new queue; in this case the queue is called"QM websphere mq.QL".PLEASE NOTE: Use existing "Queue Manager" that has been created during theinstallation. In this walkthrough the "Queue Manager" has been called“QM schoemang”.This is WebSphere MQ Explorer showing the configured queues.11 / 30
Oracle Enterprise Gateway3. Setting up the OEG environment3.1. Download OEG Gateway softwareOEG provides copies of Gateway software to partners, customers, andevaluators.3.2. Load WebSphere MQ Provider files onto the OEG GatewayWebSphere MQ provides a particular JMS provider that the Gatewaywill use to connect to WebSphere MQ. The JMS provider takes theform of Java archive files (i.e. JAR files). Once WebSphere is installedit is a simple matter to copy the necessary JAR files from theWebSphere MQ installation and drop the JMS provider JAR files ontothe OEG Gateway.The .bindings file created in section 2.3 would also need to be copiedto the Gateway host.3.2.1 Instructions for Software install1. Browse to /WebSphere Install Dir/lib directory2. Copy the following jar files: fscontext.jar providerutil.jar jta.jar connector.jar com.ibm.mq.jar com.ibm.mqjms.jar dhbcore.jar3. Browse to the /OEG Install Dir/ext/lib directory and copy filesinto /lib directory12 / 30
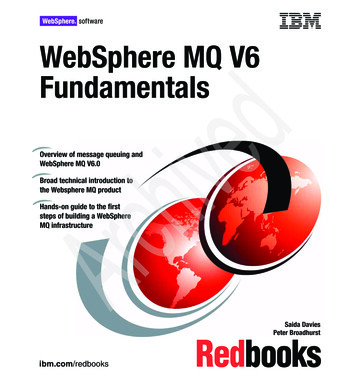
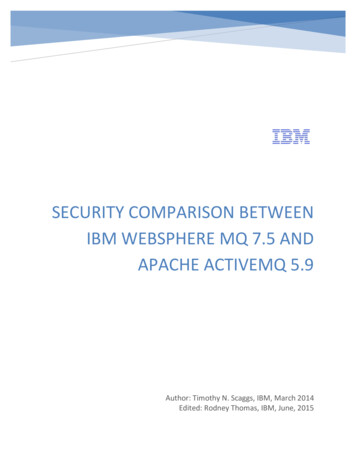
Oracle Enterprise Gateway4. Configuring the Gateway to place messages on WebSphere MQQueueThe gateway will be configured to place messages it receives on a queue(i.e. destination) named “JMSDEMOQueue” in WebSphere MQ.4.1. Creating a JMS Session:1. In Policy Studio with the External Connections panel selectedright click on the JMS Services and Add a JMS Service andconfigure the following fields: Name: WebSphere MQ Provider URL: file:///D://JMS//JNDI:, where D:///JMS//JNDIpoints to the location of the .bindings file located on the Gatewayinstalled on Windows in this case (D:///JMS//JNDI is pointing to apath on the demo machine used for this guide which isd:\JMS\JNDI)If the .bindings file was uploaded to an Appliance then theProvider URL would be configured like this:Provider URL: file:///opt/OEG/OEG product Dir/ext/lib Initial Context Factory:com.sun.jndi.fscontext.RefFSContextFactory Connection Factory: JMSDEMOCF Username: leave blank (or ask MQ service administrator) Password: leave blank2. Click OK3. With the Services panel selected right click on the “OEG Gateway”Process.4. Select Messaging System - Add JMS Session5. Set JMS Service to “Websphere MQ” just configured above.6. Choose not to allow duplicates.7. Click OKPLEASE NOTE: The provider URL will differ depending on where the .bindingsfile is located.It should be located in a folder of ANY name on the Appliance or host wherethe Gateway is running.The JMS Session configuration for Windows:13 / 30
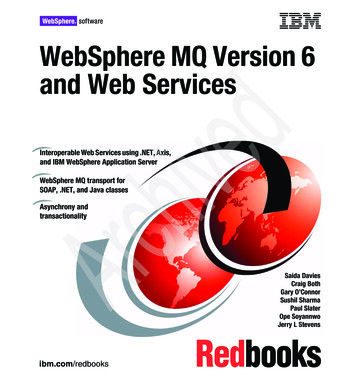
Oracle Enterprise GatewayThe JMS Session configured for the Appliance (VX4000):14 / 30
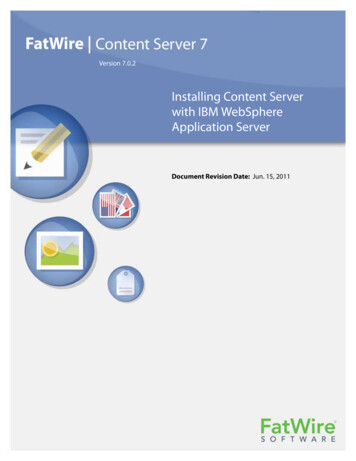
Oracle Enterprise Gateway4.2. Create a “Route to WebSphere” PolicyCreate a small test policy to route messages on to the WebSpherequeue by completing the following steps:1. Open the OEG Policy Studio with the Policies panel selected.2. Right click on Policies and select Add Policy.3. Enter the new Policy name “Route to WebSphere” and click OK.4. Open Services panel and right click on Default Services in theexpanded OEG Gateway process.5. Create a new relative path on the Gateway Process called“/ToWebSphere”.6. Map the /ToWebSphere path to the policy called “Route toWebSphere. This means that when a message is received by theGateway on the path “/ToWebSphere”, it will be passed to the“Route to WebSphere” policy, which will then process themessage.Configuring the Messaging System FilterWhen a policy that routes to a JMS provider (such as WebSphere MQ)is created, the policy must contain a Messaging System filter, whichcan be found under the Routing category of filters in the Policy Studio.To configure this filter, complete the following steps:NOTE: Make sure that the JMS Service has been configured already(see section 4.1) as the available JMS service will need to berefered to when configuring the Messaging System Filter1. Go back to the “Route to Websphere” filter and drag a MessagingSystem filter from the Routing group located in the pallette onthe right of the Policy Studio.2. Under the Request tab select the JMS Service that has beenconfigured above (titled “WebSphere MQ”) from the JMS Sessiondropdown.3. Set the Destination to “JMSDEMOQueue” (This is the queuerefered to in the .bindings file created in section 2.3)4. The Message Type should be specified. Change this to “Usecontent.body attribute to create a message in the format specifiedin the ‘SOAP OVER Java Message Service’".5. All other settings may be left at default.6. Click on the Response tab and select ‘No Response’7. Click on Ok15 / 30
Oracle Enterprise GatewayNote on Message Type:Here is an explanation of how the various serializations (from OEG message toJMS message work)- Use content.body attribute to create a message in the formatspecified in the "SOAP over Java Messaging Service" proposal:If this option is selected, messages will be formatted according to the SOAPover JMS proposal. This is the default option since, in most cases; it is themessage body that is to be routed to the messaging system. This will result ina ByteMessage being sent to the queue/topic and JMS a property will containthe Content-Type (i.e. text/xml)- Create a MapMessage from the java.lang.Map in the attributenamed below:Select this option to create a javax.jms.MapMessage from the OEG messageattribute named below that consists of name-value pairs.- Create a ByteMessage from the attribute named below:Select this option to create a javax.jms.ByteMessage from the OEG messageattribute named below.- Create an ObjectMessage from the java.lang.Serializable in theattribute named below:This option can be selected in order to create a javax.jms.ObjectMessage fromthe OEG message attribute named below.- Create a TextMessage from the attribute named below:A javax.jms.TextMessage can be created from the message attribute namedbelow by selecting this option from the dropdown.To complete the test policy create the following flow:1. Messaging System Filter: Located in the “Routing” group. Thisfilter should be configured as described above. This is amandatory filter in the policy.2. Set Message Filter: Located in the “Conversion” group. Used to setthe content of an XML response message that can be returned tothe client to acknowledge that the message has been placed on16 / 30
Oracle Enterprise Gatewaythe WebSphere queue. This step is not mandatory, but generatesan acknowledgement of the message placed on the queue. Drag the Set Message filter onto the policy canvas andadd message content as below.Example of the configuration of the Set Message filter:3. Reflect Filter: Routes the customized response back to the clientif necessary. The Reflect filter can be found under the Utilitycategory of filters.Drag the Reflect filter onto the policy canvas.Link the 3 filters together with success arrows as belowOnce configured, the policy will appear as follows:17 / 30
Oracle Enterprise Gateway4.3. Ensure policies are updated on the Gateway Open the Policy Studio. Click on Settings. Select Deploy to ensure that the changes made are propagated tothe live Gateway. Click Yes to deploy changes to the server.4.4. Test the configuration to place message on WebSphere QueueOEG Service Explorer will be used as the client to test the integration.The entire transaction will be tested from the client, through theGateway, and on to a WebSphere queue.The following diagram shows the solution architecture:18 / 30
Oracle Enterprise Gateway4.5. Load a sample message into OEG Service ExplorerLoad a sample XML message into OEG Service Explorer. Ensure thatthe URL field in OEG Service Explorer points to the Gateway and inparticular to the “WebSphere” path on the Gateway.The screenshot below shows a sample SOAP Request loaded in the OEGService Explorer:19 / 30
Oracle Enterprise Gateway4.6. Send Message and check WebSpher
Download and install WebSphere MQ 2. Configure WebSphere MQ 3. Install OEG Gateway . Oracle Enterprise Gateway 6 / 30 4. Configure Gateway to send messages to WebSphere MQ 5. Configure Gateway to listen for messages from WebSphere MQ queue 6. Test Setup 2. Setting up the WebSphere MQ environmentFile Size: 1MB