Transcription
FLUOstar OmegaLUMIstar OmegaPOLARstar OmegaSPECTROstar OmegaOperating ManualRevision E
Omega Operating ManualBMG LABTECHThis manual is designed to guide FLUOstar Omega, POLARstar Omega, LUMIstar Omega andSPECTROstar Omega users through the basic hardware features of the instrument.Although these instructions were carefully written and checked, we cannot accept responsibility for problemsencountered when using this manual. Suggestions for improving this manual will be gratefully accepted.BMG LABTECH reserves the right to change or update this manual at any time. The Revision-Number isstated at the bottom of every page.For contact information please visit www.bmglabtech.com or send an email to germany@bmglabtech.com.Copyright 2007-2010 BMG LABTECH. All rights reserved. All BMG LABTECH brand and product names are trademarks ofBMG LABTECH. Other brand and product names are trademarks or registered trademarks of their respective holders.2/250415B0001E2010-07-28
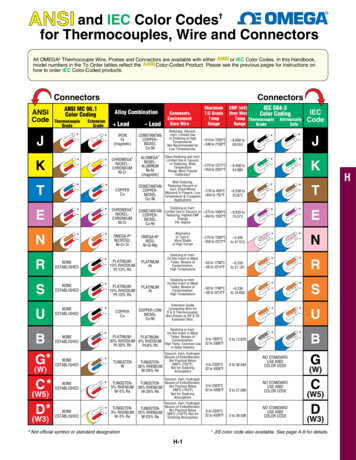
BMG LABTECHOmega Operating ManualOmega Family of ReadersThe FLUOstar Omega is a multifunctional microplate reader that supports a wide variety of applications andthe following reading modes: fluorescence intensity, time-resolved fluorescence, absorbance andluminescence.The POLARstar Omega can measure in the same modes as the FLUOstar, as well as in fluorescencepolarization mode with simultaneous dual emission.The LUMIstar Omega is a luminescence microplate reader that can be upgraded to include all of the abovementioned modes.The SPECTROstar Omega is an absorbance microplate reader that can be upgraded to include all of theabove mentioned modes.The versatile optical system allows easy switching from top to bottom optic.All Omega instruments achieve high-performance measurement data in a wide range of wavelengths.Additionally, the instruments have a built-in incubator and can be configured with up to two reagent injectors.Figure 1: FLUOstar Omega2010-07-280415B0001E3/25
Omega Operating ManualBMG LABTECHTABLE OF CONTENTS1TECHNICAL SPECIFICATIONS52INSTALLATION72.12.22.3TRANSPORT LOCKSOFTWARE INSTALLATIONPOWER AND COMMUNICATION CONNECTIONS3INSTRUMENT OVERVIEW4DESCRIPTION OF .64.2.74.2.84.2.9OPTICS11INSTALLATION AND CHANGING OF OPTICS11FLUORESCENCE INTENSITY OPTICS12LUMINESCENCE OPTICS12FLUORESCENCE POLARIZATION OPTICS13DUAL EMISSION OPTICS13COMBINATION OPTICS13ABSORBANCE OPTICS14HIGH DENSITY OPTICS14BOTTOM OPTICS14ADVANCED OPTIC HEAD FOR TRF / TR-FRET15FEHLER! VERWEISQUELLE KONNTE NICHT GEFUNDENWERDEN.4.3FILTERS194.3.1FILTER CHANGE AND INSTALLATION194.3.2FLUORESCENCE FILTERS214.3.3FLUORESCENCE POLARIZATION FILTERS214.3.4DUAL EMISSION FILTERS214.3.5ABSORBANCE FILTERS214.3.6LUMINESCENCE FILTERS214.4SPACERS214.5REAGENT INJECTORS224.5.1USE AND MAINTENANCE OF THE REAGENT INJECTORS2354/25INSTRUMENT DISINFECTION240415B0001E2010-07-28
BMG LABTECHOmega Operating Manual1 Technical SpecificationsMeasurement principles:FLUOstar Omega:LUMIstar Omega:POLARstar Omega:SPECTROstar Omega:- Fluorescence intensity- Time-resolved fluorescence – TR-FRET (opt.)- Luminescence (opt.)- UV/VIS absorbance spectra - AlphaScreen (opt.)- Upgradeable to POLARstar Omega- Luminescence- Simultaneous dual emission luminescence (opt.)- Upgradeable to FLUOstar / POLARstar Omega- Fluorescence polarization- Fluorescence intensity- Simultaneous dual emission fluorescence- Time-resolved fluorescence – TR-FRET (opt.)- Luminescence (opt.)- Simultaneous dual emission luminescence (opt.)- UV/VIS absorbance spectra - AlphaScreen (opt.)- UV/VIS absorbance spectra- Upgradeable to FLUOstar / POLARstar OmegaLight source:FLUOstar, POLARstar & SPECTROstar Omega: High-energy xenon flash-lampDetector:Side window photomultiplier tubeFilters:FLUOstar & POLARstar Omega:LUMIstar Omega:2 filter wheels with 8 excitation and 8 emission filter positionsEmission filter wheel with 8 filter positionsGain control:Software selectable gainAutomatic gain adjustmentPlate carrier:Auto lock microplate carrierAll microplate formats up to 1536-wellMicroplates should fulfill the SBS specification and non-SBS formatsshould fit: (lxwxh) (mm) max: 128x86x22; min. length 124Reagent injectors:Up to two built-in reagent injectorsIndividual injection volumes for each wellInjection volumes definable down to 3 lUp to 4 independent injection actions per wellVariable injection speed (100 l/s to 420 l/s)Shaking:Linear, orbital and figure eight shakingProgrammable speed and shake timeIncubation:Incubation range from ambient 5 C to 45 C, in 0.1 C stepsExtended incubation up to 60 C (optional)Temperature monitoring (without incubation)Temperature stability 0.2 CFluorescence intensity:Limit of detection 0.2 fmol / well fluoresceinSpectral range (ex. and em.): 240 . 740 nm (900 nm opt.)Dynamic range 8 decadesTime-resolved fluorescence:Limit of detection 30 amol / well europiumAdvanced TRF/TR-FRET: 3 amol / well europiumSpectral range (ex. and em.): 240 . 740 nm (900 nm opt.)Dynamic range: 6 decades2010-07-280415B0001E5/25
Omega Operating ManualBMG LABTECHLuminescence:Limit of detection 20 amol / well ATPSpectral range 240 . 740 nmDynamic range: 9 decadesFluorescence polarization:Limit of detection: 5 mP SD at 1 nM fluoresceinSpectral range: (ex. and em.): 380 . 740 nm (900 nm opt.)Dynamic range: 4 decadesAbsorbance Spectrometer based:Spectral range 220 . 850 nmFull spectrum captured in 1 s/wellSelectable spectral resolution: 1 nm, 2 nm, 5 nm, 10 nmOD range: 0 to 4 ODAccuracy: 1% at 2 ODPrecision: 0.5% at 1 OD and 0.8% at 2 OD AlphaScreen : 100 amol / well (384)*Computer interface:USB 2.0, compatible to USB 1.1Power requirements:100-240 V, 50/60 HzConsumption: max. 300 VAFuses: T5A/250V (use original spare fuses provided by BMGLABTECH only)Dimensions:Height: 31 cm, width: 44 cm and length 48 cmWeight:29 kgAmbient conditions:Operating temperature: 15 C to 35 CStorage temperature:-10 C to 50 CHumidity of atmosphere: 20% to 80%Non-condensingInstrument conformity:Over voltage category II; contamination class II; protection class IRobotic capabilities:Stacker for 50 microplates (optional)Limit of detection was calculated according to the IUPAC standard: 3 x (SDblank)/slope* Limit of detection 100 amol of biotinylated and phosphorylated polypeptide (P-Tyr-100 assay kit,PerkinElmer, #6760620C), measured in white 384 small volume microplates (17 µL/well)AlphaScreen is a registered trademark of PerkinElmer, Inc.Specifications are subject to change without notice.6/250415B0001E2010-07-28
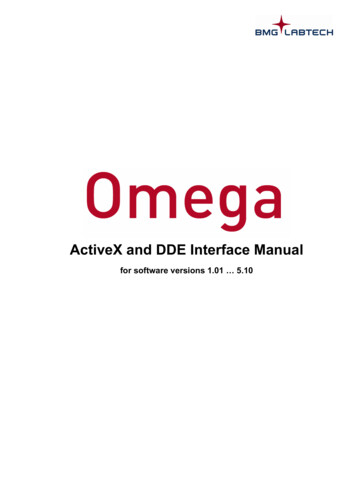
BMG LABTECHOmega Operating Manual2 InstallationWhen unpacking the instrument, please check to ensure that all of the following parts are included: FLUOstar Omega or LUMIstar Omega or POLARstar Omega or SPECTROstar Omega reader Control and Data Analysis software (CD ROM in a cover inside this manual) Manual Power cord USB cable Service box containing:-Allen key (1.5mm)2 extra fuses: 5A/250V for main power 100V-240V4 spacersInjector needle cleaner (only with instruments that have reagentinjectors)Call BMG LABTECH immediately if any of these items are missing.The area designated for the instrument should be free of dust, liquids and acidic vapours. The table's surfaceshould be flat and even. Avoid areas subject to vibrations and direct sunlight.After unpacking and positioning the reader, please do the following steps in the given order:1 – Release transport lock2 – Install software3 – Plug in power and USB connectionAlways install the software before plugging in USB connection!2.1 Transport LockWhen the instrument is shipped or moved to a different location, the transport lock should be in the lockedposition.The transport lock is located in the back left corner of the reagent box (figure 2 and figure 7). Once theinstrument is in its permanent location, the transport pin should be unlocked to free the plate carrier. To dothis turn the transport pin counter-clockwise until it is moved up by the spring.LOCKED POSITIONUNLOCKED(screw is down)(screw is up)When plate reader is tobe movedWhen plate readeris in position.Ready to measureThe groove where the transportlock fixes the plate carrier view)Figure 2: Left: transport lock in locked position (screw is down).Middle: transport lock in unlocked position (screw is up).Right: the groove where the transport pin can lock the plate carrier2010-07-280415B0001E7/25
Omega Operating ManualBMG LABTECHIf the instrument needs to be moved to a new location, the plate carrier should be in the locked positionotherwise the transport system could be damaged.Figure 3: Plate In / Plate Out button.Press and hold the plate in / plate out button for 3 seconds, hereafter the plate carrier will automatically moveto its lock position. Once the reader is switched off, the transport pin can be moved down and turnedclockwise. The transport pin must be screwed until it tightens. Please tighten it firmly with your fingers. Don‟tuse any tools.The transport system is locked when the transport lock is in its down position and firmly tightened.2.2 Software InstallationBefore connecting the instrument's USB communication cable the software must beinstalled! Please follow the instructions in the software manual.2.3 Power and Communication Connections Power ConnectionFirst check that the power switch on the back of the instrument is in the "Off" position. Inspect the voltageinformation on the label next to the power switch to ensure that it corresponds to the local main powerspecifications. Also make sure the power cable is grounded. Hereafter, the power cable can be connected tothe instrument. USB Communication ConnectionConnect the USB cable to the FLUOstar Omega (or POLARstar Omega or SPECTROstar or LUMIstarOmega) and to the USB port on the PC. Please connect the reader directly to your PC and do not use aUSB-hub.Only connect a computer that corresponds to EN 60950 and UL 1950 for data processinginstruments.You can perform a connection check within the setup menu of the Omega software (go to „Setup Connection‟ and click „Connection check‟).If the instrument and PC are communicating, a „Connection OK‟ message will appear.Figure 4: Connection check window (‘Setup / Connection’)8/250415B0001E2010-07-28
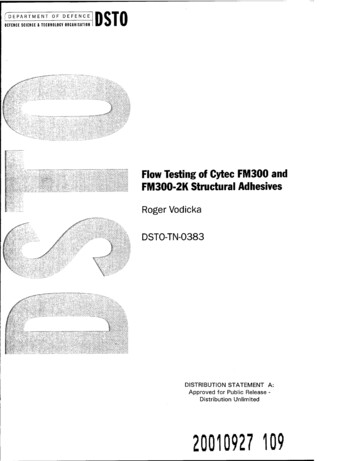
BMG LABTECHOmega Operating Manual3 Instrument OverviewFront ViewReagent boxPlate In / Plate Out buttonInstrument turned on/busy lightPlate carrierFigure 5: FLUOstar OmegaA constant green light means the instrument is turned on. A flashing green light means the instrument isbusy (e.g. performing a measurement, plate in/out, priming, etc.). A faster flashing green light (5 flashes persecond) means an error has occurred.Back tionPower cableconnectionOn/OffswitchFigure 6: Back of Omega reader2010-07-280415B0001E9/25
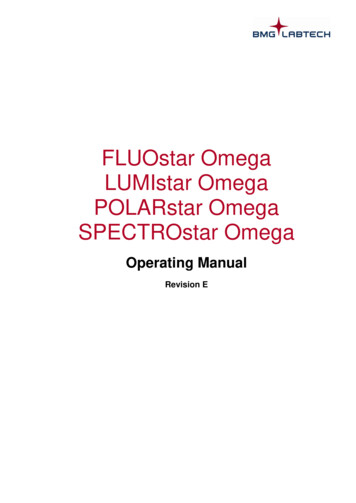
Omega Operating ManualBMG LABTECHTop View, Reagent BoxFilter wheel cover(for emission filter wheel andexcitation filter wheel)Transport lockMeasurementhead positionBottom opticAbsorbance opticReagent injectors (optional)Injection needle holderFigure 7: FLUOstar Omega & POLARstar Omega top view of reagent box withspectrometer based absorbance and 2 reagent injectors; no top optic is installed10/250415B0001E2010-07-28
BMG LABTECHOmega Operating Manual4 Description of Components4.1 OpticsAll readers are equipped with standard UV/Vis optics for top reading. For the Omega, there are different topreading optics available for fluorescence intensity, fluorescence polarization, luminescence, absorbance andtime-resolved fluorescence.4.2 Installation and Changing of OpticsThe Omega readers are equipped with quick-fix mountings (figure 8), allowing for the easy exchange ofoptics and placement of position spacers (for more about spacers see 4.4). No tools are required forchanging the optics. Remove the optic from the positioning wheel (figure 9) by hand and turn the holders onthe measurement head frame to release the black mounting piece of the optic.Quick-fix: in released positionQuick-fix: in fixed positionFigure 8: Quick-fix - pull up and turn to change opticAlways hold the optics by the black mounting piece.Emissionpositioning wheelExcitationpositioning wheelEmission no. 2(available inPOLARstarOmega)Figure 9: Filter wheel cover with positioning wheels2010-07-280415B0001E11/25
Omega Operating Manual4.2.1BMG LABTECHFluorescence Intensity OpticsThe fluorescence intensity and time-resolved fluorescence light guides are silver in color, liquid-filled andcome connected to the excitation and emission positioning wheels.To position the measurement head with the holders, see chapter 4.2 Installation and Changing of Optics.Regarding reagent injection: be careful when positioning the needles in the measurement head (see figure11), to avoid damage to the reagent needles as well as to the optic. The optional reagent injectors need tobe available.Figure 10: Fluorescence intensity optic4.2.2Figure 11: Holes to position reagent needles in themeasurement headLuminescence OpticsThe luminescence optic has one light guide, which is silver in color.The light guide connects to the emission side. To position themeasurement head with the holders, see chapter 4.2 Installation andChanging of Optics.There are two dedicated luminescence optics: a 3 mm diameter lightguide that is used for plates up to 96-wells, and a 2 mm diameter lightguide that is used for plates up to 384-wells.For reading in the luminescence, the luminescence option needs tobe present.Figure 12: Luminescence optic12/250415B0001E2010-07-28
BMG LABTECH4.2.3Omega Operating ManualFluorescence Polarization OpticsThe light guides for fluorescence polarization are black and form a triangle at thebase of the optic.Position the light guides as follows: right light guide into excitation position, leftlight guide into the upper emission position (PMT 1) and the center light guideinto the lower emission position (PMT 2).Only the POLARstar Omega can measure fluorescence polarization. It is possibleto upgrade the FLUOstar Omega to a POLARstar Omega.Regarding filters for fluorescence polarization see chapter 4.3.3.Figure 13: fluorescencepolarization optic4.2.4Dual Emission OpticsThe dual emission optics are designed for assays in which you excite at one wavelength and measure twoemission wavelengths simultaneously (i.e. FRET). This is only possible in the POLARstar Omega becausethis action requires two PMT's. The dual emission optics look like the polarization optics, but are not capableof polarization. The optic has to be installed in the same way as the polarization optic (figure 13).4.2.5Combination OpticsThis optic can only be used with readers with PMT based absorbance, not withspectrometer based absorbance.The combination optic is made up of two liquid-filled light guides for fluorescenceintensity or luminescence and a quartz fiber for absorbance measurement (figure14).To position the measurement head with the quick-fix holders, see chapter 4.2Installation and Changing of Optics.For fluorescence measurements: excitation enters through the yellow marked lightguide and emission is measured through the blue marked light guide.For absorbance measurements: The gray, red marked, absorbance light guideexcites from above and the absorbance is measured through the bottom optic.Figure 14: Combination opticRegarding reagent injection: be careful when you position the needles in the measurement head (see figure15) to avoid damage to the reagent needles as well as to the optic. The optional reagent injectors need to beavailable.Figure 15: Holes to position reagent needles in the measurement head2010-07-280415B0001E13/25
Omega Operating Manual4.2.6BMG LABTECHAbsorbance OpticsThis optic can only be used with readers with PMT based absorbance, not withspectrometer based absorbance.There is an optimized optic for absorbance mode available (see figure 16). Thisoptimized absorbance optic connects to the red-marked excitation-positioning wheel.You can also use the combination optic (see chapter 4.2.5).Figure 16:Optimizedabsorbance optic4.2.7High Density OpticsThe high-density optic has one excitation light guide surrounded by six emission lightguides. This optic is designed to minimize cross talk in plate formats such as 384and 1536-well plates.To position the measurement head with the quick-fix holders, see chapter 4.2Installation and Changing of Optics.The single black light guide connects to the yellow-marked position of the excitationwheel. The six-bundled light guides are inserted into the blue-marked position of theemission wheel.To measure 1536-well plates the reader has to be prepared specially.Injection is not possible into 1536 well plates.Figure 17: Highdensity optic4.2.8Bottom OpticsThe bottom optics are used to measure fluorescence, luminescence and absorbance. The bottom opticsenter the reagent box on the left side and are connected to the left position of the excitation and emissionwheels.Figure 18: Principle drawing oftop and bottom optics14/250415B0001E2010-07-28
BMG LABTECH4.2.9Omega Operating ManualAdvanced Optic Head for TRF / TR-FRETThe Advanced Time-Resolved-Fluorescence (TRF) – Optic Head is an upgrade option for the FLUOstarOmega and POLARstar Omega microplate readers. It is based on an innovative optical system using a lensand z-adjustment to direct the excitation light to the optimal focal point in the center of a well.Fig. 19 The TRF- optic head withexcitation and emission light guidesEmission Light Guide (blue)Excitation Light Guide(yellow)Lens (DO NOT TOUCH)Indentation for Quick Fix holderKnob for adjustingthe z-height of the lensScale displaying z-heightabove well bottom (mm)2010-07-280415B0001E15/25
Omega Operating ManualBMG LABTECHInstallation:NOTES:1. Before installing the TRF-optic head make sure to install the supplied filters for TRF measurement asdescribed in 4.3.1 “Filter Change and Installation”.2. Make sure that the firmware of your Omega reader is at least v.1.12. The firmware version can beread by opening the Control software and clicking on the reader icon in the upper right corner.Contact BMG LABTECH in case you need an update of the reader firmware(support@bmglabtech.com).1) Open the lid of the reagent box of the FLUOstar/POLARstar Omega. Take the body of the TRF-optic headin the left hand, the light guides in your right hand and feed them through underneath the already installedexcitation light guides. Let the light guides then point outwards of the instrument to prevent scratches insidethe reagent box. (Fig. 20).Fig. 20 Feeding the light guides ofthe TRF-optic head2) Hold the Advanced TRF-optic head straight inside the instrument. Turn it 45 degrees and position it suchthat the lens is perpendicular towards the open hole of the measurement position. Carefully lower the TRFoptic head and feed the head through the two rising bars pointing upwards from the bottom. Now the headshould rest smoothly on the bottom of the reagent box.Fig. 21 Turn the TRF optic head45 degrees16/250415B0001E2010-07-28
BMG LABTECHOmega Operating Manual3) Turn the lower right Quick-fix clockwise until it touches the base of the TRF optic head. Hold the optichead with your left hand while lifting up the Quick-fix with your right hand ca. 7 mm and turn further clockwiseuntil the lever touches the wall. Release the Quick-fix and it will snap-on and hold the optic head in position.Repeat this procedure for the upper left Quick-fix (Fig. 22).Fig. 22 Schematic of the Quick-Fix holder (left) and actual image of the TRF-optic head in theinstrument (right).Connect the excitation light guide (yellow) to the matching pin hole (yellow) of the Excitation PositioningWheel.Be careful NOT TO OBSTRUCT the black light guide of the absorbance spectrometer. Theexcitation light guide of the TRF optic head must reside BELOW the black light guide of theabsorbance spectrometer (Fig. 23)Connect the emission light guide (blue) to the matching pin hole (blue) of the Emis
Omega Operating Manual BMG LABTECH 8/25 0415B0001E 2010-07-28 If the instrument needs to be moved to a new location, the plate carrier should be in the locked position otherwise the transport system