Transcription
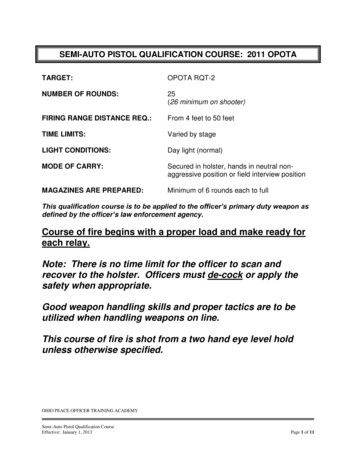
SEMI-AUTO PISTOL QUALIFICATION COURSE: 2011 OPOTATARGET:OPOTA RQT-2NUMBER OF ROUNDS:25(26 minimum on shooter)FIRING RANGE DISTANCE REQ.:From 4 feet to 50 feetTIME LIMITS:Varied by stageLIGHT CONDITIONS:Day light (normal)MODE OF CARRY:Secured in holster, hands in neutral nonaggressive position or field interview positionMAGAZINES ARE PREPARED:Minimum of 6 rounds each to fullThis qualification course is to be applied to the officer’s primary duty weapon asdefined by the officer’s law enforcement agency.Course of fire begins with a proper load and make ready foreach relay.Note: There is no time limit for the officer to scan andrecover to the holster. Officers must de-cock or apply thesafety when appropriate.Good weapon handling skills and proper tactics are to beutilized when handling weapons on line.This course of fire is shot from a two hand eye level holdunless otherwise specified.OHIO PEACE OFFICER TRAINING ACADEMYSemi-Auto Pistol Qualification CourseEffective: January 1, 2013Page 1 of 11
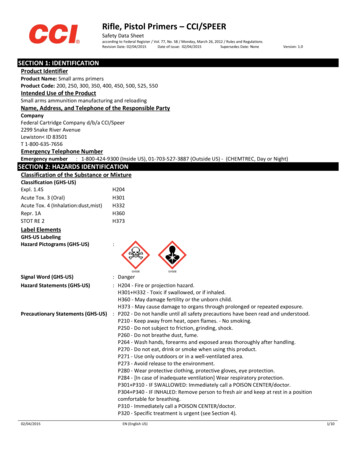
GLOSSARY OF TERMSMotor Program: A compilation or series of movements designed to accomplish aprinciple task. A technique becomes permanent or „locked-in‟ when the neural systemcan perform the motor skills without requiring conscious thought. Much like walking youwill no longer need to „think‟ about performing you will just do it automatically. It is oftencalled implanting it into 'muscle memory'. (also referred to as motor programming)Automatic motor programs allow us to perform time and time again amazinglycomplex moves without having to think about it. As you start out, the process is “SeeThink-Act”. But, as you commit skills to muscle memory it becomes “See-Act”.High Ready/Center Ready: Applicable to pistol craft, this is a two hand hold high in thecenter of the shooters chest. The forearms are resting on the lower ribs with the muzzleof the pistol parallel to the deck and oriented toward the threat. The weapon can be firedat close quarters from this position or it can quickly & easily be brought up and out fortwo hand sighted fire.Position Sul: Used to check 360 or move around people or things we don‟t want tocover with the muzzle. From the high ready, the support hand palm should be flatagainst the solar plexus, with fingers extended and parallel to the ground. The supporthand thumb is pointed towards the shooter‟s chin. (Elevation of the support hand mayvary but most shooters find that they are able to maintain correct hand position withoutundo stress on the wrists when the hand is held about naval level.) The strong handmaintains the grip on the handgun keeping the trigger finger out of the trigger guard andhigh along the frame.The muzzle of the weapon is pointed directly at the ground between the shooter‟s feet.The slide of the handgun is held against the back of the knuckles of the support hand.Care must be taken to ensure that the muzzle does not point outward to the front or tothe side of the shooter. The muzzle MUST be straight down.The strong hand thumb is extended towards the support hand thumb so that both thumbtips are touching. Elbows should be relaxed down against the shooter‟s sides.Modified High Ready: This is the high ready position utilizing a one handed hold. Theweapon hand is drawn back with the wrist or forearm resting on the lower ribs with themuzzle parallel to the deck and oriented toward the threat.OHIO PEACE OFFICER TRAINING ACADEMYSemi-Auto Pistol Qualification CourseEffective: January 1, 2013Page 2 of 11
GLOSSARY OF TERMS continued360 Scan: This can also be called or referred to as 360 awareness. Shooters need tobe conscious of their muzzle direction as they scan left, right and rear. The pistol can bemaintained in the high ready position or position Sul as shooters move their feet tocheck over their shoulders. This technique should only be applied when there is nolonger any continued threat from the intended target. Due care must also be applied toavoid covering other shooters with the muzzle.Reload Without Retention: (Round in Chamber) A reload w/o retention is used whenyou want to continue to fight with a fully loaded weapon and the situation permits this.Conservation of ammunition is not a priority. When an officer has scanned 360 and isaware of their surroundings and the task at hand, he/she reaches for a fully preparedmagazine with their non-firing hand. Bring the magazine up to the pistol andsimultaneously drops the partially loaded magazine to the ground. As soon as thepartial magazine is clear of the magazine well the fully prepared magazine is seated intothe magazine well.Reload With Retention: Also known as a magazine exchange, a reload with retentionis used when you want or need a fully loaded weapon and the situation permits this.Conservation of ammunition is a priority.This can be accomplished one of three ways.(1) When an officer has scanned 360 and is aware of their surroundings and the task athand, he/she reaches for a fully prepared magazine with their non-firing hand. Bringthe magazine up to the pistol and simultaneously drop the partially loaded magazineto the ground. As soon as the partial magazine is clear of the magazine well the fullyprepared magazine is seated into the magazine well. The shooter may then, if timeand situation permits, pick up the partially loaded magazine and place it in atactically sound location on their person.(2) When an officer has scanned 360 and is aware of their surroundings and the task athand, he/she reaches for a fully prepared magazine with their non-firing hand. Bringthe magazine up to the pistol. He/she drops the partially loaded magazine into thesame hand. As soon as the partial magazine is clear of the magazine well the fullyprepared magazine is seated into the magazine well. The shooter may then placethe partially loaded magazine in a tactically sound location on their person.(3) When an officer has scanned 360 and is aware of their surroundings and the task athand, he/she drops the partially loaded magazine into their support hand and puts itaway in a tactically sound location on their person. With the partial magazine putaway the shooter then reaches for a fully prepared magazine removes it from themagazine pouch and seats it into the pistol.OHIO PEACE OFFICER TRAINING ACADEMYSemi-Auto Pistol Qualification CourseEffective: January 1, 2013Page 3 of 11
GLOSSARY OF TERMS continuedEmergency Reload: (Empty Gun) Emergency reload is used when your weapon isempty. As the weapon is brought back into your work space, the empty magazine isdropped to the ground while the support hand moves to grab a fully prepared magazinefrom where you normally keep it. The prepared magazine is seated in the magazinewell. The weapon put back into to battery and punched back out to the threat to furtherengage or reassess the situation.Close Quarters Retention Position: A technique thought of when envisioning agunfight between 2 people in a phone booth. On a 4 count draw stroke the weapon isdrawn up high into the armpit. The support hand comes to a defensive position at chestor chin level to fend off an attack or protect the face and neck. As the muzzle comes up,out and clears the top of the holster the strong elbow drops orienting the muzzle towardthe threat. The magazine plate is oriented toward the shooters ribs and the slide or topof the pistol is canted out away from the shooter to avoid interference with clothing orgear. Shooters should take care to be sure that the muzzle is not presented too far infront of their body so as to hand the gun to the suspect enabling the suspect to performa blocking or disarming technique.Flanking Step: A step to the side, left or right, which gets the officer off the spot wherethe suspect is focusing his attack. This could be one big step or several small ones.OHIO PEACE OFFICER TRAINING ACADEMYSemi-Auto Pistol Qualification CourseEffective: January 1, 2013Page 4 of 11
SCORINGSilhouette Area:The entire area contained within the humanoid target outline.(The entire white and dark area shown)-1Preferred Area:0The inner outlined area within the silhouette from head to hips.(The dark area shown)The pistol target is scored the following way:Shooters can score a maximum of 25 points (100%) on this course of fire.Shooters must have no less than 20 points (80%) to pass the course of fire.A shooter can lose points for: Failing to hit the preferred area (zero (0) point for each round fired) Failing to fire rounds within the allotted time limits (zero (0) point for each roundnot fired) Missing the failure drill designated area (-1 point for missing the head/pelviccircles) Any round off the silhouette (-1 point for each hit off the silhouette) Firing additional rounds (-1 point for each additional round fired) There is no penalty for failing to utilize flanking steps or 360 degree scanning. Firing rounds over the allotted time limit (-1 point for each additional round fired)The firearms qualification instructor shall determine if rounds are fired outside theallotted time limits based upon the totality of circumstancesOHIO PEACE OFFICER TRAINING ACADEMYSemi-Auto Pistol Qualification CourseEffective: January 1, 2013Page 5 of 11
Example 1: A shooter makes all 25 shots on time. When scoring the target you count23 hits in the preferred area. You note one on the silhouette but outside the preferredarea and one off the silhouette completely.We have 23 hits that count. An extra point is taken off the score for the complete missmaking the final score a 22. Pass.Example 2: A shooter fires all 25 rounds. The shooter has 1 round over the time limitand the head shot is missed on stage 2. When scoring the target you count 22 hits inthe preferred area. You note two off the silhouette completely.We have 22 hits that count. Then you remove 1 for being over time, 1 point for the headshot and take an extra point off the score for each complete miss (2) making the finalscore a 18. Fail.Total hits in preferred area 1 point eachSubtract the below penalties from the above totalHead or hip circle miss- 1 pointSubtract 1 additional point each for: Hits off silhouette- 1 point each Rounds fired over time- 1 point each Rounds beyond 25 allotted- 1 point eachTotal Score FinalOHIO PEACE OFFICER TRAINING ACADEMYSemi-Auto Pistol Qualification CourseEffective: January 1, 2013Page 6 of 11
PISTOL COURSE OF FIRENote: Stepping off the attack line can be choreographed by the instructor in order tokeep shooters on line moving in the same direction EX. All step right then all step left.Load & Make ReadyShooters on line load and make ready. Press check, de-cock (if appropriate) andholster. Top off your magazine pouches.Load and Make Ready: Motor Program Walk Through1. Draw to full presentation and get on the sights2. Bring the weapon back into your work space3. Retrieve a magazine from where you normally keep it, look it into the magazinewell & seat it4. Charge the weapon/run the slide5. Punch back out to the target and get on the sights6. Lower the weapon, breathe and scan your way back to the high ready position &de-cock7. Check 360 , press check, de-cock and reluctantly re-holsterStage 1Distance to Target: 4 FeetOn the facing of the target or the sound of the timer, you will draw to a close quarter‟sretention position and fire 3 rounds in 5 seconds into the preferred area.After firing: Create distance by taking one step back Breathe, scan 360 , de-cock, reload if necessary and reluctantly recover to theholster** This drill is completed 1 time for a total of 3 rounds** Minimum of 3 rounds in the gun going into Stage 2Stage 2Distance to Target: 9 FeetOn the facing of the target or the sound of the timer, you will draw and present, whiletaking a flanking step to the left or right, and fire 2 rounds into the preferred area and 1round to the head/hip. You have 6 seconds to complete the drill.(Note: Score targets upon completion of this stage)After firing: Breathe, scan 360 , de-cock, reload if necessary and reluctantly recover to theholster** This drill is completed 1 time for a total of 3 rounds** Minimum of 5 rounds in the gun going into stage 3Note: Prepare magazines and top off magazine pouches if needed.OHIO PEACE OFFICER TRAINING ACADEMYSemi-Auto Pistol Qualification CourseEffective: January 1, 2013Page 7 of 11
Stage 3Distance to Target: 12 Feet, One-handed ShootingA. On the facing of the target or the sound of the timer, you will draw while taking aflanking step to the left or right and fire 4 rounds into the preferred area of the targetusing the dominant hand only. You have 8 seconds to complete the drill.After firing: Breathe and scan 360 Perform a reload with retention (choose one of three ways) De-cock and remain at a modified high ready position with the weapon in yourdominant hand onlyOn command: Transfer the weapon to your non-dominant hand only and remain at a modifiedhigh ready position, for Stage 3B** This drill is completed 1 time with the dominant hand for a total of 4 rounds** Minimum of 5 rounds in the gun going into stage 3BB. On the facing of the target or the sound of the timer, you will punch out while takinga flanking step left or right and fire 4 rounds into the preferred area of the targetusing the non-dominant hand only. You have 7 seconds to complete the drill.After firing: Breathe, scan 360 , de-cock and remain at the modified high ready On command, transfer the weapon back to the dominant hand, reload ifnecessary and reluctantly recover to the holster** This drill is completed 1 time with the non-dominant hand for a total of 4 roundsNote: Do not top off the magazine in the gun.Prepare magazines and top off magazine pouches if needed.Stage 4Distance to Target: 20 FeetPrepare weapon with three rounds total. 1 in the chamber 2 in the magazineOn the facing of the target or the sound of the timer, you will draw while taking aflanking step to the left or right and fire 3 rounds into the preferred area of the target.Upon slide lock, take a flanking step in the opposite direction while performing anemergency reload and fire 3 additional rounds into the preferred area of the target.You have 12 seconds to complete the drill.After firing: Breathe, scan 360 , de-cock, reload if necessary and reluctantly recover to theholster** This drill is completed 1 time for a total of 6 rounds** Minimum of 3 rounds in the gun going into Stage 5Note: Prepare magazines and top off magazine pouches if needed.OHIO PEACE OFFICER TRAINING ACADEMYSemi-Auto Pistol Qualification CourseEffective: January 1, 2013Page 8 of 11
Stage 5Distance to Target: 30 FeetOn the facing of the target or the sound of the timer, you will draw & present whiletaking a flanking step left or right and fire 3 rounds into the preferred area of the target.You have 8 seconds to complete the drill.After firing: Breathe, scan 360 , de-cock, reload if necessary and reluctantly recover to theholster** This drill is completed 1 time for a total of 3 rounds** Minimum of 3 rounds in the gun going into Stage 6Stage 6Distance to Target: 50 FeetOn the facing of the target or the sound of the timer, you will draw and present whiletaking a flanking step left or right and fire 2 rounds into the preferred area of the target.You have 8 seconds to complete the drill.After firing: Breathe, scan 360 , de-cock and reluctantly recover to the holster** This drill is completed 1 time for a total of 2 rounds** Minimum of 1 round in the gun going into unloading and clearingEnding: Unload Clear & HolsterShooters on line unload clear and holster an empty weapon.Unload, Clear & Holster: Motor Program Walk Through1. Draw to full presentation and get on the sights2. Bring the weapon back into your work space3. Remove the source of ammunition and put it away4. Run the slide several times watching the live round kick out onto the deck. Do notattempt to catch it5. Lock the slide to the rear6. Visually and physically inspect the chamber and magazine well7. Look away8. Visually and physically inspect the chamber and magazine well againWhen you are satisfied that the weapon is clear:9. Release the slide forward10. Punch back out on target & get on the sights(If it is required for disassembly of your weapon, it is appropriate at this time topull the trigger to prepare for disassembly)11. Breathe, scan, de-cock and reluctantly recover to the holsterOHIO PEACE OFFICER TRAINING ACADEMYSemi-Auto Pistol Qualification CourseEffective: January 1, 2013Page 9 of 11
COURSE OF FIRE QUICK REFERENCE SHEET(Drills)LoadingProper loading procedures and holsterStage 1Action:1. On signal draw to close quarters retention position & fire three rounds into thepreferred areaDistance:Time:Rounds:4 ft5 sec3Stage 2Distance:Time:Rounds:9 ft6 sec3Stage 3ADistance:Time:Rounds:12 ft8 sec4Stage 3BDistance:Time:Rounds:12 ft7 sec4Stage 4Distance:Time:Rounds:20 ft12 sec6After Action:1. Take one step backward creating distance.2. Breath, Scan, de-cock, reload if necessary & holsterAction:1. On signal, flanking step while drawing & fire two rounds preferred area, one round tothe headAfter Action:1. Flanking step breathe, Scan, de-cock, reload if necessary & holster(note: Score targets upon completion of this stage)Action: Stage 3A1. On signal, flanking step while drawing & fire4 rounds preferred area with dominant handonlyAfter Action:1. Breathe, scan, de-cock, reload if necessaryand remain at the high ready position withthe pistol in the dominant handAction: Stage 3B1. On signal, flanking step whilepresenting to the target & fire 4rounds preferred area, nondominant hand onlyAfter Action:1. Flanking step, breathe, scan, decock, reload if desired & holster2. On command, transfer the pistol to the nondominant hand & remain at a modified highready position*Note: The pistol needs to be prepared with 1 round in the chamberand 2 in the magazine. 3 rounds total.Action:1. On signal, flanking step while drawing & fire three rounds preferred area2. On slide lock take a flanking step in the opposite direction while reloading3. Fire three additional rounds preferred areaAfter Action:1. Flanking step, breath, scan, de-cock, reload if necessary & holsterStage 5Distance:Time:Rounds:Action:1. On signal, flanking step while drawing & fire three rounds preferred area30 ft8 sec3Stage 6Distance:Time:Rounds:EndingAfter Action:1. Flanking step, breathe, scan, de-cock, reload if necessary & holsterAction:1. On signal, flanking step while drawing & fire two rounds target preferred area50 ft8 sec2After Action:Flanking step, breathe, scan, de-cock & holsterProper un-loading and clearing proceduresOHIO PEACE OFFICER TRAINING ACADEMYSemi-Auto Pistol Qualification CourseEffective: January 1, 2013Page 10 of 11
COURSE OF FIRE QUICK REFERENCE SHEET(Scoring)Total hits in preferred area 1 point eachSubtract the below penalties from the above totalHead or hip circle miss- 1 pointsSubtract 1 additional point each for: Hits off silhouette- 1 point each Rounds fired over time- 1 point each Rounds beyond 25 allotted- 1 point eachTotal Score FinalSpecific notes:Stage 1 reactionary shooting Any hit inside the preferred area is considered a hit (1 point value)Stage 2 failure drill Failure drill accepted areas are the head circle and the hip circles The target area should be designated by the instructor prior to starting the stageof fire Any round that does not impact the designated circle is scored as - 1 (minus one)regardless of where it lands outside the circle This stage should be scored and marked immediately after firingOHIO PEACE OFFICER TRAINING ACADEMYSemi-Auto Pistol Qualification CourseEffective: January 1, 2013Page 11 of 11
against the solar plexus, with fingers extended and parallel to the ground. The support hand thumb is pointed towards the shooter‟s chin. (Elevation of the support hand may vary but most shooters find that they are able to maintain correct hand position without undo stress on the wrists