Transcription
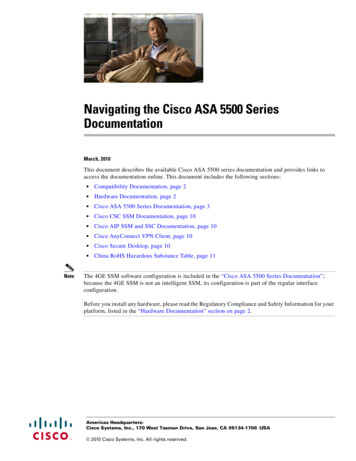
Navigating the SAP User Menu Screen Quick Reference – for Mac UsersPC Users (other side)Command fieldFollow the menu path:Extras Settings to change usersettings on the SAP User Menu screen.System name, session, and clientMenu barSAP StandardMenu screen buttonSAP User Menu screenbuttonList of “favorites” you cancreate; frequently usedtransactions and URLsSAP water graphic; toremove it, follow themenu path:Extras Settings.Select Do not displaypicture.Click on an arrowto open and closefolders.Double-click to start atransaction.Navigation areaStatus BarNavigation AreaWorking area on the SAP User Menu screen where the menu and Favorites folders are located. Open thefolders until you see a transaction name such as Create a Requisition. Double-click on it to start a transaction.Navigation PathRefers to the folders and transactions you need to access on the SAP User Menu screen to start atransaction. For example, the navigation path for Create a Requisition is:- User Menu- Role ZMIT- Purchasing- Requisitions- Create a RequisitionMenu BarAllows you to perform some system and display functions through a dropdown menu.Command FieldAnother way of starting a transaction from any SAP screen instead of using the folders on the SAP UserMenu screen. Type in a transaction code such as /nme51 and press Enter to bring up the transaction.User Menu buttonClick on the SAP User Menu screen button to access the Roles menu folders for which you have authorization.SAP Menu buttonClick on the SAPMenu button to access the SAP menu folder, the equivalent of the SAP R/3 menu.Create a FavoriteOpen the folders and click on the transaction you want to add to the Favorites folder.Follow the menu path: Favorites Add or click. To use the favorite, double-click on it.Status BarShows the same system information that is on top of the screen.User SettingsThe following settings can be turned on and off: display water graphic, display transaction code to the left ofeach transaction item, put Favorites folders on the bottom of the screen, display Role ZMIT folder, displayonly Favorites folder, but not menu ones.
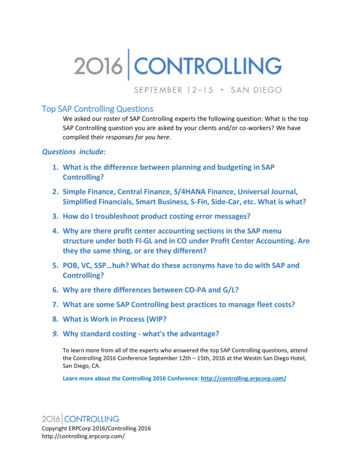
Navigating the SAP User Menu Screen Quick Reference – for PC UsersClick the arrow toopen the Command field.Follow the menu path:Extras Settings to change usersettings on the SAP User Menu screen.Windows buttons – Place cursor over them to highlight them.Menu barSAP Standard Menuscreen buttonSAP User Menuscreen buttonList of “favorites” you cancreate; frequently usedtransactions and urlsSAP water graphic; to removeit, follow the menu path:Extras Settings.Select Do not displaypicture.Click on an arrowto open and closea folder.Double-click tostart a transaction.Navigation areaClick the arrow to openthe Status Bar.Navigation AreaWorking area on the SAP User Menu screen where the menu and Favorites folders are located. Open thefolders until you see a transaction name, such as Create a Requisition. Double-click on it to start atransaction.Navigation PathRefers to the folders and transactions you need to access on the SAP User Menu screen to start atransaction. For example, the navigation path for Create a Requisition is:- User Menu- Role ZMIT- Purchasing- Requisitions- Create a RequisitionMenu BarAllows you to perform some system and display functions through a dropdown menu.Command FieldAnother way of starting a transaction from any SAP screen instead of using the folders on the SAP UserMenu screen. Type in a transaction code such as /nme51 and press Enter to bring up the transaction.User Menu buttonClick on the SAP User Menu button to access the Roles menu folders for which you have authorization.SAP Menu buttonClick on the SAP Menu button to access the SAP menu folder, the equivalent of the SAP R/3 menu.Create a FavoriteOpen the folders and click on the transaction you want to add to the Favorites folder.Follow the menu path: Favorites Add or click. To use the favorite, double-click on it.Status BarWhen open, shows system name, session, and client on the left.User SettingsThe following settings can be turned on and off: display water graphic, display transaction code to the left ofeach transaction item, put Favorites folders on the bottom of the screen, display Role ZMIT folder, displayonly Favorites folder, but not menu ones.Doc#: C-010327-UMS-KH-1.00Copyright 2001 Massachusetts Institute of Technology
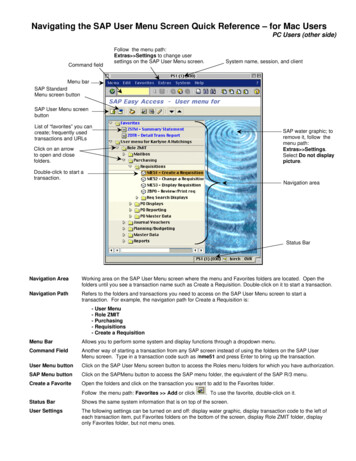
SAP – Frequently Used Buttons – Quick ReferenceNote: Keyboard shortcuts for the same buttons may be different depending on the SAP screen you are using.Standard Toolbar ButtonsButtonKeyboardShortcut DescriptionKeyboardShortcutDescriptionEnter key Enter/ContinueCtrl PCtrl SSave todatabaseF3BackShift F3F12ButtonKeyboardShortcutDescriptionPrintPage DownNext pageCtrl FFindCtrl Page Down Last pageCtrl GContinueSearchF1HelpNoneCreate newsessionAlt 12Customizelocal layoutExit systemtaskCtrl Page Up First pageCancelPage UpButton(Mac only)(PC only)Previous page(PC only)Application Toolbar and Screen ButtonsButtonKeyboardShortcut KeyboardShortcutDescriptionF8ExecuteShift F2DeleteShift F5Get variantF5OverviewNoneUpdate/RefreshShift F6Selection screenhelpNavigation ButtonsKeyboardButton onButtonKeyboardShortcutDescriptionEnter keyEnter/Continue/CopyF8Scroll leftCtrl Shift F1Move FavoritesUpF12CancelShift F1Shift F7Scroll rightNext ItemCtrl Shift F2Move FavoritesDownCtrl F10User menuCtrl F11SAP menuCtrl F12BusinessWorkplace MenuCtrl F7Previous layoutCtrl F8Next layoutF6Display PeriodscreenMatchcode ButtonsButtonKeyboardShortcutDescriptionF4Display Matchcode listF6Insert in personal list. Click on an item, thenon the button.F4Display Matchcode listShift F6Display personal list. After you create thepersonal list, click to end the list.Shift F6Restores the originalMatchcode listShift F4Hold list displayed while you make a selection.Click on the button, then double-click to selecta value.ButtonKeyboardShortcut(Mac)(PC)(PC only)Description
Working with cutDescriptionCtrl F1Select all itemsCtrl F2Deselect allCtrl F3Start/end of block. Select firstitem; click button. Select lastitem; click button.Ctrl F6Display resultsF5Change sort order todescending or ascending.NoneMultiple Selection. Include orexclude single values or ranges.F7Display all possible values.F8Collapse AllShift F4Dynamic Selections. Allowsyou to select additional fieldsfor search criteria.Shift F5Restrict values on Matchcodelist.F2Selection Options. Choosevalues , , , etc.F5 (Mac)Display Change. Switchesfrom display to change mode.NoneReplace item back intoworkflow in Workflow riptionKeyboardShortcutDescriptionF6Display header details.F2Display detailsF2Display line item details.Ctrl Shift F6Show release strategy forPO.Shift F6Display conditions for a PO lineitem.Ctrl F11Display delivery address.F7Display the vendor address fora PO.Shift F5Display the delivery schedulefor a PO line item.Shift F5Ctrl F12General Statistics (Reqs)PO HistoryNoneServices for object(Display JVs, ift F2Delete selection lineF9Paste text into field after youcopy or cut it. Position thecursor and click the button.Ctrl F10Shift F6Item text (POs)Detailed text (JVs)F9Select. Click in a line item,then on the button.Ctrl Shift F1Cut text (JV item text)Ctrl ShiftF2Copy text (JV item text)Shift F4Search and replace words inthe JV text screen.(PC only)ButtonKeyboardShortcutDescription(PC only)F6Create text (JVs)(Mac only)Copyright 2001 Massachusetts Institute of TechnologyDoc #: C-010301-BUT-KH-4.00
SAP Matchcode Quick ReferenceDisplay Matchcode List or SearchClick in the field and then on the Matchcode button to the rightof the field. Note: Not all fields have Matchcodes.Mac:PC:Types of MatchcodesA. Hit List – for a short list of values –1. Scroll down to see all the values.12. Double-click on a value such as 1040 to select it.Search the Hit List (optional):3. Click the Find button.24. When the Find box appears, type in a searchterm such as computer.35. Clear the check boxes for Starting at current lineand/or Only on current page unless you want tolimit your search accordingly.6. Type in a number to limit or expand your searchresults in Cancel search after hits.47. Click the Find button at the bottom of the screen.58. Double-click on the value to select it from the listthat appears.69. Double-click again to copy it into the entry field.7B. Restrict Value Range – category search –On a Mac:11. Click on the Tab List button and select from the list.(The name of the tab may be wrong for thecategory you selected but the screen is correct.)2. Type in your search term. You can enter more thanone field.TIP: Type part of the word followed by an asterisk, (suchas sera*) if you don’t know the full name.233. Type in a number in the Restrict display to field tolimit your search or click No restrictions.4. Click the Enter button.5. Double-click on the value to select it.4
On a PC:1. Click on the arrows to scroll through the tabs, thenclick on one; or use the Tab List button and selectfrom the list like the Mac.2. Type in your search term. You can enter more thanone field.12TIP: Type part of the word followed by an asterisk, (suchas sera*) if you don’t know the full name.3. Type in a number in the Restrict number to field tolimit your search or click No restriction.344. Click the Enter button.5. Double-click on the value to select it.C. Calendar Search – for month, day, and year –On a Mac:1. Click on the month and year on top of the screen.Select from the dropdown list.12. Double-click on the number in the middle to select aday.2On a PC:1. Scroll up and down in the navigation bar on the rightto find the month and year. They are listed on theleft side of the box.12. Double-click on the number in the middle to select aday.2Create your own Personal Matchcode List (on the Hit List Matchcode screen)Insert in Personal ListAdd a value to your list. Click on a value, then on the button. Repeat for as manyvalues as you want in the list.Display Personal ListDisplayed after you select a personal value. Click on this button after you select yourvalues to view the entire list. This list then becomes the default whenever you clickon the Matchcode button for that field.Delete from Personal ListSame button as the Insert button but on the Personal Value List screen. Click on avalue, then on the button to delete the value from the personal list.Display all valuesUsed on the Personal Value List screen. Click to display the original Matchcode list.Doc#: C-010108-MAT-KH-1.00Copyright 2001 Massachusetts Institute of Technology
SAP - Create Journal Voucher Quick ReferenceNavigating toCreate Journal VoucherFrom the SAP Easy Access Screen, follow the navigation path:User Menu Journal Vouchers Parked JVs Create a Parked JVOr use the transaction code: /nf-651. Complete Initial Screen:Document date: Today's date or the receiptdate from the sourcedocument. For FY documentsenter 06/30/yy (yy fiscal yearthat just ended).Doc.type:SA – for periods 1-12FY – for period 13Company code: Select correct company code.Posting date:Today's date or the receiptdate from the sourcedocument. For FY documentsenter 06/30/yy (yy fiscal yearthat just ended).Currency/rate:USDHeader text:(Optional)Short description of thetransaction, for your referenceonly122. Click the Fast entry button.3. Enter Debits and Credits:Complete the following fields for each line item:PK:Posting Key:40 – for debit50 – for creditAccount:G/L accountCost ctr:OrderWBS elementEnter only one cost object.Due date:Enter date of originaltransaction; otherwise leaveblank. If cost object has closedsince the transaction occurred,you can backdate theexpense.For FY documents, use WBSelements less than 5000000.Amount:Amount of debit or creditText:Description of transactionNote: Be sure debits & credits balance to zero.4. Follow the menu path:Extras Texts 3
5. Enter Explanatory Texta) In the “Text in Accounting Document” dialogbox, double-click on 'Correspondence.5ab) Type an explanation in the Text Screen andclick the Back button.c) You are returned to the “Text in AccountingDocument” dialog box. Click the Enterbutton.5c6. Add, Change, or Delete line items:a) To add line items, click the Fast entry buttonand enter line items as described above.b) To change a line item, click the Fast entrybutton and make changes on the Fast Entryscreen. Then follow the menu path:Extras Texts to make text changes.c) To delete a line item, click the line item onceto select it and follow the menu path:Edit Delete.7. Park the Journal Voucher6a & 6bTo save the JV and work on it later:Follow the menu path:Document Park document6cNote: Write down the document number that appearsat the bottom of the Initial Screen.8. Complete the Journal VoucherTo submit the JV for review and posting:a) Follow the menu path:Document Complete.b) The “Backup Notification” dialog box asks ifyou are sending backup to CAO. Click Yesor No accordingly (Do NOT click Cancel).Note: Include the document number with all backup.Your JV will not be posted until the backup is receivedand matched with the JV.c) For each line item with a property G/Laccount, enter a PO number or an externalreference number and click the Enter button.d) For each line item with an underrecovery G/Laccount, enter a WBS element if you are in adepartment, lab, or center. Only CAO canenter either a WBS or an internal order. Clickthe Enter button.e) A dialog box tells you whether the JV will beposted directly or sent for review. Click theEnter button.8b8c8dNote: Write down the document number that appearsat the bottom of the Initial Screen.Doc#: C-020719-JV-DP-3.02Copyright 2002 Massachusetts Institute of Technology
SAP Journal Voucher Upload Quick ReferenceFor SA and FY Journal DocumentsI.Type your data into a spreadsheet file using the following 04420050800703Transfer travel expensesFund U/RTransfer travel expensesFund U/RCol DescriptionAEnd of document *I*4505622J*Note: Do not typein the columnheadings. Theyare shown forclarity only.678900045056226789000RulesBCost object (7 digits)Type “X” to mark the last line of the journal document in your upload file. No more than 800lines per uploaded journal document. The last line must contain an amount; it cannot be 0.Enter the cost center, internal order, or WBS element to be credited or debited.CG/L account number (6 digits)Enter the G/L account number identifying the expense or revenue.DEDescriptionA short description of the line item text of the JV charge, up to 40 characters.Transaction date(mm/dd/yyyy)Date the activity occurred. Must be within begin and end dates of cost object. To format a 4digit year, see: VUPprepch.htmlFDebitsThe amount to be debited. Format as follows: No plus signs ( ), no minus signs (-), no dollar signs ( ) Commas and decimal points are optional Enter one debit per line in the fileG*HCreditsAmount to be credited. Same rules as for debits. Total debits and credits must balance.Only enter if the G/L account number is 421818 (Equipment-not MTDC).Purchase Order number(10 characters)*IExternal (reference) number(12 characters)Only enter if the G/L account number is 421818 (Equipment-not MTDC) and there is no POnumber. This may be a purchase requisition number.*JUnderrecovery WBS orinternal order (7 characters)Only used for underrecovery. If you are a dept., lab, or center, enter a WBS for each line itemwith an underrecovery G/L account. Only CAO can enter either a WBS or an internal order.*Special fields. See the above Rules for when to use.II. Save your file as type: Text (Tab delimited).III. Upload your file in SAP.From SAP User Menu screen, use the transaction code /nzjva or follow the navigation path:User Menu Role ZMIT Journal Vouchers Spreadsheet Uploads SA/FY JV Documents1.Select the company code from the Matchcode list.2.If you know the file name and path, type it in here. Otherwise,use the Matchcode button to select it.3.Choose Pre-validation Only to check the file for errors butnot post the transactions. Select Pre-validation and Postingto check the file for errors first, and if error-free post thetransactions to SAP.4.Enter an explanation for all line items (72 spaces).5.Enter Y if you will be sending backup documents to CAO;enter N if you won’t.6.For normal charges, choose SA and skip to Step 8. Forcharges in closing period 13, choose FY.7.For FY charges ONLY, enter the last day of the fiscal year forthe posting date (e.g., 06/30/2001) even though the screensays SA/FY/SX documents. Enter 13 for the period (CAOuses 14–16). Otherwise, leave the default date.8.Choose Processing in Background for files over 100 lines.Processing Immediately is for files 100 lines or less.9.Click the Execute button.129345678
IV. Check the results of the upload.If you chose Processing in Background, go to Step 11.If you chose Processing Immediately:Journal Document Number10. For Pre-validation and Posting with no errors,the “Electronic Journal Voucher” screen showsthe journal document number on the left.For Pre-validation only with no errors, redo theupload and choose Pre-validation andPosting in Step 3 to post the JVs.For both options: If errors are found, correct them andredo the upload.For Processing in Background (Steps 11–19):1311. A dialogue box displays the background jobnumber. Write down the job number. Click theEnter button.12. To see the results of your upload, check thebackground job directly after executing it.Follow the menu path:System Services Jobs Job overview1413. Type in the job number from Step 12 or leavethe asterisk (*) to list all your jobs.14. Click the Execute button to go to the "JobOverview" screen.1615. When the job is finished, select the job name.16. Click the Spool button. The “Output Controller:List of Spool Requests” screen is displayed.17. Select the spool number.18. Click the Display button. The “Graphical display ofspool request ” screen is displayed.1519. Scroll to the bottom of the screen to see yourjob results.18For Pre-validation and Posting with no errors, thejournal document number is on the left.For Pre-validation only with no errors, redo theupload and choose Pre-validation and Posting in Step3 to post the JVs.For both options: If errors are found, correct themand redo the upload.Copyright 2002 Massachusetts Institute of TechnologyDoc.#: C-020719-DP-JVUP-3.0217
SAP – Internal Provider Billing Quick ReferenceFrom the SAP User Menu screen, follow the navigation path:Navigating to Create a JVfor SAP reqsUser menu ! Role ZISP ! Billing ! Create ISP JVOr use the transaction code: /nzip11. Enter the purchase requisition that you want topost a JV to or use the Matchcode button tosearch for it.2. Click the Enter button.213. Complete text fields and display req line items.Document date:Date of requisition you want toreferenceClose requisition:(optional)Check if your jv will close thebalance on the reqHeader text:(optional)Any info about the reqCorrespondence text:Explanation for the jvDisplay all accountassignments:(optional)Display all line items on thesecond IP screen434. Click the Enter buttonto display all line itemsor double-click on one line item at a time.5. Debit requisitioner’s account.Invoiced amount:Dollar amount to post to jv fromrequisitioner’s accountText field:(optional)Description of chargeDue on:Delivery date of goods/services6. Credit internal provider’s account.Account:G/L account that will be creditedCost CntrOrder No.WBS ElementCost object to be creditedInvoiced Amt:Dollar amount of credit or enterasterisk (*) to have SAPcalculate itText field:Additional info about the req(optional)Due on:Delivery date of goods/
SAP Menu button Click on the SAPMenu button to access the SAP menu folder, . Note: Keyboard shortcuts for the same buttons may be different depending on the SAP screen you are using. Working with Data Button Keyboard Shortcut Descript