Transcription
WSG Series of intelligent mechatronic gripping modulesInterfacing to Universal RobotsFirmware Version 4.0.2February 2016
Contents12Introduction . 3Preparation . 32.12.22.32.4Configuration of the Gripper . 3Network Configuration of the Robot Controller . 5Hardware Installation . 5Software Installation . 634Getting Started . 7Software Description . 84.14.24.34.3.14.3.2Program Files . 8Scripts and Sub-Programs. 9Installation File . 10Modbus client . 10Variables . 12-2-
1IntroductionThis document describes how to set up, mount and use a WSG series gripper with a robot arm of theUR series from Universal Robots. It is assumed in this manual, that you have set up your robot asdescribed in the user manual of your robot arm and have read the “Mounting and Operating Manual” of the gripper. The robot controller uses the Modbus/TCP interface of the gripper. For detailedinformation on controlling the gripper with this interface, please read the “WSG Fieldbus Manual”.2PrerequisitesThe following requirements have to be met, to use a WSG gripper with a Universal Robot: Modbus/TCP license for the WSG gripping module (included in Collaborative Robot Kit) OR:3Universal CB2 controller with Polyscope version 1.8Universal CB3 controller with Polyscope version 3.1Preparation3.1 Configuration of the GripperThe following steps have to be made on the gripper to setup the communication interface on thegripper. If your gripper is part of a “Collaborative Robot Kit”, these steps have already been donefor you.1. Using the Ethernet/Power cable, connect the module to the existing Ethernet network of alternatively to the network card in your PC or laptop. The gripper’s IP address is factory-set to a static value of 192.168.1.20. For more information about connecting to the gripper or changing the IP address, please refer to thegripper manual. To directly operate the module on your computer’s network connection,you may have to alter your computer’s network configuration. If in doubt, contact yoursystem administrator.2. Connect your module with a power supply (24 V).3. The gripper will now start up. The indicator for the operating state will light up blue and afterabout 5 seconds it will start flashing quickly blue. This signals that the gripper is booting. After about 15 seconds the indicator will slowly flash white. The gripper is ready for use.4. On your computer, open the Internet browser and enter the address http://192.168.1.20-3-
5. Open the page “Help License Manager”. Enter the Modbus/TCP license key in the licensekey field and click “Submit”. Modbus/TCP is an optional feature for the WSG gripping modules. A license key can beobtained separately. Please contact your local sales representative.6. Click on “Reboot” to restart the gripper. After the gripper has rebooted reload the page. Onthe page “Help License Manager” the option “Modbus/TCP Interface” should now beshow “licensed”.7. Open the “Settings Command Interface” page.8. Select “Modbus/TCP” as interface.9. Click on Apply.-4-
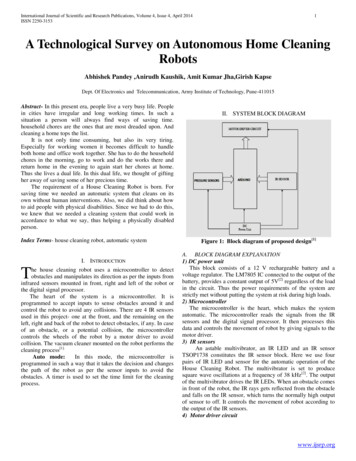
3.2 Network Configuration of the Robot ControllerThe Ethernet interface of the robot has to be activated and configured by performing the followingsteps:1. On the teach panel of the robot, click on “Setup Robot”.2. Click on “Setup Network”.3. Choose “Static Address”.4. Enter the following settings:IP address: 192.168.1.10Subnet mask: 255.255.255.0Default gateway: 0.0.0.0Preferred DNS server: 0.0.0.0Alternative DNS Server: 0.0.0.05. Click “Apply” If you want to use a different IP address, make sure that the robot can connect to thegripper. Refer to the gripper manual to change the network settings of the gripper andcontact your system administrator for the correct network settings.Fig. 1: Network settings on Universal Robot3.3 Hardware Installation1. Mount the adapter plate to the tool output flange of the robot using the provided screws.-5-
2. Mount the Gripper to the adapter plate.3. Plug in the power supply and Ethernet wires on the gripper.4. Connect the power supply wire to the 24V of the robot controller.5. Connect the gripper to the Ethernet Interface of the robot controller. If the port is alreadyused, use a network switch. Please refer to the manual of your robot arm for details on how to connect the powersupply and the Ethernet connection.Secure the wires with tie straps. Make sure, that the wires are long enough to let the robotmove freely.3.4 Software Installation1. Plug the provided USB Drive into the USB port on the right hand side of the teach panel.2. Wait until the message “WSG Installation finished” appears on the display.3. Unplug the USB drive from the teach panel.-6-
4Getting StartedThe delivered software consists of script files for the actual control of the gripper, an installation file,which defines the variables and the Modbus/TCP configuration, an example program and a programtemplate file, which can be used for your own implementations.To run the example program follow the following steps:1. On the teach panel click “Program Robot”.2. Click on “Load Program”.3. Select the subfolder “Weiss Robotics”.4. Select the File “WSG-example-CB2.urp” if you have a CB2 controller or “WSG-example-CB3”if you have a CB3 controller, respectively.5. Click “Open”.6. If you are asked if the installation file should be loaded, click on “Load installation”.7. Start the program by clicking the “Play” button.The gripper should now move. The gripper is referenced and then moved to a defined position. Afterwards a grip command is executed and the status of the gripper is read. If the gripper reports thestate “Holding” the part is held for 1 sec, before it is released again. If the state is different from“Holding” the grip is released again.To implement a new program follow these steps:1. On the teach panel click “Program Robot”.2. Click on “Load Program”.3. Select the subfolder “Weiss Robotics”.4. Select the File “WSG-template.urp”.5. Click “Open”.6. If you are asked if the installation file should be loaded, click on “Load installation”.7. Put your commands in the main loop in the template.8. Start the program by clicking the “Play” button.-7-
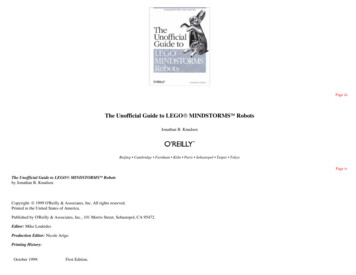
5Software DescriptionIn the following section you can find a description of the provided software modules.5.1 Program FilesThere are two program files provided for each type of robot controller (CB2 and CB3) by the programpackage:WSG template.urp:This file provides the required subprograms and initialization for using the gripper. The gripper isreferenced and the variables are initialized. Then a loop is started running the user code.Fig. 2: Program templateWSG example.urpProvides a basic example to show how the subprograms can be used to control the gripper and evaluate the status of the gripper. The gripper is referenced and then moved to a defined position. Afterwards a grip command is executed and the status of the gripper is read. If the gripper reports thestate “Holding” the part is held for 1 sec, before it is released again. If the state is different from“Holding” the grip is released again.-8-
5.2 Scripts and Sub-ProgramsThe scripts are located in the subfolder “WSG scripts” and are called by the sub-programs defined inthe template program.Sub-ProgramScript FilenameDescriptionWSG Stopwsg stop.scriptStops the current action and sets thegripper in IDLE stateWSG Homewsg home.scriptStarts a reference movement. Has tobe executed at least once.WSG Wait Idlewsg wait for idle.scriptWaits until the gripper state is “Idle”WSG Wait Id Errwsg wait for idle or error.scriptWaits until the gripper state is “Idle”or “Error”.wsg move.scriptPre-positions the gripper to the position set by i WSG Pos with the speedset in i WSG Speed.wsg grip.scriptStarts a grip using the position, speedand force set by i WSG Pos,i WSG Speed and i WSG Force.WSG Wait Gr Finwsg wait for grip finished.scriptWaits until the grip is finished and thegripper state is “Holding”, “No Part” or“Part Lost”WSG Get Statewsg get state.scriptReads the gripper state and stores it ins WSG stateWSG Releasewsg release.scriptOpens the gripper to the position setby i WSG Pos.WSG Fast Stopwsg fast stop.scriptIssues a fast stop.wsg init.scriptInitializes the Modbus interface andthe variables. Can be used on CB3instead of an installation file.WSG MoveWSG GripWSG InitThe basic usage is to issue a command and then wait with “WSG Wait Idle” until the gripper hasfinished the issued command and returned to the “Idle” state. For waiting after “WSG Grip” is issued, use the sub-program “WSG Gr Fin”.After a grip is performed, you can read the state with “WSG Get State” and react depending on thevalue of the variable “s WSG State”.-9-
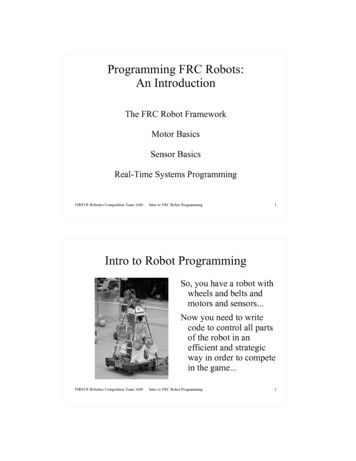
For more detailed information on the gripper commands and states please refer to the“WSG Fieldbus Interface Manual”.5.3 Installation FileWe provide an installation file, which defines the Modbus/TCP connections. You can use this file orcreate your own installation file. If you want to create an installation file yourself, please set the following settings. Instead of using an installation file, you can also run the “WSG Init” sub-program,which sets the Modbus/TCP configuration from within the robot program.5.3.1 Modbus clientAdd a Modbus client with the following settings:IP: the IP address of the gripper. Default is 192.168.1.20TypeIDFrequencyNameRegister Input025 HzRI WSG STATERegister Output025 HzRO WSG COMMAND FLAGSRegister Output125 HzRO WSG WIDTHRegister Output225 HzRO WSG SPEEDRegister Output325 HzRO WSG FORCELIM The frequency can be set when activating the option “Show advanced settings”. If you want to read out more process data, such as position, speed and force from thegripper, you can add more Register Inputs. For further information on the Modbus/TCPcommunication interface please refer to the “WSG Fieldbus Interface Manual”.- 10 -
Fig. 3: Modbus Setup on Universal Robot- 11 -
5.3.2 VariablesThe following variables are used by the scripts and have to be defined either in the installation or theprogram:VariableDefaultvalueDescriptionCommand parameter “Force Limit”i WSG Force1000New gripping force limit in 1/100 Newton (i.e. a value of 1050means 10.50 N). The gripping force is twice the nominal force thatis applied to the part to be gripped.Please note:Setting this parameter to a value beyond the system limits andtriggering a motion-related function using it raises a FAST STOP.Command parameter “Speed”i WSG Speed5000Current movement speed in 1/100 millimeters per second (i.e. avalue of 3005 means 30.05 mm/s), given as finger speed relative toeach other.Please note:Setting this parameter to a value beyond the system limits andtriggering a motion-related function using it raises a FAST STOP.Command parameter “Position”i WSG Pos0New finger opening width in 1/100 millimeters (i.e. a value of 1220means 12.20 mm).Gripper StateThis variable contains a string describing the gripper state. It is onlyupdate by the “WSG get state” sub-program and script.s WSG ng”“No Part”“Part ��Waiting for new commandFingers moving towards the partNo part foundPart was gripped but then lostHolding a partFingers moving away from the partFingers moving due to a pre-positioncommand (WSG MOVE)An error occurred“Error”- 12 -
Weiss Robotics GmbH & Co. KG. All rights reserved.The technical data mentioned in this document can be changed to improve our products withoutprior notice. Used trademarks are the property of their respective trademark owners. Our productsare not intended for use in life support systems or systems whose failure can lead to personal injury.
i_WSG_Pos 0 Command parameter “Position” New finger opening width in 1/100 millimeters (i.e. a value of 1220 means 12.20 mm ). s_WSG_State “Idle” Gripper State This variable c