Transcription
Setting Up Single Sign-On forEncompassSet Up & User GuideLast revised on September 11, 2020
2020 EllieMae, Inc.2020 Ellie Mae , Encompass , AllRegs , DataTrac , Ellie Mae Network , Mavent , Millennial Tracker ,Mortgage Returns , Prospect Manager , Total Quality Loan , True CRM , TQL and the Ellie Mae logo aretrademarks of Ellie Mae, Inc. or its subsidiaries. All rights reserved. Other company and product names maybe trademarks or copyrights of their respective owners.Setting Up Single Sign-On for Encompass Set Up & User Guide Last revised on: September 11, 2020 2
Table of ContentsIntroduction - Using Single Sign-On5Using Single Sign-On with Encompass5New Encompass Log In ScreenSingle Sign-On RequirementsConfiguring an Identity Provider (IdP) for SSO Using SAML568Setting up the Connection10Configure Your IdP for SAML Authentication10Configure Microsoft Azure11Adding Users to the Encompass Application15Set Up the Connection Between Encompass and Azure17Configuring Okta18Generating and Uploading CA Certificate24Assigning Users to the Encompass Application24Specifying the Encompass User ID for Each User27Set Up the Connection Between Encompass and Okta29Configure Salesforce30Generating and Uploading CA Certificate33Adding Users to the Encompass Application34Set Up the Connection Between Encompass and Salesforce36Setting Up Attributes36Setting Up Single Sign-On for Encompass Set Up & User Guide Last revised on: September 11, 2020 3
Set up the Connection in Encompass Developer Connect40Managing Connections44Multiple Connections44Deactivate a Connection44Replace a Metadata XML File44Setting Up Your SSO Preferences for Encompass45Single Sign-On (SSO) Options in Encompass45Login Access Settings for Organizations46Restricted Access - Setting up an Organization with SSO Log in Option Only46Full Access - Setting up an Organization with SSO Login or Encompass Login CredentialsOptions47Organizations using the ‘Parent’ Settings47Login Access Settings for Individual Users48Full Access: New Users Added to Organizations with Full Access48Restricted Access: New Users Added to Organizations with Restricted Access49Customizing the Login Access Level of a New User50Managing the Log in Access for Existing Users52Updating the Login Access for an Organization from Restricted Access to Full AccessManaging Organizations and Users When Changing Login Access Settings5355Moving a Full Access Organization to a Restricted Organization (‘Use Parent Info’ is selected)55Moving a Restricted Access Org to a Full Access Org (Use Parent Info is selected ONLY)57Moving Organizations That are Not Utilizing the ‘Use Parent Info’ Option59Moving Non-Customized Users to an Organization that has Different ‘Login Access’ Settings60Moving customized users to an organization that has a different ‘Login Access’ selected62Logging Into Encompass64Logging in with Restricted Access65Logging in with Full Access66IdP Parameter MatrixSetting Up Single Sign-On for Encompass Set Up & User Guide Last revised on: September 11, 2020 467
Introduction - Using Single Sign-OnIntroduction - Using Single Sign-OnUsing Single Sign-On with EncompassSingle Sign-On (SSO) is an authentication process that enables users to authenticate securely with multiplewebsites or applications by logging in only once with one set of credentials, a user name and password. Whena user logs into an SSO website or application, a trusted identity provider (IdP) verifies the user's credentials.To authenticate the user, the identity provider prompts the user to enter a user name and password for thewebsite. Once the user is authenticated, the identity provider grants access to the websites and/orapplications.Starting in Encompass 20.2, Encompass administrators use the Login Access section of the OrganizationDetails to determine if their company's users will be required to log into Encompass using credentials providedby their company's IdP (Restricted Access) or if they will have the option to log in using their IdP credentials ortheir Encompass user name and password credentials (Full Access).The option to choose between Restricted Access and Full Access is available inEncompass Banker Edition only. In Broker Edition, the Full Access option is the onlyoption that is available for use with SSO.New Encompass Log In ScreenStarting in Encompass 20.2, a new Web-based log in screen will be presented to all users when openingEncompass. Encompass Loan Officer Connect users will recognize this new screen, as it is similar to the login screen used with that platform.Setting Up Single Sign-On for Encompass Set Up & User Guide Last revised on: September 11, 2020 5
Introduction - Using Single Sign-OnSingle Sign-On RequirementsIf the Encompass administrator elects not to require users to log into Encompass with SSO (i.e., you are usingthe Full Access option), you do not need to configure any additional settings. By default, all organizations areset up to use the Full Access option. (Note that users with Full Access will still have the option to log in usingIdP credentials too, but administrators must still configure their IdP and set up the connection in order for thecredentials to work.)If the administrator elects to require their users to only log into Encompass using their IdP credentials (i.e., theRestricted Access option), there are additional prerequisites that must be completed. The following listdescribes the high-level tasks for setting up SSO:nConfigure your identity provider: Select an IdP, and then set up credentials for Encompass users.Only an Encompass Super Administrator can perform this task. (The administrator assigned withthe admin user ID can also perform this task.)nYour IdP must be configured using SAML 2.0. Refer to the Configuring an Identity Providern(IdP) for SSO Using SAML section for more information.Refer to the Configure Microsoft Azure, Configure Okta, or Configure Salesforce sectionsfor instructions for configuring your chosen IdP.Setting Up Single Sign-On for Encompass Set Up & User Guide Last revised on: September 11, 2020 6
Introduction - Using Single Sign-OnnSet up the Connection to your IdP in Encompass Developer Connect: Refer to the Configuring anIdentity Provider (IdP) for SSO Using SAML section for instructions. If you or your developer do nothave access to Encompass Developer Connect yet, you can use a Configure SSO button provided inEncompass Banker Edition (in the Company/User Setup Company Information settings) to godirectly to the SAML SSO set up page in Encompass Developer Connect. No additional credentialsare needed to access SAML SSO set up page. Only an Encompass Super Administrator can performthis task. (The administrator assigned with the admin user ID can also perform this task.)nIf you are using Encompass Broker Edition, you cannot access the Configure SSO button.You must have access to Developer Connect to access the SAML SSO set up page.)nSet up your SSO preferences in Encompass: Only an Encompass Super Administrator can performthis task. (The administrator assigned with the admin user ID can also perform this task.) After yourcompany's identity provider is configured and the connection is set up in Encompass DeveloperConnect, you can set up your company's SSO preferences from the Company/User Setup Organization/Users Organization Details Login Access settings. See the Setting Up YourSSO Preferences for Encompass section for detailed instructions.nOnce you have set up the Login Access settings, users can then log into Encompass. Theirlog in process will vary depending on the Login Access settings you have configured. Refer tothe Logging Into Encompass section for instructions.nEncompass Broker Edition users cannot modify the Login Access settings. The Full Accessoption is the only option that is available for use with SSO, which enables users to log intoEncompass using their Encompass credentials or they can log in with their assignedSSO credentials using their company's IdP log in screen.Setting Up Single Sign-On for Encompass Set Up & User Guide Last revised on: September 11, 2020 7
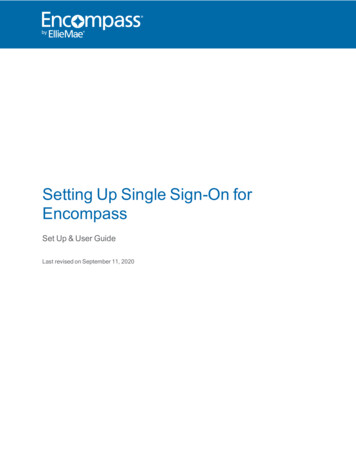
Configuring an Identity Provider (IdP) for SSO Using SAMLConfiguring an Identity Provider (IdP) for SSO UsingSAMLThis information is for Encompass Super Administrators (or the administrator assigned with the admin userID) who want to configure Single Sign-On (SSO) for Encompass. SSO enables users to log into Encompassand other products on the Ellie Mae Lending Platform with the same user name and password (provided byyour company's IdP provider).Supported FlowsEllie Mae identity federation services support one authentication flow with SAML 2.0:nService provider (SP)-initiatedThe following diagram illustrates the single sign-on flow for SP-initiated SSO, which is when an applicationtriggers SSO.Setting Up Single Sign-On for Encompass Set Up & User Guide Last revised on: September 11, 2020 8
Configuring an Identity Provider (IdP) for SSO Using SAMLSP-Initiated FlowThe instructions and configuration settings provided in this document are applicable to the Service provider(SP)-initiated authentication flows.Setting Up Single Sign-On for Encompass Set Up & User Guide Last revised on: September 11, 2020 9
Configuring an Identity Provider (IdP) for SSO Using SAMLSetting up the ConnectionSetting up a SAML SSO connection between your IdP and Encompass is a two-step process:1. Configure your IdP application with Ellie Mae settings and collect the XML metadata file from theconfiguration. The configuration settings required by Ellie Mae are provided in this guide for each ofthe following IdPs: Microsoft Azure, Okta, and Salesforce.Other IdPs may be used, but they must be configured using SAML 2.0. OnlyIdPs configured using SAML 2.0 are supported.2. Set up SAML SSO in Encompass Developer Connect. In this step you upload your IdP configurationto Encompass Developer Connect. Instructions are provided in the Set up the Connectionin Encompass Developer Connect section.Configure Your IdP for SAML AuthenticationBefore setting up the connection with your IdP, ensure you have the following prerequisites:nnnnAdministrative login credentials for the IdPUnderstanding of your IdP administration settingsThe ability to provide the Encompass user ID assigned to the administrator that is configuring the IdPGeneral concepts of identity federationTo continue, see the Configure Okta, Configure Salesforce, or Configure Microsoft Azure section.Ellie Mae Technical Support can assist you with providing therequirements/parameters needed for IdP setup (i.e., Identifier, Entity ID, Sign-On,URL), SSO onboarding and activation/deactivation, configuring the EncompassSettings required for SSO, and troubleshooting SSO issues. IdP setup andconfiguration should be handled primarily by your company or IT team.Setting Up Single Sign-On for Encompass Set Up & User Guide Last revised on: September 11, 2020 10
Configure Microsoft AzureConfigure Microsoft AzureEncompass supports only public CA certificates as part of the IdP configuration.Because Microsoft Azure does not allow for public CA certificates in SAMLmetadata, the instructions below provide the settings for SAML configuration only.To configure Microsoft Azure (Azure) for SSO with Encompass, an Azure Active Directory Premiumsubscription is required.Please note that Microsoft controls the features and functionality provided forAzure and they be updated without Ellie Mae's knowledge. Therefore, theseinstructions may not reflect the most current user interface provided in Azure.To Configure Azure for SSO with Encompass:Note that these instructions walk you through the steps to add the Encompass application to Azure, andthen configure it, for the first time. If you have already added the Encompass application to Azure, you canskip to the relevant steps in the instructions to edit the configuration as needed.1. Log in to the Microsoft Azure Portal as an administrator, and then click Go to the Portal.2. Click the View button for the Manage Azure Active Directory.3. In the left panel, click Enterprise Applications.4. Click New application.Setting Up Single Sign-On for Encompass Set Up & User Guide Last revised on: September 11, 2020 11
Configure Microsoft Azure5. Click the Non-Gallery application option.nIf you do not see this screen, click the Click here to switch back to old app galleryexperience link near the top of the screen.)6. In the Name field, type a name for your Encompass application (e.g., Encompass), and then clickAdd.7. After clicking Add, the new Encompass application is added to the Enterprise applications Allapplications list. Click the Encompass application in the list to continue.8. On the Overview screen, the Encompass application properties are displayed. In the Set upsingle sign on section, click Get Started.Setting Up Single Sign-On for Encompass Set Up & User Guide Last revised on: September 11, 2020 12
Configure Microsoft Azure9. On the Single sign-on dialog box, select SAML as the sign-on method.10. On the SAML-based Sign-on screen, locate the Basic SAML Configuration section, and then clickthe Edit (pencil) icon.Setting Up Single Sign-On for Encompass Set Up & User Guide Last revised on: September 11, 2020 13
Configure Microsoft Azure11. In the Basic SAML Configuration section, enter the following values:Set this attribute To this value Identifier (Entity ID)https://idp.elliemae.comReply URL (Assertion Consumer Service URL)https://idp.elliemae.com/sp/ACS.saml2Sign-On URLhttps://idp.elliemae.com/sp/ACS.saml2Relay StateRelay State should be left blank.12. When finished, click the Save icon, and then click the X in the top-right corner to close thewindow.13. In the User Attributes & Claims section, click the Edit (pencil) icon.14. On the User Attributes & Claims screen, it is extremely important that you indicate a Unique UserIdentifier claim. Specifically, you must map the attribute that contains (i.e., captures) theEncompass user ID value to the Unique User Identifier. If you do not compete this step, users willnot be able to log into Encompass via the Azure log in screen.nFor example, if you have set up the employeeid value so that it captures the Encompassuser ID value, assign this employeeid value to the Unique User Identifier field.nOn the User Attributes & Claims screen, click Add new claim, and then select the claimand the value to map to it.nTo update the value that is mapped to the Unique User Identifier attribute, click the Editsymbol (.)next to the value.Setting Up Single Sign-On for Encompass Set Up & User Guide Last revised on: September 11, 2020 14
Configure Microsoft AzurenNote that in order to set up a value to capture the Encompass user ID, you must accessMicrosoft PowerShell and enter the required code. Since every company is unique, themethods you use to set up this value will vary. Here is a sample:15. In the SAML Signing Certificate section, click the Download link for the Federation MetadataXML to download, and then save, the metadata file onto your computer.Adding Users to the Encompass ApplicationNext, it is very important that you add/assign users or user groups to your Encompass application. Thisprocess establishes the required connection between your Encompass application in Azure and yourcompany's Encompass users so that they will be able to log into Encompass via the Azure log in screen onceSSO is being used by your company.Setting Up Single Sign-On for Encompass Set Up & User Guide Last revised on: September 11, 2020 15
Configure Microsoft AzureTo Add Users or User Groups to the Encompass Application:1. On the Overview screen, click Users and groups in the left panel.2. Click Add user.3. On the Add Assignment screen, click Users and groups.Setting Up Single Sign-On for Encompass Set Up & User Guide Last revised on: September 11, 2020 16
Configure Microsoft Azure4. In the Users and groups list, all of the users that have been set up in Azure (i.e., user profiles) arelisted. Click the name of each user you want to assign to the Encompass application. When you clicka user name, a copy of the user is moved to the Selected items section of the screen.5. When finished, click Select to assign the selected users to your Encompass application.Set Up the Connection Between Encompass and AzureFinally, you can now set up the connection between your Encompass application and Azure. You will performthe required steps in Encompass Developer Connect. Note that you do not need prior access or log incredentials in order to access Encompass Developer Connect to perform these steps. (If you do have log incredentials already, you can continue to use those to log in to Encompass Developer Connect to completethese steps.)Refer to the Set Up the Connection in Encompass Developer Connect section for instructions.Setting Up Single Sign-On for Encompass Set Up & User Guide Last revised on: September 11, 2020 17
Configuring OktaConfiguring OktaThese instructions walk you through the steps to add the Encompass application to Okta, and then configureit, for the first time. If you have already added the Encompass application to Okta, you can skip to the relevantsteps in the instructions to edit the configuration as needed.To Configure Okta for SSO:Please note that Okta controls the features and functionality provided in theirinterface and they be updated without Ellie Mae's knowledge. Therefore, theseinstructions may not reflect the most current user interface provided.1. Log in to your Okta administrator account.nIf you are using the Developer Console Dashboard, switch to the Classic UI.nClick Admin to display the administrator view. You must have administrator access toproceed with the next steps.2. Hover your mouse pointer over the Applications menu, and then select Applications to open theApplications page.Setting Up Single Sign-On for Encompass Set Up & User Guide Last revised on: September 11, 2020 18
Configuring Okta3. Click Add Application.4. In the pop-up window, select Web from the Platform drop-down list, and then select SAML 2.0for the Sign on method.Setting Up Single Sign-On for Encompass Set Up & User Guide Last revised on: September 11, 2020 19
Configuring Okta5. Click the Create button.6. In the Create SAML Integration screen, type Encompass for the App name.7. It is recommended that you add an App logo to help identify your Encompass application when itis listed with additional applications in Okta. To add a logo, click Browse, and then navigate andselect the logo you want to use. Once selected, click Upload Logo to display the logo on thisscreen.Setting Up Single Sign-On for Encompass Set Up & User Guide Last revised on: September 11, 2020 20
Configuring OktaHere are two sample image files you can use. Click an image to view and download it toyour computer.8. When finished, click Next.9. Here you can set up the SAML settings for the Encompass application. In the SAML Settingssection, click Edit.10. For the Single sign on URL, enter: https://idp.elliemae.com/sp/ACS.saml211. Select the Use this for Recipient URL and Destination URL check box.Setting Up Single Sign-On for Encompass Set Up & User Guide Last revised on: September 11, 2020 21
Configuring Okta12. Provide the following information for the fields indicated:nAudience URI (SP Entity ID): https://idp.elliemae.comnDefault RelayState: Leave this field blank. This is the redirect URL that Ellie Mae will setwhen SSO is initiated.13. Also in the SAML Settings section, it is extremely important that you indicate the Applicationusername attribute. Specifically, you must select the Okta username attribute here.nIn addition to selecting Okta username here, you must also complete an additional steplater. For each user that is assigned to the Encompass application, you must alsospecify the Encompass user ID for each of them. If you do not perfo
Sep 11, 2020 · n In addition to selecting Okta username here, you must also complete an additional step later. For each user that is assigned to the Encompass application, you must also specify the Encompass user ID for each of them. If you do not perform this step for each user, they will not be able to successfully log in