Transcription
Introduction to the AirWatch Cloud Connector (ACC) GuideThe AirWatch Cloud Connector (ACC) provides organizations the ability to integrate AirWatch with their back-endenterprise systems. This document describes setting up ACC for a SaaS deployment, which is when certain AirWatchcomponents, including the ACC, are hosted in the cloud.The ACC runs in the internal network, acting as a proxy that securely transmits requests from AirWatch to theorganization's critical enterprise infrastructure components. This allows organizations to leverage the benefits ofAirWatch Mobile Device Management (MDM), running in any configuration, together with those of their existing LDAP,certificate authority, email, and other internal systems. For a diagram that illustrates this refer to ACC DeploymentModel.The ACC integrates with the following internal components: Email Relay (SMTP) Directory Services (LDAP/AD) Email Management Exchange 2010 (PowerShell) BlackBerry Enterprise Server (BES) Lotus Domino Web Service (HTTPS) Syslog (Event log data)The following components are only available if you purchased the PKI Integration add-on, which is available separately: Microsoft Certificate Services (PKI) Simple Certificate Enrollment Protocol (SCEP PKI) Third-party Certificate Services (On-premise only)In This Guide Before You Begin – This section covers topics and prerequisites you should familiarize yourself with so you can getthe most out of using this guide. Architecture & Security – This section lets you see the basic architecture type for your deployment. Prerequisites for ACC Connectivity in SaaS Environments – This section details all of the prerequisites for runningACC in a SaaS environment. ACC Installation – This section details the installation process for the ACC and how to enable it in the AirWatchAdmin Console. EIS to ACC Migration– This section provides instructions on how to migrate from the legacy EIS to ACC. Appendix A – Upgrading ACC – This section gives instructions on how to upgrade the ACC from a previous versionand how to set up automatic updates. Appendix B – Regenerating Certificates – This section tells you how to regenerate certificates for the ACC.1
Before You BeginOverviewBefore configuring the AirWatch Cloud Connector (ACC), you should consider the following prerequisites, requirements,supporting materials, and helpful suggestions from the AirWatch team. Familiarizing yourself with the informationavailable in this section will help prepare you for configuring the ACC. RequirementsFor a complete listing of all requirements for installing ACC in a SaaS environment, refer to the Prerequisites forACC Connectivity in SaaS Environments.2
Prerequisites for ACC Connectivity in SaaS e RequirementsVM or Physical Server1 CPU Core (2.0 GHz)2 GB RAM or higher1 GB disk space for the ACC application, Windows OS, and .NET runtime. Iflogging is being done, then it is recommended you have an additional 5 GB ofdisk space.Sizing for up to 200,000 UsersNote: ACC traffic is automatically load-balanced by the AWCM component – it does not require a separate loadbalancer. To accommodate additional users as part of your sizing requirements you can deploy multiple ACCs, which willall be load balanced by AWCM.Number of UsersUp to10,00010,000 to 50,00050,000 to 100,000100,000 to 200,000CPU Cores22 load-balanced serverswith 2 CPU Cores2 to 3 load-balanced serverswith 2 CPU Cores2 load-balanced serverswith 4 CPU CoresRAM (GB) PerServer44816General RequirementsRemote access to WindowsServers available to AirWatchand Administrator rightsRecommended to setup Remote Desktop Connection Manager for multipleserver management, installer can be downloaded mation.aspx?id 21101See General Requirements.Installation ofNotepad (Recommended)Installer can be downloaded 1/npp.6.5.1.Installer.exeServices accounts forauthentication to backendsystemsValidate AD connectivity method using LDP.exe tool y/ldp.zip)LDAP, BES, PowerShell, etc.Software RequirementsWindows Server 2008 R2 orWindows Server 2012 orWindows Server 2012 R2Install PowerShell on theOptional3
StatusRequirementChecklistNotesserverInstall .NET Framework 4.0Download from n.aspx?id 17718SourceDestination ComponentComponentProtocol PortVerificationHTTPSVerify by enteringhttps://awcmXXX.awmdm.com/awcm/statusand ensure there is no certificate trust error.(Replace 'XXX' with the same number as usedin your environment URL, for example, '100'for cn100.)Network RequirementsACC Server AirWatch SaaS443For example:(https://awcm274.awmdm.com)If auto-update is enabled, ACC must be able toquery AirWatch Admin Console for updatesusing port 443.ACC Server AirWatch Admin ConsoleForexample: (https://cn274.awmdm.com)HTTP or 80 orHTTPS 443ACC Server Internal SMTP(OPTIONAL)SMTPACC Server Internal LDAP(OPTIONAL)LDAP or 389,LDAPS 636,3268,or3269ACC Server Internal SCEP(OPTIONAL)HTTP or 80 orHTTPS 443ACC Server Internal ADCS(OPTIONAL)DCOMACC Server Internal BES(OPTIONAL)HTTP or 80 orHTTPS 443Verify by entering https://cnXXX.awmdm.comand ensure there is no certificate trust error.(Replace 'XXX' with the same number as usedin your environment URL, for example, '100'for cn100.)25135,10255000,49152655354
SourceDestination ComponentComponentProtocol PortACC Server Internal Exchange 2010 or higher(OPTIONAL)HTTP or 80 orHTTPS 443Verification*Note: An outbound proxy or any other connection management software or hardware must not terminate or reject theoutbound connection from the ACC. In other words, the outbound connection required for use by ACC must remainopen at all times.General RequirementsRemote Access to ServersEnsure that you have remote access to the servers that AirWatch is installed on.5
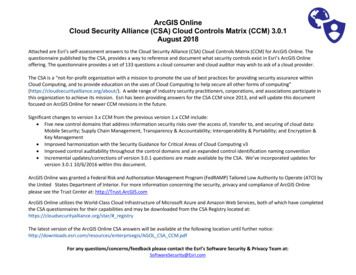
Architecture & SecurityOverviewThe AirWatch Cloud Connector (ACC) is a Windows service that can be installed on a physical or virtual server runningWindows 2008 R2 or higher. It operates from within your internal network and can be configured behind any existingWeb Application Firewalls (WAF) or load balancers. By initiating a secure HTTPS connection from ACC to the AirWatchCloud Messaging Service (AWCM), ACC can periodically transmit information from your internal resources such as AD,LDAP, etc. to the AirWatch Admin Console without any firewall changes. If you plan on proxying ACC traffic through anoutbound proxy, then there are settings in ACC that will allow for proxying (see Proxy Information).In This Section Supported Configurations – See the supported configurations for the ACC. ACC SaaS Deployment Model – See a SaaS deployment model for ACC.Supported ConfigurationsUse ACC in the following configurations: Using HTTPS transport Supporting HTTP traffic through an outbound proxyACC SaaS Deployment Model6
ACC InstallationOverviewInstall the AirWatch Cloud Connector (ACC) by first enabling it in the AirWatch Admin Console and then downloadingand running the installer executable file onto the server that will host the service. Installing the ACC includes thefollowing tasks: Enabling the use of ACC in the AirWatch Admin Console. Generating certificates for the AirWatch server and ACC. Configuring the ACC to communicate with the Enterprise and AirWatch services. Downloading the ACC installer and installing it. Verifying the installation was successful and communications have been established between the AirWatch serverto AWCM and the AWCM to ACC.In This Section Enabling ACC from the AirWatch Admin Console – Enable and configure ACC settings that apply to your deployment. Running the ACC Installer – Follow these step-by-step instructions by running the installer on the server that willhost ACC. Verifying a successful ACC installation – Verify ACC is installed correctly and communicating with AWCM.7
Establishing Communications with AWCMThe following steps apply to both SaaS and on-premise deployments. Establishing communications with AWCM allowsyou to configure an AirWatch instance to use a particular AWCM server.1. Navigate to Groups & Settings All Settings System Advanced Site URLs to view the AirWatch CloudMessaging section.Note: If you are a SaaS customer and do not see this page in the system settings, then these settings have alreadybeen configured for you.2. Select the Enable AWCM Server check box. This allows the connection between the AirWatch Admin Console andthe AWCM server.3. Enter the AWCM Server External URL in the field. This field allows you to enter the servername used by externalcomponents and devices (e.g., ACC) to securely (via HTTPS) communicate with AWCM. An example of an ACC URL is:Acme.com.Note: Do not add https:// since this is assumed by the application and automatically added.4. Enter the port in the AWCM External Port field. This is the port that is being used by the servername above tocommunicate with AWCM.Note: For secure external communications, use port 443. If you are bypass offloading SSL, then you want to use aninternal non-secure communications port, which is by default 2001 but can be changed to other port numbers.5. Enter the AWCM Server Internal URL in the field. This URL allows you to reach AWCM from internal componentsand devices (e.g., Admin Console, Device Services, etc.). Examples of AirWatch URLs are:https://Acme.com:2001/awcm or http://AcmeInternal.Local/awcm.Note: If your AWCM server and AirWatch Admin Console are internal (within the same network), and you want tobypass offloaded SSL, there is no need for a secure connection, so you can use http instead of https. For example,http://AcmeInternal.Local:2001/awcm. This example shows the server resides within the internal network and iscommunicating on port 2001.8
Enabling ACC from the AirWatch Admin ConsolePrepare for the installation by enabling ACC, generating certificates, and selecting enterprise services and AirWatchservices by performing the following steps.Note: Perform the following steps on the server running ACC. Do not download the installation program onto anothercomputer and copy it to the ACC server.1. Navigate to Groups & Settings All Settings System Enterprise Integration Cloud Connector.2. Select the Enable Cloud Connector checkbox to enable ACC and display the General tab.3. Enable ACC to automatically update when a newer version is available. If you want more information regardingauto-update, refer to ACC Auto-Update Option.4. Select the Advanced tab, then select the Generate Certificates button to generate a certificate for the ACC andAirWatch server. Certificates are generated for both and displayed under ACC and AirWatch certificates.Note: Once certificates are generated, the button changes to Regenerate Certificates. For more information aboutRegenerating Certificates, refer to Appendix B - Regenerating Certificates.5. Select each checkbox to enable or disable Enterprise Services. The services you select (enabled) will integrate withACC. SMTP (Email Relay)Note: AirWatch SaaS offers email delivery through its own SMTP, but you can enable ACC to use another SMTPserver here. Enter SMTP servers settings for email in Groups & Settings All Settings System EnterpriseIntegration Email (SMTP). Directory Services (LDAP/AD) Exchange PowerShell (for certain Secure Email Gateways) BES (BlackBerry sync user and mobile device information) Syslog (Client/server protocol used to integrate with the AirWatch event log data)The following components are only available if you purchased the PKI Integration add-on, which is availableseparately: Microsoft Certificate Services (PKI)9
Simple Certificate Enrollment Protocol (SCEP PKI) OpenTrust CMS Mobile (third-party certificate services) Entrust PKI (third-party certificate services) Symantec MPKI (third-party certificate services)Note: Since there is no need to go through ACC for cloud certificate services, if you want to integrate withcertificate services (like Symantec MPKI) by selecting one of the checkboxes in the screen below, the service youselect must be on-premise, not in the cloud (SaaS).6. Select each checkbox to enable or disable AirWatch Services. The AirWatch components you select (enabled) willintegrate with ACC. Device Services (Admin Console and all services required for it to operate, including related Windows services) Device Management (Enrollment, App Catalog, and related Windows services) Self-Service Portal (including related Windows services) All Other Components (including related Windows services)Note: AirWatch recommends leaving all services enabled.7. Select Save to keep all these settings.10
8. Select Download Cloud Connector Installer located near the bottom of screen on the General tab.9. A Download Cloud Connector Installer screen displays. Enter a password for the ACC certificate in the fields. Thepassword will be needed later when you run the ACC installer and need to enter the certificate password.10. Select Download and save the Cloud Connector x.x Installer.exe file on the ACC server for use later in Running theACC Installer.Running the ACC InstallerPerform the following steps to install the ACC.Note: SaaS customers should ensure the server you are installing ACC on can reach AWCM by browsing to"https://awcmXXX.awmdm.com/awcm/status". (Replace 'XXX' with the same number as used in your environment URL,for example, '100' for cn100.) You should see the status of the AWCM with no SSL errors. If there are errors, resolvethem before continuing or the ACC will not properly function.1. Open the installer on the ACC server. When the Welcome screen appears select Next.Note: The installer verifies prerequisites on your ACC server.Note: If a previous version of EIS is installed, the installer auto-detects EIS and gives you the option of migrating allEIS settings to ACC. For more information on migrating, see EIS to ACC Migration. If a previous version of ACC isinstalled, the installer auto-detects it and offers the option to upgrade to the latest version. For more informationon updating ACC, see Appendix A - Upgrading ACC.2. Accept the license agreement and then select Next.3. Select Change. to select the installation directory and then select Next.4. Enter the Certificate Password that you provided on the System Settings page in AirWatch. Select Next.11
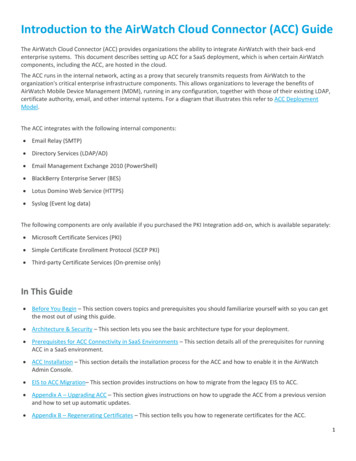
5. If you plan on proxying ACC traffic through an outbound proxy, then select the check box and provide proxy serverinformation. If needed, enter the Username and Password credentials and then select Next.6. When the installation screen appears, select Install to begin the installation.Note: The installer displays a checkbox for auto-updating ACC. For more information on auto-update, see the ACCAuto-Update Option.7. Select Finish.Verifying a Successful ACC InstallationPerform the following steps to verify that the ACC installation was successful.1. Navigate to Groups & Settings All Settings System Enterprise Integration Cloud Connector.2. Select Test Connection at the bottom of the screen and the following message displays:If a message displays saying AirWatch cannot communicate with AWCM, then this is not an ACC issue. This is anAWCM issue, and you should consult with your AirWatch representative .If a message displays saying AirWatch can communicate with AWCM but ACC is not responding, then this is an issuewith ACC. It probably means there is a certificate issue with ACC, or ACC cannot reach the AWCM server. You couldtry regnerating the ACC certificate, uninstalling ACC, deleting all ACC folders, re-downloading ACC, and re-installingit.3. If migrating, determine which features are new in ACC and test the new functionality to verify the migration wassuccessful.Integrating with your Directory ServiceNow that you have successfully installed ACC, you can use it to integrate with your directory service infrastructure.Details for doing so are fully detailed in the AirWatch Directory Services Guide,.12
EIS to ACC MigrationOverviewThe AirWatch Enterprise Integration Service (EIS) has been divided into two products – AirWatch Cloud Connector (ACC)and Mobile Access Gateway (MAG). There are many benefits with the architecture of these new products and simplicityof integrating them into your enterprise. Both products can be used separately, yet complement each other when usedtogether, but neither can be used with EIS. AirWatch will continue to support the existing functionality of EIS in futurereleases of the AirWatch Admin Console, although, customers who are planning on utilizing any of our latest integrationfeatures such as the MAG will need to migrate to ACC.In This Section Prior to Migrating from EIS to ACC – SaaS customers should follow these steps before attempting to migrate fromEIS to ACC. Migrating Procedure – Follow these instructions to perform the migration process.Prior to Migrating from EIS to ACCBefore you begin, you need to inform your AirWatch representative that you want to migrate from EIS to ACC. Yourrepresentative must configure AWCM in our SaaS environment so when you install ACC, it can establish communicationswith AWCM.Also, you need to install the MAG. Since ACC and MAG replace EIS, you must also install MAG to preserve the samefunctionality provided by EIS. MAG must be installed prior to ACC. For more information, refer to the Mobile AccessGateway Guide.Migrating ProcedureTo enable migration from the EIS to ACC:1. Navigate to Groups & Settings All Settings System Enterprise Integration Enterprise Integration Services.The following message displays at the top of the screen:2. Read the disclaimer regarding ACC replacing EIS and select Transfer Settings.Note: While EIS is migrating to ACC, your AirWatch server will not be able to connect to any external systems suchas AD, CAs, etc. All devices will continue to check into AirWatch, and other MDM functionality will remain13
operational, as expected. Please prepare for this downtime. The ACC migration process should only take less than 30minutes.3. Navigate to Groups & Settings All Settings System Enterprise Integration Cloud Connector. All EIS settingshould have been transferred to ACC.4. Select Generate Certificates. The Download Cloud Connector Installer link appears at the bottom of the screen.5. Verify all ACC settings are correct. See examples below:6. Run the ACC installer on the EIS server as noted in Running the ACC Installer.Note: AirWatch recommends installing ACC on the EIS server in case you need to restore EIS. It is much easier torestore if both reside on the same server. The ACC installer will not delete or overwrite EIS. Once the ACC installer islaunched, EIS recognizes the migration process and disables EIS.7. After the ACC installation is complete, select Test Connection on the Cloud Connector screen.Note: A successful test (Cloud Connector is Active) means AirWatch, AWCM, and ACC are actively communicatingand you have migrated from EIS to ACC.14
Appendix A – Upgrading ACCOverviewUpgrade the AirWatch Cloud Connector (ACC) from the AirWatch Admin Console to take advantage of the latest bugfixes and enhancements. This process can be automated using the ACC auto-update option, or performed manually forsituations where administrative control is a priority.In This Section ACC Auto-Update Option – See the benefits of the ACC auto-update option and how the process operates. ACC Manual Update Option – See instructions for manually updating the ACC.ACC Auto-Update OptionWhile you are installing ACC, by default, the auto-update check box is selected. Auto-update allows ACC to upgradeautomatically to the latest version without any user intervention by querying AirWatch for newer versions of ACC.AirWatch recommends that you allow auto-update (do not de-select the
Ensure that you have remote access to the servers that AirWatch is installed on. 6 Architecture & Security Overview The AirWatch Cloud Connector (ACC) is a Windows service that can be installed on a p