Transcription
Mercury: InstallationS. Martínez-Fernández, X. Franch, J. Bisbal.Index1.Installation of Mercury . 22.Installation of the necessary infrastructure . 5
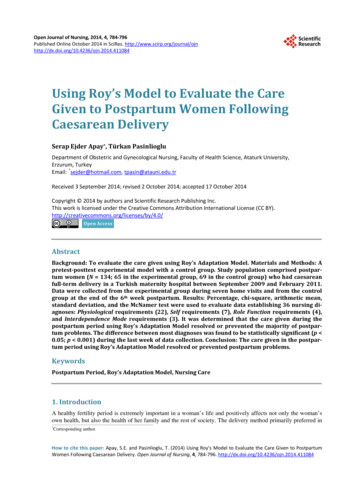
Mercury: Using QuPreSS to Evaluate Predictive Services21. Installation of MercuryNote: Mercury services run under the Tomcat 6 application server and the WS engine Axis2version 1.3. Besides, MySQL has been chosen as database management system. If you donot have this software installed, please refer before to Section 2.Otherwise, if you have installed Tomcat 6, Axis 2 and MySQL, the installation of Mercurymainly consists of three tasks:1. Creation of the databases.2. Deploying the .war file of the web client front-end to Tomcat 63. Deploying the Web Services (WS) in Axis 2.Next three subsections respectively details these tasks.1.1.Creation and Import of the DatabasesThe first step is the creation of the databases. In the terminal, we need to execute the“tablescreation.sql” script and indicate the password (which is password in the virtualmachine of SHARE). All the scripts are in the folder “Installation”.mysql –u root –p tablescreation.sqlAfter this step, the databases “groundtruth” and “forecastdata” will be created. We need topopulate them by importing the data from July 2011 to March 2014, which is contained inthe files “groundtruth.sql” and “forecastdata.sql” respectively.mysql –u root –p groundtruth groundtruth.sqlmysql –u root –p forecastdata forecastdata.sqlFigure 1 shows how to create the databases and import existing data.Figure 1. Creation and Import of the Databases.
Mercury: Using QuPreSS to Evaluate Predictive Services1.2.3Deploying the Web ClientTo deploy the web client application in the Tomcat6 server, we need to access to theTomcat6 manager page by entering in a browser (e.g., Mozilla Firefox) the following URL:http://localhost:8080/manager/htmlIn the virtual machine, the user/password is admin/admin. Then, we need to upload the“ForecastVerifier.war” which is in the folder “Installation”. To do so, we need to browse the“ForecastVerifier.war” in the “WAR file to deploy” option. Figure 2 shows this option.Figure 2. How to deploy .war files in the Tomcat server.1.3.Deploying the Web ServicesThe Web Services are included in the “ws.zip” inside the “Installation” folder. We need tocopy this file in the directory for services of Axis2:sudo cp ws.zip d then move to that directory and unzip the file (Figure 3 shows how to do this):cd do unzip ws.zip
Mercury: Using QuPreSS to Evaluate Predictive Services4Figure 3. Deploying the web services in Axis2.Finally, Figure 4 shows hot to give the right permissions to the web services and restartTomcat 6.Figure 4. Giving to the “tomcat6” user the permission to access the services
Mercury: Using QuPreSS to Evaluate Predictive Services52. Installation of the necessary infrastructure2.1.Installation of MySQLIt can be done easily in the terminal, as Figure 5 shows, by:sudo apt-get install mysql-serverIt is important to indicate a password for root (see Figure 6). More information can be foundon: ml#mysql-installationFigure 5. Installing MySQL.Figure 6.Indicating password for the root user.
Mercury: Using QuPreSS to Evaluate Predictive Services6Additionally, we need to install the libmysql-java library so that MySQL databases can bedriven from Java. This can be done from the terminal as Figure 7 shows:sudo apt-get install libmysql-java* Note: in Windows this driver is called “mysql-connector-java” and the .jar file need to becopied in the folder of jre (e.g., C:\Program Files\Java\jre1.6.0 07\lib\ext).Figure 7. Installing libmysql-java library2.2.Installation of Tomcat 6The Tomcat 6 server can be installed by entering in the terminal prompt (see Figure 8):sudo apt-get install tomcat6Morever, the tomcat6-admin package contains two web applications that can be used toadminister the Tomcat server using a web interface. They can be installed by entering thefollowing command in the terminal prompt (see Figure 9):sudo apt-get install tomcat6-adminFinally, usernames, passwords and roles (groups) can be defined centrally in a Servletcontainer. In Tomcat 6.0 this is done in the /etc/tomcat6/tomcat-users.xml file (see Figure10). In the virtual machine of SHARE, the user/password is admin/admin. More informationon: tml
Mercury: Using QuPreSS to Evaluate Predictive ServicesFigure 8. Installing tomcat6.Figure 9. Installing tomcat6-admin.7
Mercury: Using QuPreSS to Evaluate Predictive Services8Figure 10. Configuring the users of and roles of Tomcat 6.2.3.Installation of Axis 2Apache Axis2 is a Web Services / SOAP / WSDL engine. Mercury services are compliantwith the Axis 2, version 1.3, which is the “Installation” folder and can also be download .cgiTo deploy Axis 2 in the Tomcat6 server, we need to access to the Tomcat6 manager page byentering in a browser (e.g., Mozilla Firefox) the following URL:http://localhost:8080/manager/htmlIn the virtual machine, the user/password is admin/admin. Then, we need to upload the“axis2.war” which is in the folder “Installation”. To do so, we need to browse the“axis2.war” in the “WAR file to deploy” option. Figure 11 shows this option.
Mercury: Using QuPreSS to Evaluate Predictive ServicesFigure 11. Deploying Axis 2 in Tomcat 6.9
Mercury: Using QuPreSS to Evaluate Predictive Services 5 2. Installation of the necessary infrastructure 2.1. Installation of MySQL It can be done easily in the terminal, as Figure 5 shows, by: sudo apt-get install mysql-server It is important to indicate a password