Transcription
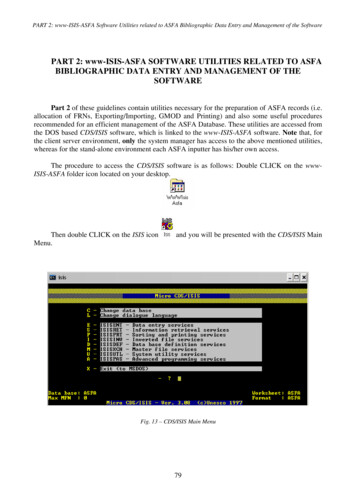
PART 2: www-ISIS-ASFA Software Utilities related to ASFA Bibliographic Data Entry and Management of the SoftwarePART 2: www-ISIS-ASFA SOFTWARE UTILITIES RELATED TO ASFABIBLIOGRAPHIC DATA ENTRY AND MANAGEMENT OF THESOFTWAREPart 2 of these guidelines contain utilities necessary for the preparation of ASFA records (i.e.allocation of FRNs, Exporting/Importing, GMOD and Printing) and also some useful proceduresrecommended for an efficient management of the ASFA Database. These utilities are accessed fromthe DOS based CDS/ISIS software, which is linked to the www-ISIS-ASFA software. Note that, forthe client server environment, only the system manager has access to the above mentioned utilities,whereas for the stand-alone environment each ASFA inputter has his/her own access.The procedure to access the CDS/ISIS software is as follows: Double CLICK on the wwwISIS-ASFA folder icon located on your desktop.Then double CLICK on the ISIS iconMenu.and you will be presented with the CDS/ISIS MainFig. 13 – CDS/ISIS Main Menu79
PART 2: www-ISIS-ASFA Software Utilities related to ASFA Bibliographic Data Entry and Management of the SoftwareALLOCATION OF FRNs AND DISPATCH OF RECORDS TO CSAIn order to export and dispatch a batch of ASFA records to the publisher (CSA)*, it isnecessary to assign a correct sequential numbering to the records for the following reasons: the software disrupts the sequential numbering of records whenever a record is deletedduring input preparation the TRN assigned to the records during their preparation may not correspond to the finalFRN that we wish to assign to them when exporting. For example, in the case of a newyear’s input, the TRN of the first record will be sequential to the number of the last recordof the previous year’s input, whereas the FRN of the same record must have the new yearstarting from number one. Note that the FRN is the only number included in the exportedrecord.Before assigning the correct sequential FRN numbering to the records that you wish to sendto CSA, you must first 1) identify their MFNs and, 2) verify that all the records are complete (i.e. Cis selected in the “Data entry status” field).1. Identification of MFNsIt is important to know the MFNs (Master file Numbers) of the records that you wish to sendto CSA, because the utility programme (contained in the software) which assigns the FRN, onlyrecognizes the MFNs as an identifying number of the record. Therefore, once the range of TRNs tobe exported has been defined, the corresponding MFNs must be identified.To identify the MFNs, click on the “Edit Record(s) by browse” button; type the first TRN ofthe range of records to be exported and then click on the “Browse” button. The records will bedisplayed showing both TRNs and MFNs.2. Verification that records are completeAll records sent to CSA must be complete, therefore it is important to verify that all therecords to be exported have C (Completed) in the “Data Entry Status” field and NOT T(Temporary). If necessary, complete all the records within the range you are exporting. This isimportant, because the “Assign FRN and Export” utility will NOT export a range of recordscontaining one or more records marked as T (Temporary) and during the Export procedure an“error” message will appear on the screen.To identify any T records in the range to be exported, the following procedure should becarried out:a) Click on the “Edit Record(s) by search” button. A screen containing a number ofsearchable fields is displayed*The Publisher (CSA) specifically requests the ASFA Input Centres to send small, more frequent batches ofrecords rather than one or two large batches in one year (e.g. approximately 30-150). This ensures timelinessand also facilitates the detection, correction and mitigation of any possible errors.80
PART 2: www-ISIS-ASFA Software Utilities related to ASFA Bibliographic Data Entry and Management of the Softwareb) Select T (Temporary) in the “Record status” fieldc) Type the range of MFNs that you wish to export to CSA in the field “Range of MFNs”and then click on the SEARCH buttond) All the T (Temporary) records within the range of MFNs that you searched will bedisplayed on the screen in the Browse Mode. Click on the “UPDATE” button next tothe record to display the worksheet, carry out the necessary modifications to completeit, change the status of the record from T to C and then save the record again.How to use the “Assign FRN and Export” software utility:1.2.3.4.5.6.7.8.Double Click on the www-ISIS-ASFA folder iconDouble Click on the Assign FRN and Export iconType the range of the MFN numbers to export in the two boxes MFN range Click Next . Note: If an error message appears on the screen informing you that oneor more temporary records are contained in the range, you cannot continue with theExport of this range of records. Therefore, you must return to the www-ISIS-ASFAData Entry module, identify the temporary records and complete them as explained inpoints “a to d” above.Type your two letter Input centre code (for example Poland PL, Mexico MX) andthe last two digits of the year (2007 07)Type the starting FRN and click Next . Note: If you type an FRN number that youhave already assigned during a previous export, the system will issue an “Error”message informing you that the FRN was already assigned to another record. In thiscase, change the FRN number to one that has never been assigned.Type the location, i.e. Drive, followed by the name of the ISO 2709 file to be exportedand sent to CSA. Note: If you do not specify the Drive, by default the system will savethe file in C:\Xitami\webpages\DB\asfa\Asfa-PgmClick Next and then Finish to complete the procedure.Once the export procedure is completed, you may send your Exported records to theASFA Publisher (CSA) either 1) by sending the file via e-mail as a zipped attachment or2) by transferring the ISO file via FTP.Important note for ASFA partners working with collaborating centres:The FRN (final record number) assigned to the records sent to CSA must be unique andsequential for the records, and not the individual input/collaborating centres preparing them. It isrecommended that only one of the ASFA Input Centres, most probably the National ASFA Partner,coordinates this sequential numbering. This work may be organized in either of the following ways:1. The National ASFA Partner receives all the ASFA records prepared by the variouscollaborating centres, it assigns the FRNs to the records and then sends them to CSAon behalf of the collaborating centres or2. The National ASFA Partner maintains only a register of the FRNs and, when acollaborating centre wishes to send records to CSA, it asks the National ASFA Partnerwhich FRNs should be assigned.81
PART 2: www-ISIS-ASFA Software Utilities related to ASFA Bibliographic Data Entry and Management of the SoftwareINVERTED FILEThe Full Inverted File* MUST be carried out after importing ASFA records into the wwwISIS-ASFA software, otherwise the imported records cannot be found when using www-ISISASFA to browse or search the records.The procedure for generating the full Inverted file is described below: Double Click on the www-ISIS-ASFA folder icon that is on your desktop Double Click on the icon ISIS and you will be presented with the CDS/ISIS Main Menu Select I Inverted file services from the CDS/ISIS Main Menu Select F Full inverted file generation The phrase Inverted file exists and will be cleared, OK (Y/N)? will be presented on thescreen. Type Y The phrase MFN limits? will appear: Press Enter After a number of system messages the following text will appear: Full inverted filegeneration completed Press Enter and then Type X to return to the CDS/ISIS Main Menu. Type X to exit from DOS*The Inverted file is a group of files contained in the www-ISIS-ASFA software system, which contains: 1) allthe terms that can be used as an access point during a search of that database (single words, or groups of wordsindexed with a pre-fix, e.g. au , ti , etc.), and 2) for each term, a list of references that point to the recordscontained in the Master File, from which the term was extracted. The “Inverted File” (in all ISIS based DatabaseManagement Software) enables you to search and browse for records in your database. It is therefore a veryimportant file, but it does not update itself automatically when you import records into your database(although it does update itself automatically, in the www-ISIS-ASFA software during data entry, when youcreate new records and when you modify existing records).82
PART 2: www-ISIS-ASFA Software Utilities related to ASFA Bibliographic Data Entry and Management of the SoftwareEXPORTING ASFA RECORDS ON TO DISKETTES OR OTHER DRIVESThe records prepared using the www-ISIS-ASFA data entry interface may be downloaded, i.e.exported, on to a diskette or any other drive (e.g. USB pen drive or CD-ROM) as an ISO file.IMPORTANT: the ONLY numbers recognized by ISIS are the MFNs, therefore, once therange of TRNs to be exported has been defined, the corresponding MFNs must be identified. Toidentify the MFNs: click on the “Edit Record(s) by browse” button, type the first TRN of the rangeof records to be exported and then click on the “Browse” button. The records will be displayedshowing both TRNs and MFNs.The procedure explaining the export and import of records takes, as an example, a diskettedesignated as Drive A .The procedure for exporting the ASFA records is as follows:1. Double Click on the www-ISIS-ASFA folder icon2. Double Click on the icon ISIS and you will be presented with the CDS/ISIS Main Menu3. Select M Master File Services4. Select E Export CDS/ISIS file from the Master File Services Menu. The DataInterchange Services - Export parameters table now appears on the screen5. The Database name ASFA will appear as default. Press Enter 6. The output ISO file name CSA.ISO will appear as default. Assign any name to thefile, such as the Input Centre Code, followed by the extension ISO, e.g. FA.ISO. Note: thename of the file must not exceed 10 characters including the full stop and the extensionISO (e.g. xxxxxx.ISO)7. Press Enter until the cursor arrives at the MFN limits field. Then type the range ofrecords to be exported, e.g. 1/808. Press Enter until the cursor arrives at the Reformatting FST field. Note that thisfield is CSA by default. Remove CSA and leave the field blank9. Press Enter until the prompt Backup drive and/or directory? appears. Type A: and press Enter 10. At the prompt Press CR when ready or C to cancel press Enter 11. Once the procedure is completed, a prompt indicating the number of records exported will appearon the screen. These records have been downloaded in the drive indicated, in a file called FA.ISO 12. Press Enter to return to the Master File Services Menu, select X or press Esc to return to the CDS/ISIS Main Menu and then select X to exit.83
PART 2: www-ISIS-ASFA Software Utilities related to ASFA Bibliographic Data Entry and Management of the SoftwareIMPORTING ASFA RECORDS ON TO THE SAME OR DIFFERENT COMPUTERRecords which have been downloaded on to a diskette or any other drive (e.g. USB pen driveor CD-ROM) as an ISO file may be imported on to another computer.The procedure is as follows:1. Double Click on the www-ISIS-ASFA folder icon2. Double Click on the icon ISIS and you will be presented with the CDS/ISIS Main Menu3. Select M Master File Services4. Select I Import External file from the Master File Services Menu. The Data InterchangeServices - Import Parameters table now appears on the screen5. The Database name ASFA will appear as default. Press Enter 6. In the Input ISO file name field type the name of the ISO file containing the records to beimported (e.g. FA.ISO)7. Press Enter until the prompt Backup drive and/or directory? appears. Then type A: and press Enter 8. At the prompt X - no more diskettes CR - to continue after mounting new diskette ,press Enter 9. Once the importing procedure is completed, the same prompt appears on the screen, X - nomore diskettes CR - to continue after mounting new diskette . Select X - no morediskettes . N.B. Do NOT press Enter , otherwise the ISO file will be imported again.10. A prompt will appear indicating The next MFN to be assigned . Press Enter to return tothe Master File Services Menu, select X or press Esc to return to the CDS/ISIS MainMenu and then select X to exit.IMPORTANT: Each time an ISO file is imported, the Full Inverted File MUST be carriedout otherwise the imported records cannot be found when using www-ISIS-ASFA to browse orsearch the records.The procedure for generating the full Inverted file is as follows Double Click on the www-ISIS-ASFA folder icon that is on your desktop Double Click on the icon ISIS and you will be presented with the CDS/ISIS Main Menu Select I Inverted file services from the CDS/ISIS Main Menu84
PART 2: www-ISIS-ASFA Software Utilities related to ASFA Bibliographic Data Entry and Management of the Software Select F Full inverted file generation The phrase Inverted file exists and will be cleared, OK (Y/N)? will be presented on thescreen. Type Y The phrase MFN limits? will appear: Press Enter After a number of system messages the following text will appear: Full inverted filegeneration completed Press Enter and then Type X to return to the CDS/ISIS Main Menu Type X to exit from DOS.85
PART 2: www-ISIS-ASFA Software Utilities related to ASFA Bibliographic Data Entry and Management of the SoftwareEXPORTING/IMPORTING RECORDS MAINTAINING THE SAME MFNs(EXCH/99 TAGGING)During the process of exporting, when the records are downloaded into an ISO file, they donot maintain their original MFNs. Consequently, when these records are imported on to anotherstand alone computer (or back to the same computer) they will be allocated different MFNs, whichmay cause some difficulties in identifying any particular record.To avoid this problem, a “tagging” system may be used during the exporting procedure,which enables each downloaded record to maintain its original MFN. In this way, when the recordsare then imported on to another stand alone computer (or back to the same computer) they will notbe allocated different MFNs, but will have their original MFNs. In the case where the records areimported back to the same computer, they will simply overwrite the same MFNs.The procedure for tagging records during exporting is as follows:1. Double Click on the www-ISIS-ASFA folder icon2. Double Click on the icon ISIS and you will be presented with the CDS/ISIS Main Menu3. Select M Master File Services4. Select E Export CDS/ISIS file from the Master File Services Menu. The DataInterchange Services - Export parameters table now appears on the screen5. The Database name ASFA will appear as default. Press Enter 6. The output ISO file name CSA.ISO will appear as default. Assign any name to the file,(remember not to exceed 10 characters) such as the Input Centre Code, followed by theextension ISO, e.g. FA.ISO7. Press Enter until the cursor arrives at the MFN limits field. Then type the rangeof records to be exported, e.g. 1/808. Press Enter until the cursor arrives at the Reformatting FST field. Remove CSAand type EXCH9. Press Enter until the prompt Backup drive and/or directory? appears. Type A: and Press Enter 10. At the prompt Press CR when ready or C to cancel press Enter . Once theprocedure is completed, a prompt indicating the number of records exported will appear onthe screen. The 80 records (as in point 7 above) have been downloaded in the drive indicated,in a file called FA.ISO 86
PART 2: www-ISIS-ASFA Software Utilities related to ASFA Bibliographic Data Entry and Management of the Software11. Press Enter to return to the Master File Services Menu and then select X, or press Esc , to return to the CDS/ISIS Main Menu.The procedure for importing records which have been tagged is as follows:1. Double Click on the www-ISIS-ASFA folder icon2. Double Click on the icon ISIS and you will be presented with the CDS/ISIS Main Menu3. Select M Master File Services from the CDS/ISIS Main Menu4. Select I Import External file from the Master File Services Menu. The DataInterchange Services - Import Parameters table now appears on the screen5. The Database name ASFA will appear as default. Press Enter 6. In the Input ISO file name field type the name of the ISO file containing the recordsto be imported (e.g. FA.ISO)7. Press Enter until the cursor arrives at the Input Tag containing MFN field. Type 99 8. Press Enter until the prompt Backup drive and/or directory? appears. Type A: and then press Enter 9. At the prompt X - no more diskettes CR - to continue after mounting newdiskette , press Enter 10. Once the importing procedure is completed, the same prompt appears on the screen, X no more diskettes CR - to continue after mounting new diskette . Select X - nomore diskettes . N.B. Do NOT press Enter otherwise the ISO file will be importedagain.11. A prompt will appear indicating The next MFN to be assigned . Press Enter toreturn to the Master File Services Menu, select X or press Esc to return to theCDS/ISIS Main Menu12. Generate the Inverted File/Full Inverted file as explained in section “Inverted File”REMEMBER: Each time an ISO file is imported, the Full Inverted File MUST be carriedout otherwise the imported records cannot be found when using www-ISIS-ASFA to browseor search the records.87
PART 2: www-ISIS-ASFA Software Utilities related to ASFA Bibliographic Data Entry and Management of the SoftwareCORRECTION OF A RECURRENT MISTAKE IN CONSECUTIVE RECORDSIf, while checking or proofreading completed ASFA records, a recurrent mistake is noted in agroup of consecutive records, a small utility programme exists within the CDS/ISIS software whichenables the correction of that mistake in all the records involved, without having to call up each oneindividually to correct the mistake.The programme, called GMOD, is extremely useful when the same correction is necessary in alarge number of records.The procedure for running the GMOD programme is as follows:1. Double Click on the www-ISIS-ASFA folder icon2. Double Click on the icon ISIS and you will be presented with the CDS/ISIS Main Menu3. Select A Advanced programming services from the CDS/ISIS Main Menu4. Select R Run programme5. Type the name of the programme GMOD and press Enter 6. At the prompt Field Tag type the Tag Number of the field containing the mistake andpress Enter (e.g. if the mistake is in the English Monographic Title field, then type 220).Note: In the worksheets each field name is followed by its respective Tag Number. For acomplete list of Field Tags numbers see Annex 7: ASFA Field Definition Table7. At the prompt Change type the existing information which is to be modified and press Enter . Note that it is not necessary to type the entire phrase or sentence containing themistake. If information is to be added, it is sufficient to type only the word after which theinformation should follow, or just the mistake itself if a simple spelling mistake needscorrection8. At the prompt By type the correct information which is to replace the existing incorrectinformation and press Enter 9. At the prompt Limit to search result (y/n)? type n and press Enter 10. At the prompt From MFN: type the MFN number of the first record in the range thatneeds to be modified and press Enter 11. At the prompt To MFN: type the MFN number of the last record in the range that needsto be modified and press Enter After the programme has run, you will be presented with a table,
the client server environment, only the system manager has access to the above mentioned utilities, whereas for the stand-alone environment each ASFA inputter has his/her own access. The procedure to access the CDS/ISIS software is as follows: Double CLICK on the www-ISIS