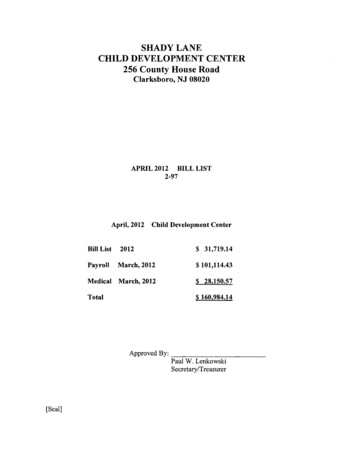
Transcription
EMC ViPR SRMVersion 3.7Upgrading to ViPR SRM 3.7 using theSystem Upgrade UIP/N 302-002-431REV 01
Copyright 2015 EMC Corporation. All rights reserved. Published in USA.Published October, 2015EMC believes the information in this publication is accurate as of its publication date. The information is subject to changewithout notice.The information in this publication is provided as is. EMC Corporation makes no representations or warranties of any kind withrespect to the information in this publication, and specifically disclaims implied warranties of merchantability or fitness for aparticular purpose. Use, copying, and distribution of any EMC software described in this publication requires an applicablesoftware license.EMC², EMC, and the EMC logo are registered trademarks or trademarks of EMC Corporation in the United States and othercountries. All other trademarks used herein are the property of their respective owners.For the most up-to-date regulatory document for your product line, go to EMC Online Support (https://support.emc.com).EMC CorporationHopkinton, Massachusetts 01748-91031-508-435-1000 In North America 1-866-464-7381www.EMC.com2EMC ViPR SRM 3.7 Upgrading to ViPR SRM 3.7 using the System Upgrade UI
CONTENTSChapter 1Upgrading the System5Overview. 6Required tools.6Required credentials. 6Verifying and documenting the current status of the environment. 6Backing up the environment.7Saving the Java certificates file. 7Updating WinRM URL prefixes. 8Updating the Centralized Management module. 8Upgrading the system. 10Restoring the Java certificates file.13Chapter 2Upgrading the SolutionPacks15Upgrading all SolutionPacks and other components.16Chapter 3Post-Upgrade Tasks19Checking the status of remote host services.20Reconfiguring a SolutionPack.20Increasing the heap size for the Tomcat service.20Chargeback Reports. 21Restoring timeout values.21Editing new actions scripts.21Deleting old alert definitions. 22Deleting old data from the SolutionPack for EMC Atmos. 22Checks for the SolutionPack for Physical Hosts. 23Compliance changes. 23Installing the Compliance Rules module.23Updating the SNMP collections. 24Installing new alerting components. 25Deleting backup schedules from the DPA server. 26Virus scanning software in Windows deployments. 26Reviewing report customizations. 26Validating the environment. 26EMC ViPR SRM 3.7 Upgrading to ViPR SRM 3.7 using the System Upgrade UI3
CONTENTS4EMC ViPR SRM 3.7 Upgrading to ViPR SRM 3.7 using the System Upgrade UI
CHAPTER 1Upgrading the SystemThis chapter includes the following topics:llllllllllOverview. 6Required tools.6Required credentials. 6Verifying and documenting the current status of the environment.6Backing up the environment.7Saving the Java certificates file. 7Updating WinRM URL prefixes. 8Updating the Centralized Management module. 8Upgrading the system. 10Restoring the Java certificates file.13Upgrading the System5
Upgrading the SystemOverviewThis guide applies to binary-only installations of 3.6.x and mixed/vApp installations ofversion 3.6.4 or higher.If you are upgrading a binary-only installation of 3.5.x, refer to EMC VIPR SRM: Upgradingversion 3.5.x to 3.7.If you are upgrading a vApp or mixed deployment of 3.6.3 or lower, refer to EMC VIPR SRM:Upgrading version 3.5.x to 3.7 or EMC ViPR SRM: Upgrading version 3.6.1, 3.6.2, or 3.6.3 to3.7.If you want to update a single SolutionPack to receive the benefit of a required fix orfeature, refer to the Updating SolutionPacks and Other Components chapter of the adminguide.Required toolsEnsure that you have the necessary tools.lWinSCP or equivalentlPutty/SSHlRemote DesktopRequired credentialsGather the necessary credentials.lroot/administrator credentials for all of the ViPR SRM serverslESX server credentials (if appropriate)lSMI array hostslBrocade SMI hostsVerifying and documenting the current status of the environmentVerify and document the current status of the environment before starting the upgradeprocess. This will help you assess the success of the upgrade.Before you beginRefer to Manage ViPR SRM System Health for details about verifying the health of yoursystem.Refer to the ViPR SRM Performance and Scalability Guidelines for details about determiningconfiguration size.NoteThe Topology-Mapping-Service module, by default, is configured with 2GB max heap. Forthose installed on the Frontend and Backend hosts, actual maximum consumption isunder 128MB. The additional memory need not be considered for sizing calculations. TheTopology-Mapping-Service installed on the Collector host should have its full 2GB maxheap considered.6EMC ViPR SRM 3.7 Upgrading to ViPR SRM 3.7 using the System Upgrade UI
Upgrading the SystemProcedure1. Look for blank reports and graphs. Determine if there are any blank reports caused bycollection errors. Resolve any issues or document them for later follow up.2. Look for broken links and resolve any issues or document them for later follow up.3. Validate that end-to-end topology is working. Resolve any issues.4. Review the existing backend and databases. Check Report Library EMC M&R Health Module Performance Backends and Report Library EMC M&R Health ModulePerformance Databases.lCheck backend thresholds to verify that you have room to accommodate newsizinglAdd additional backends and databases as required.lRefer to the Watch4net Database Split v1.2 document for help if you need tomanually move data to redistribute the metrics.5. Review and document any customizations.For example:lPolling intervalslTimeout valuesAfter you finishEngage EMC Support to resolve any observed issues prior to proceeding with theupgrade.Backing up the environmentEnsure the proper backup of all of the servers in your environment. This includes all of thefrontend, backend, and collector hosts.Refer to the following guides for details about your backup system:lEMC ViPR SRM: Backing Up with VMware vSphere Data Protection Advanced 5.8lEMC ViPR SRM: vApp Backup and Restore Using NetBackuplEMC ViPR SRM: Backing up with EMC Avamar 7.1lEMC ViPR SRM: vApp Backup and Restore Using IBM Tivoli Storage ManagerlEMC ViPR SRM: vApp Backup and Restore Using Symantec NetBackuplEMC ViPR SRM: vApp Backup and Restore using Commvault Simpana Virtual ServerProtectionThese guides are available from the ViPR SRM Product Documentation Index.Saving the Java certificates fileThe certificates file provided with the Java installation is overwritten during the upgrade.If you deployed LDAP over SSL and have certificates stored in this file (such as for anBacking up the environment7
Upgrading the SystemLDAP server configuration), save the certificates file before the upgrade, and restore thefile after the upgrade.Procedure1. To save the certificates file before the upgrade, go to this directory: {APG INSTALLDIRECTORY}/Java/Sun-JRE/ Java version /lib/security.For example, cd /opt/APG/Java/Sun-JRE/ Java version /lib/security.2. Copy the cacerts file to a safe place. (Do not use the Java installation directorybecause it will be deleted and replaced by the new installation.)For example, cp cacerts /var/tmp/cacerts.After you finishIf the certificate is lost and you set up LDAP over SSL as a custom solution, then you willneed to follow the same custom steps to set it up again.Updating WinRM URL prefixesPrior to ViPR SRM version 3.7, if you discovered Windows hosts using Custom WinRM URLprefixes, you had to add the custom URL prefix to module.properties of Generic-RSCCollector Manager. After upgrading to 3.7, these changes are no longer applicable.Procedure1. To resolve this issue, enter the custom WinRM URL prefix along with the hostcredentials.Updating the Centralized Management moduleTo get the new System Upgrade interface in Centralized Management to upgrade all of theservers from a single UI, you must update the Centralized Management module to thelatest version.Procedure1. Download the Centralized Management package from anagement-2.5u1-windows-x64.pkg2. From Centralized Management, click Packages Management on the left-hand pane.3. On the Packages Listing page, click the Upload button.4. Click Browse, and select the Centralized Management package file.5. Click OK.8EMC ViPR SRM 3.7 Upgrading to ViPR SRM 3.7 using the System Upgrade UI
Upgrading the System6. Click Continue.The package is uploaded to the server.7. On the left-hand pane, navigate to Physical Overview Front End Modules WebApplications Centralized Management.8. Click Manually Update to Latest Version.9. Click Update.Updating the Centralized Management module9
Upgrading the System10.Restart the tomcat service.a. From Centralized Management, navigate to Physical Overview Front End.b. On the Services tab, click the Tomcat module.c. Click Restart.Upgrading the systemLearn how to upgrade the system with the System Upgrade wizard.Before you beginIf you have enabled Online Update, the files have automatically been staged, and youcan skip steps 1, 3, and 4. For information about enabling and configuring OnlineUpdate, refer to the “Online Update overview” section of the EMC ViPR SRMAdministrator’s Guide.10EMC ViPR SRM 3.7 Upgrading to ViPR SRM 3.7 using the System Upgrade UI
Upgrading the SystemProcedure1. Download the core update file for each of your deployed architectures fromsupport.emc.com. The vApp file also contains the appliance update file for vAppdeployments.OptionDescriptionLinux (vApp)ViPR SRM 3.7.0.0 vApp Update UI.zipLinux (binary only) ViPR SRM 3.7.0.0 Linux 64-bit Update File.zipWindowsViPR SRM 3.7.0.0 Windows 64bit Update File.zip2. From Centralized Management, click Configuration System Upgrade.If an upgrade package is currently being downloaded via Online Update, wait until thedownload is complete before proceeding to the next step.3. For your Linux and/or Windows deployments, click Browse and select the core updatefile.4. Click Upload Content.5. The system displays a message about ensuring that there is minimum of 5 GB diskspace on the servers. Click OK.The system upgrade files are uploaded to Centralized Management and nondisruptively distributed to all of the servers in the deployment. This process may takeseveral minutes.6. When you are ready to proceed with the upgrade, click Go to maintenance mode.Upgrading the system11
Upgrading the SystemMaintenance mode begins, the front end becomes unavailable, and you areredirected to the Platform Upgrade page. Any users who try to access the front end willreceive a message that it is in maintenance mode and has been temporarily disabled.7. When the system has completed the validation checks, click Launch upgrade.The upgrade begins. After several minutes, the Upgrade status displays.12EMC ViPR SRM 3.7 Upgrading to ViPR SRM 3.7 using the System Upgrade UI
Upgrading the SystemNoteYou may need to manually refresh your browser to see the Upgrade status page.When the upgrade is complete, the system displays a green check mark next to eachnode and a success message at the top of the window.8. Click Exit.9. Click OK.The system restarts the front end, and it is now available to users.NoteIt is normal for the Topology-Mapping Service on the primary backend, the frontend,or the additional backend to remain stopped at this point. The service will startautomatically when the SolutionPack for EMC M&R Health is upgraded on thesesystems.Restoring the Java certificates fileRestore the cacerts file that you saved before upgrading the software.Procedure1. Go to the directory where the upgraded version of Java was installed: {APGINSTALL DIRECTORY}/Java/Sun-JRE/ new Java version /lib/securityFor example, cd /opt/APG/Java/Sun-JRE/ new Java version /lib/security2. Save the current certificates file.For example, cp cacerts cacerts.bakRestoring the Java certificates file13
Upgrading the System3. Restore the original cacerts file containing your certificates.For example, cp /var/tmp/cacerts cacerts4. Restart the tomcat service.For example, {APG INSTALL DIRECTORY}/bin/manage-modules.shservice restart tomcat Default14EMC ViPR SRM 3.7 Upgrading to ViPR SRM 3.7 using the System Upgrade UI
CHAPTER 2Upgrading the SolutionPacksThis chapter includes the following topics:lUpgrading all SolutionPacks and other components.16Upgrading the SolutionPacks15
Upgrading the SolutionPacksUpgrading all SolutionPacks and other componentsYou can upgrade all of your installed SolutionPacks and other components with a singleclick.Before you beginIf you want to update a single SolutionPack to receive the benefit of a required fix orfeature, refer to the Updating SolutionPacks and Other Components chapter of the adminguide.For information about load-balancing in a scaled-out deployment, refer to the ConfiguringLoad Balancing for ViPR SRM article on community.emc.com.Synchronize the packages across the servers:1. From Centralized Management, click Packages Management on the left-hand pane.2. Click the Synchronization button.3. Select retrieve the latest packages from the remote servers.4. Wait for the synchronization to complete before proceeding.Procedure1. From Centralized Management, click SolutionPacks on the left-hand pane.2. Click the Update All Components button in the top-right corner of the page.The Initialization window opens and lists the following details:lNumber of components from SolutionPacks that will be updated to the latestversion.lNumber of components that contain new features that require configuration.3. Click Next.The Configuration window opens. The left-hand pane lists each of the componentsthat include new features that you need to configure. The right-hand pane displays theconfiguration details for the component with the new features highlighted in yellow.Carefully review the selections to make sure the configuration details for thecomponents and SolutionPacks are correct, and modify any configuration that are notset correctly. When you have finished configuring a component, click Next to moveonto the next component. After you have configured every component on the list, clickNext.4. The Confirmation window opens and lists all of the components that will be updated.Confirm that all of the components are correctly listed, and then click Update.5. The Update window opens and displays the progress of each update and thepercentage complete of the overall update. Do not close the browser window duringthis step.The update process detects if any manual edits were made to the SolutionPack files. Ifa manually edited file is compatible with the new version of the SolutionPack, it willbe reused and the system will display a message to let you know. If a manually editedfile is not compatible with the new version of the SolutionPack, the system will backup the file and display a warning message that indicates the name and location of theincompatible file. The backed up files are saved in their current directory with thefollowing format: file-name -old- version date . ext 16EMC ViPR SRM 3.7 Upgrading to ViPR SRM 3.7 using the System Upgrade UI
Upgrading the SolutionPacksMessages about the following incompatible files can safely be oller.xmllemc-vmax-mapping.xml6. The Results window opens. Use the drop-down menu to check the status of eachcomponent. Any manually edited files that were backed up by the system will bedisplayed under “Updated with warnings.”Upgrading all SolutionPacks and other components17
Upgrading the SolutionPacks18EMC ViPR SRM 3.7 Upgrading to ViPR SRM 3.7 using the System Upgrade UI
CHAPTER 3Post-Upgrade TasksThis chapter includes the following topics:llllllllllllllllChecking the status of remote host services.20Increasing the heap size for the Tomcat service. 20Chargeback Reports. 21Restoring timeout values.21Editing new actions scripts.21Deleting old alert definitions. 22Deleting old data from the SolutionPack for EMC Atmos. 22Checks for the SolutionPack for Physical Hosts.23Compliance changes. 23Installing the Compliance Rules module.23Updating the SNMP collections. 24Installing new alerting components. 25Deleting backup schedules from the DPA server. 26Virus scanning software in Windows deployments.26Reviewing report customizations.
l EMC ViPR SRM: vApp Backup and Restore using Commvault Simpana Virtual Server Protection These guides are available from the ViPR SRM Product Documentation Index. Saving the Java certificates file The certificates file provided with the Java installation is overwritten during the upgrade.