Transcription
1VolumePAYROLL PARTNERSYour Partner for Payroll ServicesEvolution Helpfor Remote Users
PAYROLL PARTNERSEvolution Remote Software Guide Payroll Partners, 20063001 Medlin Drive Suite 125Arlington, Texas 76015-2332Phone 817.226.8111 Fax 817.467.9994E-mail info@payrollpartners.comWeb site www.payrollpartners.com
Payroll Partners is Your Partner for Payroll Services. We arecommitted to our clients’ total payroll satisfaction. Therefore, if you needany assistance with Evolution or have any payroll-related questions pleasecontact us.We are an organization dedicated to providing the best customerservice possible, and we are always available to help in any way we can. Ifyou have a question about how to do something in Evolution and you can’tfind it in the Evolution Help for Remote Users Manual then please give us acall at (817) 226-8111 or send an e-mail to info@payrollpartners.com.We welcome any suggestions or comments on how to make thisInstruction Manual more beneficial to you. If you would like to seesomething added to the manual then please let us know. We appreciate yourinput and would be glad to update any information.
DEFINITIONS OR COMMON PHRASESABABank Routing Number (It can not begin with a 5)ACHAutomated Clearing House; billing and direct deposits are processed through hereAgency ChecksChecks written to third parties for child support, garnishments, 401K, insurance, etc.Commit ChangesYellow SunDBDTDivision (usually hidden), Branch, Department, Team (not used)Direct DepositEmployees’ paychecks are electronically deposited into their checking or savings bankaccountEFTPSElectronic Federal Tax Paying System
EICEarned Income Credit; to be eligible, the employee must complete a Form W-5 EICAdvance Payment Certificate and meet certain income testsE-SheetsExcel-style spreadsheet for importing time and other data into payrollEvolutionPayroll SoftwareHRHuman Resources Module in Evolution for tracking employees and benefitsOASDIOld Age and Survivors Disability Insurance; this is the social security portion of the FICAtaxPre-processThis is a preliminary payroll run that calculates payroll checks, but does not finalize yourpayroll. A pre-process is a tool designed for you to double check payrolls for accuracybefore submitting them.Refresh your screenBlue circular arrow button located near the top of your screen by the date boxSave ChangesGreen Check Mark
Scheduled E/DA Schedule Earnings or DeductionSwipeclockTimekeeping softwareTOATime off AccrualYTDYear to Date
TABLE OF CONTENTSSetting up a New Employee .1Setting up an Employee with Multiple Pay Rates .3Setting up a Salaried Employee with Overtime Pay .4Setting up a New Employee Claiming Exempt on his or her W4 .5Rehiring a Terminated Employee .6Starting a Payroll .8Creating a Second Batch 10Adding an Employee into a Batch .11Setting up a Single Direct Deposit . .14Setting up Multiple Direct Deposits 18Stopping a Direct Deposit .22Current Payroll Only .22Permanently. .23Stopping all Scheduled E/Ds .25Stopping a Scheduled E/D .26Current Payroll Only .26Permanently .28Blocking Federal Withholding 30Current Payroll Only .30Permanently .31Blocking Additional Federal Withholding .32Current Payroll Only .32Permanently. .33Voiding a check .35Calculating a Manual Check . .37Before Starting a Payroll .37After Starting a Payroll .41Calculating a Net to Gross Manual Check .44Entering a Manual Check in Payroll .46Payroll Partners Frequently Asked Questions .52
Setting up a New Employee*Before following the directions on Setting up a New Employee, please make sure theemployee has not previously been entered into your company’s employee records inEvolution. To double check, click on the EMPLOYEE command button and selectemployee. Sort your employees by EE code, last name, first name or social securitynumber. Scroll through your entire list of employees and make sure the new employeehasn’t already been entered. If you are not sure if the employee has worked for yourcompany in the past, you will need to remove all filters so all employees’ records will bevisible. To do this click on the red question mark beside the EE code bar in theEMPLOYEE-Employee section. When the Filter records to view box pops up, click theCLEAR ALL button and then select OK. This will allow you to view all past and currentemployees’ records. Then scroll through your entire list of employees and make sure thenew employee hasn’t already been entered.*If you have double checked to make sure the employee has never been entered into yourcompany’s employee records in Evolution then follow the directions below to set up a newhire.1. Click on the EMPLOYEE command button and select employee.2. Click on the plus sign at the top of your screen. This will direct you to the EEEntry tab.3. Start filling in the blanks with your new employee’s information.4. If your company has departments set up in Evolution then don’t forget to enter adepartment on the first column for your new hire. After entering the employee’sgender, you can hit F4 on your keyboard or click on the square button to the rightof the Gender drop-down arrow. When the Filter & Select D/B/D/T box pops up,highlight the correct department and then click on the SELECT button. This willput a department in the department field.5. In the second column, enter the hire date in both the Current Hire Date and OriginalHire Date fields. If the employee is ever terminated and later rehired, you shouldchange the Current Hire Date to reflect the new hire date and you should leave theOriginal Hire Date as is.*There are more instructions on the next page for Setting up a New Employee.*1
6. On the second column, be sure the pay frequency defaulted correctly. If yourcompany has multiple pay frequencies, click on the drop-down arrow under the PayFrequency field and select the correct one. This is important when you create abatch for a particular pay frequency.7. If your employee is salaried, leave the defaults for the Rate Number and RateAmount field. The Rate Number field should default to 1 and the Rate Amountfield should default to 0.00.8. On the third column, be sure the federal/state marital status and number ofdependents is filled in. If your new employee, claims Married, but Withhold atSingle Rate on the W4 then select Single on EE Entry tab.9. Below the Federal Dependents field, there is an EIC field. EIC stands for EarnedIncome Credit. This field should automatically default to NONE. Unless theemployee is eligible for EIC, leave the default set at NONE. To be eligible, theemployee must complete a Form W-5 EIC Advance Payment Certificate and meetcertain income tests. If you have any questions about EIC give Payroll Partners acall at (817) 226-8111.10. Save and commit all changes by clicking on the green check mark and yellow sun.2
Setting up an Employee with Multiple PayRates*Follow the Setting up a New Employee directions on pages 1-2 in addition to thedirections below if your employee has multiple pay rates.*1. Click on the EMPLOYEE command button and select pay rate info.2. Click the Browse tab, find your employee on the right-hand side of the screen andhighlight him or her.3. Then click on the Details tab. Rate Number 1 should already be entered. RateNumber 1 is the primary rate you entered on the EE Entry tab.4. To add a second rate, hit the plus sign at the top of your screen. In the lower righthand corner, there is a box that says rate amount. Fill in the rate amount box.5. Unless your company is set up to have certain departments attached to certain rates,leave the Rate Number at 2. Under the words ‘Primary Rate,’ be sure it reads NO.Commit your changes by clicking on the yellow sun.3
Setting up a Salaried Employee withOvertime Pay*Follow the Setting up a New Employee directions on pages 1-2 in addition to thedirections below if your full-time salaried employee is able to earn overtime pay. Youmust set up a second rate for overtime earnings.*1. On the EE Entry tab, enter the salary amount and leave the default settings for RateNumber (it should read 1) and Rate Amount (it should read 0.00).2. Next, click on the EMPLOYEE command button and select Pay Rate Info. Youwill see the primary rate (Rate 1) set to 0.00. Leave this information as is.3. Hit the plus sign at the top of your screen and in the lower right-hand corner, fill inthe rate amount. The rate amount needs to be the flat pay rate amount not the timeand-a-half rate. When you enter the hours under the Overtime Hours EarningsCode in the payroll, it will calculate at the time-and-a-half rate.4. Leave the Rate Number at 2, and under the words ‘Primary Rate,’ put NO. Saveand commit your changes by clicking the green check mark and yellow sun.4
Setting up a New Employee ClaimingExempt on his or her W4*In order for federal withholding tax to be exempt, your employees must fill out their W4form correctly. If they write in a number of exemptions on line 5 or write an additionalamount on line 6 and claim exempt on line 7 then they have filled the form out incorrectly.The employee will need to fill out a new W4 form for your records. To claim exempt, youremployee must leave line 5 and line 6 on the W4 blank and write exempt on line 7.*If the W4 form is filled out correctly follow the Setting up a New Employeedirections first. After the new employee has been entered into Evolution, fax a copy of theW4 to Payroll Partners at (817) 467-9994. If you are not faxing a cover sheet with the W4then please write your company name on the W4. If the employee’s W4 form is filled outcorrectly then your payroll processor will block the federal withholding. This means nofederal taxes will be withheld from your employee’s check.If you are working on payroll and need Payroll Partners to block the federalwithholding immediately, please give us a call at (817) 226-8111 after faxing the W4. Wewill make the change and then you can refresh (blue circular arrow) to see the change.You can double check to make sure federal withholding was blocked by clicking onthe EMPLOYEE command button and selecting employee. Once on the Browse tab,highlight your employee and click on the Federal Tax tab. Under EE Federal, it shouldread Block. You can also check the upcoming payroll’s pre-process to ensure theemployee has no federal taxes deducted from the pay check.5
Rehiring a Terminated Employee1. Click on the EMPLOYEE command button and select employee.2. When on the Browse tab, click on the red question mark (middle right-hand side ofyour screen) beside the EE Code bar.3. When the Filter records to view box pops up, click on the CLEAR-ALL buttonlocated in the lower left-hand corner of the pop-up box. Then click on the OKbutton. This will allow you to see any terminated employees.4. Highlight the terminated employee you want to rehire and double click. You willbe directed to the EE Entry tab.6
5. Erase the termination date, by clicking on any number under Current TerminationDate and hitting delete on your keyboard. Then under Current Status Code, clickthe drop-down arrow and change the status to ACTIVE.6. You will also need to change the current hire date. Please put the date theemployee was rehired in the current hire date field. In the original hire date field,you should leave the original start date of your employee.7. Lastly, save and commit your changes by clicking on the green check mark andyellow sun.7
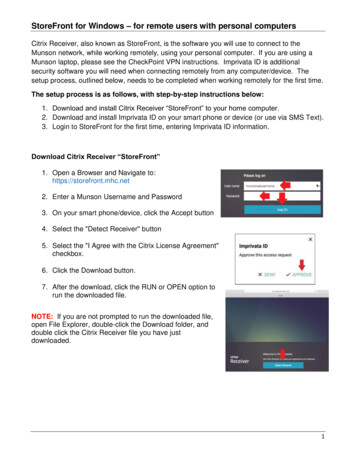
Starting a Payroll1. Click on the PAYROLL command button and select payroll.1. Once on the payroll tab, click on the CREATE PAYROLL button (lower righthand side of the screen). You will then see a new payroll check date appear withyour previous payrolls. If the check date is correct then click the green check markand yellow sun to save. If the check date that appears is not correct, change thedate by clicking on the drop-down arrow next to the check date at the bottom ofyour screen. Then save your changes by clicking on the green check mark andyellow sun.2. Unless you are running a second payroll for the same check date make sure thepayroll run number is 1.3. If you are not redirected to the Batch screen after saving, then click on the BATCHbutton (at the bottom of your screen). Once on the Batch tab, click the CREATEBATCH button. You will see a period of dates pop up and also your payfrequency. If the period beginning date, period ending date and the pay frequencyare correct, then click the green check mark and yellow sun (and proceed to step 5).8
If the frequency, period beginning date or period ending date is incorrect proceed tostep 4.4. Correct the period beginning date, period ending date or the pay frequency byclicking on the drop-down arrow to the right of each box. Once corrected, click thegreen check mark and yellow sun.5. Once you have saved, a box will pop up asking you ‘Would you like to auto-createchecks for this batch?’ Clicking on YES will bring in all of your employees for thefrequency selected, and clicking on NO will not bring in anyone.6. By clicking on the Checks tab, you will be able to see your employees.9
Creating a Second Batch*If you have multiple pay frequencies with the same check date you will need to create asecond batch to pull the employee(s) in. For example, under check date 6/15/04 you mighthave one batch with a pay frequency of bi-weekly and a second batch with a pay frequencyof monthly. This will allow two different batches of employees to be paid under the samecheck date.*Follow the Starting a Payroll instructions on pages 8-9 before following the Creating aSecond Batch directions below.1. In the payroll, go back to the Batch tab and click on the CREATE BATCH button.Adjust your period beginning date, period ending date and pay frequency. Be sureto save your new batch by clicking on the green check mark and the yellow sun.2. After saving the second batch, a box will pop up asking you ‘Would you like toauto-create checks for this batch?’ Clicking on YES will bring in all youremployees with that pay frequency, and clicking on NO will not bring in any ofyour employees.3. By clicking on the Checks tab, you will be able to see your employees.10
Adding an Employee into a Batch*If you have already started a payroll and need to add in a new employee, a rehire or aterminated employee with final hours you will have to pull them into the batch.*To set up a new employee please refer to the directions on Setting up a New Employee onpages 1-2 before continuing.To rehire a terminated employee please refer to the directions on Rehiring a TerminatedEmployee on pages 6-7 before continuing.There are two options for adding an employee into a batch.instructions you find are the most beneficial.Please use the set ofFor the first option for Adding an Employee into a Batch, read the directions below.1. After entering the new employee(s) and/or rehiring terminated employees, click onthe PAYROLL command button and select payroll. Once your check date ishighlighted, click on the BATCH button at the bottom of your screen.2. You should be directed to the Checks tab. Double click on any employee and youwill be taken to the Check Lines tab.3. Once on the Check Lines tab, click the plus sign at the top of your screen.4. A Payroll Expert box will pop up asking you to choose a check type. Make sure itreads Regular and click NEXT.5. Then it will ask you to select the employee. You can sort by EE name, EE code orSocial Security number. Most of the time, the easiest way to sort is by EE name.After picking the sort method, click the drop-down arrow below the sort method toselect the employee and click NEXT.*There are more instructions on the next page for Adding an Employee into a Batch.*11
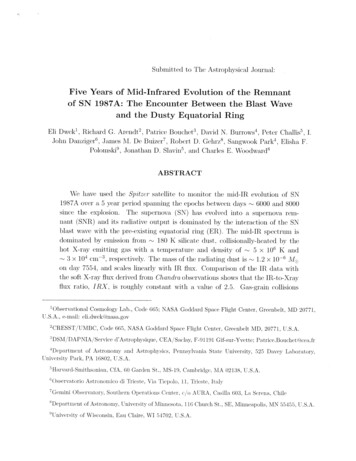
8. When it asks to select a check template, just click on NEXT. Then it will ask ifyou want to pay salary and either click on yes or no. Next, it will ask if you wantto pay regular hours and either click on yes or no.9. You will then be brought to the Check Lines tab. You can enter the amount and/orhours for any E/D code on the Check Lines tab or you can click on the BATCHbutton at the bottom of your screen. By clicking on the BATCH button, you willbe redirected to the Checks tab where you can also enter the amount and/or hoursfor any E/D code.10. Remember to save and commit your changes by clicking on the green check markand yellow sun.For the second option for Adding an Employee into a Batch, read the directions below.1. After entering the new employee(s) and/or rehiring terminated employees, click onthe PAYROLL command button and select payroll. Once your check date ishighlighted, click on the BATCH button at the bottom of your screen.12
2. You should be directed to the Checks tab. Click in any of the white boxes on yourscreen. Then hit the Insert key on your keyboard. Doing this will add blank line toyour batch.3. Stay on the blank line and click the box under the EE Code column. A drop-downarrow will appear in the box. Click the drop-down arrow and scroll down to findthe employee you want to add to the batch. The employees will not be inalphabetical order. Instead, they will be sorted by EE Code. Knowing theemployee’s EE Code ahead of time will save you time.4. Highlighting the correct employee will add the employee to the batch.5. Save and commit by clicking on the green check mark and the yellow sun.6. Then you can enter the payroll information (hours, salary, vacation, etc.) on thisscreen (Checks tab) by hitting the Enter key on your keyboard to scroll over to thedesired column or you can double click on the employee.7. Double clicking on the employee will direct you to the Check Lines tab, where youcan enter the amount and/or hours for any Earnings or Deduction code. Save andcommit all changes by clicking on the green check mark and yellow sun.13
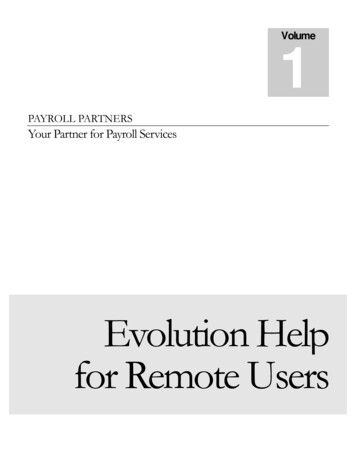
Setting up a Single Direct Deposit*Evolution considers Direct Deposits as deductions. You have to set up the bankinformation and then the deduction. This is a two-step process, and it must be done in thisorder: setting up the Direct Deposit and then setting up the Direct Deposit ScheduledE/D.*1. Click on the EMPLOYEE command button and select Scheduled E/Ds. Then clickon the Browse tab to find your employee.2. Highlight the employee and click on the Direct Deposits tab. On the DirectDeposits tab, enter the employee’s ABA number (the bank routing number shouldstart with a 0, 1, 2 or 3, bank account number and account type (checking). Underthe words ‘In Prenote,’ put No. Save and commit your changes by clicking on thegreen check mark and yellow sun.3. After entering the direct deposit information, you must set up a Scheduled E/D.Click on the Browse Scheduled E/Ds tab and make sure the employee doesn’t havea Direct Deposit E/D set up. If not, hit the plus sign at the top of the screen.14
4. Once on the Details 1 tab, click on the drop-down arrow under E/D code and selectDirect Deposit (checking account).5. When an employee wants to deposit the whole check into an account then it shouldbe set up as a Direct Deposit. This is a net direct deposit and it usually is achecking account. When setting up a net Direct Deposit Scheduled E/D, make sureit has a calculation method of NONE. The system should default to NONE.6. Under the first column, be sure to set up the scheduled deduction as foll
Oct 02, 2016 · Excel-style spreadsheet for importing time and other data into payroll Evolution Payroll Software HR Human Resources Module in Evolution for tracking employees and benefits OASDI Old Age and Survivors Disability Insurance; this is the social security portion of the FICA tax Pre-process