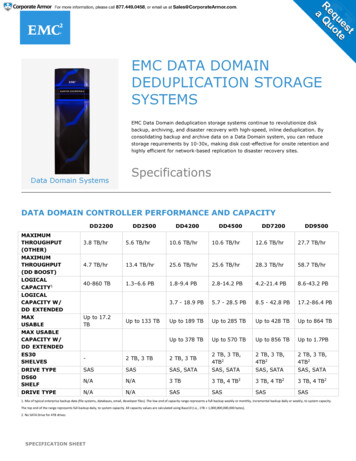
Transcription
1.Data Domain Pre-requisitesBefore we begin to configure NetBackup, we need to verify the following:-2. Administrator rights and network access to the NetBackup master and mediaservers That the NetBackup master and media servers can communicate with the DataDomain The Data Domain has the OST license installed The Data Domain has an OST user name and password for NetBackup to use tocommunicate The Data Domain has been configured with an appropriate LSU (Logical StorageUnit) for OST The Boost option has been enabled on the Data DomainEnabling OSTObtain the OST PLUGIN from the Vendor and install it on the media server (see below). This shallbe obtained after installing proper OST license keys on the data domain node. Using thecommand on data domain node.#license add “keys”Then add an Admin account to be used for OST purpose :# user add netbacku priv adminOnce the account is created set the account to ost.#ost set user-name netbacku ost#ost show user-nameNow enable OST :#ost enable#ost statusCreate OST logical Storage Unit ( LSU ) .Only one LSU should be created per Data Domain.# ost lsu create “ddname masterservename lsu1”#ost lsu show
Install the Data Domain OST plug-in software on the NetBackup Media Server that will bedirecting backups to it.Before installing the software stop the NetBackup Remote Manager and Monitor Service (nbrmm) by entering :#nbrmms –terminateAnd after performing the install restart nbrmms :#nbrmmsPlease verify if the plug-in got installed properly .#bpstsinfo –pi ( pi – plug-in info)3.Installing the Data Domain OST Plug-in onNetBackup Media ServersThe OST plug-in software must be installed on NetBackup media servers that need toaccess the Data Domain system acting as Source deduplication systems ( DDBoOST )The Plugin software is need for both Windows and LinuxWindows plug in repositoryLinux plug in repository3.1Install the UNIX plug-in1. Stop the NetBackup Remote Manager and Monitor Service(nbrmms) process if it is running by entering:# /usr/openv/netbackup/bin/nbrmms -terminate2. Use the tar file# tar -xvf OST 2.4.1.0-289644 OST redhat 64.tar4. The package also contains an installation script called install.sh, which verifieswhether or not nbrmms has been stopped before starting the installation. Enter:# ./install.shThe shared library files that the script installs arelibstspiDataDomain.so and libstspiDataDomainMT.so.The plug-in recognizes DataDomain as the Data Domain vendor prefix.The install log is shown below:Installing the Data Domain OpenStorage Client Libraries .
cp libstspiDataDomain.so /usr/openv/lib/ost-plugins/libstspiDataDomain.socp libstspiDataDomain.so The new Data Domain OpenStorage Client Libraries havebeen installed on this media server. In order for the changesto take effect, the NetBackup Remote Manager and MonitorService (nbrmms) needs to be restarted on the media serverand Netbackup needs to discover any new OpenStorage functionalityavailable on the Data Domain Restorer. Restarting this servicemay cause the media server to be temporarily unavailable.The media server will automically recover.5. If the plug-in already exists, you are prompted to enter y to proceed.6. Restart the NetBackup nbrmms process by entering:# /usr/openv/netbackup/bin/nbrmms3.2Install the Windows plug-in1. Double-click the libstspiDataDomainSetup.exe executable to launch the SetupWizard.2. If the dialog box below appears, click ok and then stop theNetBackup Remote Manager and Monitor Service before running the executable again.3. Select I Agree when the License Agreement box shown below is displayed
4. Select the installation folder.By default, the plug-in is installed in the C:\Program Files\Veritas\NetBackup\Bin\ostplugins folder. If your copy of NetBackup is installed in different folder, click the Browsebutton and select that folder, or type the complete pathname of the NetBackupinstallation folder in the text box.For example, if NetBackup is installed inD:\Program Files\Veritas, select or type the path asD:\Program Files\Veritas.8. Select Install9. A progress bar shows the status of the installation.
10. After the installation is complete, the Installation Complete screen is displayed.11. Once complete, Restart the NetBackup Remote Manager and Monitor Service.13. Tune the Windows media server for OST performance as described below.3.3Tune Windows media servers for OST performance1. Within REGEDT32, navigate toHKEY LOCAL rameters\2. Add a new DWORD value named GlobalMaxTcpWindowSize and set the value to2097152 (decimal).3. Add a new DWORD value named TcpWindowSize and set the value to 2097152(decimal).4. Add a new DWORD value named Tcp1323Opts and set the value to 1.5. Restart the Windows server.
4.Configuring a NetBackup Media Server for DataDomain OST BackupsNetBackup media server configuration consists of the following procedures: Registering each Data Domain system Adding credentials for each media server that is to communicate with a DataDomain system Creating disk pools Creating storage units, which are collections of disk pools Setting backup policies to use the Data Domain storage unitsAll of the above procedures will be administered from the NetBackup GUI.
1. Start the Configure Disk Storage Servers wizard.
2. Click Next.
3. Select OpenStorage from the drop down menu and click Next.
4. Enter the Storage server type, Storage server name, Select the media serverthat has the DataDomain OSt plug-in installed and finally enter the username andpassword for authentication.
5. You do no need to select additional media servers at this time as this can bedone later, click next.
6. The storage server will now be added, once complete click next.
7. Click next to start the Disk Pool wizard.
8. Click next.
9. Select OpenStorage (DataDomain) and click next.
10. Select the DataDomain server specified in step 4 and click next.
11. Select the OST volume that has been configured within DataDomain forNetBackup and click next.
12. Enter a name for the Disk Pool and click next.
13. The Disk Pool should now be create, click next to proceed.
14. You will now be presented with the Storage Unit wizard, click next.
15. Enter a name for the Storage Unit, select the Only use the selected mediaservers and tick the box for the media server you are configuring.16. Enter the Maximum concurrent jobs as 10017. Enter the Maximum fragment size as 5120018. Click next to complete the setup.
19. Finally setup a NetBackup policy and select the DataDomain storage unit asshown below.5.Adding additional NetBackup Media servers toOpenStorage disk poolsWhen additional media servers need to be configured to backup to existing Data DomainOST disk pools there is no need to run the Configure Disk Storage wizard again asdetailed in section 6. Instead just make sure the media server has the OST plug-ininstalled and then go to the NetBackup GUI and navigate to Media and DeviceManagement Credentials Storage Servers and then double click on the Data Domandisk pool. A dialog box like the one below should appear.
Check the box of the media server you are adding to the Data Domain disk pool andclick ok.Then navigate to the appropriate storage unit located under NetBackup Management Storage Storage Units, double click on the Data Domain storage unit and check thebox of the media server you are adding to the disk pool and click ok, refer to screenshotbelow.
The additional media server can now backup to the Data Domain disk pool.
The Boost option has been enabled on the Data Domain 2. Enabling OST Obtain the OST PLUGIN from the Vendor and install it on the media server (see below). This shall be obtained after installing proper OST license keys on the data domain node. Using the command on