Transcription
The Reverse Mortgage AnalystIllustrated User ManualMay 26, 2009 versionChristena Schafale, Consultant, AARP Foundation
Table of ContentsUsing this Manual. 1Getting Started . 1The Navigator. 2Entering Counselor Information. 3Entering New Client Information. 4Get Client . 6Loan Estimates. 7Payment Options. 10Creditline . 10Tenure . 10Modified Tenure . 11Term . 12Modified Term . 13Creditline Scenarios . 14Amortization Schedule . 15Creditline Draw Estimates . 17Comparing Loan Costs and Benefits. 18Using the Charts Function. 20TALC . 22HECM Certificates. 23HECM Refinance Counseling. 24Comparing Refinance Costs and Benefits . 25Refi Disclosure . 25Sell & Move . 26Annuity Comparison . 26HECM for Purchase . 27Print & Email. 28Technical Specifications. 30User Support . 30
Using this ManualIf you are just getting started using Ibis RMA, it will be helpful to try out all the features and seehow they work. This manual will lead you through an exploration of the program, withillustrations showing how the screens will look as you go along. You may want to read throughthe text once first, then sit down at the computer, open Ibis RMA, and follow along, enteringsample client data and trying out features.Getting StartedTo access the Ibis Reverse Mortgage Analyst, open your browser and go to:https://rma.ibisreverse.com.You will see the login screen, where you will enter your username and password.1
The NavigatorWhen you open the software, you will find yourself at the Navigator screen. The Navigator is aroadmap to all the other places in the program. The initial Navigator screen that you see is asimplified one.Once you have entered client data, you will see a Navigator screen with many more options.Tip:When selecting a button on the Navigator screen, click the text inside the button, not the blankareas. You will know you are in the right place when the words appear underlined.2
Entering Counselor InformationThe first time you use the Ibis RMA, you will need to enter information about yourself and youragency. This information is used to generate printable counseling certificates. Once you haveentered and saved this information, you won’t have to do it again.on the Navigator screen. Now fill in theTo enter counselor information, click onblanks. Click Save at the bottom of the screen, which will save your information and return youto the Navigator.If the counselor is based at a different physical location from the agency they work for, thecounselor’s info would be placed in the first section, and the agency’s information (which willappear on the certificate) would appear in the second section.3
Entering New Client InformationClick on(at the top left of the Navigator page). This will take you to the ClientInfo page, where you will enter data about your clients.Data Entry Tips: Use the Tab key to move from one field to another. You cannot enter the client’s state and county info manually. You mustenter the zip code and use the Find It button. When entering the Month of the client’s Date of Birth, use the month’snumber. For example, for March enter 3. “Word wrap” means that you can type in more than appears to fit in thebox; so just keep typing. Required fields are marked with a red asterisk.First, enter the 5-digit zip code in which this client’s home is located. Then click on thebutton. This will cause the home’s state and county to be entered into thoseboxes.Some zip codes cover more than one county. If the zip code you enter is one of these, youwill be shown a list of counties in that zip code. Select the county where the home islocated.Note that the zip code is needed despite the national lending limit, because Ibis uses thezip code to provide localized estimates of third-party closing costs. Required Entries: The boxes marked with a red asterisk (*) must be completed, or youwill not be able to save the data you have entered. To be sure that estimates arecalculated correctly, be sure to enter info for the co-owner, if there is one. If a legal representative (guardian, conservator, or power of attorney) is being counseledinstead of the owner, you may enter this information as well. In the Current Debt box, enter the total amount of any current debt against the home,for example, mortgages or outstanding balances on home equity lines of credit. Do notinclude any other debt such as credit cards or car loans. When all required boxes are complete, click onat the bottom of the page.This will save all of the client data you have entered to the secure online databaseassociated with your User ID. If you have entered all the required data, clicking on SaveClient will also take you to the Loan Estimates page. If you are missing any requiredinfo, an error message will remind you what you need to enter.DON’T’ FORGET TO SAVE YOUR CLIENT!4
5
Get ClientIf you have already entered client data and want to retrieve it, click onon theNavigator page. This takes you to the Select a Client page, where you can open a client’s recordby clicking on the borrower’s name.Clicking on the client’s name selects that client and takes you to the Estimates page for thatclient. The selected client’s name and age will now appear at the top of any page you go to.By default, the clients are listed by the date of the most recent revision, with the most recentlyedited records at the top. You can change this by clicking on the heading at the top of eachcolumn, if you would prefer to search the list by the client’s name, by the date they wereoriginally entered, or by the user who entered them.If a client name appears at the top of this page, that client’s current Client Info and Settings datawill automatically be saved when you click anything on this page.If you delete one of your clients from the Select a Client page, the client’s name will disappearfrom the list, but their data will be archived with your User ID. A site administrator would beable to reactivate the client at your request, in case of an accidental deletion.6
Loan EstimatesHere you will see three sample HECM loans and two empty columns into which you can enterdata for non-HECM loans. The three HECMs shown by default are based on three differentcombinations of interest rate type, index, and margin. These default settings are subject tochange as prevailing interest rates change.Changing Margins: If you need to change the margins or select a different index, click onHECM Settings at the top of the page. This will take you to a page where you can make thesechoices. Note that, for previously entered clients, the system will retain the index rates used thelast time you did calculations for this client. If you want to update to current rates, click theCurrent Rates button at the bottom of the screen.Choosing a Fixed Rate: The dropdown boxes next to “Adjusting Period” allow you to selectMonthly-adjusting, Annual-adjusting, or Fixed Rate loans. If you select Fixed Rate, clickCurrent Rate, which will refresh the screen so that you can see the current default rate, whichyou can change if needed. Take note of which column (HECM 1, 2 or 3) you are using for FixedRate; this will be reflected on the Estimates page. You will need to select this column in order tohave the fixed rate reflected in the Amortization schedule and other printouts.7
The checkboxes at the top of the Estimates page allow you to specify which loans will appear onloan printouts and comparisons. (See page 25 for directions on creating, printing, saving, andemailing PDF printouts.)The Select Loan box:appears just above the words Loan Programin the upper left of the page. It is used to choose and highlight a specific loan on the page, whichallows you to place some or all of the Net Principal Limit into an initial Lump-Sum Cashadvance or a Monthly Advance. It also allows you to select which loan will be reflected in anamortization schedule.(just to the right of the Select LoanThe Select Type box:box) displays “Creditline/Tenure” by default. You can change this setting if you want togenerate a HECM term or modified term loan with monthly payments for a specific period oftime, or specific monthly payments that are larger than those allowed by a tenure plan. Leave itas is if you want to show tenure or creditline options.Data Entry Tip: You can change data that appears in any box with a white background. Enter your new data, then hit the Tab key on your keyboard or click onany other data entry box on the page to recalculate. Don’t forget to click the Save & Continue button at the top or bottombefore you leave this page! If you don’t, you will lose the informationyou just entered. Hitting the Enter key has the same effect as clicking Save & Continue,taking you to the Scenarios page. Use your Back button or the Estimateslink at the top of the page to get back to the Estimates page.Non-HECM LoansYou can also enter data about any non-HECM loan in the columns called OTHER-1 andOTHER-2. To do this, you will need to obtain the data from printouts or other informationprovided to your client by a lender. Entering data on non-HECM loans will allow you togenerate amortization schedules and side-by-side loan comparisons with HECM loans.If a non-HECM loan does not have a given feature (for example, if it does not provide anycreditline growth, or doesn’t have a servicing fee set-aside), just leave the entry box blank.If a loan has a "teaser" interest rate (for example, a lower rate for the first six months), do notenter the teaser rate as the "Initial Total Loan Rate." Instead, enter the rate that will be in effectwhen the teaser rate ends. For example, if the initial teaser rate is 7% but it will increase to 7.5%after six months, enter 7.5% as the "Initial Total Loan Rate" because that's the rate that will be ineffect for all but six months of the loan.8
9
Payment optionsCreditline: By default, all funds will be placed in a creditline. If that’s what your client wants, leavethings as is. Click the Save & Continue button at the top of the page to proceed to theScenarios page to specify a pattern of creditline draws. See below for details.Tenure: The maximum tenure payment is displayed at the bottom of the column for all clients. Ifyour client is interested in receiving the maximum tenure payment, simply delete theSelected Creditline amount and click anywhere on the page to recalculate. The programwill then fill in the maximum tenure amount in the Monthly Advance box.10
Modified Tenure: To show a specific monthly payment and calculate what would be left in the line ofcredit, put the desired monthly amount in the Monthly Advance box. The available lineof credit will now show up in the Less Selected Creditline box. To show a specific creditline amount and calculate the tenure payment that would beavailable, enter the desired creditline in the Selected Creditline box. The maximummonthly tenure payment that could be combined with that creditline will now appear inthe Monthly Advance box.11
Term:Go to the Select Type box:HECM Term Plan from the dropdown menu.at the top of the screen. ChooseThere are three pieces of information that will determine how much the term payment will be:1.Selected Creditline, if any2.Monthly Advance3.Monthly Term in Years (how many years the borrower wants to receive monthlyadvances) You will need to specify two out of three in order to calculate the third. To calculate a term payment for a fixed number of years with nothing reserved in acreditline,o Enter 0 in the Selected Creditline boxo Fill in the desired number of years in the Monthly Term in Years box.o Click the calculator icon next to the Monthly Advance box to calculate howmuch the monthly payment will be. To calculate a term payment based on a specific amount each month, with nothingreserved in a creditline,o Enter 0 in the Selected Creditline boxo Fill in the desired monthly payment in the Monthly Advance boxo Click the calculator icon next to the Monthly Term in Years box to calculatehow many years payments will last.o Results will display the term in years and in months. There may be a smallremainder left in the creditline. (Click again if number of months does notdisplay correctly.)12
Modified Term:There are three different ways to display a modified term plan. Specify creditline and monthly advance, then calculate term in years:o Enter the desired creditline amount in the Selected Creditline boxo Enter the desired monthly payment amounto Click the calculator button next to Monthly Term in Years. Specify creditline and term in years, then calculate monthly advanceo Enter the desired creditline amount in the Selected Creditline boxo Enter the desired term in years in the Monthly Term in Years boxo Click the calculator button next to Monthly Advance Specify monthly advance and term in years, calculate remaining creditlineo Enter 0 in the Selected Creditline boxo Enter the desired monthly advanceo Enter the desired term in yearso Click the calculator button next to Selected CreditlineThebutton at the top or bottom of the page will save your work. It willalso automatically take you to the Creditline Draw Scenarios page.13
Creditline ScenariosIf you have entered a creditline for your client, this page allows you to select the draw patternand specify the dollar amounts that best approximate your client’s intended or expected use ofthe creditline.The draws you specify here will be transferred into three key reports and make them morerealistic for your client.You can show monthly or annual draws of any amount you select, or monthly or annual drawsequal to projected creditline growth. You can also show up to 5 draws of different amounts atparticular future times. For instance, your client might specify that he wants to take a tripcosting 5000 in year 2 of the loan, then buy a car costing 15,000 in year 3, then give 10,000to his grandchildren in year 5.You can then look at the results in several ways, by clicking on one of the three report buttons atthe bottom of the page.14
Amortization ScheduleThe Loan Amortization Schedule projects into the future the single loan you selected in theSelect a Loan Program menu on the Loan Estimates page, using the draws you specified on theScenarios page.15
Assumptions The text at the top of the page explains the assumptions that go into the amortizationschedule. These assumptions should be pointed out whenever you provide anamortization schedule, because the projected loan balances are only as accurate as theassumptions they are based on.By default, the schedule uses the initial interest rate and a predicted 4% appreciationrate. However, you can change these assumptions to better fit the client’s situation, or toillustrate what would happen if the home did not appreciate as expected, for instance.o You can select one of four interest rates for projecting the loan’s future balance:the loan’s initial rate, that rate plus 2 points, or plus 4 points, or the loan’s“expected” rate.o Appreciation rate can be changed to any percentage between -10% and 10%.ExplanationsThe definitions at the bottom of the page provide an explanation of each column on theamortization schedule. Note that the net home value takes into account the projected costs ofselling the home. (This is different from the home value column in FFRMA amortizationschedules, which does not reflect costs of sale.)16
Creditline Draw EstimatesFor each loan you select on the Estimates page, this report displays the client’s selected creditlinedraws and the amount of funds remaining available in the creditline. To change the draws thatare illustrated, click on Scenarios at the top or bottom of the page. To change which loans areselected, click on Estimates.17
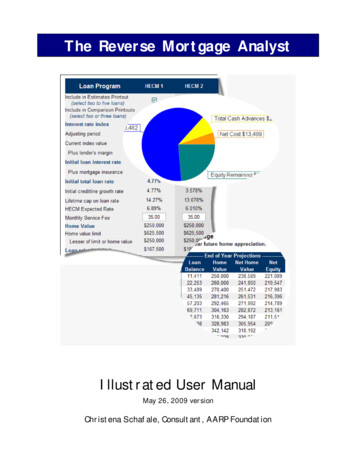
Comparing Loan Costs and BenefitsThe Comparison button on the Scenarios page or the Navigator takes you to the ReverseMortgage Comparisons report.This report is similar to the Performance report found in the FFRMA software. It projects theloan into the future and shows the three basic facts about any reverse mortgage: Loan advances (what the borrower got)Loan costs (what it cost them to get it)Leftover equity (what the borrower or their estate has left after the loan is paidoff)The Comparisons report allows you to compare these projections side-by-side for three differentloans or loan variations, at five future points in time. The five points in time are the medianprojected remaining life expectancy for the youngest borrower, and 20%, 60%, 140%, and 180%of this median life expectancy.The report also includes a Total Annual Rate at each point in time, which is similar to the officialTotal Annual Loan Cost (TALC) rate, but takes into account client-specific creditline draws andother factors which may make it more useful to the borrower. This single percentage, like anAPR, includes both interest charges and closing costs, and allows side-by-side comparison ofloans with different kinds of costs.AssumptionsLike the Amortization schedule, the Comparison report relies on some assumptions, includingprojected interest rate and appreciation rate. These assumptions can be changed using the boxeson the upper right hand side of the page.ExplanationsThe software provides a 2-page handout that explains the Comparison report in detail. Thehandout should be given to clients whenever you provide the Comparison report. To review the handout, click on thebutton at the bottom of the page, whichtakes you to the
May 26, 2009 · The Reverse Mortgage Analyst Illustrated User Manual May 26, 2009 version Christena Schafale, Consultant, AARP Foundation . If you are just getting started using Ibis RMA, it will be helpful to try out a