Transcription
WinTV 10 US Help1 Hauppauge Computer Works 2020
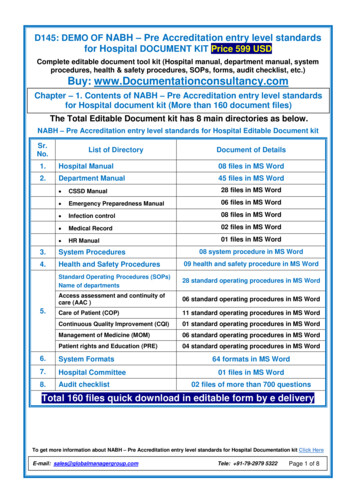
The WinTV10 Main WindowFundamental OperationThe majority of options can be selected by clicking on the left hand mouse button.Double-click the left hand mouse button inside the TV window to change window mode (normalview, TV window only, full screen).Click the right hand mouse button inside the TV window to open the context Menu.Nearly all functions can be accessed using the keyboard.Control ButtonsWinTV Settings2 The WinTV10 Main Window Hauppauge Computer Works 2020
Clicking this button will open the WinTV Settings dialog.On Screen DisplayClicking this button will display channel information.Open File for PlaybackClick this button to open a previously recorded file for playback.SnapshotClick the Snapshot button to save a still image of the currently displayed TV / video.Start Live TVClick the TV button to watch Live TV.Closed CaptionClick to toggle closed caption on or off.TV GuideClick to open the TV Guide Menu (Only available for ATSC signals in North America)Context MenuClick to open the open the MenuStart RecordingStarts recording the currently watched channel.Terminate Recording / Exit Live TVClick this button to exit a recording, or to exit Live TV mode.3 The WinTV10 Main Window Hauppauge Computer Works 2020
Pause Live TV / Change Playback PositionThe big button in the middle pauses Live TV. Click the same button again to continue Live TV.The other buttons do: Skip back 60 seconds, skip back 30 seconds, skip forward 10 seconds, andskip forward 60 seconds.Change ChannelClick the Channel Up or Channel Down button to change channel.Mute AudioThis button allows you to turn the sound on or off.Change Audio VolumeUse this slider bar to change the audio volume.Pause Buffer IndicatorThe white bar below the TV window shows how much the pause buffer is filled with content.The bar grows with time. You can click your mouse button on the white bar to directly jump to acertain position in the pause buffer. The timer will show how far back the video is from LiveTV.Minimize Application Window, Enter Full ScreenMode, Exit Application Click on the minimize button to minimize the WinTV application to the task bar. (Clickon the WinTV icon in the task bar to maximize.)Click the maximize button to watch the TV in full screen. To return to windowed mode,double click the left hand mouse button or press the Esc key.Click the X button to close the WinTV application.Resize Application Window4 The WinTV10 Main Window Hauppauge Computer Works 2020
To set the WinTV window size, hold down the left mouse button when it's over the lower rightcorner of the WinTV window, drag it to the preferred size, and then release the mouse button.You can set different sizes for the normal view and No-Title mode.WinTV SettingsClick the WinTV Settings button or Configuration under the Options Menu in the main TVwindow to open Settings.Settings is separated into several tabs."General" - General settings."Capture" - To specify the locations for recordings, timeshift buffer file and snapshots."Devices" - Tuner setup for channel search and configuration of external video inputs."All Channels" - To manage your channels."Favorites" - To define your favorite channels."Parental Control" - To enable parental control (North America only)."Advanced Options" - Advanced options."WinTV Extend" - To Configure Wintv Extend (optional)5 WinTV Settings Hauppauge Computer Works 2020
Settings / "General"Section "Version"Version : The current version of WinTV 10 installed is displayed.Section "Activation Code"WinTV v10 Activation Code : The activation code used to activate will be displayed. As wellthe product the code was paired with.Section "Languages"User Interface Language: Select the language of the application user interface here. Changestake effect after restarting the application.6 Settings / "General" Hauppauge Computer Works 2020
Preferred Audio Language: Specifies the preferred audio language for multi languagebroadcasts.Closed Caption Service: Specifies the preferred subtitles language for broadcasts with multilingual subtitlesUse SPDIF Output: If this option is enabled, audio will be routed to the S/PDIF output of yoursoundcard.Show Captions: If enabled, subtitles are displayed (when available).Section "Video Renderer"EVR or VMR9: Specifies the video renderer to be used. The video renderer is a softwareinterface to your display adapter. Changes take effect after restarting the application.Use hardware acceleration MPEG-2/H.264 and HEVC: If enabled, the hardware acceleration,that newer display adapters offer, is used. This may improve system performance whendisplaying video. Changes take effect after restarting the application. MPEG-2/H.264 is mostcommon used signal type. HEVC also know as h.265 is newer signal type in some Europeancountries.Section "Monitor Shape"4:3 or 16:9: Select the aspect ratio of the connected computer monitor here.Auto-size window: If this option is enabled, the aspect ratio of the application window is alwayskept constant when resizing the window.7 Settings / "General" Hauppauge Computer Works 2020
Settings / "Capture"Section "Recordings"Recordings Directory: Specifies the folder where recordings are saved. You can click onBrowse to select a different folder. Also snapshots are placed here.Default Pre Padding (minutes): Specify how many extra minutes a recordings should startusing pre-padding.Default Post Padding (minutes) : Specify how many extra minutes a recordings shouldcontinue recording using post-padding.Default Padding Preference: Please look at WinTV Scheduler for information.8 Settings / "Capture" Hauppauge Computer Works 2020
Analog Aspect Ratio: Select the aspect ratio for recordings from analog TV /video (Only forproducts with analog TV tuner / video inputs.)Default Analog Recording Quality: Select the quality for recordings from analog TV / videohere. (Only for products with analog TV tuner / video inputs.)Section "Disk Buffering"Disk Buffering is used to enable time-shift, where the TV content is continuously buffered toyour hard disk.Pause-Mode Recording Directory: Specifies the folder where the temporary disk buffer file isplaced. You can click on Browse to select a different folder.Buffer Size (minutes): Sets the duration in minutes for which the TV content is buffered to harddisk. Enter 0 minutes to disable disk buffering. Changes take effect after restarting theapplication.Section "Snapshots"The following settings refer to snapshots, i.e. still images of the currently displayed TV / video.Snapshots are generated by pressing the space bar or Snapshot button.Snapshot Directory: Specifies the folder where snapshots are saved. You can click on Browseto select a different folder.Snapshots File Type: Specifies the file type of the saved snapshot file JPG or BMP.Vertical Resolution: Specifies the vertical resolution of the image, i.e. the number of lines. Youcan select between: Native: The image is saved in the currently displayed size.480 - 1080: The image is zoomed to the selected number of lines, before it is saved.Please note: Image quality directly depends on the size of the displayed TV / video image. Thelarger the TV / video image is the better is the quality of the snapshot.9 Settings / "Capture" Hauppauge Computer Works 2020
Settings / "Devices"To set up the TV tuner and scan for channels, select the device from the list and click on "TunerSetup". The Device Setup Wizard will open.If Tuner Setup is grayed out, the product is not selected.Please refer to the Device Setup Wizard section for the available options10 Settings / "Devices" Hauppauge Computer Works 2020
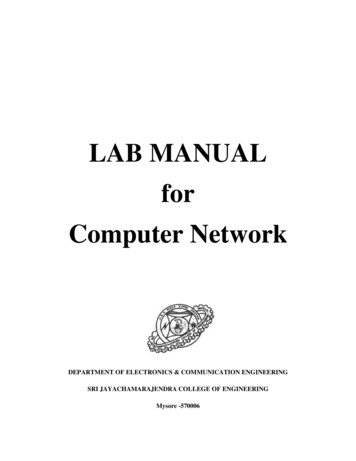
Settings / "All Channels"All channels from the channel database are listed.With the checkmark in the first column, channels can be enabled or disabled. Uncheckedchannels will be hidden from the channel list in the main menu window.Channels are sorted only based on the Preset numberRight click on a channel to open a context menu:Menu option "Select All": Selects all channels in the list.Menu option "Delete": Deletes the selected channel(s) permanently from the database.11 Settings / "All Channels" Hauppauge Computer Works 2020
Menu option "Tune": Tunes to the selected channel for watching / listening.Menu option "Details": Opens a dialog window with details about the channel.View and Edit Details about a ChannelWhen selecting "Details" from the menu, the Edit Channel window is opened.Section "General"Name: You can edit the name of the channel in the "Name" field.Type: Type of signal can be selected manually if needed.Preset: You can change the position of a channel in the list by changing the number in the"Preset" field. Note: If the new position is in use by another channel already, the other channel ismoved to the end of the list.The other options in this dialog are for the purpose of information only, and cannot be edited.12 Settings / "All Channels" Hauppauge Computer Works 2020
Moving a Channel up or downYou can move the selected channel up or down using the arrow buttonschange the channel numeric number.13 Settings / "All Channels" Hauppauge Computer Works 2020. This would
Settings / "Favorites"Defining FavoritesOn the left side all existing channels are listed. The right side shows the pre-defined and userdefined channel groups and some buttons.Add: Creates a new channel group named "New Group", which can then be renamed.Rename: Used to rename the selected channel group.Remove: Deletes the user defined channel group or a channel from a group. (This does notactually remove the channel from the database.)14 Settings / "Favorites" Hauppauge Computer Works 2020
To create a new group with your favorites:1. Click on Add, to create a new group.2. Rename this group to "My Channels" (for example).3. Click on a channel in the left list, drag this channel over to your channel group whileholding down the mouse button, then release the mouse button. The selected channel isplaced in the channel group. Repeat this procedure with all desired channels.Note: The "Favorites" tab is not designed to sort, rename or delete channels from the database.Use the "All Channels" tab for these tasks.Using FavoritesAfter a new group has been defined, it will be shown in the drop down list under the FindChannels menu on the main TV window. When selecting this channel group, only channels fromthe group will be displayed.15 Settings / "Favorites" Hauppauge Computer Works 2020
Settings / "Parental Control"This dialog allows you to enable Parental Control on digital TV programs, and is available onproducts for North America only.Section "Parental Control"Enable Parental Control: Once you have set the 'Unlock Code', you can select this option toenable parental control.Block Unrated Content: If this option is enabled, unrated TV content will not be displayed.Unlock Code: The Unlock Code is a password chosen by yourself. Enter the password into the'Unlock Code' field and retype the same password in the 'Confirm' field. After the Unlock Code16 Settings / "Parental Control" Hauppauge Computer Works 2020
has been set, the Parental Control option can be enabled. If you want to disable parental control,or change settings later, you will have to enter the Unlock Code again.Section "Region"Rating Region: Specifies the rating region.Blocked TV Parental Ratings: Select the parental rating (and eventually sub-rating) for whichTV content is to be blocked.TV-Y: For all children, including very young children.TV-Y7: For children age 7 and above.TV-G: General audience; suitable for all children.TV-PG: Parental Guidance; suggests parents to watch with their children.TV-14: Unsuitable for children under age 14.TV-MA: Mature Audience only.MPAA: Specifies the film rating according to the Motion Picture Association of America.G: General Audience. All ages admitted.PG: Parental Guidance Suggested. Some material may not be suitable for children.PG-13: Parents Strongly Cautioned. Some material may be inappropriate for children under 13.R: Restricted. Under 17 requires accompanying parent or adult guardian.NC-17: No one of age 17 and under admitted.X: Same as NC-17.17 Settings / "Parental Control" Hauppauge Computer Works 2020
Settings / "Advanced Options"Section "TV"Automatically start Live TV: If enabled (default), on startup of the WinTV application, live TVis started automatically.Disable Now/Next: If this option is checked, the Now/Next electronic program guideinformation is not shown when changing channels.Disable OSD Graphics: If this option is checked, the On Screen Display annunciators are notdisplayed (for example "Mute" or the channel number).Cycle window mode on double click: If enabled (default), on double click inside the TV imagethe application view mode cycles through "Normal ", "No Title" and "Full Screen". If not18 Settings / "Advanced Options" Hauppauge Computer Works 2020
enabled, a double click switches between the current view and "Full Screen", where the currentview may be "Normal" or "No Title". (You can also change the application view in the WinTVmenu).Prefer AC3 audio: If enabled (default), AC3 audio is preferred over MPEG audio, if a channeloffers MPEG audio and AC3 audio.Block Windows Screen Saver: If enabled (default), it will stop screen saver from running whileWinTV is active.Remember Last Used Window Mode: If enabled WinTV will remember the window mode(Title, No title, Full screen) when closing and will open in that mode the next time it is run.Use Game Mode for analog (No Lag Preview) - Disables PVR Mode: In normal mode the TV/ video displayed in WinTV is delayed for a few seconds, because it is buffered on hard drive orin memory. In Game Mode the analog TV / Video is displayed without delay. You should enableGame Mode if you intend to connect a game console to the video input of WinTV. In GameMode these functions are disab
Menu option "Tune": Tunes to the selected channel for watching / listening. Menu option "Details": Opens a dialog window with details about the channel. View and Edit Details about a Channel When selecting "Details" from the menu, the Edit Channel window is opened. Section "General" Name: You can edit the name of the channel in the "Name" field.