Transcription
PART 4EXPERTLAND NAVIGATION
PART 4 Expert Land NavigationUSING THEMILITARYLENSATICCOMPASS
PART 4 Expert Land NavigationWARNINGThis presentation is intended as aquick summary, and not acomprehensive resource. If youwant to learn Land Navigation indetail, either buy a book; or getsomeone, who has the knowledgeand skills, to teach you in person.
PART 4 Expert Land NavigationNOTETo get the ideas across presented onthese slides, many figures, pictures,and calculations may not be to scaleand may be exaggerated for clarity.
PART 4 Expert Land NavigationNote:Prior to being issued any training *equipment, you willbe required to sign a “statement of liability” agreeingto pay for anything you damage or lose.All items will be inspected and inventoried prior toyour signature and at the end of the training day too.If you do not intend to sign this statement, then youmay be denied training.* You may use your own equipment.
PART 4 Expert Land NavigationAny Questions?
PART 4 Expert Land NavigationBREAK TIME
PART 4 Expert Land Navigation. . . and now on with the . . .PRESENTATION
PART 4 Expert Land NavigationLAND NAVIGATION WITH MAPAND LENSATIC COMPASS
PART 4 Expert Land NavigationLAND NAVIGATIONWhy Learn Land Navigation? Training and practicing land navigation on footprovides the following everyday navigation (how not to get lost) benefits;- Tracking present location (Where am I ?)- Determining Distance (How far is it and am I there yet ?)- Sense of direction (Where do I want to go and where am I actually going ?)- How to read a topographic map (Do I understand the map ?)-Terrain and map association (What hill or river am I looking at ?)- Spatial skills (Can I mentally visualize the landscape in 3D ?)- Planning safe, practical routes (Take a long safe route or a short risky route ?)- And more Navigational skillsThe best way to learn LAND NAVIGATION is to get "dirt time", that is, get out there with a map and compass!Navigation is not about finding yourself after you are lost (although that’s what happens sometimes); it’s aboutkeeping track of your position as you move away from a known point. As you move you have to remaincognizant of the terrain you are leaving, of the terrain you are passing, and of the terrain that is ahead.Navigation in the wilderness means knowing your starting point, your destination, and your route to get there.These skills will allow you to venture farther off the beaten path than you ever thought before.
PART 4 Expert Land NavigationTHIS PRESENTATION IS DIVIDED INTO FOUR PARTSPART 1Basic Land Navigation The Lensatic Compass The Topographic Map The Land and Map AssociationPART 2Intermediate Land Navigation Making Sense of Direction Tracking Present Location Determining Travel DistancePART 3Advance Land Navigation Planning to Navigate Navigation Methods to Stay On Course Additional Skills of Land NavigationPART 4Expert Land Navigation Navigation in different types of Terrain Night Navigation Sustainment
PART 4 Expert Land NavigationAny Questions?
PART 4 Expert Land NavigationPART 4EXPERT LAND NAVIGATION Navigation in Different Terrain– Description– Skills Night Navigation– Description– Skills Sustainment– Description– Maintaining Skills
PART 4 Expert Land NavigationNAVIGATING DIFFERENT TERRAINSDESCRIPTIONThe LAND NAVIGATION information, concepts,and skills already presented in the other lessons willhelp you to navigate anywhere in the world.However, there are some special considerationsand helpful hints that may assist you in variousSPECIAL ENVIRONMENTS. Terrains that can befeatureless, rough, dense, unpredictable footing orground, and unpredictable weather/visibility. Navigating accurately in featureless terrain takes lots of. mental concentration, patience, advancednavigation skills, practice, and experience.– Dead Reckoning– Desert (Mountain, Rocky Plateau, and Sand Dune Deserts)– Jungle– Snow / Arctic– Fog / limited visibility
PART 4 Expert Land NavigationNAVIGATING DIFFERENT TERRAINSDEAD RECKONINGDEAD RECKONING, where azimuth (or direction of travel) data is combined with pacing (or distance traveled)data. With this technique, one can establish their position in featureless terrain, foul weather, or even incomplete darkness.DEAD RECKONING is not as accurate as other forms of navigation, but it will suffice, when that is the onlyresource available. In theory, Dead Reckoning works. But in reality, not as well, since it is impossible to walka straight line, and measuring distance (pace or time) is not precise. It is an estimated position It is a good way of not getting lost It narrows down the area of uncertainty You are not at your estimated position, just somewhere near it For short distances, such as a few miles, the cumulative errors are acceptableThe "dead" in dead reckoning is derived from "ded.," an abbreviation of "deduced.“ It's navigation by logicaldeduction. It does not necessarily mean it's a deadly form of navigation.Dead reckoning consists of three fundamental steps.1. You begin your journey from a positive fix, a point you are sure of and can locate on the map.2. From there you maintain accurate data of distance and direction traveled for each leg of your route, on asheet of paper.3. You then use this data to update your position on the map.The rules of dead reckoning: Plot your estimated position . . .1. Every hour on the hour (30 minutes on the half hour is more accurate)2. After every change of direction (azimuth)3. After every rest stop
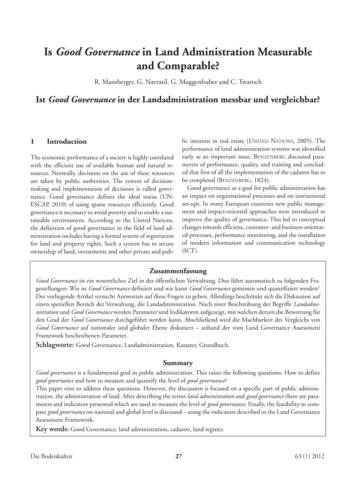
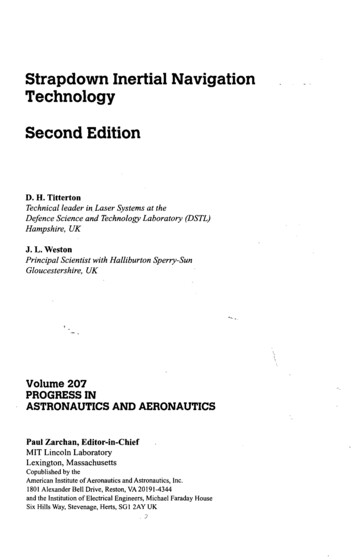
PART 4 Expert Land NavigationNAVIGATING DIFFERENT TERRAINSDEAD RECKONINGExample – you want to explore a prairie / plain with flat terrain.1. Set compass azimuth and follow it, use the Center-Hold method.2. Measure distance traveled by pace count, time or other method.3. When you decide to change directiona. Stop and take out the map.b. Draw a course line out from your start point in the direction you traveled.c. Measure calculated distance on the drawn line equal to the distance traveled.d. Put a “X”, circle, or tick mark - this is your new current ESTIMATED FIXED POSITION.4. From your new estimated fixed position, repeats the above steps.Estimated Position # 4Estimated Position # 7Estimated Position # 6270º 700mEstimated Position # 3Estimated Position # 2Estimated Position # 5EstimatedPosition # 8EstimatedPosition # 9FinishStart90º 1KmEstimated Position # 1
PART 4 Expert Land NavigationNAVIGATING DIFFERENT TERRAINSDEAD RECKONINGOther featureless (non-identifiable landmarks) landscapes to use Dead Reckoning
PART 4 Expert Land NavigationAny Questions?
PART 4 Expert Land NavigationNAVIGATING DIFFERENT TERRAINSDESERTThere are three types of deserts – Mountain, Rocky Plateau, and Sand Dune Deserts.SAND DUNE DESERTSWhen operating in an area with few visual cues, restricted visibility by a sandstorm,you must proceed by Dead Reckoning.For short distances, or as long as they are visible, use your foot steps behind youas a trail back azimuth reference, to keep you on course.Distances are deceptive! That distinct landmark that seems so near may actuallybe over 20 to 30 miles distant. In the dry desert air, everything will seem muchcloser than it actually is.The general rule of thumb for estimating distance and time travel is to multiplyyour most conservative estimate by a factor of three.NOTE - Animals like to stay near water sources, an oasis.
PART 4 Expert Land NavigationNAVIGATING DIFFERENT TERRAINSDESERTThere are three types of deserts – Mountain, Rocky Plateau, and Sand Dune Deserts.ROCKY PLATEAU DESERTSMost challenging of all, however, are the existence of hidden canyons and deep washes (arroyos) which canimpede your forward progress along a route you might have thought was easy cruising. It is not uncommon tohave to hike 10 to 20 miles out of your way to work your route around a canyon that is impassable.To avoid some of these, study your map very carefully with yourcurrent surroundings.Use Dead Reckoning, very close intermediate landmarks,Baselines, Back Azimuths, etc.
PART 4 Expert Land NavigationNAVIGATING DIFFERENT TERRAINSDESERTThere are three types of deserts – Mountain, Rocky Plateau, and Sand Dune Deserts.MOUNTAIN DESERTSIf you know which mountain you are on, use ASPECT OF SLOPE to identify which side of a hill you are on.By studying the map and knowing roughly where you are, a slope with the same approximate direction canusually be quickly identified.Aspect of Slope. To determine the aspect of slope, take a compass reading along an imaginary line that runsstraight down the slope. It should cut through each of the contour lines at about a 90 angle. By checking themap and knowing the direction of slope where you are located, you will be able to keep track of your location,and it will help guide your cross-country movement even when visibility is poor.1.Take a compass bearing directly down the slope you are standing on.2.Put the compass onto the oriented map, over the mountain you are standing on.3.Move the compass around till you find a place where the bearing lies at right anglesto the contours, just as on the ground.4.You now know your position lies somewhere along the bearing as it is laid out onthe map.5.To find out exactly where, just check your altimeter. (If you have one)Use Dead Reckoning, very close intermediate landmarks, short Baselines, BackAzimuths, etc. to navigate terrain.
PART 4 Expert Land NavigationNAVIGATING DIFFERENT TERRAINSDESERTOTHER MOUNTAIN DESERTS
PART 4 Expert Land NavigationAny Questions?
PART 4 Expert Land NavigationNAVIGATING DIFFERENT TERRAINSJUNGLEThe jungle and many rainforests are sodense that you will have to make use ofwildlife paths, ridge lines, streams, dryriver beds, or established human trails.This is fine if your intended route oftravel is going the same way, but moreoften than not, it isn’t.The navigator must rely heavily upon the dead reckoning technique whenmoving in the jungle.Navigation is further complicated by the inability to make straight-linemovements.Travel during the day and get off any established paths at night; animals(predators) will use these same trails.Be prepared to follow a meandering course that will take you twice as long tocover the same ground you would have covered had you attempted a moredirect route (in a clear, easy terrain, of course). Trying a direct route in thejungle thickets is impossible.A lost navigator in the jungle can eventually find his way back to civilization byfollowing any body of water with a downstream flow.Terrain analysis, constant use of the compass, and an accurate pace countare essential to navigation in this environment.
PART 4 Expert Land NavigationAny Questions?
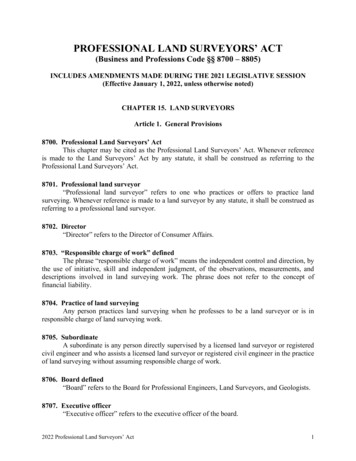
PART 4 Expert Land NavigationNAVIGATING DIFFERENT TERRAINSSNOW / ARCTICIn the winter, valley floors are often the easiest places to navigate since they are somewhat sheltered fromthe wind that sweeps across the ridges, and the snow has likely covered any areas choked by underbrush.Navigating over vast areas of smooth and often featureless snow can be exhausting and disorienting.When the weather is good, Dead Reckoning techniques work well, even on glaciers or other opensnowfields, and use Human Reference Points, or Make a Reference Point for a Back Azimuth.REFERENCE POINTMADE OF SNOWWhen hiking in an area near the magnetic pole, always question your compass accuracy, it can mess withyour compass.Back up your navigational decisions and headings with celestial observation, your shadow, sundial, or watchtechnique.Snow changes things, filling in the landscape * Areas develop new and ever-changing contours.* Depressions are leveled out.* Drifts fill ravines, turning them into flats.* Trails disappear.* Bodies of water look like open fields.* An ALL WHITE environment reduces depth perception and judgment of distance.
PART 4 Expert Land NavigationAny Questions?
PART 4 Expert Land NavigationNAVIGATING DIFFERENT TERRAINSFOG / LOW VISIBILITY / SNOW WHITEOUTKnow where you are at all times, because visibility can deteriorate quite suddenly in any environment.If you see a fog bank approaching or fog starting to form be sure to fix your map position.No. 1 rule for navigating in low visibility is “Always trust your compass.”Use Dead Reckoning, visible intermediate landmarks, human reference points, back azimuths, thumbthe map, baselines, etc.DURING A SNOW WHITEOUT * There is the danger of suffering from vertigo in a world where there isno clear deference between sky and ground.* There are times it can be difficult to know whether you are moving upor down; one useful trick is to toss a snowball ahead of you.- If it appears to stick in mid-air, the ground ahead must slopeupward.- If it lands lower than your feet you are on a downward slopeand need to proceed very carefully.- If it disappears from view, back off quickly; you could be onthe edge of a steep drop, or cliff.
PART 4 Expert Land NavigationAny Questions?
PART 4 Expert Land NavigationNIGHT NAVIGATIONDESCRIPTIONDarkness presents its own characteristics forLand Navigation because of limited or no visibility.However, the techniques and principles are thesame as that used for day navigation.The success in nighttime Land Navigationdepends on rehearsals during the planning phasebefore the movement, such as detailed analysis ofthe map to determine the type of terrain in which thenavigation is going to take place and thepredetermination of azimuths and distances.Navigating at night is challenging and requires a high level of knowledge, confidence, and lots of practiceperforming these skills, before heading out to the wilderness at night. Dark Adaptation Protecting Night Vision Scanning the terrain Traveling at night Night navigation with Lensatic Compass
PART 4 Expert Land NavigationNIGHT NAVIGATIONDark AdaptationThe first thing is to get your eyes ready for night vision navigation. Before heading into the dark, allow your eyes to adjust to the dark. Five minutes in the dark withoutlooking at bright lights is the minimum necessary, 30 minutes is better. Dark adaptation is affected by exposure to bright lights such as matches, flashlights, flares, and vehicleheadlights. Full recovery from this exposure may take up to 45 minutes. Exposure to bright sunlight during the day can impair your night vision. Wear sunglasses in brightsunlight to prevent this. For sunglasses to be effective, all visible light must be attenuated, not justportions of the visible spectrum. To protect night vision, provide the best comfort, allow for scanning closeto the sun, and provide normal color vision, dark sunglasses with a neutral gray tint are recommended. staying either in a dark area for about 30 minutes, or in a red-lighted area for about 20 minutes followedby about 10 minutes in a dark area. The red-lighted method may save time by allowing you to checkequipment, or do some other job before moving into darkness. If in a white lighted area, wear red goggles for 30 minutes, before heading out in the night. Wearing redgoggles is effective because red light does not affect the eyes.
PART 4 Expert Land NavigationAny Questions?
PART 4 Expert Land NavigationNIGHT NAVIGATIONProtecting Night VisionSecond thing is maintain night vision during the night. Any bright light can temporarily ruin one's night vision. Dark adaptation is affected by exposure to bright lights such as matches, flashlights, flares, and vehicleheadlights. Full recovery from this exposure may take up to 45 minutes. Using a flashlight with a red lens filter will not damage your night vision. The fashionable eye patch worn by the pirates weren't always due to the loss of an eye. In fact manypirates did it so that the one eye was good at seeing in the dark. If it becomes necessary to look into a lighted area or to use a flashlight, cover one eye so as to retainsome night vision in the eye. Use a red light stick to read your map or other activity during the night. Night vision goggles (NVG) impede dark adaptation. However, if a soldier adapts to the dark beforedonning the goggles, he gains full dark adaptation in about two minutes after removing them.
PART 4 Expert Land NavigationNIGHT NAVIGATIONScanning the TerrainNight vision scanning enables you to overcome many of the physiological limitations of your eyes andreduce the visual illusions that so often confuses the eyes (mind). Practice seeing things without looking directly at them. The technique involves scanning from right to left or from left to right using a very slow, scanningmovement. At night you must avoid looking directly at a faintly visible object when trying to confirm its presence. Usethe corners of your eyes. Off-Center Vision. This technique requires looking 10 degrees above, below, or to either side of anobject rather than directly at it. This allows the peripheral vision to remain in contact with an object. Bleach-Out Effect. Even when off-center viewing is practiced, the image of an object viewed longer thantwo to three seconds tends to bleach out and become one solid tone. As a result, the object is no longervisible. To overcome this condition, you must be aware of this phenomenon and avoid looking at anobject longer than two to three seconds. By shifting your eyes from one off-center point to another, youcan continue to pick up the object in your peripheral field of vision. Practice what you know about seeing at night until it becomes second nature for you to use your eyes totheir best advantage. You can use Night Vision Binoculars as anadditional aid in scanning the landscape at night.
PART 4 Expert Land NavigationNIGHT NAVIGATIONTraveling at NightAs you know there are many more hazards at night, where your visibility is limited. The basic technique used for night Land Navigation is dead reckoning. If you are using Night Vision Goggles (NVG) or Night Vision Binoculars, you canuse other day Land Navigation techniques. When moving around in the dark, it is safer to move slowly and slide your feet,using your toes to sense obstacles in front of you. Travel at a steady pace and avoid running in the dark. You tend to travel slower and shorter steps, adjust your pace count. Check your progress and position on the map every 30 minutes. Lifting knees higher than normal when walking will reduce the chance of stumblingover rocks, roots, and low branches. Stay off paths that wild predators use for preying on other animals. Navigation using the stars is recommended in some areas; however, a thoroughknowledge of constellations and location of stars is needed.
PART 4 Expert Land NavigationAny Questions?
PART 4 Expert Land NavigationNIGHT NAVIGATIONLensatic Compass for Night TravelNight Use of the Compass.For night use, special features of the compass includethe luminous markings, the bezel ring, and twoluminous sighting dots.Turning the bezel ring counterclockwise causes anincrease in azimuth, while turning it clockwise causes adecrease.The bezel ring has a stop and spring which allows turnsat 3º intervals per click and holds it at any desiredposition.
PART 4 Expert Land NavigationNIGHT NAVIGATIONLensatic Compass for Night Travel32711
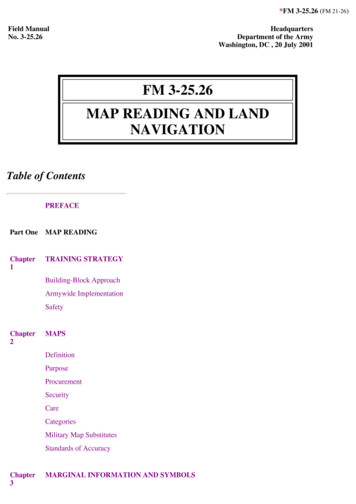
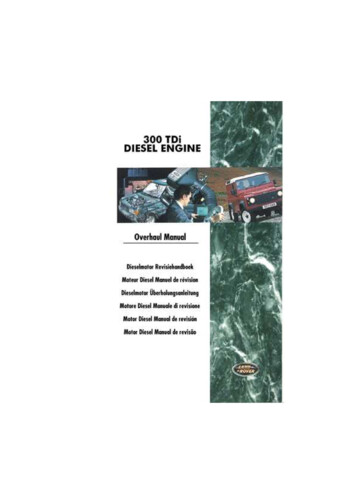
PART 4 Expert Land NavigationNIGHT NAVIGATIONLensatic Compass for Night TravelSTEP 1a.Plot your course on the map. Say your travel is a 327º azimuth.b.Align the North Arrow and Luminous Bezel Line with the Black Index Line.
PART 4 Expert Land NavigationNIGHT NAVIGATIONLensatic Compass for Night TravelSTEP 2a.b.360º - 327º 33º sum33 . 3 11c.Rotate Luminous Bezel Line 11 clicks right.NOTE 1If sum is not exactly divisible by 3,then round up or down to thenearest whole number.* Round up – hit right of target* Round down – hit left of targetNOTE 2Check the bezel ring around the face ofthe compass; it should make a distinctclick as it is rotated. If it does not click,you will have to use the alternatemethod for night azimuth settings.ALTERNATE METHOD360º - 327º 33º sumSet Luminous Bezel Line to 33º
PART 4 Expert Land NavigationNIGHT NAVIGATIONLensatic Compass for Night TravelSTEP 3NOTEUse the Luminous Sighting Dots as a visualqueue on aligning your body with thecompass during night navigation.a.Using the Center-Hold method, rotate yourbody till the North Arrow and LuminousBezel Line are aligned.b.The 327º azimuth will be aligned under theBlack Index LineCENTER-HOLD METHOD
PART 4 Expert Land NavigationNIGHT NAVIGATIONLensatic Compass for Night TravelSTEP 4NOTEUse the Luminous Sighting Dots as a visual queue onaligning your body with the compass during night navigation.a.Using the Center-Hold method, keep the North Arrow alignedwith the Luminous Bezel Line.b.Proceed forward in the direction of the Luminous sighting Dots.DIRECTION OF TRAVEL
PART 4 Expert Land NavigationAny Questions?
PART 4 Expert Land NavigationSUSTIANMENTDESCRIPTIONLand navigation is a skill that is highly perishable. The Navigatormust continually make use of the skills they have acquired to remainproficient in them.Sustainment should use the building-block approach to training;theory of land navigation; the practice of these skills; land navigationtesting, and building of navigation skills.The purpose of setting up a sustainment program is to provideNavigators with training that reinforces and builds on the training theyhave received in the classroom and field. All Navigators should receivethis training at least twice a year.The program also provides the Navigator with a means of identifyingthe areas in which they need additional training.The best way to maintain your LAND NAVIGATION skills is to get "dirt time", that is, get out there with a mapand compass! SUSTAINMENT PROGRAM TRAIN-THE-TRAINER PROGRAM SET UP A LAND NAVIGATION COURSE
PART 4 Expert Land NavigationSUSTIANMENTSUSTAINMENT PROGRAMThe sustainment program should address all skills from basic map reading to the Navigator planning andexecuting a route.1.The program should cover the following: Map reading instruction/review. Land navigation skills training. Dead reckoning training/practice. Terrain association training/practice. Land navigation written/field examination. Training and testing.2.The program should be developed into individual“Training Modules” so that it can be used as a wholegroup program or used separately by individuals.3.First determine the levels of proficiency and problems that the Navigators have in land navigation.4.Evaluate by personal observation, written test, and annual training.5.Provide training site, resources, and time for Navigators to practice land navigation.
PART 4 Expert Land NavigationAny Questions?
PART 4 Expert Land NavigationSUSTIANMENTTRAIN-THE-TRAINER ROGRAMThe purpose of a Train-the-Trainer program in a group is to develop instructors that are capable of trainingnavigators with the confidence and skills necessary to accomplish all assigned land navigation tasks.Development of the Program. The group should appoint a cadre of instructors to act as primary andalternate instructors for land navigation training.Determine which instructors conduct which module of training and have them practice until they are fullyprepared to give the training.These instructors act as training cadre for the entire group. They train their peer instructors to instruct thesubordinate members, and they certify each instructor’s training program.Use the training modules the group has developed and have the students go through each module of traininguntil they can demonstrate expertise.Conduct of Training. Conduct training at the lowest level possible.
PART 4 Expert Land NavigationAny Questions?
PART 4 Expert Land NavigationSUSTIANMENTSET UP A LAND NAVIGATION COURSEThere are basic guidelines to use when setting up a course.Determine the Standards. The group determines the standards for the course. Recommended standardsare as follows: A course is made up of routes (lanes) - no less than 3 lanes, no more than 5 lanes. Total distance of a lane - no less than 2,700 meters, no more than 11,000 meters. Total number of position stakes (legs) for each lane - no less than 7, no more than 9. Distance between stakes - no less than 300 meters, no more than 1,200 meters. Time allowed - no less than three hours, no more than four hours.Decide on the Terrain. The group should use terrain that is similar to terrain they will be using in actualexpeditions / wilderness trips, but, terrain should be different each time training is conducted. The training area for a course needs to be at least 25 square kilometers (5Km x 5Km).Perform a Map and Ground Reconnaissance. Check the terrain to determine position stake locations, tolook for hazards, and to develop training briefings.The following sequence can be used to develop any type of land navigation course. The difference in eachcourse depends on the groups guidance.(1) Plot the locations of your position stakes on a map.(2) Fabricate position stakes. (what type of material to use – easily visible from a far distance or less visible)(3) Survey the locations of your position stakes.(4) Certify the course by having your subject matter experts (SMEs) negotiate each lane of the course.(5) Prepare course requirement sheets and print them.(6) Complete a risk assessment of the training area.(7) Begin teaching.
PART 4 Expert Land NavigationSUSTIANMENTSET UP A LAND NAVIGATION COURSEThere are basic guidelines to use when setting up a course.STANDARDS: The candidate must navigate using the compass from a start point, through severalintermediate points (stake points), to a finish point, and record the position stake number for each pointwithin 4 hours. the following information must be annotated for record purposes: Start time. From start point to point 1: degrees magnetic, meters,and position stake number. From point 1 to point 2: degrees magnetic, meters, andposition stake number. From point 2 to point 3, etc, to finish point: degreesmagnetic, meters, and position stake number. Stop time and elapsed time in hours and minutes.
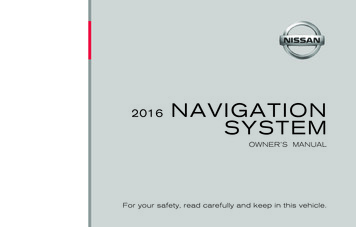
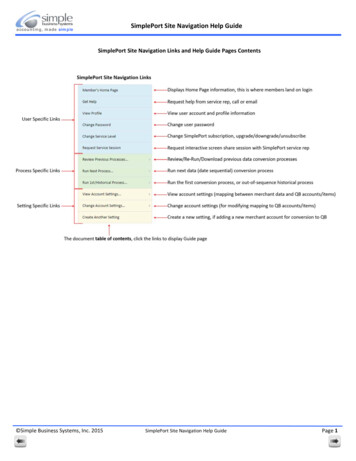
PART 4 Expert Land NavigationSUSTIANMENTSET UP A LAND NAVIGATION COURSEEXAMPLE #1 SETTING UP A COURSE.Navigator A training lane #1 – Proceed to SP1, SP5, SP4, SP2, SP7, SP6, SP8, FINISH PointNavigator B training lane #2 – Proceed to SP3, SP8, SP6, SP1, SP2, SP4, SP5, FINISH PointNavigator C training lane #3 – Proceed to SP9, SP3, SP5, SP1, SP2, SP4, SP1, FINISH Point Stake Points (which may or may not be shown on the student’s map depending on skill level)THIS IS HOW EACHNAVIGATOR SHOULD FINISHON THEIR ANSWER SHEETSP6SP8ASP1SP7FINISHBSP3CSP2SP4ROADNavigator ASP1 (250º / 400m / 15min)SP5 (169º / 1050m / 47min)SP4 (055º / 1000m / 30min)SP2 (337º / 400m / 15min)SP7 (107º / 450m / 23min)SP6 (325º / 600m / 35min)SP8 (267º / 1400m / 1hr 28min)FINISH (115º / 1100m / 1hr 5min)Navigator BSame process above.SP9SP51½01 KMNavigator CSame process above.
PART 4 Expert Land NavigationSUSTIANMENTSET UP A LAND NAVIGATION COURSETHIS IS HOW EACHNAVIGATOR SHOULD FINISHON THEIR ANSWER SHEETSP8SP9SP7EXAMPLE #2 SETTING UP A COURSE.Navigator A training lane #1 – Proceed 235º 500m, 112º 1300m, 352º 800m, 230º 1800mNavigator B training lane #2 – Proceed 287º 350m, 104º 1300m, 330º 850m, 220º 1650mNavigator C training lane #3 – Proceed 046º 700m, 108º 1400m, 331º 850m, 232º 1850m Stake Points (which may or may not be shown on the student’s map depending on skill level)ANavigator A SP2, SP6, SP9, FBNavigator B SP3, SP5, SP7, FCNavigator C SP1, SP4, SP8, FASP1SP2SP3BCSP4SP5SP6ROADFINISH AFINISH BFINISH C1½IF THE NAVIGATOR HAS A DIFFERENTANSWER, THIS ISWHERE THEY MADE ERRORS INCALCULATING THEIR “POSITION”AND LAND NAVIGATION“STAYING ON COURSE”.EXAMPLE Navigator A reached SP1vice of SP2. From there, SP4, SP9, FA(Navigator drifts to the right).01 KM
PART 4 Expert Land NavigationSUSTIANMENTSET UP A LAND NAVIGATION COURSEEXAMPLE #3 SETTING UP A COURSE.Navigator A training lane #1 – UTM Coordinates 55906 428261, 56073 428194, 56059 428307, 55866 428171Navigator B training lane #2 – UTM Coordinates 55906 428248, 56084 428205, 56025 428307, 55880 428158Navigator C training lane #3 – UTM Coordinates 55906 428274, 56095 428213, 56040 428307, 55852 428186SP8SP9SP7 Stake Points (which may or may not be shown on the student’s map depending on skill level)4283ANavigator A SP2, SP6, SP9, FBNavigator B SP3, SP5, SP7, FCNavigator C SP1, SP4, SP8, FASP1SP2SP3IF THE NAVIGATOR HAS A DIFFERENTANSWER, THIS ISWHERE THEY MADE ERRORS INSP4CALCULATING THEIR “POSITION”SP5AND LAND NAVIGATIONSP6 4282“STAYING ON COURSE”.BCROADFINISH AFINISH BFINISH C558559THIS IS HOW EACHNAVIGATOR SHOULD FINISHON THEIR ANSWER SHEETEXAMPLE Navigator A reached SP1vice SP2. From there, SP4, SP9, FA(Navigator drifts to the right).5605614281
PART 4 Expert Land NavigationAny Questions?
PART 4 Expert Land NavigationNote:Prior to being issued any training *equipment, you willbe required to sign a “statement of liability” agreeingto pay for anything you damage or lose.All items will be inspected and inventoried prior toyour signature and at the end of the training day too.If you do not intend to sign this statement, then youmay be denied training.* You may use your own equipment.
PART 4 Expert Land NavigationTESTINGNow it is time for the following . . . Written exam Hands-on / Outdoors exam
PART 4 Expert Land NavigationTHE END OFLAND NAVIGATIONPRESENTATIONPART 4
LAND NAVIGATION Why Learn Land Navigation?-Tracking present location-Determining Distance-Sense of direction-How to read a topographic map-Terrain and map association-Spatial skills-Planning safe, practical routes-And more Navigational skillsThe best way to learn LAND NAVIGATION is to get "dirt time", that is, get out there with a map and compass! .