Transcription
RFA & RVT Geometry Exchange Add-Onfor Archicad 24ARCHICAD 24 Help
GRAPHISOFT Visit the GRAPHISOFT website at www.graphisoft.com for local distributor and product availabilityinformation.RFA & RVT Geometry Exchange Add-On for Archicad 24Copyright 2020 by GRAPHISOFT, all rights reserved. Reproduction, paraphrasing or translation withoutexpress prior written permission is strictly prohibited.TrademarksArchicad is a registered trademark of GRAPHISOFT.All other trademarks are the property of their respective holders.
ContentsRFA & RVT Geometry Exchange Add-On for Archicad 24 4INTRODUCTION . . . . . . . . . . . . . . . . . . . . . . . . . . . . . . . . . . . . . . . . . . . . . . . . . . . . . . . . . . . . . . . . . . . . 4Import RFA as GDL Object . . . . . . . . . . . . . . . . . . . . . . . . . . . . . . . . . . . . . . . . . . . . . . . . . . . . . . . . . . . . 5Hotlink 3D RVT Model . . . . . . . . . . . . . . . . . . . . . . . . . . . . . . . . . . . . . . . . . . . . . . . . . . . . . . . . . . . . . . . . 8Export 3D Model as Revit 3D Geometry . . . . . . . . . . . . . . . . . . . . . . . . . . . . . . . . . . . . . . . . . . . . . . . . 12RFA & RVT Geometry Exchange Add-On for Archicad 243
INTRODUCTIONRFA & RVT Geometry Exchange Add-On for Archicad 24INTRODUCTIONUse the RFA & RVT Geometry Exchange Add-on to import and export 3D models via native Revit file formats:.RVT and .RFA.Note: This feature is released as part of a stand-alone Archicad 24 add-on. The Archicad Action Centerwill notify you when the add-on becomes available. Import and export elements via Revit RVT files, with their precise geometry and parameters (as noneditable content), for coordination and model referencing purposes. Import Revit Families (RFA; mostly manufacturer content) to Archicad as Objects, Doors and Windows.The generated Archicad library items have the same precise geometry and all parameters (in non-editablemode) as those stored in RFA. RVT files can be accessed locally or via BIMcloud, using Hotlink or Publish functions.Archicad uses the ODA Teigha BIM Engine, which imports RFA file versions 2015-2020.The three Revit Exchange functions are described below:Import RFA as GDL ObjectHotlink 3D RVT ModelExport 3D Model as Revit 3D GeometryRFA & RVT Geometry Exchange Add-On for Archicad 244
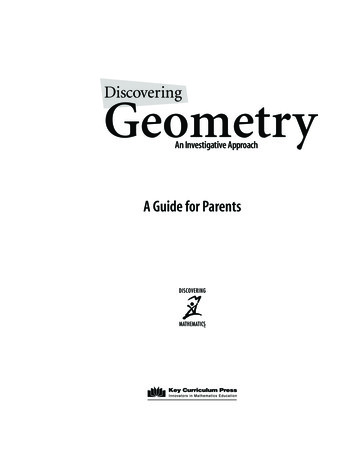
Import RFA as GDL ObjectImport RFA as GDL ObjectThis command imports a Revit Family (RFA) object (mostly manufacturer content) and generates a GDLObject, Door or Window having the same precise geometry and all parameters.The resulting object will lose its editable parametric capabilities.1. Use File Libraries and Objects Import RFA as GDL Object.2. Browse for an RFA file to import, then click Open.3. In the appearing Import RFA as GDL Object dialog, customize the import options:–Import as Library Part Type: Based on the Revit Family Category and Host Object Category, theLibrary Part type will automatically select the best match: Object, Door or Window. You may overridethe type here.–Segmentation of Curved Geometry: Use the slider to set the level of geometric detail (polygonsegmentation) at one of three levels. The more polygons, the larger the resulting object. It isrecommended to keep this setting in the middle. If the object is too large, use Fewer Polygons. If theresult is too segmented and rough, then use More Polygons. To check the Polygon count, downloadand install the Polycount add-on which is part of the Goodies package available x.html4. Click Import.–The imported family object is converted to a GDL Object, Door or Window in the Archicad project fromwhich you issued the Import command.–The generated GDL Object, Door or Window is placed into the project’s Embedded Library. Use theObject, Door or Window tool to place it into the project.RFA & RVT Geometry Exchange Add-On for Archicad 245
Import RFA as GDL ObjectImported Object: Custom Parameters in ArchicadWith the “Import as Object” option, the following parameters are created: Edge Snapping, on or off. Enable Stretching: When on, Dimension 1, 2 and Height become enabled in the Preview and Positioningpanel and can be graphically edited in the model. Stretching will distort the geometry. Rotation Angle (x axis): Rotate the object 0/90/180/270 degrees or a custom angle around the x axis. 2D Representation: Projection Line Pen, Fill Type and Fill Pens on Floor Plan. Surfaces: Allows override of individual embedded Surfaces. Parts Visibility by Category: Control the visibility of parts of the Object as defined by its RFA Categories Parameters: data as defined in the RFA file. This data is locked as read-only, and has no effect on theobject’s geometry.RFA & RVT Geometry Exchange Add-On for Archicad 246
Import RFA as GDL ObjectImported Door or Window: Custom Parameters in Archicad Edge Snapping, on or off. Stretch Thickness: When on, enables you to modify the Thickness of the Door/Window (will stretch thegeometry). 2D Representation: Projection Line Pen, Fill Type and Fill Pens on Floor Plan; Wall Contour Lines: can beturned on or off and set line type and pen; Wall End Lines can be turned on or off and set line type andpen. Surfaces: Allows override of individual embedded Surfaces. Parts Visibility by Category: Control the visibility of parts of the Door/Window based on their RevitCategory. This option only appears if there are multiple Categories defined in the RFA. Parameters: Data as defined in the RFA file. This data is locked as read-only, and has no effect on theobject’s geometry.Note: The ‘Host Object’ will be automatically filtered out during Import.RFA & RVT Geometry Exchange Add-On for Archicad 247
Hotlink 3D RVT ModelHotlink 3D RVT ModelUse this workflow to import 3D model elements from Revit RVT files, placing them as a Hotlink in Archicad.The resulting GDL objects use the precise geometries and properties, including true surface colors, of theimported elements.Use the same workflow to place an RVT Hotlink as any other hotlink in Archicad.When placing a new RVT Module, make sure to click the Settings button (from the New Hotlink Moduledialog) to define how to handle the attributes and properties of the hotlinked RVT file. These options aredetailed below.1. Use File External Content Place Hotlink.2. In the appearing Place Hotlink dialog box, click Select Module.3. From the New Module pop-up button, click From File.4. The New Hotlink Module dialog appears: browse for an RVT type file.5. Click Settings.RFA & RVT Geometry Exchange Add-On for Archicad 248
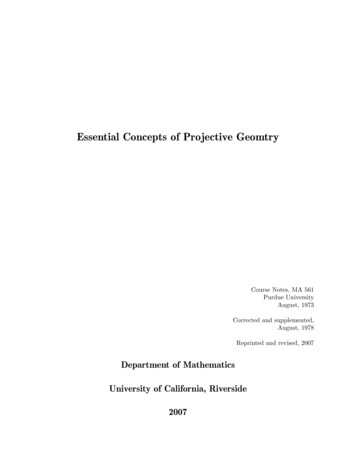
Hotlink 3D RVT Model6. The RVT 3D Geometry Hotlink Options dialog appears. Here, customize the import options:Building Materials and SurfacesChoose one of these two options for handling imported Revit Building Materials and Surfaces. Generate Attributes: Adds each Revit surface and material to the Archicad project as Surface andBuilding Material attributes, with an optional prefix to distinguish them in the Archicad attribute lists. Use uniform Building Material: Converts all Revit surfaces and materials to a single Building Material inArchicad. In this case, click the pop-up to choose a Building Material from the Archicad project. Allgenerated Library Parts will use the selected Building Material. (Choose this if you want to avoidincreasing the number of Archicad project Attributes.)LayersChoose one of these options for creating Layers for imported Revit Objects: Generate Layers based on RVT Categories: Places Objects onto Archicad Layers that correspond toRevit Categories. Use an optional extension to distinguish these Layers in the Archicad Layer list. Use uniform Layer: Places all imported Objects onto a single Archicad Layer. Enter a Layer name in thefield. (If such a Layer already exists in the project, that Layer will be used; otherwise, a new Layer iscreated.)RFA & RVT Geometry Exchange Add-On for Archicad 249
Hotlink 3D RVT ModelClassifications and PropertiesCheck the box if you want to Generate Classifications and Properties based on RVT Categories andParameters.Revit Parameters (textual, numeric, and True/False only) are imported as Archicad Properties, in a PropertyGroup using the name you define below. Classification System Name: Revit Categories are imported to Archicad as a Classification System,using the name you define here. (All Categories of the Revit project are recreated in Archicad - not just theones assigned to the hotlinked content.)The Classification System name will also use the Properties Group name you define below (e.g. RVT). ItsVersion is the version number of the RVT file format you have placed. (After import, you can see this datain Archicad’s Classification Manager.) Properties Group Name: The imported parameters will be added to the Archicad project as a PropertyGroup, using the Properties Group name you enter here (e.g. RVT). (After import, you can see this data inArchicad’s Property Manager.)Note: After hotlink, it is recommended to merge the newly added Classification System and its Propertiesinto the Archicad host file.Segmentation of Curved GeometryUse the slider to set the level of geometric detail (polygon segmentation) at one of three levels. The morepolygons, the larger the resulting object. It is recommended to keep this setting in the middle. If the object istoo large, use Fewer Polygons. If the result is too segmented and rough, use More Polygons.1. Click OK to return to the New Hotlink Module, then click Select.2. The RVT 3D Geometry View dialog appears.Choose a Revit 3D view (if there is more than one) from which to import the model elements. Archicad willcreate GDL objects based on the content of the selected view. Only Revit objects created in a 3D view ofRevit can be imported to Archicad.3. Click Select to return to the Place Hotlink dialog. The RVT file you selected is shown as the module to beplaced.RFA & RVT Geometry Exchange Add-On for Archicad 2410
Hotlink 3D RVT Model4. For the Elements’ Elevation option, make sure you choose Keep Elevation as in Story Structure ofHotlink Source (as shown below). Otherwise, the imported model may “fall apart” when its elements areplaced in a different story structure.5. Click Place Hotlink.–Elements of the imported Revit 3D view are converted to GDL Objects in the Archicad project.–The objects are placed into the project’s Embedded Library.Hint: To view the RVT model file on its own, hotlink the file into an empty Archicad project.For general information on managing Hotlinks in Archicad, see Hotlink Module Manager.RFA & RVT Geometry Exchange Add-On for Archicad 2411
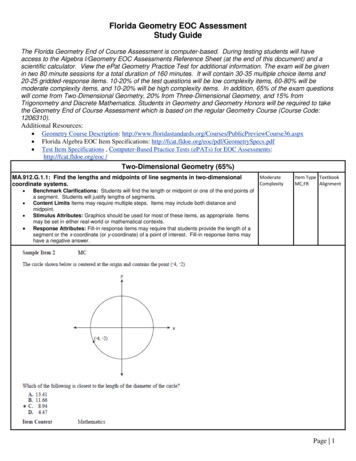
Export 3D Model as Revit 3D GeometryExport 3D Model as Revit 3D GeometryThis command exports Archicad 3D model content to Revit, generating RVT objects with precise geometries(including true colors) and properties, in RVT file version 2020.1. .In Archicad, open the 3D window containing the view to export. The View Settings, including PartialStructure Display, affect the content of the exported object. Graphic Overrides are ignored.2. Do one of the following:–Use File Save As, and choose the RVT file format.–Add the 3D View to a Publisher Set and set its format to Revit Project file.Save the file as RVT, or Publish the view in RVT format3. Click Options to bring up the Export 3D Model Options dialog.–Export Properties and Classifications as properties: Check this to include Classification andProperties data in the exported model. Since Revit does not support multiple classifications, use theoptions below to determine which properties (or classifications) to export.RFA & RVT Geometry Exchange Add-On for Archicad 2412
Export 3D Model as Revit 3D Geometry- Only from selected Classification System: Choose one Classification System to export itsProperties with exported elements. Properties from other Classification Systems will not beexported.- All relevant Properties and Classifications: All Properties in the exported elements will beincluded. All Classification Systems from the exported elements will also be included, but handledas properties in Revit.Note: Exported elements are mapped to Categories in Revit, based on their Archicad Element type.–Keep hierarchy of Beam, Column, Curtain Wall, Railing and Stair elements: Check this to exportthese element types as single elements. Uncheck it to export them as hierarchical sets of elements(for example: an exported Curtain Wall will include separate Frame and Panel elements).–Units: Choose By Project Working Units to automatically determine Metric or Imperial for theexported model elements, or manually set the units.Notes:–2D data such as Drawings and Layouts are not exported.–Parameters of GDL objects are not exported–Archicad Project and Story data are not exported.–Interference Checking (collision detection) in Revit can be applied to the exported RVT file.–Archicad Zones are exported with their 3D representation only; therefore Revit Rooms are notgenerated from them automatically.–The elements are exported as so-called Revit DirectShape (interoperability) elements. They can beused as reference model elements. Therefore, an exported Archicad Wall is not a Wall with full nativefunctionality - it is just a referenced Wall element.–Exported geometries are frozen and locked; they cannot be modified.–The DirectShape elements do not contain materials in Revit, they have only colors (includingtransparency); therefore, only Archicad Surfaces are exported (Building Materials are not).RFA & RVT Geometry Exchange Add-On for Archicad 2413
- Elements of the imported Revit 3D view are converted to GDL Objects in the Archicad project. - The objects are placed into the project's Embedded Library. Hint: To view the RVT model file on its own, hotlink the file into an empty Archicad project. For general information on managing Hotlinks in Archicad, see Hotlink Module Manager.