Transcription
Adobe Photoshop workspace space-basics.html›PHOTOSHOPWorkspace basicsPhotoshop User Guide1 of 21Search Adobe SupportWorkspace!Select an article:3/1/18, 9:06 AM
Adobe Photoshop workspace space-basics.htmlLearn how to navigate and use the Adobe Photoshopworkspace. Use preset workspaces, or create customworkspaces by moving and manipulating windowsand panels.ON THIS PAGEStart workspaceA first look at the Photoshopworking areaWorkspace overviewNote:If you're wondering whether Photoshop or Lightroom is theright application for your requirements, this article will helpyou decide: Choosing the right photo app.Manage windows andpanelsComprehensive searchCreate documentsSave and switch workspacesYou create and manipulate your documents and files usingvarious elements, such as panels, bars, and windows. Anyarrangement of these elements is called a workspace. (Theworkspaces of different Adobe creative applications sharesimilar appearances so that you can move between theapplications easily.) You can adapt Photoshop to the way youwork by selecting from several preset workspaces or bycreating one of your own.Rich tooltipsHide tooltipsWindows High-densitymonitor support and permonitor scalingUse Photoshop with theTouch Bar on MacBook ProWindows Modifier KeyspaletteStart workspaceApplies to: Photoshop CCLast Published: January 25, 2018The Start workspace in Photoshop gives you quick access toyour recent files, libraries, and presets. Depending on yoursubscription status, the Start workspace may also displaycontent tailored for your requirements. You can also look forthe right Adobe Stock asset for your project directly fromwithin the Start workspace.Photoshop displays the Start workspace at launch orwhenever no documents are open.Note:If necessary, customize the number of recent files displayed.2 of 213/1/18, 9:06 AM
Adobe Photoshop workspace space-basics.htmlSelect Preferences File Handling and then specify thedesired value (0-100) in the Recent File List Contains. field.The Start workspaceNote:To quit this workspace, simply press the Esc key.Work with the Start workspaceToggle between tile and list views Click the Tile icon (or the List icon ( ).)Find a stock asset Enter a keyword in the Search Stockfield. Photoshop displays the search results from AdobeStock in a new browser window.Access your assets Open a recently-opened file or alibrary. Else, create a new document using a preset.Disable the Start workspace1. Select Preferences General.2. Deselect Show Start Workspace When No DocumentsAre Open.3 of 213/1/18, 9:06 AM
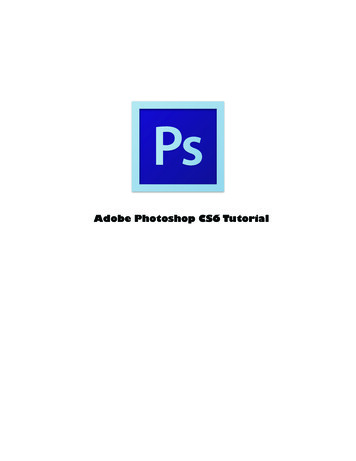
Adobe Photoshop workspace space-basics.htmlA first look at the Photoshop workingareaA: Tools panel B: History panel C: Color panel D: CreativeCloud Libraries panel E: Layers panelInteractive image Click the highlighted areas in the image toview more information about themWorkspace overviewThe Application bar across the top contains a workspaceswitcher, menus (Windows only), and other applicationcontrols. On the Mac for certain products, you can showor hide it using the Window menu.The Tools panel contains tools for creating and editingimages, artwork, page elements, and so on. Related toolsare grouped.The Options bar Control panel displays options for thecurrently selected tool.The Document window displays the file you’re workingon. Document windows can be tabbed and, in certain4 of 213/1/18, 9:06 AM
Adobe Photoshop workspace space-basics.htmlcases, grouped and docked.Panels help you monitor and modify your work. Panelscan be grouped, stacked, or docked.The Application frame groups all the workspaceelements in a single, integrated window that lets youtreat the application as a single unit. When you move orresize the Application frame or any of its elements, allthe elements within it respond to each other so noneoverlap. Panels don’t disappear when you switchapplications or when you accidentally click out of theapplication. If you work with two or more applications,you can position each application side by side on thescreen or on multiple monitors.If you are using a Mac and prefer the traditional, freeform user interface, you can turn off the Applicationframe.Usability featuresThe Photoshop workspace is easy to use and includes anumber of usability features:Different brightness levels: Choose Edit Preference(Windows) or Photoshop Preferences (Mac OS) andselect a Color Theme swatch in the Interface section.Note:To quickly decrease brightness, press Shift 1; to increasebrightness, press Shift 2. (On Mac OS, it’s necessary to alsopress the FN key.)On-image displays: Stay informed as you use yourfavorite tools. On-image displays show selectiondimensions, transformation angles, and more. Tochange the placement of the displays, choose anoption from the Show Transformation Values in the5 of 213/1/18, 9:06 AM
Adobe Photoshop workspace space-basics.htmlInterface preferences.Maximized screen space: Click the button at thebottom of the toolbar to switch between Standardand Fullscreen display modes.Set UX color: You can customize the interface tosport one of the following colorthemes: Black, Dark Gray, Medium Grayand Light Gray.To do this, follow these steps:1. Choose Edit Preferences Interface.2. Choose the desired color theme.Available Color Theme optionsHide or show all panelsTo hide or show all panels, including the Tools panel andControl panel, press Tab.To hide or show all panels except the Tools panel andControl panel, press Shift Tab.Note:You can temporarily display hidden panels if Auto-Show HiddenPanels is selected in Interface preferences. Move the pointer tothe edge of the application window (Windows) or to the edge ofthe monitor (Mac OS) and hover over the strip that appears.Display panel optionsClick the panel menu iconthe panel.6 of 21in the upper-right corner of3/1/18, 9:06 AM
Adobe Photoshop workspace space-basics.htmlNote:You can open a panel menu even when the panel isminimized.Note:In Photoshop, you can change the font size of the text inpanels and tooltips. In the Interface preferences, choose a sizefrom the UI Font Size menu.Reconfigure the Tools panelYou can display the tools in the Tools panel in a singlecolumn, or side by side in two columns.Click the double arrow at the top of the Tools panel.Manage windows and panelsYou can create a custom workspace by moving andmanipulating Document windows and panels. You can alsosave workspaces and switch among them.Rearrange, dock, or float document windowsWhen you open more than one file, the Document windowsare tabbed.To rearrange the order of tabbed Document windows,drag a window’s tab to a new location in the group.To undock (float or untab) a Document window from agroup of windows, drag the window’s tab out of thegroup.Note:7 of 213/1/18, 9:06 AM
Adobe Photoshop workspace space-basics.htmlYou can also choose Window Arrange Float in Window tofloat a single Document window, or Window Arrange FloatAll In Windows to float all of the Document windows at once.To dock a Document window to a separate group ofDocument windows, drag the window into the group.To create groups of stacked or tiled documents, drag thewindow to one of the drop zones along the top, bottom,or sides of another window. You can also select a layoutfor the group by using the Layout button on theApplication bar.To switch to another document in a tabbed group whendragging a selection, drag the selection over thedocument’s tab for a moment.Dock and undock panelsA dock is a collection of panels or panel groups displayedtogether, generally in a vertical orientation. You dock andundock panels by moving them into and out of a dock.To dock a panel, drag it by its tab into the dock, at thetop, bottom, or in between other panels.To dock a panel group, drag it by its title bar (the solidempty bar above the tabs) into the dock.To remove a panel or panel group, drag it out of the dockby its tab or title bar. You can drag it into another dock ormake it free-floating.8 of 213/1/18, 9:06 AM
Adobe Photoshop workspace space-basics.htmlNavigator panel being dragged out to new dock,indicated by blue vertical highlightNavigator panel in its own dockNote:You can prevent panels from filling all the space in a dock.Drag the bottom edge of the dock up so it no longer meetsthe edge of the workspace.Move panelsAs you move panels, you see blue highlighted drop zones,areas where you can move the panel. For example, you can9 of 213/1/18, 9:06 AM
Adobe Photoshop workspace space-basics.htmlmove a panel up or down in a dock by dragging it to thenarrow blue drop zone above or below another panel. If youdrag to an area that is not a drop zone, the panel floats freelyin the workspace.Note:The position of the mouse (rather than the position of thepanel) activates the drop zone, so if you can’t see the dropzone, try dragging the mouse to the place where the dropzone should be.To move a panel, drag it by its tab.To move a panel group, drag the title bar.Narrow blue drop zone indicates Color panel willbe docked on its own above the Layers panelgroup.A. Title bar B. Tab C. Drop zoneNote:Press Ctrl (Windows) or Command (Mac OS) while moving apanel to prevent it from docking. Press Esc while moving thepanel to cancel the operation.10 of 213/1/18, 9:06 AM
Adobe Photoshop workspace space-basics.htmlAdd and remove panelsIf you remove all panels from a dock, the dock disappears.You can create a dock by moving panels to the right edge ofthe workspace until a drop zone appears.To remove a panel, right-click (Windows) or Control-click(Mac) its tab and then select Close, or deselect it fromthe Window menu.To add a panel, select it from the Window menu anddock it wherever you want.Manipulate panel groupsTo move a panel into a group, drag the panel’s tab to thehighlighted drop zone in the group.Adding a panel to a panel groupTo rearrange panels in a group, drag a panel’s tab to anew location in the group.To remove a panel from a group so that it floats freely,drag the panel by its tab outside the group.To move a group, drag the title bar (the area above thetabs).Stack floating panelsWhen you drag a panel out of its dock but not into a drop11 of 213/1/18, 9:06 AM
Adobe Photoshop workspace space-basics.htmlzone, the panel floats freely. The floating panel allows you toposition it anywhere in the workspace. You can stack floatingpanels or panel groups so that they move as a unit when youdrag the topmost title bar.Free-floating stacked panelsTo stack floating panels, drag a panel by its tab to thedrop zone at the bottom of another panel.To change the stacking order, drag a panel up or downby its tab.Note:Be sure to release the tab over the narrow drop zone betweenpanels, rather than the broad drop zone in a title bar.To remove a panel or panel group from the stack, so thatit floats by itself, drag it out by its tab or title bar.Resize panelsTo minimize or maximize a panel, panel group, or stackof panels, double-click a tab. You can also double-clickthe tab area (the empty space next to the tabs).To resize a panel, drag any side of the panel. Somepanels, such as the Color panel cannot be resized bydragging.Collapse and expand panel iconsYou can collapse panels to icons to reduce clutter on the12 of 213/1/18, 9:06 AM
Adobe Photoshop workspace space-basics.htmlworkspace. In some cases, panels are collapsed to icons inthe default workspace.Panels collapsed toiconsPanels expanded from iconsTo collapse or expand all panel icons in a column, clickthe double arrow at the top of the dock.To expand a single panel icon, click it.To resize panel icons so that you see only the icons (andnot the labels), adjust the width of the dock until the textdisappears. To display the icon text again, make the dockwider.To collapse an expanded panel back to its icon, click its13 of 213/1/18, 9:06 AM
Adobe Photoshop workspace space-basics.htmltab, its icon, or the double arrow in the panel’s title bar.To add a floating panel or panel group to an icon dock,drag it in by its tab or title bar. (Panels are automaticallycollapsed to icons when added to an icon dock.)To move a panel icon (or panel icon group), drag theicon. You can drag panel icons up and down in the dock,into other docks (where they appear in the panel style ofthat dock), or outside the dock (where they appear asfloating icons).Comprehensive searchPhotoshop features powerful search functionality that letsyou search across UI elements, documents, Help & learningcontent, inspiring Stock assets, and much more—all fromwithin a unified dialog. You can search for items right afterlaunching Photoshop or when one or more documents areopen.For details, see Photoshop search.Create documentsWhen you create a document in Photoshop, instead ofbeginning with a blank canvas, you can choose from a widevariety of templates, including templates from Adobe Stock.Templates include stock assets and illustrations that you can14 of 213/1/18, 9:06 AM
Adobe Photoshop workspace space-basics.htmlbuild on to complete your project. When you open atemplate in Photoshop, you can work with it just as youwould work with any other Photoshop document (.psd).In addition to templates, you can also create a document byselecting one of the numerous blank presets available inPhotoshop.For more information, see Create documents.New Document dialog Templates from Adobe Stock and blankpresetsSave and switch workspacesBy saving the current size and position of panels as a namedworkspace, you can restore that workspace even if you moveor close a panel. The names of saved workspaces appear inthe workspace switcher in the Application bar.Save a custom workspace15 of 213/1/18, 9:06 AM
Adobe Photoshop workspace space-basics.html1With the workspace in the configuration you want tosave, choose Window Workspace NewWorkspace.2Type a name for the workspace.3Under Capture, select one or more options:Keyboard shortcuts Saves the current set ofkeyboard shortcuts (Photoshop only).Menus or Menu Customizationset of menus.Saves the currentDisplay or switch workspacesSelect a workspace from the workspace switcher in theApplication bar.Note:In Photoshop, you can assign keyboard shortcuts to eachworkspace to navigate among them quickly.Delete a custom workspaceSelect Manage Workspaces from the workspace switcherin the Application bar, select the workspace, and thenclick Delete.Select Delete Workspace from the workspace switcher.Choose Window Workspace Delete Workspace,select the workspace, and then click Delete.Restore the default workspace16 of 213/1/18, 9:06 AM
Adobe Photoshop workspace space-basics.html1Select the Default or Essentials workspace from theworkspace switcher in the application bar.2Select Window Workspace Reset [WorkspaceName].Restore a saved workspace arrangementIn Photoshop, workspaces automatically appear as you lastarranged them, but you can restore the original, savedarrangement of panels.To restore an individual workspace, choose Window Workspace Reset [Workspace Name].To restore all the workspaces installed with Photoshop,click Restore Default Workspaces in the Interfacepreferences.Note:To rearrange the order of workspaces in the application bar,drag them.Rich tooltipsFiguring out what Photoshop tools do is now easier thanever before! When you hover the pointer over certain toolsin the Tools panel, Photoshop displays a description and ashort video of the tool in action.You can choose not to view rich tooltips. To do so, deselectthe Preferences Tools Use Rich Tooltips preference.17 of 213/1/18, 9:06 AM
Adobe Photoshop workspace space-basics.htmlHide tooltipsWhen you position the pointer over most tools and options,descriptions appear in tooltips by default. If you find tooltipsvisually distracting, you can hide them.In the Interface preferences, deselect Show Tooltips.Note:Tooltips are not available in some dialog boxes.Windows High-density monitorsupport and per-monitor scalingOn Windows 10 Creators Update and later versions,Photoshop offers a full range of choices for UI scaling—from100% through 400% in 25% increments. This enhancementmakes the Photoshop user interface looks crisp and sharpregardless of the pixel density of your monitor. Photoshopautomatically adjusts its resolution based on your Windowssettings.In addition, you can adjust per-monitor scaling acrossmonitors with different scaling factors. This flexibility ensuresthat a high resolution (HiDPI) laptop works seamlesslyalongside a lower-resolution desktop monitor, or vice versa.For example, one of your monitors can have a scale factor of175%, while another monitor can have a scale factor of400%. So, you can choose either the highest-end 13-inchlaptops with 4k screens, the more affordable 1080p models,or tap into 8k desktop monitors, and still have anuncompromised experience within Photoshop.18 of 213/1/18, 9:06 AM
Adobe Photoshop workspace space-basics.htmlIn Windows, select Start Settings System Display.Now, under Scale And Layout, choose a scaling factor foreach of your displays.Note:On Windows 10 Creators Update and later versions, the UIScaling setting in Photoshop (Preferences Interface UIScaling) still applies to some components, such as the FileInfo and Camera Raw dialogs. On earlier versions ofWindows, this preference applies to all Photoshopcomponents. When the UI Scaling option is set to Auto,scaling defaults to the value closest to the primary monitor'sOS scaling factor—100 or 200.Use Photoshop with the Touch Bar onMacBook ProSee Use Photoshop with the Touch Bar.Windows Modifier Keys paletteThe new Modifier Keys palette lets you accessfrequently-used keyboard modifiers—Shift,Ctrl, and Alt—on Windows-powered touchdevices, such as the Surface Pro. Select Window Modifier Keys.Twitter and Facebook posts are not coveredunder the terms of Creative Commons.19 of 213/1/18, 9:06 AM
Adobe Photoshop workspace space-basics.htmlLegal Notices Online Privacy Policy Back to topPHOTOSHOP See all appsLearn & SupportGet StartedUser GuideTutorialsAsk the CommunityContact UsPost questions and get answers fromReal help from real people.experts.Ask nowStart nowWas this helpful?20 of 21YesNo3/1/18, 9:06 AM
Adobe Photoshop workspace space-basics.htmlProductsBlogs & CommunitySupportAdobe›Change region21 of 21Copyright 2018 Adobe Systems Incorporated. All rights reserved. / Privacy / Terms of Use / Cookies3/1/18, 9:06 AM
Toggle between tile and list views Find a stock asset Access your assets Select Preferences File Handling and then specify the desired value (0-100) in the Recent File List Contains. field. The Start workspace Note: To quit this workspace, simply press the Esc key. Work with the Start workspace
![Adobe Photoshop 2021 (Version 22.1.1) [32 64bit] [2022] - GWBC](/img/64/adobe-photoshop-2021-version-2211.jpg)