Transcription
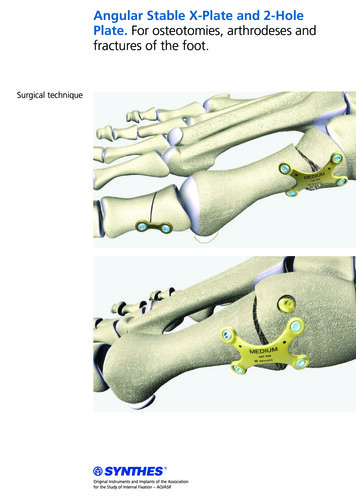
Angular Stable X-Plate and 2-HolePlate. For osteotomies, arthrodeses andfractures of the foot.Surgical technique
Table of ContentsIndications4Implants5X-plate: Crescentic osteotomy6X-plate: MTC arthrodeses102-hole plate: Akin osteotomy14Ordering information16Bibliography19Image intensifier controlWarningThis description is not sufficient for immediate application ofthe instrumentation. Instruction by a surgeon experiencedin handling this instrumentation is highly recommended.See also the surgical technique for the LCP locking compressionplate (036.000.019).SynthesX-Plate and 2-Hole PlateSurgical technique1
Angular Stable X-Plate and 2-HolePlate. For osteotomies, arthrodeses andfractures of the foot.System descriptionThe X-plate and 2-hole plate have threaded round holesallowing insertion of 27 mm locking screws (head 2.4 mm)without the screw heads protruding.The angles of the round threaded holes allow insertion ofa locking screw through an osteotomy or arthrodesis to correspondingly increase fixation stability.Angular stability– Stable connection between plate and screw2SynthesX-Plate and 2-Hole PlateSurgical techniqueSMALL
X-shape– The plate adapts easily to the anatomy– Freely selectable screw pathCrescentic saw blade guided by Kirschner wire– Exact positioning of the osteotomy and precise guidance ofthe saw using a 1.6 mm Kirschner wire– Short cutting time– Minimum shortening of the 1st metatarsalGreater deflection of two screw holes– Transversing the osteotomy or arthrodesis with a lockingscrew increases stability3
IndicationsX-plateArthrodesis– MTP– MTC– Talonavicular– Calcaneo-CuboidProximal osteotomies– Crescentic– Ludloff– Mau– Open wedge– Closing wedgeCalcaneal osteotomiesFractures– Single– Multifragmental2-hole plate– Akin osteotomy4SynthesX-Plate and 2-Hole PlateSurgical technique
ImplantsX-plate, pure titanium447.702447.704447.706X-Locking Plate 2.4/2.7, small, 18 12 mm,Pure TitaniumX-Locking Plate 2.4/2.7, medium,24 14 mm, Pure TitaniumX-Locking Plate 2.4/2.7, large, 30 14 mm,Pure TitaniumSMALLX-plate, stainless steel247.702247.704247.706X-Locking Plate 2.4/2.7, small, 18 12 mm,SteelX-Locking Plate 2.4/2.7, medium,24 14 mm, SteelX-Locking Plate 2.4/2.7, large, 30 14 mm,SteelSMALL2-hole plate447.710247.710Locking Plate 2.4/2.7, straight, 2 holes,17 6.0 1.6 mm, Pure TitaniumLocking Plate 2.4/2.7, straight, 2 holes,17 6.0 1.6 mm, SteelLocking screws402.206–260202.206–260LCP Locking Screws Stardrive Ø 2.7 mm(head 2.4 mm), self-tapping,length 6–60 mm, TANLCP Locking Screws Stardrive Ø 2.7 mm(head 2.4 mm), self-tapping,length 6–60 mm, Steel5
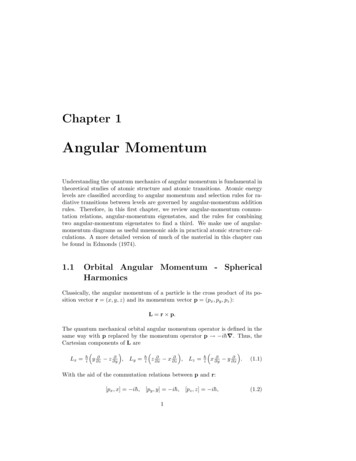
Surgical technique X-plateFixation of a crescentic osteotomyThis particular surgical technique is restricted to a crescenticosteotomy at the base of the 1st metatarsal fixed with an Xplate. Preoperative planning is not described. The distal softtissue release, the removal of the exostosis, and the mobilizationof the sesamoid bone are not explained either.1Approach to and performance of the osteotomyIf the surgeon does not have the specific instruments cited here,the crescentic osteotomy can also be performed with instruments of his or her choice.(a)Required instrumentsOscillating Saw Attachment II Crescentic Technique532.023Saw Blade 28 18 0.6 mm, crescentic,for Oscilliating Saws, sterile03.000.313SSaw Blade 28 21.9 0.6 mm, crescentic,for Oscilliating Saws, sterile03.000.316SThe metatarsal I base is approached through a 3-4 cm longdorsal incision. Expose the extensor hallucis longus and thebrevis tendons. Hold the latter medially or laterally to the side.Identify the metatarsal I/cuneiform I articular cavity with aKirschner wire or the image intensifier.At an angle as close as possible to 120 , insert a 1.6 mmKirschner wire into the sagittal plane that runs through thelengthwise axis of the 1st metatarsal. The distance between theosteotomy and the MTC joint should be 1 cm. (a)(b)A neutral orientation in the mediolateral plane is desirable.Medial orientation of the Kirschner wire may lead to the elevation of the distal metatarsal fragment and pronation of thetoe. Conversely, a lateral orientation of the Kirschner wiremay lead to the depression of the distal metatarsal fragmentand supination of the toe. (b)Insert the Colibri Power Tool with the oscillating saw attachmentover the Kirschner wire. Keep a firm grip on the drilling machinewhile performing the osteotomy. (c)(c)6SynthesX-Plate and 2-Hole PlateSurgical technique
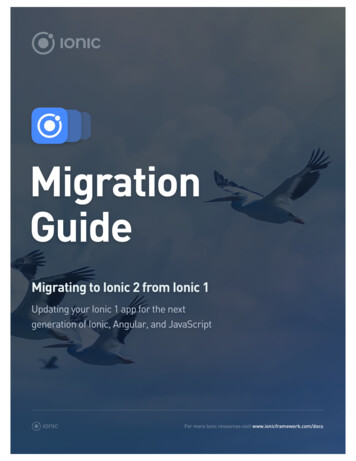
2Correct the intermetatarsal anglePosition both metatarsal fragments with two bone holding forceps or two Kirschner wires by pressing the proximal fragment ina medial direction, and the distal fragment in a lateral direction.Insert a Kirschner wire running from a medial-distal to a proximal direction to provide temporary fixation.Note: Do not elevate the distal metatarsal.7
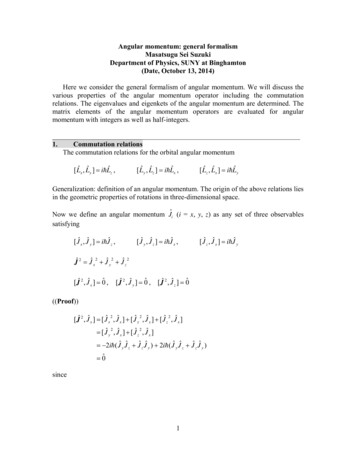
3Bend the X-plateRequired instrumentsBending Pin for LCP Plates 2.4 and 2.7, with thread329.922Universal Bending Pliers, length 165 mm391.963With the assistance of 2 bending pins or a forceps and onebending pin, adapt the X-plate to the anatomy.Note: Only a slight amount of bending is necessary. Repeatedlybending the plate causes material fatigue and must therefore beavoided.4Predrill and fix the plateRequired instrumentsLCP Drill Sleeve 2.7 (head LCP 2.4), with Scale up to 60 mm323.061Drill Bit 2.0 mm, with double marking, length 140/115 mm323.062Depth Gauge for Screws 2.7 to 4.0 mm,measuring range up to 60 mm319.010Screwdriver Shaft Stardrive T8, self-holding314.467Torque Limiter, 0.8 Nm, with AO/ASIF Quick Coupling511.776Handle with Quick Coupling, length 110 mm311.430The first locking screw is inserted from a distal to proximal direction through the osteotomy.Note: The angle of the threaded holes identified with two dotsis stronger to make it easier to insert a locking screw throughthe osteotomy.Screw the LCP drill guide into the plate hole. Predrill the holewith a 2.0 mm drill with a scale. Read the screw length on thedrill guide scale.Note: You must use the LCP drill guide for the drill hole andplate thread to be aligned on the same axis.8SynthesX-Plate and 2-Hole PlateSurgical technique
Alternatively, determine the screw length with the depth gauge.Introduce the measured length of the 2.7 mm locking screw(2.4 mm head). For the screw to lock properly, manually screw inthe last threads using the 0.8 Nm torque limiter.Insert the other locking screws in the same manner. After predrilling, always first screw in the locking screw before starting onthe next hole. Remove the Kirschner wire used for temporaryfixation.9
Surgical technique – X-plateMTC arthrodesisThe X-plate is for neutralization.1Preparing the arthrodesisLocalize the MTC joint with a Kirschner wire or another method.The approach is through a dorsomedial incision. Prepare thejoint surfaces for internal fixation.Temporarily fix the joint with a Kirschner wire or clamp.10SynthesX-Plate and 2-Hole PlateSurgical technique
2CompressInsert a compression screw from a proximal to distal direction orvisa versa. (Alternatives: from a plantar-distal to proximal-dorsaldirection, or from a plantar-proximal to a distal-dorsal direction).Remove the temporary fixation.3Bend the plateRequired instrumentsBending Pin for LCP Plates 2.4 and 2.7, with thread329.922Universal Bending Pliers, length 165 mm391.963With the assistance of 2 bending pins or a forceps and onebending pin, adapt the X-plate to the anatomy.Note: Only a slight amount of bending is necessary. Repeatedlybending the plate causes material fatigue and must therefore beavoided.11
4Insert the locking screwsRequired instrumentsLCP Drill Sleeve 2.7 (head LCP 2.4), with Scale up to 60 mm323.061Drill Bit 2.0 mm, with double marking, length 140/115 mm323.062Depth Gauge for Screws 2.7 to 4.0 mm,measuring range up to 60 mm319.010Screwdriver Shaft Stardrive T8, self-holding314.467Torque Limiter, 0.8 Nm, with AO/ASIF Quick Coupling511.776Handle with Quick Coupling, length 110 mm311.430The locking screws can be inserted in any sequence.Screw the LCP drill guide into the plate hole. Predrill the holewith a 2.0 mm drill with a double marking. Read the screwlength on the drill guide scale.Alternatively, determine the screw length with the depth gauge.12SynthesX-Plate and 2-Hole PlateSurgical technique
Introduce the measured length of the 2.7 mm locking screw(2.4 mm head). For the screw to lock properly, manually insertthe last threads using the 0.8 Nm torque limiter.Introduce the other locking screws in the same manner. Afterpredrilling, always first insert the locking screw before proceedingto the next hole.13
Surgical technique 2-hole plateFixation of an Akin osteotomyPreoperative planning is not described.1OsteotomyA medial incision is made. Perform the osteotomy. Retain thelateral cortex. Stabilize with a Kirschner wire if necessary.Note: If the lateral cortex is fractured, the osteotomy must bestabilized with a Kirschner wire.2Affix the plateRequired instrumentsLCP Drill Sleeve 2.7 (head LCP 2.4), with Scale up to 60 mm323.061Drill bit 2.0 mm, with double marking, length 140/115 mm323.062Depth Gauge for Screws 2.7 to 4.0 mm,measuring range up to 60 mm319.010Screwdriver Shaft Stardrive T8, self-holding314.467Torque Limiter, 0.8 Nm, with AO/ASIF Quick Coupling511.776Handle with Quick Coupling, length 110 mm311.430In most cases, this plate does not have to be bent.Screw the LCP drill guide into the plate hole. Predrill the holewith a 2.0 mm drill with a scale. Read the screw length on thedrill guide scale. Alternatively, determine the screw length withthe depth gauge.Note: You must use the LCP drill guide for the drill hole andplate thread to be aligned on the same axis.Introduce the measured length of the 2.7 mm locking screw(2.4 mm head). For the screw to lock properly, manually insertthe last threads using the 0.8 Nm torque limiter.Use the same procedure for the second locking screw.14SynthesX-Plate and 2-Hole PlateSurgical technique
3After internal fixationIf a Kirschner wire was used, remove it now.Note: If the lateral cortex is fractured, leave the Kirschner wirein place.15
Ordering information01.282.104 Compact Foot X-Locking Plate 2.4/2.7 and Locking Plate 2.4/2.7,straight (2 holes), Pure Titanium01.282.102 Compact Foot X-Locking Plate 2.4/2.7 and Locking Plate 2.4/2.7,straight (2 holes), Steel682.730682.730Module Compact Foot X-Lock. Plate 2.4/2.7 and Locking Plate2.4/2.7, straight (2 holes), with Lid, without Contents1447.702X-Locking Plate 2.4/2.7, small, 18 12 mm, Pure Titanium2247.702X-Locking Plate 2.4/2.7, small, 18 12 mm, Steel2447.704X-Locking Plate 2.4/2.7, medium, 24 14 mm, Pure Titanium2247.704X-Locking Plate 2.4/2.7, medium, 24 14 mm, Steel2447.706447.710X-Locking Plate 2.4/2.7, large, 30 14 mm, Pure TitaniumLocking Plate 2.4/2.7, straight, 2 holes,17 6.0 1.6 mm, Pure Titanium2247.706247.710X-Locking Plate 2.4/2.7, large, 30 14 mm, SteelLocking Plate 2.4/2.7, straight, 2 holes,17 6.0 1.6 mm, Steel2312.240Double Drill Guide 2.7/2.01312.240Double Drill Guide 2.7/2.01329.922Bending Pin for LCP Plates 2.4 and 2.7, with thread2329.922Bending Pin for LCP Plates 2.4 and 2.7, with thread2323.061LCP Drill Sleeve 2.7 (head LCP 2.4), with Scale up to 60 mm,for Drill Bits 2.0 mm323.0611LCP Drill Sleeve 2.7 (head LCP 2.4), with Scale up to 60 mm,for Drill Bits 2.0 mm1310.870Countersink 2.7, length 62 mm1310.870Countersink 2.7, length 62 mm1323.062Drill Bit 2.0 mm, with double marking, length 140/115 mm,3-flute, for Quick Coupling323.0621Drill Bit 2.0 mm, with double marking, length 140/115 mm,3-flute, for Quick Coupling1314.467Screwdriver Shaft, Stardrive , T8, self-holding1314.467Screwdriver Shaft, Stardrive , T8, self-holding1ImplantsModule Compact Foot X-Lock. Plate 2.4/2.7 and Locking Plate2.4/2.7, straight (2 holes), with Lid, without tional310.163Drill Bit 2.0 mm, with marking, length 110/95 mm,2-flute, for Jacobs Chuck310.163Drill Bit 2.0 mm, with marking, length 110/95 mm,2-flute, for Jacobs Chuck310.200Drill Bit 2.0 mm, length 85/70 mm, 2-flute, for Jacobs Chuck310.200Drill Bit 2.0 mm, length 85/70 mm, 2-flute, for Jacobs Chuck310.260Drill Bit 2.7 mm, length 100/75 mm, 2-flute, for Quick Coupling310.260Drill Bit 2.7 mm, length 100/75 mm, 2-flute, for Quick Coupling310.270Drill Bit 2.7 mm, length 85/70 mm, 2-flute, for Jacobs Chuck310.270Drill Bit 2.7 mm, length 85/70 mm, 2-flute, for Jacobs Chuck310.280Drill Bit 2.7 mm, length 125/100 mm, 2-flute, for Quick Coupling310.280Drill Bit 2.7 mm, length 125/100 mm, 2-flute, for Quick Coupling310.534Drill Bit 2.0 mm, with marking, length 110/85 mm,2-flute, for Quick Coupling310.534Drill Bit 2.0 mm, with marking, length 110/85 mm,2-flute, for Quick Coupling313.303Screwdriver Shaft, Stardrive , T8, cylinder, with groove,shaft 3.5 mm, for Mini Quick Coupling313.303Screwdriver Shaft, Stardrive , T8, cylinder, with groove,shaft 3.5 mm, for Mini Quick Coupling313.304Screwdriver Shaft, Stardrive , T8, cylinder, with groove,shaft 3.5 mm, for AO/ASIF Quick Coupling313.304Screwdriver Shaft, Stardrive , T8, cylinder, with groove,shaft 3.5 mm, for AO/ASIF Quick Coupling314.039Screwdriver Shaft, Stardrive , T8, self-holding314.039Screwdriver Shaft, Stardrive , T8, self-holding347.981Holding Forceps for Plates 1.0 to 2.4347.981Holding Forceps for Plates 1.0 to 2.4161SynthesX-Plate and 2-Hole PlateSurgical technique
01.282.004 LCP Compact Foot Basic Instrument Set and Screws 2.7 mm,Titanium01.282.002 LCP Compact Foot Basic Instrument Set and Screws Ø 2.7 mm,Steel682.733Insert, size 1/2, Compact Foot Instruments (Basic Instrument Set)1682.733Insert, size 1/2, Compact Foot Instruments (Basic Instrument Set)1391.962Bending/Cutting Pliers1391.962Bending/Cutting Pliers1391.963Universal Bending Pliers, length 165 mm2391.963Universal Bending Pliers, length 165 mm2319.005Depth Gauge for Screws 2.0 and 2.4 mm,measuring range up to 40 mm319.005Depth Gauge for Screws 2.0 and 2.4 mm,measuring range up to 40 mm1319.010Depth Gauge for Screws 2.7 to 4.0 mm,measuring range up to 60 mm319.0101Depth Gauge for Screws 2.7 to 4.0 mm,measuring range up to 60 mm1311.012Handle, medium, with Mini Quick Coupling1311.012Handle, medium, with Mini Quick Coupling1311.430Handle with Quick Coupling, length 110 mm1311.430Handle with Quick Coupling, length 110 mm1682.735Rack for LCP Locking Screws 2.7 mm (head LCP 2.4)1682.735Rack for LCP Locking Screws 2.7 mm (head LCP 2.4)1682.736Rack for Cortex Screws 2.7 mm1682.736Rack for Cortex Screws 2.7 mm1511.776Torque Limiter, 0.8 Nm, with AO/ASIF Quick Coupling1511.776Torque Limiter, 0.8 Nm, with AO/ASIF Quick Coupling1511.777Torque Limiter, 0.4 Nm, with AO/ASIF Quick Coupling1511.777Torque Limiter, 0.4 Nm, with AO/ASIF Quick Coupling1402.210–402.240LCP Locking Screw Stardrive 2.7 mm (head LCP 2.4),self-tapping, length 10–40 mm, TAN3202.210–202.240LCP Locking Screw Stardrive 2.7 mm (head LCP 2.4),self-tapping, length 10–40 mm, Steel3402.242–402.260LCP Locking Screw Stardrive 2.7 mm (head LCP 2.4),self-tapping, length 42–60 mm, TAN2202.242–202.260LCP Locking Screw Stardrive 2.7 mm (head LCP 2.4),self-tapping, length 42–60 mm, Steel2402.870–402.900Cortex Screw Stardrive 2.7 mm, self-tapping,length 10–40 mm, TAN3202.870–202.900Cortex Screw Stardrive 2.7 mm, self-tapping,length 10–40 mm, Steel3402.964–402.969Cortex Screw Stardrive 2.7 mm, self-tapping,length 45–60 mm, TAN2202.964–202.969Cortex Screw Stardrive 2.7 mm, self-tapping,length 45–60 mm, Steel2Optional1Optional313.300Combined Holding Sleeve forCortex Screws Stardrive 2.4/2.7 mm, T8313.300Combined Holding Sleeve forCortex Screws Stardrive 2.4/2.7 mm, T8313.301Holding Sleeve forLCP Screws Stardrive 2.4/2.7 mm (head LCP 2.4), T8313.301Holding Sleeve forLCP Screws Stardrive 2.4/2.7 mm (head LCP 2.4), T803.100.000 Handle, lockable, with Mini Quick Coupling03.100.000 Handle, lockable, with Mini Quick Coupling314.121X-ray symbol Stardrive 50 mm, thickness 0.5 mm, steel314.121X-ray symbol Stardrive 50 mm, thickness 0.5 mm, steel402.206LCP Locking Screw Stardrive 2.7 mm (head LCP 2.4),self-tapping, length 6 mm, TAN202.206LCP Locking Screw Stardrive 2.7 mm (head LCP 2.4),self-tapping, length 6 mm, Steel402.208LCP Locking Screw Stardrive 2.7 mm (head LCP 2.4),self-tapping, length 8 mm, TAN202.208LCP Locking Screw Stardrive 2.7 mm (head LCP 2.4),self-tapping, length 8 mm, Steel Accessories for the Colibri machine system (532.001)Vario Cases532.023689.507Lid (stainless steel), size 1/1, for Vario Case 03.000.313S Saw Blade 28 18 0.6 mm, crescentic, for Oscilliating Saws, sterile689.509Vario Case , Framing, size 1/1, height 67 mm03.000.316S Saw Blade 28 21.9 0.6 mm, crescentic,for Oscilliating Saws, sterile689.516Vario Case , Framing, size 1/2, height 126 mm689.537Lid (Stainless Steel), size 1/2, for Vario Case 682.640Insert, size 1/4, for Additional InstrumentsOscillating Saw Attachment II Crescentic TechniqueVario Cases have space for:LCP Compact Foot Basic Instrument Set (Art. No. 01.282.004 or 01.282.002)3 Implant Modules 1 Insert, size 1/4,for Additional Instruments (Art. No. 682.640)LCP Compact Foot Basic Instrument Set (Art. No. 01.282.004 or 01.282.002) and4 implant modules.17
18SynthesX-Plate and 2-Hole PlateSurgical technique
BibliographyOsteotomies of the First MetatarsalCoughlin, MJ, Boise, Idaho, (1996) Instructional Course Lectures,The American Academy of Orthopaedic Surgeons-Hallux Valgus;J Bone Joint Surg 78-A:932–66Trnka HJ, Parks BG, Ivanic G, Chu IT, KG, Easley ME, Schon LC,Myerson MS (2000) Six First Metatarsal Shaft Osteotomies,Mechanical and Immobilization Comparisons. Clin Orthop RelatRes 381:256-265Akin osteotomyFrey C, Jahss M, Kummer FJ (1991) The Akin procedure: ananalysis of results. Foot Ankle 12(1):1–6Proximal Metatarsal OsteotomyCoughlin MJ (2002), Proximal First Metatarsal Osteotomy. In:Harold B. Kitaoka (editor) The Foot and Ankle, ed 2. In Series:Thompson RC (editors) Master Techniques in OrthopaedicSurgery. Lippincott Williams & Wilkins:71–98Jones C, Coughlin M, Villadot R, M.D., Golanó P (2005) Proximalcrescentic metatarsal osteotomy: the effect of saw bladeorientation on first ray elevation. Foot Ankle Int. 26(2):152–7Roger A. Mann (1998), Hallux valgus: Soft Tissue Procedure withProximal Metatarsal Osteotomy. In: Nikolaus Wülker, MichaelStephens, Andrea Cracchiolo (editors). An Atlas of Foot andAnkle Surgery. Martin Dunitz, 19–27Veri JP, Pirani SP, Claridge R (2001) Crescentic Proximal Metatarsal Osteotomy for Moderate to Severe Hallux Valgus: A Mean12.2 Year Follow-Up Study. Foot Ankle Int 22 (10):817–22Mann RA, M.D., Rudicel S, Graves SC, Oakland, California(1992) Repair of Hallux Valgus with a Distal Soft-Tissue Procedure and Proximal Metatarsal Osteotomy. J Bone Joint Surg74-A(1):124–129Zettl R, Trnka HJ, Easley M, Salzer M, Ritschl P (2000) Moderateto severe hallux valgus deformity: correction with proximalcrescentic osteotomy and distal soft-tissue release. Arch OrthopTrauma Surg 120:397–402ArthrodesesHofbauer MH, Grossman JP (1996) The Lapidus procedure. ClinPodiatr Med Surg 13(3):485–9619
20SynthesX-Plate and 2-Hole PlateSurgical technique
Presented by:036.000.9070123SE 019740 AA Synthes2005Printed in SwitzerlandLAGSubject to modifications.
8 Synthes X-Plate and 2-Hole Plate Surgical technique 3 Bend the X-plate Required instruments Bending Pin for LCP Plates 2.4 and 2.7, with thread 329.922 Universal Bending Pliers, length 165 mm 391.963 With the assistance of 2 bending pins or a forceps and one bending pin, adapt the X-plate to the anatomy. Note: Only a slight amount of bending .