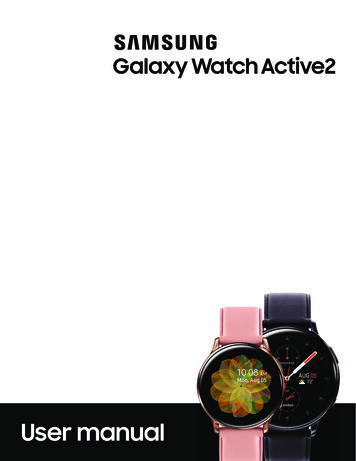
Transcription
TA B L E TUser ManualPlease read this manual before operatingyour device and keep it for future reference.
Legal InformationREAD THIS INFORMATION BEFORE USING YOURMOBILE DEVICE.Arbitration Agreement - This Product is subjectto a binding arbitration agreement between youand SAMSUNG ELECTRONICS AMERICA, INC.(“Samsung”). You can opt out of the agreementwithin 30 calendar days of the first consumerpurchase by emailing optout@sea.samsung.com orcalling 1-800-SAMSUNG (726-7864) and providingthe applicable information. For complete termsand conditions that bind you and Samsung, refer tothe “Arbitration Agreement” section of the Terms &Conditions, included with the Product.Find Legal Information OnlineThe full Arbitration Agreement, Standard LimitedWarranty, End User License Agreement (EULA),and Health & Safety Information for your device areavailable online:Arbitration Agreement, Standard Limited Warranty,and Health & Safety Information:Phone: English: samsung.com/us/Legal/Phone-HSGuideSpanish: samsung.com/us/Legal/Phone-HSGuide-SPTablet: English: samsung.com/us/Legal/Tablet-HSGuideSpanish: samsung.com/us/Legal/Tablet-HSGuide-SPWIF T580 EN UM TN QF1 081717 FINAL
Intellectual PropertyEnd User License Agreement: English: samsung.com/us/Legal/SamsungLegal-EULA4All Intellectual Property, as defined below, owned byor which is otherwise the property of Samsung or itsrespective suppliers relating to the SAMSUNG mobiledevice, including but not limited to, accessories, parts,or software relating thereto (the “mobile device”), isproprietary to Samsung and protected under federallaws, state laws, and international treaty provisions.Intellectual Property includes, but is not limited to,inventions (patentable or unpatentable), patents, tradesecrets, copyrights, software, computer programs, andrelated documentation and other works of authorship.Spanish: d Legal Information on the Mobile DeviceThe full Arbitration Agreement, Standard LimitedWarranty, End User License Agreement (EULA) andHealth & Safety Information are also available on thedevice, in the Samsung legal section of Settings. Thelocation depends on the device, and is usually in the“About device” or “About phone” section, for example: You may not infringe or otherwise violate the rightssecured by the Intellectual Property. Moreover, youagree that you will not (and will not attempt to)modify, prepare derivative works of, reverse engineer,decompile, disassemble, or otherwise attempt to createsource code from the software. No title to or ownershipin the Intellectual Property is transferred to you. Allapplicable rights of the Intellectual Property shallremain with SAMSUNG and its suppliers.Settings About phone or About device orAbout tablet Legal information Samsung legalOr, use the Search feature to search for “Legal”.Legal Informationii
Open Source SoftwareExcept as set forth in the Standard Limited Warrantythat accompanies the Product, the purchaser takesthe product “as is”, and Samsung makes no expressor implied warranty of any kind whatsoever withrespect to the product, including but not limitedto the:Some software components of this product, includingbut not limited to ‘PowerTOP’ and ‘e2fsprogs’,incorporate source code covered under GNU GeneralPublic License (GPL), GNU Lesser General PublicLicense (LGPL), OpenSSL License, BSD License andother open source licenses. To obtain the source codecovered under the open source licenses, please visit:opensource.samsung.com Disclaimer of Warranties; Exclusionof LiabilityThe information below explains that a user acceptsthis Product as sold, including the hardware andsoftware components as created and packaged forsale. If the user changes these parameters througha unique modification, Samsung will not be heldresponsible for damages or issues that result fromthese end-user changes.Legal Information iiimerchantability of the product or its fitness forany particular purpose or use;design, condition or quality of the product;performance of the product;workmanship of the product or the componentscontained therein; orcompliance of the product with the requirementsof any law, rule, specification or contractpertaining thereto.
Samsung KnoxNothing contained in the User Manual shall beconstrued to create an express or implied warrantyof any kind whatsoever with respect to the Product.In addition, Samsung shall not be liable for anydamages of any kind resulting from the purchase oruse of the product or arising from the breach of theexpress warranty, including incidental, special orconsequential damages, or loss of anticipated profitsor benefits.Samsung Knox is Samsung’s security platform and isa mark for a Samsung device tested for security withenterprise use in mind. Additional licensing fee may berequired. For more information about Knox, please referto: samsung.com/us/knoxRestricting Children’s Access toYour Mobile DeviceModification of SoftwareYour mobile device is not a toy. Do not allow childrenunder the age of 3 to play with it because they couldhurt themselves or others or damage the device. Ifparents choose to allow children 3 or older to use thedevice, they should make sure that there is adequatesupervision of children while using the device to guardagainst damage to the device and use of services thatmay increase wireless or other charges.Samsung is not liable for performance issues orincompatibilities caused by your editing of registrysettings, or your modification of Operating System(OS) software.Using custom OS software may cause your device andapplications to work improperly. Your carrier may notpermit users to download certain software, such ascustom OS.Legal Informationiv
! 2017 Samsung Electronics America, Inc.Samsung, Samsung Galaxy, and Multi Window are alltrademarks of Samsung Electronics Co., Ltd.WARNING:CHOKING HAZARD - Small parts.Not for children under 3 years.Other marks are the property of theirrespective owners.Parental control settings should be enabled to ensurethat children do not have access to services or contentnot approved by the parent. Routinely check this deviceto ensure it is working properly and is safe for childrento use.Some multimedia (audio/video) files contain DigitalRights Management (DRM) technology to verify youhave the right to use the files. Preloaded apps on yourdevice may not be compatible with DRM-protectedfiles.Samsung Electronics America, Inc.Screen images are simulated. Appearance of devicemay vary.Address:85 Challenger RoadRidgefield Park,New Jersey 07660The actual available capacity of the internal memory isless than the specified capacity because the operatingsystem and default applications occupy part of thememory. The available capacity may change when youupgrade the device.Phone: 1-800-SAMSUNG (726-7864)Internet: samsung.comPlease check with your service provider to verifyqualifying services/features.Legal Informationv
Table of ContentsGetting Started . . . . . . . . . . . . . . . . . . . . . . . . . . . . . . .1Notification Panel . . . . . . . . . . . . . . . . . . . . . . . . . . . . .21Front View . . . . . . . . . . . . . . . . . . . . . . . . . . . . . . . . . . . . .2Multi Window . . . . . . . . . . . . . . . . . . . . . . . . . . . . . . . . 23Back View. . . . . . . . . . . . . . . . . . . . . . . . . . . . . . . . . . . . . .3Enter Text. . . . . . . . . . . . . . . . . . . . . . . . . . . . . . . . . . . . 25Assemble Your Device . . . . . . . . . . . . . . . . . . . . . . . . . .4Applications. . . . . . . . . . . . . . . . . . . . . . . . . . . . . . . . 28Set Up Your Device . . . . . . . . . . . . . . . . . . . . . . . . . . . . .7Apps List . . . . . . . . . . . . . . . . . . . . . . . . . . . . . . . . . . . . 29Set Up Accounts on Your Device . . . . . . . . . . . . . . . . .9Google Apps . . . . . . . . . . . . . . . . . . . . . . . . . . . . . . . . . 33Know Your Device . . . . . . . . . . . . . . . . . . . . . . . . . . .11Additional Apps . . . . . . . . . . . . . . . . . . . . . . . . . . . . . . 36Home Screen. . . . . . . . . . . . . . . . . . . . . . . . . . . . . . . . . .12Calculator. . . . . . . . . . . . . . . . . . . . . . . . . . . . . . . . . . . . 38Customize the Home Screen. . . . . . . . . . . . . . . . . . . .13Calendar. . . . . . . . . . . . . . . . . . . . . . . . . . . . . . . . . . . . . 39Status Bar . . . . . . . . . . . . . . . . . . . . . . . . . . . . . . . . . . . . 17Camera and Video . . . . . . . . . . . . . . . . . . . . . . . . . . . . 42Navigation . . . . . . . . . . . . . . . . . . . . . . . . . . . . . . . . . . .19Clock . . . . . . . . . . . . . . . . . . . . . . . . . . . . . . . . . . . . . . . . 47
Contacts . . . . . . . . . . . . . . . . . . . . . . . . . . . . . . . . . . . . . 50Device Maintenance . . . . . . . . . . . . . . . . . . . . . . . . . . 99Email . . . . . . . . . . . . . . . . . . . . . . . . . . . . . . . . . . . . . . . . 57Applications Settings . . . . . . . . . . . . . . . . . . . . . . . . 104Galaxy Apps. . . . . . . . . . . . . . . . . . . . . . . . . . . . . . . . . . .61Lock Screen and Security. . . . . . . . . . . . . . . . . . . . . 106Gallery . . . . . . . . . . . . . . . . . . . . . . . . . . . . . . . . . . . . . . 62Cloud and Accounts. . . . . . . . . . . . . . . . . . . . . . . . . . . 112Internet . . . . . . . . . . . . . . . . . . . . . . . . . . . . . . . . . . . . . .67Google Settings . . . . . . . . . . . . . . . . . . . . . . . . . . . . . .118Memo . . . . . . . . . . . . . . . . . . . . . . . . . . . . . . . . . . . . . . . .71Accessibility . . . . . . . . . . . . . . . . . . . . . . . . . . . . . . . . .119My Files . . . . . . . . . . . . . . . . . . . . . . . . . . . . . . . . . . . . . 73General Management. . . . . . . . . . . . . . . . . . . . . . . . .122Settings. . . . . . . . . . . . . . . . . . . . . . . . . . . . . . . . . . . . . 75Software Update . . . . . . . . . . . . . . . . . . . . . . . . . . . . 130How to Use Settings . . . . . . . . . . . . . . . . . . . . . . . . . . .76About Tablet . . . . . . . . . . . . . . . . . . . . . . . . . . . . . . . . .131Connections . . . . . . . . . . . . . . . . . . . . . . . . . . . . . . . . . .77Sound . . . . . . . . . . . . . . . . . . . . . . . . . . . . . . . . . . . . . . . 88Notifications . . . . . . . . . . . . . . . . . . . . . . . . . . . . . . . . . 92Display . . . . . . . . . . . . . . . . . . . . . . . . . . . . . . . . . . . . . . 93Wallpaper. . . . . . . . . . . . . . . . . . . . . . . . . . . . . . . . . . . . 96Advanced Features . . . . . . . . . . . . . . . . . . . . . . . . . . . 97Table of Contentsvii
Getting StartedLearn about your mobile devicehardware, assembly procedures,and how to get started using yournew device.
Front View711. Front camera: Take self‑portraits and record videosof yourself.22. Power key: Press and hold to turn the device onor off, or to restart it. Press to lock or wake up thescreen.33. Volume key: Adjust the volume of your device’ssounds and audio playback.4. Back: Return to the previous screen or close a dialogbox, menu, or keyboard.5. Home key: Return to the Home screen.6. Recent apps: Tap to display recent apps, or touch andhold for Multi window .7. Proximity sensor: Detect the presence of objectsnear the device.645Getting Started2Front View
Back View761231. Headset jack: Connect an optional headset (notincluded).2. Rear camera: Take pictures and record videos.3. Flash: Illuminate subjects in low-light environmentswhen taking a photo or recording video.4. Speakers: Play music and other sounds.55. Memory card tray: Install an optional memorycard (not included) for storage of files. For moreinformation, see “Install an Optional Memory Card” onpage 4.6. Microphone: Record audio and detect voicecommands.7. USB charger/Accessory port: Connect theUSB charger (included) and other optionalaccessories (not included).4Getting Started43Back View
Assemble Your DeviceThis section helps you to assemble your device.Install an Optional Memory CardYou can install an optional microSD memory card(not included) to add more memory space to yourdevice.Warning: Small components such as Memory cards canpose a choking risk. Please be careful when handlingthese cards to avoid damaging them.1. Open the memory card slot cover and turn toexpose the slot.2. With the gold contacts facing down, carefully slidethe memory card into the slot, pushing gently untilit clicks into place.3. Close the memory card slot cover.Getting Started4Assemble Your Device
Charge the BatteryCaution: Use only charging devices that are approvedby Samsung. Samsung accessories are designed foryour device to maximize battery life. Using otheraccessories may void your warranty and may causedamage.Your device is powered by a rechargeable, standardLi‑Ion battery. A USB charger (charging head and USBcable) is included with the device for charging thebattery from any standard outlet.2. Connect the USB cable to the charging head, andthen plug the charging head into a standard outlet.The battery comes partially charged. You can use thedevice while charging.3. Unplug the charging head from the outlet andremove the USB cable from the device whencharging is complete.1. Insert the USB cable into the USB charger/Accessory port.Getting Started5Assemble Your Device
When to Charge the BatteryWhen the battery is low and only a few minutes ofoperation remain, the device sounds a warning tone atregular intervals.In this condition, your device conserves its remainingbattery power by dimming the screen.When the battery level becomes too low, the deviceautomatically turns off.For a quick check of your battery level: View the battery charge indicator located in the topright corner of your device’s display. A solid color( ) indicates a full charge.You can also choose to display a percentage value.Viewing a percentage value can provide a better ideaof the remaining charge on the battery. For moreinformation, see “Battery” on page 100.Getting Started6Assemble Your Device
Set Up Your DeviceTurn Your Device On or OffRestart the DeviceThe instructions below explain how to turn your deviceon or off.If your device stops responding to taps or fingergestures and you are unable to turn it off, you canrestart your device.Turn the Device On Press and hold the Volume down key and thePower key at the same time for more than sevenseconds.To turn the device on: Press and hold the Power key until the deviceturns on.Initial Set UpTurn the Device OffThe first time you turn your device on, a Welcomescreen is displayed. It guides you through the basics ofsetting up your device.To turn the device off:1. Press and hold the Power key.Follow the prompts to choose a default language,connect to a Wi-Fi network, set up accounts, chooselocation services, learn about your device’s features,and more.2. Tap Power off, and confirm if prompted.Getting Started7Set Up Your Device
Voice Assistant provides voice prompts anddescriptions of items on the screen to improveaccessibility. To enable or disable Voice Assistantduring setup, press the Home key quickly three times.Unlock the DeviceSecure Your DeviceTo unlock the device:Use your device’s screen lock features to secure yourdevice. Press the Power key or Home key, and then dragyour finger across the screen.The default Screen lock on your device is Swipe.Note: To choose a more secure screen lock, see“Set a Screen Lock” on page 106.Lock the DeviceBy default, the device locks automatically when thescreen times out.To lock the device: Press the Power key.Getting Started8Set Up Your Device
Set Up Accounts on Your DeviceSamsung AccountGoogle AccountCreate a Samsung account for access to Samsungcontent and apps on your device. When you turn onyour device for the first time, set up your existingSamsung account or create a new Samsung account.Your new device uses your Google Account to fullyutilize its Android features, including Gmail and theGoogle Play store.When you turn on your device for the first time, setup your existing Google Account or create a newGoogle Account.– or –To create a new Samsung account or set up yourSamsung account on your device at any time, useAccounts settings.1. From a Home screen, tapApps – or –To create a new Google Account or set up your GoogleAccount on your device at any time, use Accountssettings.Settings.2. Tap Cloud and accounts Accounts.3. Tap1. From a Home screen, tapAdd account Samsung account.Apps Settings.2. Tap Cloud and accounts Accounts.3. TapGetting Started9Add account Google.Set Up Accounts on Your Device
Factory Reset ProtectionEnable Factory Reset ProtectionAdding a Google Account to your device automaticallyactivates the Factory Reset Protection security feature.When you sign in to a Google Account on your device,Factory Reset Protection is activated. Factory ResetProtection (FRP) prevents other people from usingyour device if it is reset to factory settings without yourpermission. For example, if your device is lost or stolenand a factory data reset is performed, only someonewith your Google Account username and password canuse the device.Disable Factory Reset ProtectionTo disable FRP, remove all Google Accounts from thedevice.1. From a Home screen, tapSettings.2. Tap Cloud and accounts Accounts Google.You will not be able to access the device after a factorydata reset if you do not have your Google Accountusername and password. For more information, see“Factory Data Reset” on page 128. If you have more than one Google Account setup on your device, tap the Google Account youwant to remove.3. Tap More options Remove account. Confirmwhen prompted.Caution: Before shipping your device back to Samsungor taking it to your nearest Samsung-authorized servicecenter, you should remove your Google Account beforeresetting the device back to factory settings. For moreinformation, visit samsung.com/us/support/frp.Getting StartedApps 10Set Up Accounts on Your Device
Know Your DeviceLearn some of the key features ofyour mobile device, including thescreens and icons, as well as how tonavigate the device and enter textusing the keyboard.
Home Screen11. Status bar: Displays device status icons (right) andnotification icons (left). For more information, see“Status Bar” on page 17.2. App folder: Groups multiple apps into a folder.73. Apps list: Allows quick access to all of yourapplications.4. Primary app shortcuts: Displays these shortcuts onall Home screens.5. Home screen indicator: Indicates which Home screenis currently visible.627. Widget: Runs as a simple application extension (not ashortcut) on a Home screen.54Know Your Device6. App shortcuts: Launches your favorite applications.312Home Screen
Customize the Home ScreenManage your Home screen, use wallpapers, add widgets, and change thescreen grid dimensions. To access Home screen manager: From a Home screen, pinch the screen. – or –Touch and hold an empty space on the screen. Manage Home ScreensYour device comes with multiple Home screens tohold app shortcuts and widgets. You can add, remove,change the order of screens, as well as choose adifferent main Home screen. 1. From a Home screen, pinch the screen.2. Use these options to manage screens:Know Your Device13Add a screen: Swipe to the end of the screens,and then tapAdd.Remove a screen: Touch and hold a screen, andthen drag it toRemove.Set a screen as the main Home screen: TapMain Home screen at the top of a screen.This screen is displayed when you press theHome key.Change the order of screens: Touch and hold ascreen, and then drag it to a new position.Flipboard Briefing: Swipe to the left of thescreens to find the Flipboard Briefing screen. Toenable or disable this feature, tap On/Off at thetop of the screen.Customize the Home Screen
WallpapersAdd a Widget to a Home ScreenSet visual themes for all system screens and iconson your device. Change the look of the Home andLock screens with wallpaper. You can display a favoritepicture or choose from preloaded wallpapers.You can add a widget to a Home screen.1. From a Home screen, pinch the screen.1. From a Home screen, pinch the screen.3. Touch and hold a widget, drag it to a Home screen,and then release it.2. Tap Widgets.2. Tap Wallpapers to customize.For more information, see “Wallpaper” on page 96.Remove a WidgetWidgetsYou can remove a widget that you added to a Homescreen. Removing a widget does not delete the widget,it just removes the widget from the Home screen.Widgets are simple application extensions thatrun on a Home screen. There are many kinds ofwidgets, including links to a specific contact,Internet bookmarks, Gmail and email accounts, andmany others.Know Your Device1. From a Home screen, touch and hold a widget torelease it.2. Drag the widget to14Remove and release it.Customize the Home Screen
App ShortcutsMove a ShortcutYou can move a shortcut from one Home screen toanother.You can use app shortcuts to launch an app from anyHome screen.1. Touch and hold an app shortcut to release it.Add a Shortcut to a Home ScreenYou can add a shortcut to a Home screen.2. Drag the app shortcut torelease it.1. From a Home screen, tap3. Swipe to a new Home screen.Apps.2. Touch and hold an app shortcut, drag it to aHome screen, and then release it.Move apps and4. Tap the shortcut to place it in the next availablelocation, or drag it to a specific location andrelease it.Remove a ShortcutYou can remove a shortcut that you added to a Homescreen. Removing a shortcut does not delete the app, itjust removes the shortcut from the Home screen.1. Touch and hold an app shortcut to release it.2. Drag the app shortcut torelease it.Know Your DeviceRemove shortcut and15Customize the Home Screen
FoldersRemove a Folder from a Home ScreenPlace folders on a Home screen to organize items.You can remove a folder that you added to aHome screen.Create a Folder1. Touch and hold the folder until it detaches.You can create an app folder on a Home screen.2. Drag the folder toDelete and release it.1. From a Home screen, touch and hold an appshortcut and drag it on top of another app shortcutuntil it is highlighted.2. Release the app shortcut to create the folder. Enter folder name: Enter a name for the folder.Palette: Change the color.Add: Place more apps in the folder. Tap appsto select them, and then tap Add.3. Tap anywhere outside of the folder to close it. To add more apps, touch and hold an appshortcut and drag it to the folder.Know Your Device16Customize the Home Screen
Status BarThe Status bar at the top of the Home screen provides device information(such as network status, battery charge, and time) on the right side andnotification alerts on the left.Status IconsBattery full: Battery is fully charged.Mute mode: Mute mode is enabled.Battery low: Battery is low.Wi-Fi active: Wi-Fi is active.Battery charging: Battery is charging.Wi-Fi available: A Wi-Fi network is available.Know Your Device17Status Bar
Notification IconsNew email: New email has arrived.New Gmail: New Gmail has arrived.File download in progress: Download of a fileor app is in progress.File upload in progress: File is beinguploaded or sent.GPS active: Location service (GPS) is activeand acquiring a signal.App updates available: App updates areavailable from the Google Play store.App updates complete: App installation orupdates are complete.Know Your Device18Status Bar
NavigationLearn the basics for how to navigate through your device.Touchscreen NavigationTouch and HoldTouch and hold items on the screen to activate them.Please note that a touch screen responds best to a lighttouch from the pad of your finger or a capacitive stylus.Using excessive force or a metallic object on the touchscreen may damage the tempered glass surface andvoid the warranty. TapLightly drag your finger vertically or horizontally acrossthe screen.Tap the keyboard to enter characters or text. Tap an item to select it.Tap an app shortcut to launch the application.Know Your DeviceTouch and hold a field to display a pop-up menu ofoptions.SwipeLightly tap items to select or launch them. Touch and hold a widget on a Home screen tomove it.19Swipe the screen to unlock the device.Swipe the screen to scroll through the Home screensor menu options.Navigation
Common OptionsDragTouch and hold an item, and then move it to a newlocation. The device uses basic command options to performcommon actions. Drag an app shortcut to add it to a Home screen.Drag a widget to place it in a new location on aHome screen. Pinch and SpreadPinch the screen using your thumb and forefinger orspread by moving your fingers apart. Pinch the screen to zoom out while viewing a pictureor a web page.Spread your fingers on the screen to zoom in whileviewing a picture or a web page. Know Your Device20More options: Tap to view more menu options fora screen. This often allows you to select items todelete or share.Delete: Tap to select items to delete.Share: Tap to select items to share, and thenchoose a sharing method.Edit: Tap to customize the screen.On/Off: Tap to turn the option on (off ().) orCheckbox: Tap to enable or select. Whenenabled, a checkmark is displayed. You can often tapa checkbox at the top of the screen to select all.Menu: Tap to view available options for the field.Navigation
Notification Panel1. Users: Select and change the user profile.1723652. Settings: Display the Settings screen.3. View all: See all available Quick settings, adjustscreen brightness, and more.4. Clear all: Clear all notifications.45. Block notifications: Enable or disable notificationsfrom each app. For more information, see“Notifications” on page 92.6. Notification card: View details about a notification.7. Quick settings: Quickly enable or disable a feature.Know Your Device21Notification Panel
View the Notification PanelQuick SettingsYou can access the Notification panel from anyHome screen.In addition to notifications, the Notification panel alsoprovides quick access to device functions such as Wi-Fi,allowing you to quickly turn them on or off.1. Drag the Status bar down to display theNotification panel.To view additional Quick settings:2. Swipe down the list to see notification details. 1. Drag the Status bar down to display theNotification panel.To open an item, tap it.2. DragTo clear a single notification, drag thenotification left or right. To clear all notifications, tap Clear all.3. Drag upward from the bottom of the screen or tapBack to close the Notification panel.Know Your DeviceView all downward.Tap a setting to turn it on or off.Tap More options to edit Quick settings or tochange the button layout.3. DragView all upward to close theQuick settings.22Notification Panel
Multi WindowMultitask by using multiple applications at the same time.Window ControlsTapWindow controls in the middle of the window border foroptions.Switch windows: Switch locations between Multi window apps.Open in pop-up view: Open the selected app in a pop-upwindow.Close app: Close the selected app.Know Your Device23Multi Window
Use Multi WindowApps that support Multi window display together ona split screen. You can switch between the apps andadjust the size of their display on the screen.1. Tap Recent apps.Recently used apps that support Multi windowhave aMulti window icon in their title bar.2. TapMulti window in the title bar to launch anapplication in split screen view. Other recently used apps that supportMulti window display below the launched app.3. Tap an app to add it to the split screen view.Know Your Device24Multi Window
Enter TextText can be entered using a keyboard or by speaking.Use the Samsung KeyboardSpecial KeysEnter text using a QWERTY keyboard. Available optionsdepend on the app in use. Not all options are availablefor all apps.Symbol: Tap to insert symbols.Control: Touch and hold for quick access tocut (x), copy (c), paste (v), undo (z), redo (y),and select all (a).Touch and hold Options for the following:Voice input: Enter text using Google Voice typing.Handwriting: Use your handwriting to entertext.Clipboard: Access the clipboard.OptionsKnow Your Device25Enter Text
Configure the Samsung KeyboardSpecial KeysTo customize the Samsung keyboard:Emoticon: Insert an emoticon at thecursor position.1. From a Home screen, tapApps Settings.2. Tap General management Language and input On-screen keyboard Samsung keyboardfor options.Keyboard types: Change the layout of thekeyboard.Keyboard settings: Access keyboardsettings.For more information, see “Samsung keyboard” onpage 123.Predictive TextPredictive text suggests words that match your textentries, and can automatically complete commonwords. Predictive text can learn your personal writingstyle from your contacts, messages, email, andsocial networking sites — improving the accuracy ofpredicting text entries.Know Your Device26Enter Text
Use Google Voice TypingTo download additional languages for use withGoogle voice typing:Instead of typing, enter text by speaking. TapSettings Languages.Configure Google Voice TypingTo customize Google voice typing:1. From a Home screen, tapApps Settings.2. Tap General management Language and input On-screen keyboard Google voice typingfor options.SettingsFor more information, see “Google Voice Typing” onpage 124.Delete textTo enable Google voice typing:1. Tap Voice input on the Samsung keyboard.You may need to touch and hold Options (left ofthe Space bar) to find it.2. Speak your text.Know Your Device27Enter Text
ApplicationsLearn how to change the wayapps are displayed, organizeapps into folders, and uninstallor disable apps.
Apps ListThe Apps list displays all preloaded and downloaded apps. You can uninstall,disable, or hide apps from view.Download and Install New AppsShortcuts to apps can be placed on any of the Homescreens. For more information, see “Add a Shortcut to aHom
and SAMSUNG ELECTRONICS AMERICA, INC. ("Samsung"). You can opt out of the agreement within 30 calendar days of the first consumer purchase by emailing . optout@sea.samsung.com. or . calling 1-800-SAMSUNG (726-7864) and providing . the applicable information. For complete terms