Transcription
www .respir onics.comCPAP SystemUser Manual1007167LK 5/12/01
Table of ContentsSymbol Key . 2Intended Use . 3Specifications . 4Warnings & Cautions . 5Unpacking the System . 6System Features . 7First Time Setup . 8Installing the Filter .9Device Settings . 11Assembling the Circuit . 15Accessories . 16Adding a Humidifier . 16Adding Oxygen . 16Using DC Power . 17Using an Ultra-fine Filter . 17Carrying Case . 17Routine Use . 18Connecting the Circuit . 18Adjusting the Circuit . 18Starting Ramp . 19Turning the System Off . 19Helpful Hints . 19Screen Messages . 20Traveling with the System . 22Routine Maintenance . 23Filter . 23Cleaning . 24Reordering . 24Service . 24Troubleshooting . 26Warranty . 28REMstar Pro User Manual 1
SymbolsPressure ON / OFFRampHeated Humidifier ON / OFFDC PowerType BF Applied PartClass II (Double Insulated)IPX0 Ordinary EquipmentAttention, consultaccompanying documentsEuropean CE Marking0123This CPAP System is the subject of U.S. patent #5239995 andother pending U.S. and foreign patents.REMstar is a trademarkof Respironics, Inc. Respironics, Inc. 20012 REMstar Pro User Manual
Intended UseIntended UseThe Respironics Pro System is a continuous positive airway pressure(CPAP) device designed for the treatment of adult Obstructive SleepApnea (OSA) only.The REMstar Pro is to be used only on the instruction of a licensedphysician. Your home care provider will make the correct pressuresettings according to your physician’s prescription.Several accessories are available to make your OSA treatment with theREMstar Pro system as convenient and comfortable as possible. Toensure that you receive the safe, effective therapy prescribed for you,use only Respironics accessories.IMPORTANT!Read and understand the entire user’s manual before operating thissystem. If you have any questions concerning the use of this system,contact your home care provider or doctor.Contraindications Studies have shown that the following preexisting conditions maycontraindicate the use of positive airway pressure therapy for somepatients: Bullous Lung Disease Pathologically Low Blood Pressure Pneumothorax Pneumocephalus has been reported in a patient using nasalContinuous Positive Airway Pressure. Caution should be used whenprescribing CPAP for susceptible patients such as those with:cerebral spinal fluid (CSF) leaks, abnormalities of the cribriform plate,prior history of head trauma, and/or pneumocephalus.(Chest 1989; 96:1425-1426)The use of positive airway pressure therapy may be temporarilycontraindicated if you exhibit signs of a sinus or middle ear infection.Not for use with patients whose upper airways are bypassed. Contactyour physician if you have any questions concerning your therapy.REMstar Pro User Manual 3
SpecificationsDevice SizeProduct Use,Transport, andStorageStandardsComplianceDimensions:Weight:9 1/2” x 6 7/8” x 4 3/4” (24 x 17 x 12 cm)4 lbs. (1.8 kg)OperationTemperature:41 to 95 F (5 to 35 C)Humidity:15 to 95% Non-condensingAtmospheric Pressure: 82.8 to 102 kPascalsTransport & Storage-4 to 140 F (-20 to 60 C)15 to 95% Non-condensing50 to 102 kPascalsThis device is designed to conform to the following standards:IEC 60601-1 Medical Electrical Equipment General Requirements for SafetyIEC 60601-1-2 Electromagnetic CompatibilityUS Deviations (UL 2601-1:1997)Canada Deviations (CAN/CSAC22.2 No. 601.1-M90)Mode of OperationContinuousPower RequirementsAC Power Consumption:DC Power Consumption:100 to 240 VAC, 50/60 Hz, 1.0 A max.12 VDC, 3.0 A max.Class II EquipmentType of ProtectionAgainst Electric ShockType BF Applied PartDegree of ProtectionAgainst Electric ShockIPX0 - Ordinary EquipmentDegree of ProtectionAgainst Ingress of WaterPressure Range4 REMstar Pro User Manual4 to 20 cm H2O (in 1 cm increments)
Warnings & CautionsCAUTION! US federal law restricts this device to sale by or on the order of aphysician.WARNING! The instructions in this manual are not intended to supersedeestablished medical protocols.Indicates thepossibility forinjury to the useror the operator. This device is intended for adult use only. This device is not intended for life support. CPAP devices have the potential to allow rebreathing of exhaled air. Toreduce this potential, observe the following:- Use only Respironics circuit accessories.- Do not wear the mask and headgear for more than a few minutes.while the device is not operating.- Do not block or try to seal the vent holes in the exhalation portAs with most CPAP devices: At low CPAP pressures, some exhaled gas(CO2) may remain in the mask and be rebreathed. Do not use this device if the room temperature is warmer than 95 F(35 C). If this device is used at room temperatures warmer than 95 F(35 C), the temperature of the airflow may exceed 106 F (41 C).This could cause irritation to your airway. This equipment is not suitable for use in the presence of a flammableanaesthetic mixture in combination with oxygen or air, or in thepresence of nitrous oxide. To avoid electrical shock, disconnect the power cord before cleaning.DO NOT immerse the device in any fluids Contact your doctor if symptoms of sleep apnea recur.CAUTION!Indicates thepossibility ofdamage to thedevice. If you notice any unexplained changes in the performance of thisdevice, if it is making unusual or harsh sounds, if it has been droppedor mishandled, if the enclosure is broken, or if water has entered theunit, discontinue use and contact your home care provider. Tobacco smoke may cause tar build-up within the REMstar Pro thatmay result in the REMstar Pro malfunctioning.Additional warnings and cautions are located throughout this manualas they apply.REMstar Pro User Manual 5
Unpacking the SystemAfter unpacking the system, check to make sure you have everythingshown here:REMstar Prowith ltersUserFlexible Tubing6 ft. (1.83 m)ManualPowerCordIMPORTANT!If any of the above parts are missing, contact your home care provider.***The Encore SmartCard is a new feature which records the CPAP usage. Anothernew feature is the FOSQ “Quality of Life” questionnaire. Your doctor or homecare provider may ask you to periodically complete this questionnaire and sendyour answers (recorded on the SmartCard). The FOSQ questionnaire is detailedin the enclosed “Sleep Solutions” brochure.6 REMstar Pro User ManualSleepSolutionswww.respironics.com
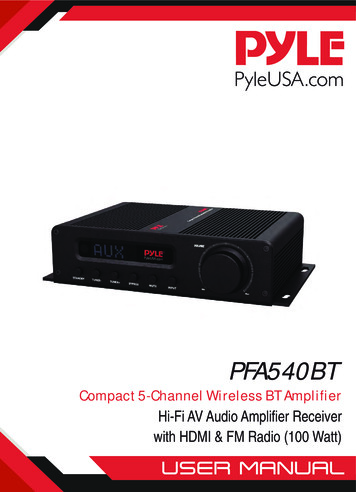
System FeaturesDisplayScreenSmartCardHumidifierButtonAC InletPressureRampDC InletMedicalOn/Off ButtonButtonEquipmentNote (on bottom)Filter andFilter CapAir OutletUserCommunicationsButtonsConnectorAC Inlet . Connect the power cord here.Air Outlet . Connect the flexible tubing here.Communications Connector . For clinical use with the Encore Data Management Software or an IEC950 approved device. Connect the communications cable here.DC Inlet . Connect the optional DC power cord here.Display Screen . All System settings, total operating time, and therapy hours will bedisplayed here.Filter Cap & Filter . The pollen filter screens out normal household dust and pollens. Thefilter cap is designed to quiet the CPAP device.Humidifier Button . This button turns the REMstar Heated Humidifier on / off and allows theheater setting to be adjusted. This is an optional accessory that may bepurchased separatelyMedical Product Note . For convenience at airport security stations, a note on the bottom of thedevice states that it is medical equipment. Taking this manual with youwhen you travel also may help you at security checkpoints.Pressure On / OffButton . This button turns the airflow on or off.Ramp Button . This button starts the ramp cycle or accesses the device settings.SmartCard . The SmartCard records device usage information (e.g., times the systemwas used for therapy). Contact your home care provider for furtherinformation about the SmartCard.User Buttons . These buttons can be used to change some of the system settings and toanswer the FOSQ quality of life questionnaire.REMstar Pro User Manual 7
First Time SetupWARNING!DO NOT use the REMstar Pro system until an appropriateprofessional adjusts the settings!Note to home care provider: Before beginning setup, be sure that youhave available the REMstar Pro Home Care Provider SetupInstructions. It contains instructions for setting up the REMstar Pro.WARNING!DO NOT connect any equipment to the REMstar Pro unlessrecommended by Respironics or your doctor.WARNING!Respironics circuit accessories (i.e., nasal mask, exhalation port,tubing) are for single patient use only and are not intended to be usedon multiple patients.CAUTION!If the REMstar Pro has been exposed to either very hot or very coldtemperatures, allow it to adjust to room temperature (approximately 2hours) before beginning setup.ATTENTION!The SmartCard does not need to be installed for the REMstar Pro towork properly. The SmartCard records device usage information foruse by your home care provider. Contact your home care provider ifyou have any questions about the SmartCard.8 REMstar Pro User Manual
First Time SetupInstalling Filters1. Install the filter and filter cap. Foradditional filter options, refer to theAccessories section on page 17.CAUTION!The pollen filter must be in place at alltimes when the device is operating.a. Place one of the filters into thefilter area on the back of theREMstar Pro. An extra filter isincluded for your convenience.b. Attach the filter cap. Position the cap so that the smallopening on the cap is facing down. Insert the cap’s bottom tabsinto the openings below the filter area. Press down on the cap’stop tabs and insert them into the openings above the filter area.Power Cord2. Connect the power cord.Plug the socket end of the power cordinto the AC inlet on the back of theREMstar Pro. Plug the pronged end ofthe power cord into an electrical outlet.CAUTION!Inspect the power cord often for any signs of damage. Replace adamaged cord immediately.CAUTION!This device is activated when the power cord is connected. ThePressure On / Off button only turns the blower on/off.REMstar Pro User Manual 9
First Time Setup3. Place the REMstar Pro on a firm, flat surface.CAUTION!Device SettingsMake sure the REMstar Pro is awayfrom any heating or coolingequipment (e.g. forced air vents,radiators, air conditioners).Also, make sure that bedding,curtains, or other items are notblocking the filter or vents of theREMstar Pro. Air must flow freely aroundthe device for the system to work properly.Once the power cord is plugged in,the REMstar Pro will perform a briefself-diagnostic test. The followingmessage will then appear on thedisplay midifierButtonPressureUser ButtonsOn/Off ButtonRampButtonDisplay Screen: All device settings will appear here.Pressure On/Off Button: Use this button to turn the air flow on oroff. DO NOT turn the airflow on until the circuit tubing is connected.Humidifier Button: Use this button when the optional REMstarHeated Humidifier has been prescribed. This button will control theoptional heated humidifier’s output. Follow the instructions includedwith the humidifier.Ramp Button: Use this button to start the ramp cycle (which lowersthe airflow pressure) or to enter the settings menu. This will allow youto fall asleep more easily.User Buttons: These buttons can be used when entering variousmenus to change some of the device settings.10 REMstar Pro User Manual
First Time SetupDevice SettingsIMPORTANT!4. Follow the display screens to change the system settings. (Theairflow must be turned OFF.)DO NOT use the REMstar Pro if the display is erratic. Contact yourhome care provider for further instructions.a. The blower status will appear. Press the button below “Menu.”P OffUsageMenub. A message will display asking if you want to change the settings.Press the button below “Yes.”Change Settings?YesNoIf you press “No,” go to page 14 for instructions.NOTE: This menu can also be accessed (when the airflow is turnedoff) by pressing the ramp button. Pressing the ramp button (when theairflow is turned on) will lower the airflow pressure to the MinimumRamp Pressure setting.REMstar Pro User Manual 11
First Time SetupThe RampFeatureThe Ramp feature will reduce the pressure and then graduallyincrease (ramp) the pressure to the prescription pressure setting sothat you can fall asleep more comfortably. If your physicianprescribed ramp for you, the minimum ramp pressure setting willappear. If ramp has not been prescribed for you, go to Step d.Setting theMinimum RampPressurec. The minimum ramp pressure will appear. Your home careprovider will have already set a minimum ramp pressure. If youfeel the minimum ramp pressure is set too low or too high, youcan change the setting. (Range: 4 cm H2O - Prescription Pressure)If the minimum ramp pressure is correct, press the buttonbelow “Yes.”To change the pressure in 1 cm H2O increments, press thebutton below “ 1” until the desired pressure appears. Pressthe button below “Yes” to confirm the setting.Min Ramp P. 4Yes 1Air FlowTurned OnRamp ButtonPressedTherapyPressureMinimumRampPressure0 cm H2ORamp TimeMinutes12 REMstar Pro User Manual
First Time SetupTurning the AlertTone On or Offd. The audible mask alert is a beeping sound that the REMstar Promakes when a large, continuous air leak has been detected in thecircuit. You have the option of turning the alert tone On or Off.If the setting is correct, press the button below “Yes.”To change the setting, press the button below “No.”Press the button below “Yes” to confirm the setting.Mask Alert OnYesNoSetting ButtonLightse. The button lights setting will appear. This setting allows you tohave the lights behind the buttons turned on or off while the airflowis on. (The lights will always be on when the airflow is off.)If the setting is correct, press the button below “Yes.”To change the setting, press the button below “No.”Press the button below “Yes” to confirm the setting.Lights OnYesNoREMstar Pro User Manual 13
First Time SetupFOSQ TestWhen “Change Settings” appears, if youpress the button below “No,” a screen willappear that says “FOSQ Test?”Change Settings?YesNoThe FOSQ test is a “quality of life” questionnaire designedspecifically for people with sleep disorders. The results allow healthcare professionals to see how therapy has improved the quality of yourlife. By completing the questionnaire periodically, you can providevaluable information about the effectiveness of your treatment. Thisdevice has the ability to record your answers on the SmartCard for laterreview by the health care provider. Contact your home care provider forfurther instructions.IMPORTANT!If your doctor or home care provider instructs you to complete thequestionnaire, he will provide you with the instructions and thequestions and you will enter your answers into the REMstar Pro.Make sure the SmartCard is installed before answering the questions.A message will appear asking if you wantto take the FOSQ test. If you want to takethe test, Press the button below “Yes.”FOSQ Test?YesNoIf you do not want to take the test, pressthe button below “No” and the display willgo back to the main screen.A SmartCard is installed in the sideof the REMstar Pro to recordinformation for the home careprovider. Your home care providermay ask you to periodically removethe SmartCard and send it to him forevaluation.The arrow in the upper right corner of thedisplay screen signifies that the SmartCard isinstalled properly.14 REMstar Pro User ManualSmartCardªSmartCardP OffUsageMenu
First Time SetupAssemblingthe Circuit5. Assemble the circuit. You will need the following accessories in order toassemble the recommended circuit. Respironics Nasal Mask with integrated exhalation port(or Respironics mask with separate exhalation port such as the Whisper Swivel ) Respironics 6 ft. (1.83 m) Flexible Tubing Respironics Headgear (for the mask; not shown)WARNING!If the REMstar Pro is used for multiple persons (e.g., rental devices) a lowresistance, main flow bacteria filter should be installed in-line between thedevice and the circuit tubing. Pressures must be verified when alternate oroptional accessories are in place.a. Connect the flexible tubing to the airoutlet on the front of the REMstar Pro.b. If you are using a mask with a built-inexhalation port: Connect the mask’s connector tothe flexible tubing.Mask'sConnectorFlexibleTubingIf you are using a mask with a separate exhalationport: Connect the exhalation port to the flexibletubing.Position the exhalation port so that the vented air isblowing away from your face. Connect the mask’sconnector to the exhalation RNING!The exhalation port is designed to exhaust CO2 from the circuit. Continuousflow is required for safe operation. Do not block or otherwise try to seal theair openings on the exhalation port.WARNING!If you are using a full face mask (i.e., a mask covering both your mouth andyour nose), the mask must be equipped with a safety (entrainment) valve.REMstar Pro User Manual 15
AccessoriesContact your home care provider for additional information on theoptional accessories. When using optional accessories, always followthe instructions enclosed with the accessories.Adding aHumidifierCAUTION!Adding Oxygento the SystemThe REMstar Heated Humidifier andREMstar Pass-over Humidifiers are availablefrom your home care provider. Thehumidifiers may reduce nasal dryness andirritation by adding moisture (and heat ifapplicable) to the airflow.For safe operation, the humidifier must always be positioned below thecircuit connection at the mask and the air outlet on the REMstar Pro.The humidifier must be level for proper operation.Oxygen may be added at the mask connection. Please note the warningslisted below when using oxygen with the REMstar Pro.WARNING!When using oxygen with the REMstar Pro, the oxygen supply mustcomply with the local regulations for medical oxygen.WARNING!When using oxygen with this system, a Respironics Pressure Valve (Partnumber 302418) must be placed in-line with the patient circuit.WARNING!When using oxygen with this system, turn the REMstar Pro on beforeturning the oxygen on. Turn the oxygen off before turning the REMstarPro off. This will prevent oxygen accumulation in the device.WARNING!Oxygen accelerates fires. Keep the REMstar Pro and the oxygencontainer away from heat, open flames, any oily substance, or othersources of ignition. DO NOT smoke in the area near the REMstar Pro orthe oxygen.16 REMstar Pro User Manual
AccessoriesUsing a DCPower SystemYou can also use the REMstar Pro in a stationaryrecreational vehicle, boat or motor home with a 12volt DC power source. Do not operate the REMstarPro while the vehicle is in motion. Contact yourhome care provider for additional information.CAUTION!Only use the Respironics DC power systemavailable from your home care provider. Use of any other systemmay cause damage to the REMstar Pro or your vehicle.CAUTION!DC power is not intended to be used as battery back-up. DO NOTconnect the DC power system while the REMstar Pro is operating onAC power. System damage may occur.Using an Ultrafine FilterAn optional ultra-fine filter can be used in addition to the pollen filter formore complete filtration of very fine particles. The ultra-fine filter isrecommended for people who are sensitive to tobacco smoke or othersmall particles.Carrying CaseThe carrying case holds the REMstar Pro and accessories. Whentraveling by airplane, use the carrying case as carry-on luggage only.Never check the REMstar Pro through the baggage department.REMstar Pro User Manual 17
Routine UseConnecting theCircuitIMPORTANT!1. Connect the circuit.Before each use, examine the flexible tubing for any damage or debris.Replace any damaged tubing.a. Connect the mask to the headgear, following the instructionsincluded with the headgear.b. If your home care provider has selected the Auto-On featurefor you, put on the mask and headgear, and breathe normallythrough your nose. The airflow should automatically turn ONwhen you begin breathing through the circuit. If the airflow doesnot turn on within four breaths, turn it ON by pressing the PressureOn/Off button on the top of the device. When operating thesystem with some mask types, some circuit configurations, or athigher altitudes, the airflow may NOT automatically turn on.- or b. If your home care provider has notselected the Auto-On feature for you,put on the mask and headgear, andimmediately turn the airflow ON bypressing the Pressure On/Off button onthe top of the device. Breathe normallythrough your nose.Adjusting theCircuit2. Adjust the circuit. Lie down on your bed and adjust the flexibletubing so it is free to move if you turn in your sleep. Adjust the maskand headgear until you have a comfortable fit and there are noairflow leaks into your eyes.When the airflow is on, the word “Menu” will no longer bedisplayed, and the pressure setting will now appear.18 REMstar Pro User Manual
Routine UseStarting RampThe Ramp feature will reduce the pressure and then graduallyincrease (ramp) the pressure to the therapeutic pressure setting sothat you can fall asleep more comfortably. If your physicianprescribed ramp for you, pressing the Ramp button will reduce the airpressure when you are trying to fall asleep. Note: The ramp feature isnot prescribed for all users.3. Press the Ramp button on thetop of the device. You can usethe Ramp button as often as youwish during the night. Refer topage 12 for additional details.Turning theSystem OFFPressureOn/OffRampButtonButton4. Remove the mask and headgear. The airflow will automaticallyturn off (in approximately 30 seconds). If the audible mask alert isturned on, the alert tone will sound (in approximately 15 secondsafter you remove the mask).IMPORTANT!The Auto-off feature may have been disabled by your home careprovider. Press the Pressure On / Off button on the top of theREMstar Pro to turn the airflow OFF.IMPORTANT!The humidifier button is active only when a Respironics HeatedHumidifier is connected or when the REMstar Pro is in the SetupMenu (refer to page 10).Helpful Hints If the alert tone sounds, press any button on the REMstar Pro tosilence the alert tone. Refer to the “Screen Messages” section of themanual for further instructions. Make sure that bedding, curtains, or other items are not blocking thefilter or vents of the REMstar Pro. Air must flow freely around thedevice for the system to work properly. If the airflow from the REMstar Pro feels cold, move the circuittubing so that it runs under your bed covers to reduce heat loss whileyou sleep.REMstar Pro User Manual 19
Routine UseScreenDisplaysDuring use, any of the following messages may appear on the displayscreen.1. “Mask Alert” - A large circuit leak, such as mask removal, hasbeen detected.What will happen: The alert tone will sound in approximately 15 seconds (if themask alert feature has been turned on). The airflow will turn off in approximately 30 seconds (if theauto-off feature has been turned on).What to do: Press any button on the REMstar Pro to silence the alert tone andclear the display screen. Check the circuit (flexible tubing, mask) for any leaks and adjustthe mask and headgear. Press the Pressure On / Off button to restart the airflow.IMPORTANT!The audible mask alert setting can be turned on or off. See the “FirstTime Setup” section for instructions.2. “Connect Pressure Line” - The flexible tubing has becomedisconnected or the REMstar Pro is not functioning correctly.What will happen: The airflow will turn off and the alert tone will sound within 10seconds.What to do: Press any button on the REMstar Pro to silence the alert tone andclear the display screen. Reconnect the tubing. Press the Pressure On / Off button to restart the airflow. If the airflow does not start, contact your home care provider orRespironics for directions on having the REMstar Pro serviced.Please have the serial number of the device and the error codeready when you call.IMPORTANT!20 REMstar Pro User ManualThis alert setting cannot be turned on or off.
Routine UseScreenMessages3. “System Error ###” - The REMstar Pro is not functioning correctly andmay need servicing.What will happen: The airflow will turn off immediately. The alert tone will sound. The light behind the buttons will flash on and off.What to do: Reset the REMstar Pro by unplugging the power cord from the electricaloutlet and then plugging it in again. If the message appears again, contact your home care provider orRespironics for directions on having the device serviced. Please have theserial number of the device and the error code ready when you call.IMPORTANT!This alert setting cannot be turned on or off.4. “Remove Card” - The Encore SmartCard has been inserted improperly.What to do: Remove the SmartCard. Reinsert the SmartCard making sure that theprinted side of the card is facing up and the end with the arrow goes intothe device first. If the message appears again, remove the card and contact your home careprovider to have the SmartCard replaced. You can continue to use theREMstar Pro. Removing the SmartCard will not affect the performance ofthe REMstar Pro. If the SmartCard is not installed, the device usage will not be recorded.When a SmartCard is installed, an arrow will be displayed in the upperright corner of the screen.5. “” - The SmartCard is in place.6. ““ When the optional heated humidifier is connected, thisindicates that the humidifier is on.REMstar Pro User Manual 21
Traveling with the SystemPacking theSystemWhen you are traveling, use the carrying case for carry-on luggageonly. The carrying case will not protect the system if it travels aschecked baggage.SecurityStationsFor convenience at security stations, there is a note on the bottom ofthe REMstar Pro stating that it is medical equipment. It may behelpful to bring this manual along with you when you travel to helpsecurity personnel understand the REMstar Pro.Checking thePower CordIf you are traveling to a country with a linevoltage different than the one you are currentlyusing, an international plug adapter may berequired to make your power cord compatiblewith the power outlets of the country to whichyou are traveling. Contact your home careprovider for additional information.22 REMstar Pro User Manual
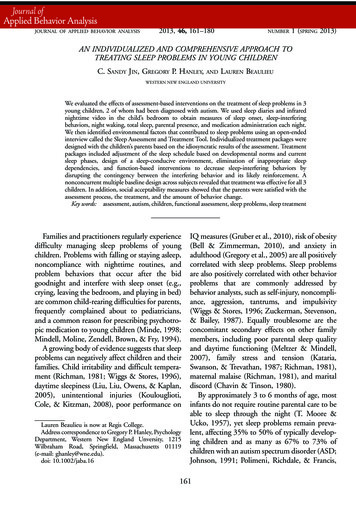
Routine MaintenanceCleaningthe FilterCAUTION!You should clean the filter at least once every two weeks under normalusage and replace it with a new one every six months.Operating the REMstar Pro with a dirty filter may keep the systemfrom working properly and damage the REMstar Pro.1. Remove the filter cap by gently pressing down on the two latcheson top of the filter cap.2. Change the filter.a. Remove the filter by gently pulling around the edges of the filter.Rinse the filter in a steady stream of running water. Squeeze outthe water and repeat. Air dry the filter on a rack for 8 to 12 hoursor in a clothes dryer for 15 to 20 minutes.b. Insert the filter into the filter area on the back of the REMstar Pro.Replace the filter cap.CAUTION!Never install a wet filter into the REMstar Pro. We recommend thatyou clean the filter in the morning and alternate using the two filtersprovided with the system to ensure sufficient drying time for thecleaned filter.REMstar Pro User Manual 23
Routine MaintenanceCleaningthe SystemWARNING!Clean the mask and tubing daily.To avoid electrical shock, unplug the REMstar Pro before cleaning.DO NOT immerse the REMstar Pro in any fluids.1. Disconnect the flexible tubing
10 REMstar Pro User Manual 3. Place the REMstar Pro on a firm, flat surface. Make sure the REMstar Pro is away from any heating or cooling equipment (e.g. forced air vents, radiators, air conditioners). Also, make sure that bedding, curtains, or other items are not blocking the filter or vents of the REMstar Pro. Air must flow freely around