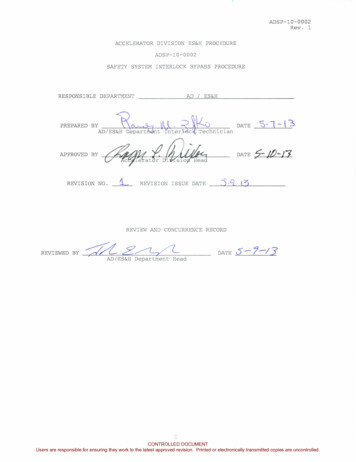
Transcription
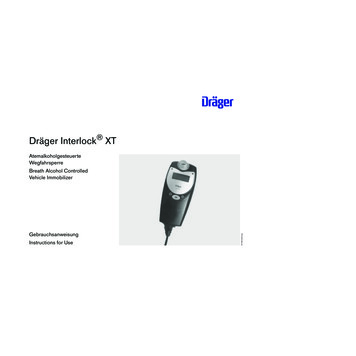
DDräger Interlock XTGebrauchsanweisungInstructions for reBreath Alcohol ControlledVehicle Immobilizer
InhaltContentsZu Ihrer Sicherheit . . . . . . . . . . . . . . . . . . . . . . . . . . . . . . . . . . . . . . . . 4For Your Safety . . . . . . . . . . . . . . . . . . . . . . . . . . . . . . . . . . . . . . . . . . . . 4Verwendungszweck . . . . . . . . . . . . . . . . . . . . . . . . . . . . . . . . . . . . . . . 5Intended Use . . . . . . . . . . . . . . . . . . . . . . . . . . . . . . . . . . . . . . . . . . . . . . 5Was ist Was . . . . . . . . . . . . . . . . . . . . . . . . . . . . . . . . . . . . . . . . . . . . . . 6What's What . . . . . . . . . . . . . . . . . . . . . . . . . . . . . . . . . . . . . . . . . . . . . . . 6Dräger Interlock XT installieren . . . . . . . . . . . . . . . . . . . . . . . . . . . 7Install Dräger Interlock XT . . . . . . . . . . . . . . . . . . . . . . . . . . . . . . . . . 7Startvorgang . . . . . . . . . . . . . . . . . . . . . . . . . . . . . . . . . . . . . . . . . . . . .Voraussetzungen . . . . . . . . . . . . . . . . . . . . . . . . . . . . . . . . . . . . . . . . . .Handgerät abnehmen . . . . . . . . . . . . . . . . . . . . . . . . . . . . . . . . . . . . . .Anforderungen an die Testperson . . . . . . . . . . . . . . . . . . . . . . . . . . . .Starting the Vehicle . . . . . . . . . . . . . . . . . . . . . . . . . . . . . . . . . . . . . . . .General Conditions . . . . . . . . . . . . . . . . . . . . . . . . . . . . . . . . . . . . . . . . .Detaching the Handset . . . . . . . . . . . . . . . . . . . . . . . . . . . . . . . . . . . . . .Conditions for Tested Person . . . . . . . . . . . . . . . . . . . . . . . . . . . . . . . .77887788Messung durchführen . . . . . . . . . . . . . . . . . . . . . . . . . . . . . . . . . . . . . 9Dräger Interlock XT aktivieren . . . . . . . . . . . . . . . . . . . . . . . . . . . . . . 9Atemprobe abgeben . . . . . . . . . . . . . . . . . . . . . . . . . . . . . . . . . . . . . . . 9» Test OK « . . . . . . . . . . . . . . . . . . . . . . . . . . . . . . . . . . . . . . . . . . . . . . 10» Test NICHT OK « . . . . . . . . . . . . . . . . . . . . . . . . . . . . . . . . . . . . . . . . 11Making a Measurement . . . . . . . . . . . . . . . . . . . . . . . . . . . . . . . . . . . . 9Activating Dräger Interlock XT . . . . . . . . . . . . . . . . . . . . . . . . . . . . . . . 9Providing a Breath Sample . . . . . . . . . . . . . . . . . . . . . . . . . . . . . . . . . . . 9» Test Passed « . . . . . . . . . . . . . . . . . . . . . . . . . . . . . . . . . . . . . . . . . . . 10» Test Failed « . . . . . . . . . . . . . . . . . . . . . . . . . . . . . . . . . . . . . . . . . . . . . 11Unterbrechung der Fahrt – Abschalten des Fahrzeugs . . . . . . . 11Interruption of Ride – Switching-off the Vehicle . . . . . . . . . . . . . . 11Wiederholungstests . . . . . . . . . . . . . . . . . . . . . . . . . . . . . . . . . . . . . . 12Retests . . . . . . . . . . . . . . . . . . . . . . . . . . . . . . . . . . . . . . . . . . . . . . . . . . 12Menüoptionen . . . . . . . . . . . . . . . . . . . . . . . . . . . . . . . . . . . . . . . . . . .Option "Start-Freigabe": . . . . . . . . . . . . . . . . . . . . . . . . . . . . . . . . . . .Option "Nächster Service": . . . . . . . . . . . . . . . . . . . . . . . . . . . . . . . . .Option "Service Telefon": . . . . . . . . . . . . . . . . . . . . . . . . . . . . . . . . . .Option "Handgerät Info": . . . . . . . . . . . . . . . . . . . . . . . . . . . . . . . . . . .Option "Steuergerät Info": . . . . . . . . . . . . . . . . . . . . . . . . . . . . . . . . . .Option "Zugangs-Code": . . . . . . . . . . . . . . . . . . . . . . . . . . . . . . . . . . .Option "Start-Freig. PIN": . . . . . . . . . . . . . . . . . . . . . . . . . . . . . . . . . .Option "Datum, Uhrzeit": . . . . . . . . . . . . . . . . . . . . . . . . . . . . . . . . . . .Menu Options . . . . . . . . . . . . . . . . . . . . . . . . . . . . . . . . . . . . . . . . . . . .Option "Free start": . . . . . . . . . . . . . . . . . . . . . . . . . . . . . . . . . . . . . . . .Option "Next Service": . . . . . . . . . . . . . . . . . . . . . . . . . . . . . . . . . . . . . .Option "Provider Info": . . . . . . . . . . . . . . . . . . . . . . . . . . . . . . . . . . . . .Option "Handset Info": . . . . . . . . . . . . . . . . . . . . . . . . . . . . . . . . . . . . .Option "Controlbox Info": . . . . . . . . . . . . . . . . . . . . . . . . . . . . . . . . . . .Option "Access Code": . . . . . . . . . . . . . . . . . . . . . . . . . . . . . . . . . . . . .Option "Free start PIN": . . . . . . . . . . . . . . . . . . . . . . . . . . . . . . . . . . . .Option "Date and time": . . . . . . . . . . . . . . . . . . . . . . . . . . . . . . . . . . . .2131414141515151616131414141515151616
Option "Freigabezeiten": . . . . . . . . . . . . . . . . . . . . . . . . . . . . . . . . . . . 16Option "Non locked times": . . . . . . . . . . . . . . . . . . . . . . . . . . . . . . . . . 16Instandhaltung . . . . . . . . . . . . . . . . . . . . . . . . . . . . . . . . . . . . . . . . . . .Kalibrieren / Justieren . . . . . . . . . . . . . . . . . . . . . . . . . . . . . . . . . . . . .Reinigen . . . . . . . . . . . . . . . . . . . . . . . . . . . . . . . . . . . . . . . . . . . . . . . . .Gerät entsorgen . . . . . . . . . . . . . . . . . . . . . . . . . . . . . . . . . . . . . . . . . .Maintenance . . . . . . . . . . . . . . . . . . . . . . . . . . . . . . . . . . . . . . . . . . . . .Calibration / Adjustment . . . . . . . . . . . . . . . . . . . . . . . . . . . . . . . . . . .Cleaning . . . . . . . . . . . . . . . . . . . . . . . . . . . . . . . . . . . . . . . . . . . . . . . . .Disposal of the Instrument . . . . . . . . . . . . . . . . . . . . . . . . . . . . . . . . .1717171817171718Störungen, Ursache und Abhilfe . . . . . . . . . . . . . . . . . . . . . . . . . . . 19Faults, Cause and Remedy . . . . . . . . . . . . . . . . . . . . . . . . . . . . . . . . 21Technische Daten . . . . . . . . . . . . . . . . . . . . . . . . . . . . . . . . . . . . . . . . 23Einstellbare Parameter . . . . . . . . . . . . . . . . . . . . . . . . . . . . . . . . . . . . . 25Technical Data . . . . . . . . . . . . . . . . . . . . . . . . . . . . . . . . . . . . . . . . . . . 23Adjustable Parameters . . . . . . . . . . . . . . . . . . . . . . . . . . . . . . . . . . . . . 25Bestell-Liste . . . . . . . . . . . . . . . . . . . . . . . . . . . . . . . . . . . . . . . . . . . . . . 30Zubehör . . . . . . . . . . . . . . . . . . . . . . . . . . . . . . . . . . . . . . . . . . . . . . . . . 30Order List . . . . . . . . . . . . . . . . . . . . . . . . . . . . . . . . . . . . . . . . . . . . . . . 30Accessories . . . . . . . . . . . . . . . . . . . . . . . . . . . . . . . . . . . . . . . . . . . . . . 30Einbaubescheinigung . . . . . . . . . . . . . . . . . . . . . . . . . . . . . . . . . . . . . 32Installation Certificate . . . . . . . . . . . . . . . . . . . . . . . . . . . . . . . . . . . . 333
Zu Ihrer SicherheitFor Your SafetyGebrauchsanweisung beachtenJede Handhabung des Dräger Interlock XT setzt die genaue Kenntnis und Beachtung dieser Gebrauchsanweisung voraus.Das Dräger Interlock XT ist nur für die beschriebene Verwendungbestimmt.Strictly follow the instructions for useAny use of the Dräger Interlock XT requires full understanding andstrict observation of these instructions.The Dräger Interlock XT is only to be used for purposes specifiedhere.InstandhaltungInstandsetzung am Dräger Interlock XT nur durch Fachleute.Für Instandsetzungen empfehlen wir den DrägerService oder einautorisiertes Dräger-Interlock-Servicezentrum.Bei Instandhaltung nur Original-Dräger-Teile verwenden.Kapitel "Instandhaltung" beachten.MaintenanceRepair of the Dräger Interlock XT may only be carried out by trainedservice personnel.We recommend an authorised Dräger Interlock Service Center.Only authentic Dräger spare parts may be used for maintenance.Observe the chapter, Maintenance.ZubehörNur das in der Bestell-Liste aufgeführte Zubehör verwenden.AccessoriesDo not use accessory parts other than those in the order list.Haftung für Funktion und SchädenDie Haftung für die Funktion des Dräger Interlock XT geht in jedemFall auf den Eigentümer oder Betreiber über, soweit das DrägerInterlock XT von Personen, die nicht dem DrägerService angehörenoder von Dräger autorisiert sind, unsachgemäß installiert, gewartetoder instandgesetzt wird oder wenn eine Handhabung erfolgt, dienicht der bestimmungsgemäßen Verwendung entspricht.Für Schäden, die durch Nichtbeachtung der vorstehenden Hinweiseeintreten, haftet Dräger nicht.Gewährleistungs- und Haftungsbedingungen der Verkaufs- undLieferbedingungen von Dräger werden durch vorstehende Hinweisenicht erweitert.Liability for proper function or damageThe liability for the proper function of the Dräger Interlock XT isirrevocably transferred to the owner or operator to the extent that theDräger Interlock XT is installed, serviced or repaired by personnelnot employed by DrägerService or authorised by Dräger or if theinstrument is used in a manner not conforming to its intended use.Dräger cannot be held responsible for damage caused by non-compliance with the recommendations given above.The warranty and liability provisions of the terms of sale and deliveryof Dräger are likewise not modified by the recommendations givenabove.Dräger Safety AG & Co. KGaADräger Safety AG & Co. KGaA4
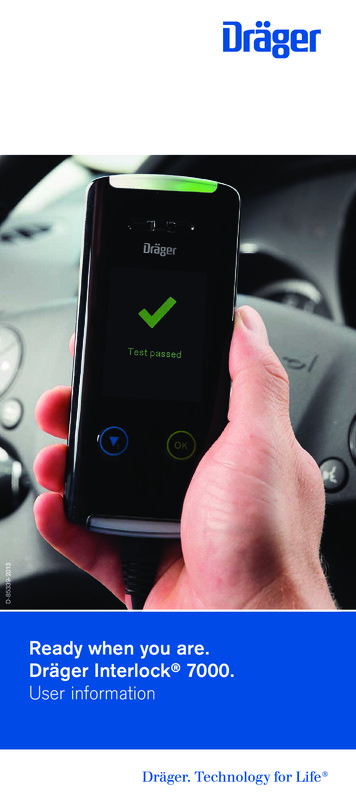
VerwendungszweckIntended UseDas Dräger Interlock XT ist ein Atemalkohol-Messgerät mit Wegfahrsperre.The Dräger Interlock XT is a breath-alcohol measuring instrumentwith a vehicle "immobilizer".Vor dem Starten eines mit dem Dräger Interlock XT ausgestattetenFahrzeuges muss der Fahrer eine Atemprobe abgeben.Das Dräger Interlock XT misst die Atemalkohol-Konzentration undspeichert den Messwert, die Startversuche sowie Hinweise auf Manipulationen und Verstöße im Datenspeicher.Das Fahrzeug kann nur gestartet werden, wenn die gemesseneAtemalkohol-Konzentration unterhalb des eingestellten Grenzwertesliegt.Before starting a vehicle equipped with the Dräger Interlock XT, thedriver has to provide a breath sample.The Dräger Interlock XT measures the breath-alcohol concentrationand stores the measured value, the starting attempt and any indication of tampering and violations with the system in the data memory.The vehicle can only be started when the measured breath-alcoholconcentration lies below a pre-set limit value.Das Gerät fordert (optional) auch zu Wiederholungstests währendder Fahrt auf.The instrument will also ask (optional) for retests while driving.Das Gerät ist keine Sicherheitseinrichtung und ersetzt keine eventuell vorgeschriebene Wegfahrsperre gegen Diebstahl.The instrument is not a safety device for automobiles and is not asubstitute for a vehicle immobilizer for theft protection.5
Was ist WasWhat's What1212Anschlusskabel FahrzeugBeschreibung derAnschlusskabel3 Steuergerät4 Taste "Auf"5 Taste "OK"6 Taste "Ab / Menü"7 Anschlusskabel Handgerät8 Handgerät9 Anzeige10 MundstückConnecting cables carDescription of connectingcables3 Control box4 Button "Up"5 Button "OK"6 Button "Down / Menu"7 Connecting cable handset8 Handset9 Display10 Mouthpiece10918276654ST-266-2002 1.eps3
Dräger Interlock XT installierenInstall Dräger Interlock XTDie Installation darf nur von einem Dräger-Interlock-Servicezentrumoder einer Fachwerkstatt entsprechend der zugehörigen Installationsanweisung durchgeführt werden.Bei der Wahl des Einbauortes sind bestehende Regeln für Kraftfahrzeug-Innenräume zu beachten.The installation may only be carried out by an authorised Dräger Interlock Service Center or a professional auto repair shop according tothe respective instructions for installation.By choosing the place of installation, the existing regulations for theinterior of vehicles have to be observed.Veränderungen oder Zusätze an dem Dräger Interlock XT können zu Gefahren führen.Durch solche Veränderungen oder Zusätze wird die in dieserGebrauchsanweisung enthaltene Einbaubescheinigung ungültig.Alterations and additions to the Dräger Interlock XT may causedangers.Such alterations and additions invalidate the certificate of installation contained in this instructions for use booklet.StartvorgangStarting the VehicleVoraussetzungenGeneral Conditions———————Für jede Testperson ist ein neues Mundstück einzusetzen.Keine Alkohol- und Lösungsmitteldämpfe (Desinfektionsmittel) inder Umgebungsluft.Keine hohen Alkoholkonzentrationen auf den Sensor geben, z. B.durch Trinken von Alkohol, Essen alkoholhaltiger Lebensmitteloder Spülen des Mundes mit alkoholhaltigem Mundwasser kurzvor der Messung.Abstand zur Antenne von Mobiltelefonen oder Sendeanlagenhalten.—Use a new mouthpiece for each person being tested.No alcohol and solvent vapours (disinfectants) in the ambient air.Do not allow a high alcohol concentration to reach the sensor. Forinstance, from drinking alcohol, eating alcohol containing foods orrinsing the mouth with alcoholic mouthwasher just before measurement.Keep away from the antenna of mobile phones or transmitters.7
Handgerät abnehmenDetaching the Handset At temperatures below –20 oC and above Bei Temperaturen im FahrzeuginnerenoCvon unter –20und über 80kannzur schnelleren Betriebsbereitschaft dasHandgerät vom Anschlusskabel gelöstwerden, sofern vorgesehen.1 Verriegelung am Stecker drücken undStecker abziehen. Handgerät an einem Ort mit gemäßigterTemperatur lagern. Vor dem Starten des Fahrzeuges Handgerät wieder anschließen.— Das Abnehmen des Handgerätes bei laufendem Motor oder während eines Wiederholungstests wird als Verstoßregistriert.100323697 1.epsoC80 oC in the interior of the vehicle, whenprovided, detach the handset from theconnecting cable for quicker readiness ofuse.1 Press this spot on the connecting plugand detach the plug. Store handset at a place with a moderatetemperature. Before starting the vehicle, connect handset again.— Detaching the handset while the engineis on or during a retest is registered as aviolation.Anforderungen an die TestpersonConditions for Tested Person————8Wartezeit mindestens 15 Minuten nachder letzten Alkoholaufnahme in denMund!Restalkohol im Mund kann zu erhöhtenMesswerten führen. Auch bei aromatischen Getränken (z. B. Fruchtsaft), alkoholischem Mundwasser oder Mundspray,medizinischen Säften und Tropfen undnach Aufstoßen und Erbrechen könnenerhöhte Messwerte auftreten. Eine Mundspülung mit Wasser oder nichtalkoholischen Getränken ersetzt die Wartezeitnicht!Messwerte oberhalb des eingestelltenGrenzwertes werden im Datenspeicherabgespeichert.Vor dem Test normal und ruhig atmen.——There must be an interval of at least15 minutes after alcohol has beentaken into mouth.Actual residues of alcohol in the mouthmay enhance the measured values. Thismay also occur by aromatic drinks (e.g.fruit juices), alcoholic mouthwashes ormouth sprays, medicines and drops, aswell as by burping and vomiting. Rinsingout the mouth with water or non-alcoholicdrinks do not substitute for the allotedtime period.A measured concentration above the preset limit value will be stored in the datamemory.Breath evenly and normally before thetest.
Messung durchführenMaking a MeasurementDräger Interlock XT aktivierenActivating Dräger Interlock XT Zündschlüssel in das Zündschloss stek- Insert key into ignition switch and turn token und auf Stellung "Zündung" drehen.Ein Selbsttest wird durchgeführt und dieVorwärmphase beginnt.Während des Vorwärmens erscheint inder Anzeige die Meldung » AufwärmenBITTE WARTEN «.Ein Signalton, das Blinken der gelbenLampe und die Meldung » Bereit für TestBITTE BLASEN « zeigen an, dass dasGerät messbereit ist.position "Ignition". A selftest is carried outand the warming-up phase starts.During warming up, the message» Warming Up PLEASE WAIT « is shownin the display.A signal tone, blinking of the yellow lightand the message » Ready for TestPLEASE BLOW « show that the instrument is ready for measurement.————Atemprobe abgebenProviding a Breath Sample Handgerät von der Halterung nehmen. Remove handset from its holster.111 200423697 1.epsEventuell ein neues Mundstück in die entsprechende Öffnung einsetzen.2 Dabei auf richtige Orientierung der Kerbeachten. Gleichmäßig in das Mundstück blasen,solange ein kontinuierlicher Signaltonertöntoder Ist der Manipulationsschutz (Blasen/Saugen) aktiviert: Gleichmäßig in das Mundstück blasen,solange ein kontinuierlicher Signaltonertönt, und anschließend (der Signaltonstoppt und man hört ein "Klick") sofortohne Unterbrechung kräftig aus demMundstück saugen, bis ein kurzer Signalton ertönt.Eventually insert a new mouthpiece intothe respective opening.2 Make sure the notch is positioned in thecorrect orientation. Blow evenly into the mouthpiece as longas a continuous tone sondsor If the anti-circumvention mode is activated(Blow/Suck): Blow evenly into the mouthpiece as longas a continuous signal tone sounds, followed immediately (the signal toneceases and you may hear a "click") without pause by a suck until a short signaltone sounds.9
—Wird die Atemprobe nicht in richtiger Art und Weise mit Blasenund Saugen abgegeben, erscheint in der Anzeige die Meldung» Blasen/Saugen Neuer Test OK «. Anzeige durch Drücken der Taste "OK" bestätigen.— Danach fordert das Gerät zur erneuten Abgabe einer Atemprobeauf.——Wird zu stark oder zu schwach geblasen erscheint in der Anzeigeeine entsprechende Meldung. Anzeige durch Drücken der Taste "OK" bestätigen.— Danach fordert das Gerät zur erneuten Abgabe einer Atemprobeauf.———Nach einer ausreichenden Atemprobe wird das Testergebnis mitder Mitteilung » Test OK « oder » Test NICHT OK « oder (optional)mit der gemessenen Konzentration angezeigt.If the breath sample is not delivered correctly with blowing andsucking, the message » Suck after Blow Repeat Test OK « isshown in the display. Acknowledge the message by pressing the button "OK".— Afterwards the instrument requests a repeated breath sample.If the breath sample flow is too hard or too soft, a respective message is shown in the display. Acknowledge the message by pressing the button "OK".— Afterwards the instrument requests a repeated breath sample.After a sufficient breath sample, the test result is shown with themessage » Test Passed « or » Test Failed « or (optional) with themeasured concentration.» Test OK «» Test Passed «——Die gemessene Atemalkohol-Konzentration ist unterhalb des eingestellten Grenzwertes. In der Anzeige erscheint » Test OK «. DerStart des Fahrzeuges wird mit der Anzeige » Start Freigabe « undeinem Zeitzähler freigegeben, der anzeigt, wie lange das Fahrzeug gestartet werden kann.— Nach dem Start befindet sich das Dräger Interlock XT im Bereitschaftszustand. Dies wird durch » Gute Fahrt « angezeigt. Handgerät wieder an der Halterung befestigen.10The measured breath-alcohol concentration is below the set limitvalue. The display shows » Test Passed «. The start of the vehicleis cleared showing in the display » Free start time: « and a timershowing how long the vehicle may be started.— After starting the vehicle, the Dräger Interlock XT is in stand-bymode. This is shown by the display » Drive Safely ! «. Attach handset to the holster again.
» Test NICHT OK «» Test Failed «——The measured breath-alcohol concentration is above the set limitvalue. The display shows » Test Failed « followed by » TemporaryLockout « with a counter which shows the remaining disabledhours, minutes and seconds. The red lamp is lit.—After an intermediate phase indicated by » Warming Up PLEASEWAIT «, the display shows » Ready for Test PLEASE BLOW « requesting a further breath sample.—Die gemessene Atemalkohol-Konzentration liegt oberhalb des eingestellten Grenzwertes. In der Anzeige erscheint » Test NICHTOK «, gefolgt von der Anzeige » Zeitsperre aktiv « mit einem Zähler, der die restlichen gesperrten Stunden, Minuten und Sekundenanzeigt. Die rote Lampe leuchtet.Nach einer durch » Aufwärmen BITTE WARTEN « angezeigtenZwischenphase erscheint die Aufforderung zur Abgabe einer weiteren Atemprobe mit der Anzeige » Bereit für Test BITTEBLASEN «.Unterbrechung der Fahrt – Abschaltendes FahrzeugsInterruption of Ride – Switching-off theVehicle——Solange die Zündung des Fahrzeugs nach einem erfolgreichenAtemtest eingeschaltet ist, befindet sich das Gerät im Bereitschaftszustand. Dies wird durch die Anzeige » Gute Fahrt ! « angezeigt.— Wird die Zündung des Fahrzeuges ausgeschaltet oder das Fahrzeug nach erfolgreicher Atemprobe nicht gestartet, beginnt eineWiederstartperiode (siehe Seite 25). Während dieser Zeit kanndas Fahrzeug gestartet werden, ohne dass ein neuer Atemalkoholtest erforderlich wird. Die Anzeige zeigt » Start Freigabe « undeinen Zeitzähler für die zum Start verbleibende Zeit.— Nach Ablauf dieser Wiederstartperiode schaltet sich das Gerätab. Das Dräger Interlock XT bleibt abgeschaltet, bis es durchdas Einschalten der Zündung erneut aktiviert wird. Vor dem erneuten Starten muss wieder ein Atemtest durchgeführtwerden.As long as the ignition of the vehicle is switched on after a successful breath test, the instrument is in the stand-by mode. This isshown by the display » Drive Safely ! «.—When the ignition of the vehicle has been switched off or when thevehicle has not been started after a successful breath test, a restart period (see page 25) starts. During this time the vehicle canbe started without a new breath alcohol test being required. Thedisplay shows » Free start timer: « and a timer of the remainingtime for starting the vehicle.— When this time of the restart period has ended, the instrument isswitched off. The Dräger Interlock XT remains switched off untilit is activated again by turning on the ignition. Before starting again a breath test has to be carried out.11
WiederholungstestsRetestsUm sicherzustellen, dass der Fahrer während der Fahrt nüchternbleibt, erfordert das Gerät während der Fahrt die Abgabe zusätzlicher Atemtests (optional).— Es ertönt ein unterbrochener Ton, die gelbe Lampe blinkt und inder Anzeige erscheint » Wiederholtest BITTE BLASEN «. Atemtest genau wie beim Start des Fahrzeugs durchführen.— Der Fahrzeugmotor muss beim Wiederholungstest weiterhin laufen. Andernfalls wird ein Verstoß registriert. Wenn in der Anzeige » Test OK « erscheint, Gerät wieder an derHalterung befestigen und Fahrt fortsetzen.— Es erscheint die Anzeige » Gute Fahrt ! «.To make sure the driver stays sober while driving, the instrumentrequires to present additional breath tests while driving (optional).— When the instrument prompts a retest, it makes a beeping sound,the yellow lamp flashes and and the display shows » Retestrequired PLEASE BLOW «. Perform the breath test exactly as when starting the vehicle.— The motor shall be running while the retest is taken. Otherwise aviolation is registered. When the display shows » Test Passed «, put the instrument backon the holster and continue driving.— The message » Drive Safely ! « returns to the display.Wichtig:— Zur Abgabe des Wiederholungstests stehen mehrere Minuten zurVerfügung. In starkem Verkehr oder gefährlichen Situationen mit dem Wiederholungstest warten, bis der Atemtest sicher abgegeben werdenkann. Aus Sicherheitsgründen und aufgrund bestimmter gesetzlicherRegelungen sollte das Fahrzeug vor der Durchführung des Wiederholungstests außerhalb des Verkehrs an einem sicheren Ortgeparkt werden.Important:— There are several minutes to deliver the retest.12 In heavy traffic or in dangerous situations wait with the retest untilthe breath test can be delivered safely. For safety reasons and certain road laws, the vehicle should beparked off the road, away from traffic in safe position before presenting the retest.
MenüoptionenMenu OptionsDas Dräger Interlock XT bietet (je nach eingestellter Konfiguration) die Möglichkeit, folgende Optionen anzuzeigen:The Dräger Interlock XT offers (dependingon the set configuration) the possibility toshow the following options:» Zurück «» Start-Freigabe «» Service « mit Untermenü:» Zurück «» Nächster Service «» Service Telefon «» Handgerät Info «» Steuergerät Info «» Zugangs-Code «mit Untermenü:» Zurück «» Code eingeben «» Start-Freig. PIN «mit Untermenü:» Zurück «» PIN eingeben «» Datum, Uhrzeit «» Freigabezeiten «» Back «» Free start «» Service « with submenu:» Back «» Next Service «» Provider Info «» Handset Info «» Controlbox Info «» Access Code «with submenu:» Back «» Enter Code «» Free start PIN «with submenu:» Back «» Enter PIN «» Date and Time «» Non locked times «Interlock1OK2Zur Auswahl ist die Zündung des Fahrzeugseingeschaltet.Before selection the ignition of the vehicle isswitched on.11Menütaste "M" drücken. Durch Drücken der Tasten " l" und "q"Menüpunkt auswählen.Auswahl mit Taste "OK" bestätigen. Durch Drücken der Tasten " l" und "q"eventuell Untermenüpunkt auswählenund mit Taste "OK" bestätigen.Press menu button "M". Select menu item by pressing the buttons"l" and "q".Acknowledge choice with button "OK". Eventually select submenu item by pressing the buttons "l" and "q" and acknowledge with button "OK".200123697 1.eps213
Option "Start-Freigabe":Option "Free start":Bietet nach Eingabe einer PIN-Zahl die Möglichkeit, zum Beispiel fürEltern oder Aufsichtspersonen, das Fahrzeug ohne Abgabe einerAtemprobe zu starten. Der PIN muss vor jedem Motorstart ohneAtemtest erneut eingegeben werden.Offers the possibility after entering a PIN number to start the vehiclewithout delivering a breath sample, for example for parents or supervisors. The PIN code has to be entered again before each motor startwithout breath test.Die Grundeinstellung des Freigabe-PIN ist » 1234 « (Änderung desFreigabe-PIN, siehe Seite 16).The basic setting of the free start PIN is » 1234 « (change of the freestart PIN, see page 16). Option » PIN eingeben: « mit den Tasten "l" und "q" auswählen Select option » Enter PIN: « with the buttons "l" and "q" and ac- und mit Taste "OK" bestätigen.Die Anzeige zeigt » PIN eingeben: 0000 «.Gewünschte erste Ziffer mit den Tasten " l" und "q" einstellen.Mit der Taste "OK" bestätigen.Danach die nächste Ziffernstelle einstellen.Ablauf für alle Ziffernstellen wiederholen.Vollständige PIN-Zahl mit Taste "OK" nochmals bestätigen odermit der Taste "q" zur Eingabe zurückgehen. knowledge with button "OK".The display shows » Enter PIN: 0000 «.Select the desired first figure with the buttons "l" and "q".Acknowledge with button "OK".Afterwards set the next figure.Repeat the procedure for all figures.Acknowledge complete PIN number again with button "OK" or return to the enter state with the button "q".Option "Nächster Service":Option "Next Service":Zeigt das Datum und den Grund des nächsten Service an.— Nach der Anzeige: Bestätigung mit Taste "OK".Shows date and reason for next service.— After display: acknowledge with button "OK".Option "Service Telefon":Option "Provider Info":Zeigt die Telefonnummer des Servicezentrums und die eventuelleProgrammnummer des Gerätebenutzers an.— Nach der Anzeige: Bestätigung mit Taste "OK".Shows phone number of service center and eventual programnumber of instrument user.— After display: acknowledge with button "OK".14
Option "Handgerät Info":Option "Handset Info":Zeigt Seriennummer und Software-Version des Handgerätes an.— Nach der Anzeige: Bestätigung mit Taste "OK".Shows serial number and software version of handset.— After display: acknowledge with button "OK".Option "Steuergerät Info":Option "Controlbox Info":Zeigt Seriennummer und Software-Version des Steuergerätes an.— Nach der Anzeige: Bestätigung mit Taste "OK".Shows serial number and software version of control box.— After display: acknowledge with button "OK".Option "Zugangs-Code":Option "Access Code":Bietet für eine begrenzte Zeit nach Eingabe einer Codezahl die Möglichkeit, zum Beispiel in einer Werkstatt das Fahrzeug ohne Abgabeeiner Atemprobe zu starten. Zum Erhalt der Codezahl das Servicetelefon anrufen (sieheOption "Service Telefon", Seite 14) und folgende Informationenbereithalten:– Seriennummer des Handgerätes (siehe Option "HandgerätInfo"),– Datum und Uhrzeit, zu der die Codezahl eingegeben werdensoll.— Der Zugang ist (je nach Einstellung) maximal für 48 Stunden nachEingabe der Codezahl gültig.Offers for a limited time period the possibility after entering a codenumber to start the vehicle without delivering a breath sample forexample in a garage. For obtaining the code number call the phone number of theservice provider (see option "Provider Info", page 14) and have thefollowing information:– serial number of the handset (see option "Handset Info"),– date and time at which the code number has to be entered.— The access is (depending on setting) possible for a maximum of48 hours after entering the code number. Option » Code eingeben: « mit den Tasten "l" und "q" auswäh- —len und mit Taste "OK" bestätigen.Die Anzeige zeigt » Code eingeben: 0000 «.Gewünschte erste Ziffer mit den Tasten " l" und "q" einstellen.Mit der Taste "OK" bestätigen.Danach die nächste Ziffernstelle einstellen.Ablauf für alle Ziffernstellen wiederholen.Vollständige Codezahl mit Taste "OK" nochmals bestätigen odermit der Taste "q" zur Eingabe zurückgehen.Die Gültigkeit des Zugangs-Code kann durch Eingabe der Codezahl "0000" beendet werden. Select option » Enter Code: « with the buttons "l" and "q" and—acknowledge with button "OK".The display shows » Enter Code: 0000 «.Select the desired first figure with the buttons "l" and "q".Acknowledge with button "OK".Afterwards set the next figure.Repeat the procedure for all figures.Acknowledge complete code number again with button "OK" orreturn to the enter state with button "q".The validity of the access code can be finished by entering thecode number"0000".15
Option "Start-Freig. PIN":Option "Free start PIN":Bietet die Möglichkeit, den Freigabe-PIN zu ändern.Offers the p
The Dräger Interlock XT is a breath-alcohol measuring instrument with a vehicle "immobilizer". Before starting a vehicle equipped with the Dräger Interlock XT, the driver has to provide a breath sample. The Dräger Interlock XT measures the breath-alcohol concentration and stores the measured value, the starting attempt and any indica-