Transcription
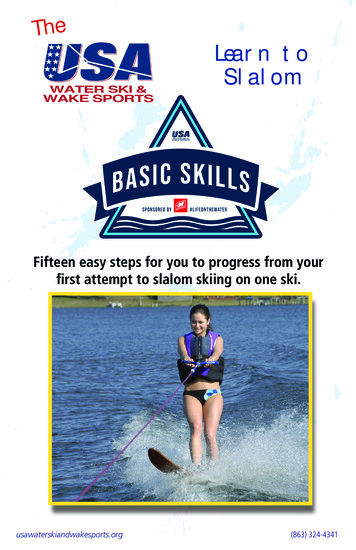
TheLearn toSlalomFifteen easy steps for you to progress from yourfirst attempt to slalom skiing on one ski.usawaterskiandwakesports.org(863) 324-4341
Level 1On land, demonstrate:The seven skier hand signalsPlacing feet in and adjusting bindingsHolding the handle properlyProper body position for startingProper body position while skiingExplain five of the 15 Skier Safety CodesandHals21nSig4ImportaAlwa nt safety ruys welear flo :tation53671. Speed up: The“thumbs-up” gesture indicates that the skier would like the speed increased.2. Slow down: The “thumbs-down” gesture indicates that the skier would like the speed decreased.3. OK: If the set speed or boat the path is good, the skier may use the OK signal.4. Turn: When either the skier or the driver wants the boat turned, a circle motion with the arm over the head withone finger in the air is used. It is usually followed by pointing in the direction of the turn.5. Back to the Dock: A pat on the head indicates that the skier would like to return to the dock.6. Cut Motor/Stop: A slashing motion with the hand across the neck indicates the boat is to stop immediately. Thissignal can be used by the skier, driver or observer.7. I’m OK (after a fall): This important signal indicates that a skier is OK after a fall. It consists of both hands claspedover the head. It should be used every time the skier falls.Water Skier’s Safety CodesRule 1: Always wear flotation. A properly fittedpersonal flotation device is designed to fit snugly, sothat it won’t slip up on the body during a fall. Therecommended type is a jacket or vest that covers thechest, abdomen and back.Rule 2: Always be sure your equipment is in goodcondition. Your personal safety and enjoyment dependon the equipment you use. Check your equipmentregularly. Be sure that your skis do not have sharp orprotruding surfaces that could cut or scrape the skier.Check towropes for frayed areas or broken bridles andhandles. Repair or replace damaged or unsafe articles.Rule 3: Don’t give the starting signal until ready. Makesure you are ready, the slack has been taken out ofthe rope and you are clear of any dangerous obstaclesaround you. Keep your ski tips up.Rule 4: Do not ski near docks, pilings, other boatsor swimmers. Always look ahead and be sure you areaware of your surroundings and where you are going atall times. Many water ski injuries result from collisionswith docks or other solid objects.Rule 5: Never put any part of your body through thehandle or wrap the line around yourself in any way.Rule 6: Never ski in shallow water or an area wherethere may be obstructions above or just beneath thesurface.Rule 7: When a fall is inevitable, try to fall backwardor to either side. A forward fall increases the chances ofcontact with the ski.Rule 8: Know and use the skier hand signals. It isparticularly important to use the skier’s “I’m OK” signalafter a fall if you are all right.Rule 9: If you fall in an area where there is other boattraffic, lift one ski half way out of the water. This willsignal to other boats that there is a skier in the water.Rule 10: Never ski to the point of excessive fatigue.Rule 11: Always ski during daylight, from sunrise toone-half hour after sunset.Rule 12: Never ski directly in front of another boat.Rule 13: Always use equal length ropes when skiingdouble.Rule 14: Always ensure that the motor is “off” when askier is entering and exiting the boat.Rule 15: Always have an observer in the towboat.usawaterskiandwakesports.org(863) 324-4341
Level 1On land, demonstrate:The seven skier hand signalsPlacing feet in and adjusting bindingsHolding the handle properlyProper body position for startingProper body position while skiingExplain five of the 15 Skier Safety CodesPlacing Feet In Bindings And AdjustingHow To Properly Hold The HandleFor two skis, use the knuckles up grip; for one ski, use the baseball grip (with either hand up).Proper Body Position For StartingDemonstrate proper cannonballbody position on land beforeentering the water to get theproper feel. Hold the handle andhave a partner pull on the rope slightlyto help pull you up. This will give you the feelingof being pulled up by the boat. While practicingthis task, make sure your knees are together atall times, and stay in the cannonball position asshown in the picture. Let the boat do the workfor you rather than trying to do the work yourself.Proper Body Position While SkiingBe sure to remain in the chair positionat all times while on the water. Thiswill ensure proper posture. You shouldhave your arms straight and shouldersup.usawaterskiandwakesports.org(863) 324-4341
Level 2 Two-Ski StartsComplete a deep-water start and maintain the proper two-ski body position for three seconds.Place the rope and handle between your skis. When ready, signal the driverto begin accelerating. Let the boat slowly pull you up. DO NOT try to pullyourself out of the water by pulling in with your arms. When you feel theboat begin to pull you up, slowly rise to a sitting position using your legs.Once up, maintain the proper body position of arms straight, knees bent andflexible and keep your head up, looking toward the boat.Practicing on land will speed the learning process2 Tip:NT Level ight,ATROPaIMArms StrKeep your , Head UpntKnees BeLevel 3 Two-Ski BalanceMaintain proper two-ski body position for 20 seconds.Place emphasis on the proper two-ski body position: head up,arms straight and knees bent and put some downward pressure on the handle.Suggested Towboat SpeedsApproximate Weight Less thanOf Skier50 lbs.Two-Ski Speeds13 mphOne Ski Speeds16 mph50 to100 lbs.18 mph22 mph100 to150 lbs.22 mph26 mph150 to180 lbs.25 mph.30 mph.usawaterskiandwakesports.org180 lbs.or more28 mph32 mph(863) 324-4341
Level 4 Two-Ski SteeringSteer back and forth in control inside the wakesInitiate each turn by putting more pressure on the inside edge of the ski opposite to the directionyou want to go. Example, to turn right, lean to your right and apply more pressure on your left ski.Releasing pressure on one foot while placing pressure on the other foot will allow you to go in thedirection you want to go. For example: unweightingthe left foot while placing pressure on the right footwill allow you to turn toward the left wake.Level 5 Two-Ski Wake CrossingCross over to the outside of the boat wakes on one side only and return to thecenter of the wakes.Cross the wakes by turning both skis at a sharp angle to thewakes and bend your knees to absorb the shock. Crossing one skiat a time with not enough angle will result in a fall.Try to cross the wake at an angle. Turn toward thewake and keep pressure on the ski closest to theboat (furthest away from the wake) until you are wellover the wake. Trying to go over the wake slowlywill result in a fall.Level 6 Two-Ski Wake CrossingLeave the center of the boat wakes onone side and cross the wakes one time.The most common mistake for a skier is to pullon the handle while crossing the wakes. Keepyour arms straight, and knees bent and together. Continue to maintain the chair position.Level 7 Two-Ski Wake CrossingComplete seven wake crossings in 60 seconds or less.Continue to emphasize proper body position.usawaterskiandwakesports.org(863) 324-4341
Level 8 Two-Ski, One-Foot BalanceInside the boat wakes, lift one ski clear of the waterand hold it in the air for five seconds.Shift all your weight to one foot, then lift the oppositefoot. Lift your knee to keep the tip of the ski fromdragging in the water.Which foot are you most comfortable standing on? This will becomeyour dominant foot that you’ll put on the front of the slalom ski. Ifnecessary, stand on both feet and have a partner give you a slightpush from behind. Whichever foot you step with first is generally yourdominant foot.Level 9 The Transition, Two Skis to OneInside the boat wakes, drop one ski and ride on the other for five secondsShift your weight to one foot and lift the heel of your other foot from the binding. Slowly movethe ski back with your toes pointed down. The water will pull the ski away.footthe ski is off, bring the freeIMPORTANT Level 9 Tip: Whentilunyleg and move it down slowlingndstauryooffcalthetobehind your standing foot.it is resting on the ski rightMake sure you have an adjustable binding on the drop ski. Adjust thisbinding so you can lift the heel out easily. Place this ski on the lessdominant foot. This will be the ski you kick off. Once you kick off theski, continue to drag your toe in the water for a few seconds and slowlyslide your foot into the back binding.usawaterskiandwakesports.org(863) 324-4341
Level 10 One Ski SteeringSteer back and forth in control inside the boat wakesInitiate the turn by leaning slightly to the side and while bringing the handletowards your hips to move in the direction you want to go.”Before you attempt this maneuver, besure to demonstrate the proper pulling position on land. You want your arms straightand hips to the handle. You should alwayslean with your shoulders to the side ratherthan back or forward. To initiate each turn,bring your hips to the handle while pointingthe tip of the ski toward the wakes. Continue to maintain proper body position.Level 11 One Ski, Deep-Water StartComplete a one ski, deep-water startBend the knee of your ski leg until it is touching your chest. Place the rope on the inside of the ski.Bend the knee of your free leg and use it as a stabilizer. As the boat begins pulling you, yourshoulders should slowly move up and slightly back to keep your weight over the center of the ski. Tomaintain your balance, drag your free leg and keep the tip of the ski in line with the boat.As you begin to rise, DO NOT push the ski out from under your body. Let the water push the ski toyou. Maintain the basic start position as the ski lifts you out of the water and stay low with yourweight over the ski. Use your free foot as a stabilizer.Right-foot forward skiers should have the rope onthe left side of the ski and vice versa for left-foot forward skiers. Some skiers have more control puttingtheir back foot in the binding as well. This is basedon comfort and control for the skier. Be sure to letthe boat do the work pulling you up.usawaterskiandwakesports.org(863) 324-4341
Level 12 One Ski Wake CrossingCross over to the outside of the boat wakes on one side only and return to the centerMaintain proper body position. You should be wellbalanced and leaning to the side rather than back orforward. Make sure your shoulders are up with hips closeto the handle; and, when you cross the wakes, use yourknees to absorb the wakes. To initiate the turn, in orderto prevent slack, turn the tip of the ski toward the wakesand slowly bring your hips towards the handle.Level 13 One Ski Wake CrossingsLeave the center of the boat wakes on one side andcross both wakes and return to the center one time.Level 14 One Ski Wake CrossingsLeave the center of the boat wakes on one side andcomplete seven crossings of both boat wakes in 60seconds or lessContinue to emphasize properbody position and lean away fromthe boat. Make sure you’re using(bending) your knees and not pulling on the rope (keeping your armsstraight).Level 15 One Ski Wake CrossingsCross both boat wakes seven times in 45 seconds or less.Congratulations!You are now a slalom skier!For additional information, go tousawaterskiandwakesports.org or contact us at:USA Water Ski1251 Holy Cow RoadPolk City, Fla. 33868Phone: (863) 324-4341E-mail: iandwakesports.org(863) 324-4341
How To Properly Hold The Handle For two skis, use the knuckles up grip; for one ski, use the baseball grip (with either hand up). Placing Feet In Bindings And Adjusting Level 1 On land, demonstrate: The seven skier hand signals Placing feet in and adjusting bindings Holding the handle properly Proper body position for starting