Transcription
4K Vertex² 18GbpsUser Manual 4K Vertex² Rev 1.00
24K Vertex² – User ManualDisclaimer: 3rd party and/or custom firmware providing extra features are not covered in this manual.
34K Vertex² – User ManualTable of contentVertex² Overview . 5Connecting Cables to Vertex² . 6Vertex² Power/Status OLED . 7Vertex² Menu/Toggle Button . 8Vertex² Info/Exit Button. 9Vertex² Out1/Up Button . 10Vertex² Out0/Down Button . 11Help on Jack connections . 12Help on AUDIO/CEC/ARC/eARC connections . 13Vertex² OLED Menu . 14Accessing Vertex² Web Server . 16Vertex² Web Server Top section . 17Vertex² Web Server INFO Section . 18Vertex² Web Server EDID Section . 19List of Custom EDID available. . 20Vertex² Web Server SCALER Section . 24Vertex² Web Server HDR/DV Section. 26Vertex² Web Server OSD Section . 30Vertex² Web Server CEC/RS232 Section . 32Vertex² Web Server MACROS Section . 34Vertex² Web Server CONFIG Section . 35Updating your Vertex² Firmware via web browser . 38CONFIG Export section of web server. 40RS232 and IP/Telnet Command List. 45IR Code List . 55FAQ. 99Highlight Hardware Features: . 102Highlight Video Features:. 103Highlight Audio Features: . 104Highlight Convenience Features: . 105Highlight HDCP Features: . 106Disclaimer: 3rd party and/or custom firmware providing extra features are not covered in this manual.
44K Vertex² – User ManualMain Specifications . 107Supported Audio/Video Signals . 108Technical Specifications . 108Certifications . 109Pro Tips . 110Disclaimer: 3rd party and/or custom firmware providing extra features are not covered in this manual.
54K Vertex² – User ManualVertex² OverviewTeam HDfury would like to thank you personally for purchasing the 4K Vertex²!This unique HDMI2.0b device supports up to 4 inputs for true full 4K60 4:4:4 600MHz 18Gbps bandwidthsignals. It will allow you to solve any HDCP error, extract full HDMI audio from any HDMI sources and upto Atmos HBR over TrueHD from eARC TVs to feed older AVR and Matrix any SD/HD/FHD/UHD/HDR/DVor PC signals up to 600MHz. Upscale to 4K or downscale to 1080p any channel individually, displayrelevant information on OLED/OSD, select between multiple edid banks for each inputs. Inject, replaceor translate HDR metadata and AVI infoframe. It is also capable of auto switching any sources includingX1X, ATV4K, Shield, etc Based on incoming content type it can send relevant RS232 commands to anyRS232 controllable display. Control can be completed with IR codes, push buttons on the unit, via IP orRS232 (MAC/WIN/Linux) or through embedded Webserver (for any web browser based device such asMAC/WIN/Linux computer or Android/iOS phones, tablets and others).Additionally, Vertex² offers a unique 5V management at output to solve standby issue of any sinks.Disclaimer: 3rd party and/or custom firmware providing extra features are not covered in this manual.
64K Vertex² – User ManualConnecting Cables to Vertex² HDMI/HDCP 1.x devices must be connected to 1080p Downscale TX1 Outputport. Make sure that you are using 600MHz certified or tested HDMI 4K cable if youplan to set up a 4K60 4:4:4 8b/ 4K60 4:2:2 12b 600MHz/18Gbps link in your setup. Connect Power connector from Power supply (110-240V 1.2A IN & 12V 1A OUT). Connect a source via HDMI input cable to ANY HDMI input. Connect any other HDMI, sound, IR or RS232 cable that you might need (optional) HDMI cable must support 18Gbps if any 18Gbps source/sink is connected (except for Audio Out)Disclaimer: 3rd party and/or custom firmware providing extra features are not covered in this manual.
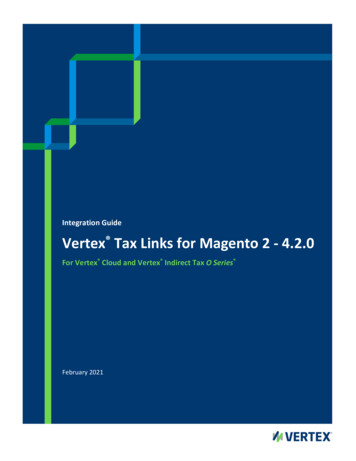
74K Vertex² – User ManualVertex² Power/Status OLEDThe Vertex² OLED will turn ON when power supply is applied; Vertex² Logo will be displayed followed bya similar default infopage to the one represented below.[192.168.1.117]: Vertex² IP address will be displayed here if LAN CONTROL RJ45 output is connected toyour LAN/WAN router/switcher. mDNS and other way are available if you cycle OLED infopage.[FW: 0.6]: Firmware Version of Vertex² is reported here.If any active input is connected, the default OLED infopage will indicate which input is active (IN1 onabove pic). Vertex² will process handshake with the active input and once completed the signalinformation will be displayed. 4K50 4:2:2 BT2020 12b LLDV 594MHz 2.2 on above pic.If any sink is connected at TX0 output, TX0 section of the default OLED infopage will report its EDIDname (LG TV on above pic) and its max supported resolution (4K60 4:4:4 8b BT2020 HDR on above pic)on the first line. Second line will display the current signal going to it, the small arrow on the rightindicate if signal is Upscaled , Downscaled or passing thru untouched [OLED OFF]: Insufficient power, OLED timer expired (default 30s) or OLED OFF. Use the Vertex² powersupply; press any button if OLED timer expired and make sure the OLED is ON (refer to p.35).[OLED ON]: The Vertex² unit is receiving power and is ready to accept an HDMI signal.Disclaimer: 3rd party and/or custom firmware providing extra features are not covered in this manual.
84K Vertex² – User ManualVertex² Menu/Toggle ButtonThe 4K Vertex² offers 2 functions per push button.[MENU] Wake up from sleep/fade mode and/or Enter Vertex² OLED MENU.[TOGG] When you are in Vertex² OLED MENU, the TOGGLE button allows you to change and cycle anysetting value.Note: You can also control and change settings with IR codes, through IP Control or RS232 forMAC/WIN/Linux or from the embedded Webserver for MAC/WIN/Linux PC or via Android/iOSsmartphone/tablet or any web browser based device.Disclaimer: 3rd party and/or custom firmware providing extra features are not covered in this manual.
94K Vertex² – User ManualVertex² Info/Exit ButtonThe 4K Vertex² offers 2 functions per push button.[INFO] Wake up from sleep/fade mode and/or Cycle OLED infopage: INFO LAN INFO HDR INFO [EXIT] When you are in Vertex² OLED MENU, the EXIT button allows you to exit OLED MENU.Note: You can also control and change settings with IR codes, through IP or RS232 for MAC/WIN/Linuxor from the embedded Webserver for MAC/WIN/Linux PC or via Android/iOS smartphone/tablet or anyweb browser based device.Disclaimer: 3rd party and/or custom firmware providing extra features are not covered in this manual.
104K Vertex² – User ManualVertex² Out1/Up ButtonThe 4K Vertex² offers 2 functions per push button.[OUT1] Wake up from sleep/fade mode and/or set and switch active or inactive inputs for TX1 output.[UP] When you are in Vertex² OLED MENU, the UP button allows you to navigate upward.Vertex² OLED/OSD will report info for up to two active inputs in default Matrix mode.Note: You can also control and change settings with IR codes, through IP or RS232 for MAC/WIN/Linuxor from the embedded Webserver for MAC/WIN/Linux PC or via Android/iOS smartphone/tablet or anyweb browser based device.Disclaimer: 3rd party and/or custom firmware providing extra features are not covered in this manual.
114K Vertex² – User ManualVertex² Out0/Down ButtonThe 4K Vertex² offers 2 functions per push button.[OUT0] Wake up from sleep/fade mode and/or set and switch active or inactive inputs for TX0 HDMIoutput.[DOWN] When you are in Vertex² OLED MENU, the DOWN button allows you to navigate downward.Vertex² OLED/OSD will report info for up to two active inputs in default Matrix mode.Note: You can also control and change settings with IR codes, through IP or RS232 for MAC/WIN/Linuxor from the embedded Webserver for MAC/WIN/Linux PC or via Android/iOS smartphone/tablet or anyweb browser based device.Disclaimer: 3rd party and/or custom firmware providing extra features are not covered in this manual.
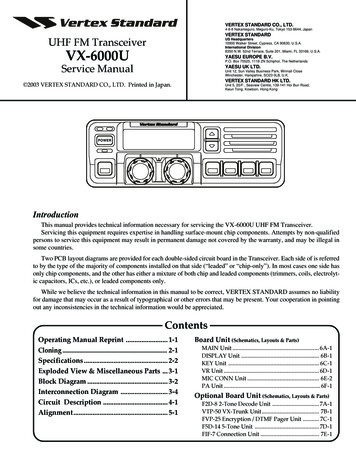
124K Vertex² – User ManualHelp on Jack connectionsINPUT JACKINPUT IRWINDOWFor local Vertex²Central control. Asystem controller willconnect an IR TX LEDon top here.ADD ON IN/OUTNot yet used.For a directconnection fromsystem controller.It does not useLED/Light. For localVertex² Centralcontrol.FRONTBACKINPUT IR JACKFor an IR RX cable with LEDreceiver. In case, for example,if IR window is not in line ofsight. For Vertex² Centralcontrol.RS232 IN/OUTControl Vertex² fromMac/Win/Linux computer orcommand any RS232 capabledisplay or equipment basedon incoming signal types.SPDIF or L/R AnalogOUTExtract HDMI sound comingfrom any source devices atVertex² inputs. SPDIF can alsooutput ARC from TX0Disclaimer: 3rd party and/or custom firmware providing extra features are not covered in this manual.
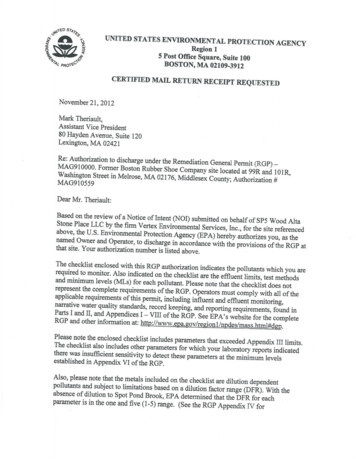
134K Vertex² – User ManualHelp on AUDIO/CEC/ARC/eARC connectionsCEC Master is always TX0eARC LINKVertex² can extract up to AtmosHBR over TrueHD from capableeARC TV connected at TX0 andoutput it via AUDIO OUT to feedany AVR input capable of decodingsuch format.FRONTBACKOLDER AVR/SINKOUTPUTAny 1080p HDR or SDR onlycapable equipment can beconnected to this output and getfull HDMI sound and video.Make sure the EDID presented byVertex² to the sources at inputsreflects its audio capabilities.HDMI AUDIOOUTPUTSelf-generated 720p/1080pvideo signal that can includefull audio from:Any source devices at Vertex²inputs, eARC or ARC from TX0.SPDIF or L/RAnalog OUTExtract HDMI soundcoming from any sourcedevices at Vertex² inputs.SPDIF can also output ARCfrom TX0.No Audio format manipulation.Vertex² cannot manipulate Audio and otherwise transform Audio format, what comes IN goes OUT untouched.Therefor if you plan to extract STEREO, incoming signal from HDMI source at Vertex² inputs should be STEREO.If incoming signal from HDMI inputs are superior to STEREO (ex ATMOS) then STEREO output cannot be used.Disclaimer: 3rd party and/or custom firmware providing extra features are not covered in this manual.
144K Vertex² – User ManualVertex² OLED MenuAUTOSWITCHYESNOAUTOSWITCH PRIORITYYESNOEDID MODECUSTOMCOPY TX1COPY TX0AUTOMIXFIXEDEDID TABLEEDID 0EDID 1EDID 2EDID 3EDID ALGO4-MAX ALL0-NORMAL1-MAX AUDIOPRIO TX0PRIO TX1Press MENU once to enterVertex² OLED Menu.Once you are in Vertex² OLEDMenu press the same menuto TOGGLE choiceSCALE MODENONEAUTOCUSTOMMUTE TX0 AUDIOONOFFMUTE TX1 AUDIOONOnce you are in the Vertex²OLED Menu. Press the UPbutton to navigate upward.OFFHDCPAUTO1.4CECONOFFCEC LA0-VIDEO [0x0E]1-AUDIO [0x05]Once you are in the Vertex²OLED Menu. Press DOWNbutton to navigate downwardARC HBRONOFFBAUD RATE1-192002-576003-1152004-9600DHCPONOFFANALOG VOLUME0 [-30/ 10]ANALOG BASS0 [-10/ 10]ANALOG TREBLE0 [-10/ 10]To EXIT the Vertex² OLEDMenu. Press EXIT button or letmenu idle for a while and itwill EXIT automatically.Disclaimer: 3rd party and/or custom firmware providing extra features are not covered in this manual.
154K Vertex² – User Manual[Autoswitch] :[Autoswitch Priority]:[EDID Mode]:[EDID TABLE]:[EDID Algo]:[SCALE Mode]:[Mute TX0 Audio ]:[Mute TX1 Audio]:[HDCP]:[CEC]:[CEC LA]:[ARC HBR]:[Baud Rate]:[DHCP] :[Analog Volume] :[Analog Bass]:[Analog Treble]:ON/OFFON/OFFCustom / Copy TX1/Copy TX0/Automix/FixedEDID 0/EDID 1/EDID 2/EDID 34-Max All / 0-Normal / 1-Max Audio / Prio TX0 / Prio TX1None / Auto / CustomON / OFFON / OFFAUTO / 1.4ON / OFF0-Video [0x0E] / 1-Audio [0x05]ON/OFF1-19200 / 2-57600 / 3-115200 / 0-9600ON/OFF0 [-30 / 10]0 [-10 / 10]0 [-10 / 10]Disclaimer: 3rd party and/or custom firmware providing extra features are not covered in this manual.
164K Vertex² – User ManualAccessing Vertex² Web ServerIt is mandatory for accessing Vertex² web server to have an Ethernet cable connected between LANCONTROL RJ45 connector and your local router or switcher.By default Vertex² use DHCP to retrieve an assigned IP automatically. You can set static IP from theVertex² webserver config page.In case you have setup a wrong Static IP and unit is not reachable anymore, you can set DHCP ON fromOLED menu to retrieve access via dynamically assigned IP again (as in default mode).There is 3 ways of accessing the Vertex² web server:1. Universal way through IP address:Simply open up a web browser on any devices located on the same network than the Vertex²unit and type in the IP address that appears on the Vertex² OLED directly in the address bar ofyour web browser. (ex: 192.168.1.137)2. Hostname access:Instead of typing IP address directly, you can use the Hostname listed on Vertex² OLED LAN INFOpage (press INFO button to cycle OLED page till you see LAN INFO and Hostname listed).Simply open up a web browser from any devices located on the same network than the Vertex²unit and type in the Hostname that appears on the Vertex² OLED directly in the address bar ofyour web browser. (ex: http://VERTEX2-XX/)XX represents the 2 last digits of your Vertex² unit unique serial number.3. mDNS access:For iOS/MAC devices, you might want to use mDNS access. Retrieve the mDNS address fromVertex² OLED LAN INFO page (press INFO button to cycle OLED page till you see LAN INFO andmDNS address listed). Simply open up a web browser on any MAC/iOS devices located on thesame network than the Vertex² unit and type in the mDNS address that appears on the Vertex²OLED directly in the address bar of your web browser. (ex: http://VERTEX²-XX.local/)XX represents the 2 lasts digits of your Vertex² X unit unique serial number.Please note that only IP address access is universal and should work across any web browser baseddevices as long as they are located on the same network. Others methods should work just fine in manycases but we cannot guarantee that they will always do, in case of issue accessing the webserver, pleaseuse IP address.Disclaimer: 3rd party and/or custom firmware providing extra features are not covered in this manual.
174K Vertex² – User ManualVertex² Web Server Top sectionImmediately upon accessing the webserver you will end up on the default INFO page with the above toptier section displayed.From that top tier section you will be able to retrieve the following information (also displayed onVertex² OLED default page and once you cycle info page with INFO button to reach LAN page info).Hostname: Display Vertex² hostname for URL accessmDNS: Display Vertex² mDNS for URL accessIP Address: Display the current IP Address of the Vertex²FW: Display the current FW running on the Vertex². (ex 0.22)Disclaimer: 3rd party and/or custom firmware providing extra features are not covered in this manual.
184K Vertex² – User ManualVertex² Web Server INFO SectionSOURCE: When available, Display active source name currently outputting thru TX0 or TX1 output.IN TX0/IN TX1: Display the source name original video signal going thru TX0 or TX1 output.VIDEO TX0/TX1: Display the real video signal (if any operation on it) going out thru TX0 or TX1 output.AUDIO TX0/TX1: Display the audio signal info going out thru TX0 or TX1 output.EDID TX0/TX1: Display the EDID max capabilities of any connected sink at TX0 or TX1 output.PORT SELECTOR: Allow you to select which input is routed to TX0 or TX1 output.REFRESH: Refresh the current page.Disclaimer: 3rd party and/or custom firmware providing extra features are not covered in this manual.
194K Vertex² – User ManualVertex² Web Server EDID Section[COPY TX0 SINK]: Use EDID from the device connected at TX0 output.[COPY TX1 SINK]: Use EDID from the device connected at TX1 output.[FIXED EDID]: Use a 4K60 4:2:0 8b 300MHz 2ch Audio EDID.[CUSTOM]: Define individual EDID for each input from a list of 10 custom and 90 predefined EDID.[AUTOMIX]: Use dynamic EDID created by a choice of 5 EDID Algo and 14 EDID Flags.[DOWNLOAD ACTIVE EDID TABLES]: Download any EDID from any inputs or outputs.[UPLOAD EDID TABLES]: Select an EDID file and a Custom EDID Table# click SEND EDID to upload it.[REFRESH]: Refresh the current page.Disclaimer: 3rd party and/or custom firmware providing extra features are not covered in this manual.
204K Vertex² – User ManualList of Custom EDID available.User can select an EDID from all below EDID tables or force the creation of an Automix EDID with belowoptions.[FIXED EDID with L/R stereo]This mode is a 4K60 4:2:0 8b 300MHz stereo EDID table. It can be used as a security EDID to ensure apicture in every setup/situation. (Except for FHD and 4K30 Max sink device)[CUSTOM USE]Pick and use EDID from a selection of preloaded EDID tables or load any EDID bank of your choice. Bydefault the selected EDID table is a 4K60 4:4:4 600MHz with Full Audio capabilities. When you select anEDID bank from the dropdown list of 100 different EDID tables available, there is nothing else to do,once you click one, the EDID of your choice will be loaded and HPD events will reset the signal to presentyour selected EDID automatically. Each input can have an individual EDID OM 1 [Default FULL no DV] Full Sound 3DCUSTOM 2 [FULL LG DV] Full Sound 3DCUSTOM 3 [FULL VIZIO DV] Full Sound 3DCUSTOM 4 [Q9FN ALLM VRR HDR10 ] Full Sound 3DCUSTOM 5 [SONY A1 LLDV V2] Full Sound 3DCUSTOM 6 [LG35C7 DV V1] Full Sound 3DCUSTOM 7 [VIZIO M50E1 DV V0] Full Sound 3DCUSTOM 8 [LG C8 LLDV] Full SoundCUSTOM 9CUSTOM 104K60-444 600MHz HDR BT2020 All Sound4K60-444 600MHz HDR BT2020 SPDIF4K60-444 600MHz HDR BT2020 Stereo4K60-444 600MHz BT2020 All Sound4K60-444 600MHz BT2020 SPDIF4K60-444 600MHz BT2020 Stereo4K60-444 600MHz All Sound4K60-444 600MHz SPDIF4K60-444 600MHz Stereo4K50-444 600MHz HDR BT2020 All Sound4K50-444 600MHz HDR BT2020 SPDIF4K50-444 600MHz HDR BT2020 Stereo4K50-444 600MHz BT2020 All Sound4K50-444 600MHz BT2020 SPDIF4K50-444 600MHz BT2020 Stereo4K50-444 600MHz All Sound4K50-444 600MHz SPDIF4K50-444 600MHz Stereo4K60-420 12bit HDR BT2020 All Sound4K60-420 12bit HDR BT2020 SPDIF4K60-420 12bit HDR BT2020 Stereo4K60-420 12bit BT2020 All SoundDisclaimer: 3rd party and/or custom firmware providing extra features are not covered in this manual.
214K Vertex² – User 4K60-420 12bit BT2020 SPDIF4K60-420 12bit BT2020 Stereo4K60-420 12bit All Sound4K60-420 12bit SPDIF4K60-420 12bit Stereo4K60-420 8-bit 300MHz HDR BT2020 All Sound4K60-420 8-bit 300MHz HDR BT2020 SPDIF4K60-420 8-bit 300MHz HDR BT2020 Stereo4K60-420 8-bit 300MHz BT2020 All Sound4K60-420 8-bit 300MHz BT2020 SPDIF4K60-420 8-bit 300MHz BT2020 Stereo4K60-420 8-bit 300MHz All Sound4K60-420 8-bit 300MHz SPDIF4K60-420 8-bit 300MHz Stereo4K30-444 300MHz HDR BT2020 All Sound4K30-444 300MHz HDR BT2020 SPDIF4K30-444 300MHz HDR BT2020 Stereo4K30-444 300MHz BT2020 All Sound4K30-444 300MHz BT2020 SPDIF4K30-444 300MHz BT2020 Stereo4K30-444 300MHz All Sound4K30-444 300MHz SPDIF4K30-444 300MHz Stereo4K30-RGB 300MHz HDR BT2020 ALL audio4K30-RGB 300MHz HDR BT2020 SPDIF4K30-RGB 300MHz HDR BT2020 Stereo4K30-RGB 300MHz BT2020 ALL audio4K30-RGB 300MHz BT2020 SPDIF4K30-RGB 300MHz BT2020 Stereo4K30-RGB 300MHz ALL audio4K30-RGB 300MHz SPDIF4K30-RGB 300MHz Stereo4K24-422 12-bit HDR BT2020 All Sound4K24-422 12-bit HDR BT2020 SPDIF4K24-422 12-bit HDR BT2020 Stereo4K24-422 12-bit BT2020 All Sound4K24-422 12-bit BT2020 SPDIF4K24-422 12-bit BT2020 Stereo4K24-422 12-bit All Sound4K24-422 12-bit SPDIF4K24-422 12-bit Stereo1080p60-444 12-bit HDR BT2020 All Sound1080p60-444 12-bit HDR BT2020 SPDIF1080p60-444 12-bit HDR BT2020 Stereo1080p60-444 12-bit BT2020 All Sound1080p60-444 12-bit BT2020 SPDIF1080p60-444 12-bit BT2020 Stereo1080p60-444 12-bit All SoundDisclaimer: 3rd party and/or custom firmware providing extra features are not covered in this manual.
224K Vertex² – User .96.97.98.99.100.1080p60-444 12-bit SPDIF1080p60-444 12-bit Stereo1080p24-444 12-bit HDR BT2020 All Sound1080p24-444 12-bit HDR BT2020 SPDIF1080p24-444 12-bit HDR BT2020 Stereo1080p24-444 12-bit BT2020 All Sound1080p24-444 12-bit BT2020 SPDIF1080p24-444 12-bit BT2020 Stereo1080p24-444 8-bit All Sound1080p24-444 8-bit SPDIF1080p24-444 8-bit Stereo1080i60-444 8-bit All Sound1080i60-444 8-bit SPDIF1080i60-444 8-bit Stereo720p60-444 8-bit All Sound720p60-444 8-bit SPDIF720p60-444 8-bit Stereo480p60-444 8-bit All Sound480p60-444 8-bit SPDIF480p60-444 8-bit Stereo[Automix Mode]:Create EDID based on mutual capabilities from sinks connected at output so it will always show a pictureand audio (ideal for pass thru). Some Flags can be checked or unchecked so you can force and overridesome parameters to match your needs. Ex: If your TV is stereo and your AVR full sound and both areconnected to Vertex² outputs port, then depending of the algo in use, for some of them at least, bydefault, Automix will report Stereo as sound capabilities, by checking Full Audio flag you will forceAutomix to always report Full Audio no matter the real sound capabilities of the connected sink devices.Enforceable flags available in Automix mode:AUDIO Flags: 2.0 Stereo, 5.1 Multi, 7.1 Full Sound, TX0, TX1, Audio OutHDR Flags: HDR10 , HLGCOLOR Flags: BT.2020/xvYcc, YCbCr Remove, 3D RemoveDV Flags: DV Force Metadata, DV Remove, DV Limit 300MHz[2.0 Stereo]: Force the mixed EDID to present stereo sound capabilities.[5.1 Multi]: Force the mixed EDID to present 5.1 multi-channel sound capabilities.[7.1 Full]: Force the mixed EDID to present Full 7.1 sound capabilities.[TX0]: Force the mixed EDID to present the max audio capabilities from sink at TX0 output.[TX1]: Force the mixed EDID to present the max audio capabilities from sink at TX1 output.[AUDIO OUT]: Force the mixed EDID to present the max audio capabilities from sink at Audio output.[HDR 10 ]: Force the mixed EDID to present HDR10 support.[HLG]: Force the mixed EDID to present the HLG support.[2020/xvYCC]: Force the mixed EDID to present BT2020 and xvYCC support.[no YCbCr]: Force the mixed EDID to present no support for YCbCr (useful to force RGB).[no 3D]: Force the mixed EDID to present no support for 3D.[DV Force Metadata]: Force the mixed EDID to present Dolby Vision support.Disclaimer: 3rd party and/or custom firmware providing extra features are not covered in this manual.
234K Vertex² – User Manual[DV Remove]: Force the mixed EDID to present no support for Dolby Vision.[DV Limit 300MHz]: Force the mixed EDID to only present support for Dolby Vision at 300MHz.Selectable algorithms available in Automix mode:-Min Mixed Capabilities-Max Audio/Min Video-TX0 Output Priority-TX1 Output Priority-Max Audio/Max VideoNote: All options are also available via IR/IP or RS232Disclaimer: 3rd party and/or custom firmware providing extra features are not covered in this manual.
244K Vertex² – User ManualVertex² Web Server SCALER Section[No Scaling]: Set your unit to No Scaling for the signal to pass-through untouched[Custom Scaling]: Set your Vertex² unit to Custom Scaling to manually define the scaling parameters.You can select between various type of resolutions, color space and deep color settings for TX0 Upscaleoutput port and TX1 Downscale port.Available Color Space options: Follow Input (default), RGB FULL, RGB BT2020, 4:4:4 BT.709, 4:4:4BT2020, 4:2:2 BT.709, 4:2:2 BT2020, 4:2:0 BT.709, 4:2:0 BT2020.Available Deep Color options: Follow Input (default), 8-bit/24-bit, 10-bit/30-bit, 12-bit/36-bit, 16-bit/48bitAvailable 1080P60 Upscale options: SCALE to 4K60, REMAIN 1080P60Available 1080P30 Upscale options: SCALE to 4K30, REMAIN 1080P30Available 4K60 Downscale options: REMAIN 4K60, SCALE to 1080P60Available 4K30 Downscale options: SCALE to 4K30, SCALE to 1080P30Disclaimer: 3rd party and/or custom firmware providing extra features are not covered in this manual.
254K Vertex² – User Manual[SEND]: Upload your custom scaling changes to the Vertex² unit.[Auto Scaling]: Set your unit to Auto Scaling to use automatic pre-sets for TX1. By default unit will useauto-sense.[TX1 4K60 SDR PRESET]: This forces any 4K50 or 4K60 input to come out as 4K60 420 8bit 300MHz or1080p60 444 12-bit or 1080p60 444 8-bit. A neat profile for people who only have a 300MHz displaywith 4K60 420 8-bit support or older HDMI revision equipment that only support 1080p (deep color ornot). If EDID allows the player to send HDMI 2.0 formats, they will be accepted by the display due toVertex² scaling/chroma changes.[TX1 4K60 HDR PRESET]: This forces 4K50 and 4K60 422 HDR input to come out as 4K60 420 12-bit, 4k60420 8-bit 300MHz or 1080p60 444 12-bit or 1080p60 444 8-bit. A neat profile for people who only havea 300MHz display with 4K60 420 10 or 8-bit support. If EDID allows the player to send HDMI 2.0 formats,such as all HDR modes, they will be accepted by the display due to Vertex² scaling/chroma changes.[TX1 4K30 PRESET]: This forces any 4K24/25/30 to come out as 4K24/25/30 444/RGB 8-bit 300MHz,1080p30 444 12-bit or 4K24/25/30 422 12-bit 300MHz. A neat profile if you have a 300MHz display. IfEDID allows the player to send HDMI 2.0 formats, they will be accepted by the display due to Vertex²scaling/chroma changes.[TX0 NO UPSCALING]: By default when using Auto Scaling, Vertex² will upscale TX0 when possible, todisable this behavior or to let the sink/display performs the upscaling, you can check this option.[REFRESH]: Refresh the current page.Disclaimer: 3rd party and/or custom firmware providing extra features are not covered in this manual.
264K Vertex² – User ManualVertex² Web Server HDR/DV SectionDisclaimer: 3rd party and/or custom firmware providing extra features are not covered in this manual.
274K Vertex² – User Manual[CAPTURED HDR METADATA]: If the source at input is sending HDR InfoFrame metadata then theinformation is captured, extracted and displayed in this text box. HDR metadata is also deciphered anddisplayed in human readable format.[CUSTOM HDR METADATA GENERATOR]: This section will allow you to create your own custom HDRmetadata and inject it on the current signal by adding it or replacing the existing HDR metadata.[Use custom HDR for TX0 and TX1]: Unchecked by default, once activated it wil
Disclaimer: rd 3 party and/or custom firmware providing extra features are not covered in this manual. 8 4K Vertex² - User Manual Vertex² Menu/Toggle Button The 4K Vertex² offers 2 functions per push button. [MENU] Wake up from sleep/fade mode and/or Enter Vertex² OLED MENU. [TOGG] When you are in Vertex² OLED MENU, the TOGGLE button allows you to change and cycle any