Transcription
Chapter 4Signal Acquisition (Recording)About this chapterThis chapter describes how to acquire (digitize) signals with Raven, andassumes that you are familiar with basic Raven concepts and operations asdescribed in earlier chapters.In order to make good recordings with Raven, you should be acquaintedwith the basic concepts of digital sound representation discussed inAppendix A, “Digital Representation of Sound”. Failure to understandconcepts such as sample rate and sample size can lead to digitized signalsthat are poor in quality or distorted in various ways.In this chapter you’ll learn how to: choose whether to record to memory, to a file, or to a file sequence create and configure a recorder window create and work with real-time signal views in a recorder windowOverview of signal acquisitionRaven acquires (records) audio signals via recorders. A recorder isrepresented on the Raven desktop by a recorder window that can displayone or more views of a signal in real time as the signal is being acquired. Arecorder window is like any other Raven sound window, except that it hasadditional controls for starting and stopping recording and cannot beedited.Recording modes Raven provides three different recording modes, which differ in where thesignal is stored as it’s recorded. Record to memory: When recording to memory, audio data are notautomatically saved to disk files, but reside only in a portion of Raven’stemporary memory allocated as a recording buffer. You can specify thesize of the buffer (in seconds) when you configure a recorder. Duringrecording, audio data are stored in the buffer until the buffer is full, andthen the oldest data are continually discarded to make room for newdata being acquired. For example, if the buffer size is 30 seconds (thedefault), the buffer will always contain the most recent 30 seconds ofdata during recording; data recorded more than 30 seconds ago are lost.While a signal is in the recording buffer, you can manually save it to adisk file, or save selections from it. Recording to memory is useful forexploratory browsing through recordings when you don’t need to saveRaven Pro 1.4 User’s Manual81
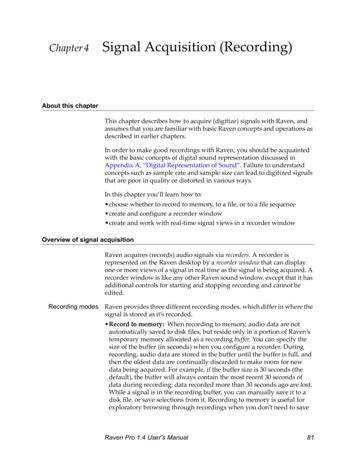
Chapter 4: Signal Acquisition (Recording)the data to files, or when the signals you’re interested in saving aresparsely distributed among sections that you don’t want to save. Record to file: When recording to a single file, Raven saves audio datadirectly to a disk file for a specified amount of time, then stops. You canalso manually stop recording to disk before the specified time hasfinished. Record to file sequence: When recording to a file sequence, Raven savesaudio data continuously to a series of files, each of which is a specifiedsize. Successive files in a sequence are named according to a templatethat you specify, which can incorporate a sequence number or atimestamp. Raven also saves a list file, which can be used to open the filesequence as a single continuous signal.Creating a recorder You create a recorder by specifying a set of configuration parameters inthe Configure New Recorder dialog box (Figure 4.1), which is invoked byclicking on the Record button on the Raven toolbar (identified by themicrophone icon, left) or by choosing File New Recorder.Figure 4.1. New Recorder dialog.Figure 4.1. The Input tab of the Configure New Recorder dialog box.You use the Record To drop-down list in this dialog to choose whether torecord to Memory, a File, or a File Sequence. Depending on whichrecording destination you choose, different tabs appear in the dialog box.The following sections discuss the configuration options on each tab.Recording InputThe Input tab (Figure 4.1) allows you to choose and configure an audioinput device. The Input tab is displayed for all three recording modes.82Raven Pro 1.4 User’s Manual
Chapter 4: Signal Acquisition (Recording)Device Click on the Device drop-down list to see a list of all available audio inputdevices. By default, the operating system’s default audio input device isselected. The name that is shown for this device will be the name of thedefault audio input device (typically a built-in sound card) for yourcomputer. The audio input device obtains its input from a recording sourcethat you choose using controls supplied by your computer’s operatingsystem. Appendix C, “Configuring Audio Input” explains how toconfigure your operating system’s controls to choose a recording source(e.g., the computer’s built-in CD player, a microphone, or line input jack)for audio input.Each audio input device is characterized by a set of available sample ratesat which signals can be recorded, the number of channels that can berecorded, and a set of sample formats. Each of these parameters isdiscussed below. Some devices may also have additional parameters thatcan be configured.Raven now includes support for multi-channel recordingusing both NI-DAQ and ASIO audio input devices. For moreinformation about using this feature, please see Appendix C,“Configuring Audio Input”.Sample Rate The Sample Rate drop-down list displays all of the sample rates availablefor the selected input device. Typically, the sample rates available aredetermined by the underlying sound input hardware. The Sample Rateparameter specifies the rate at which an analog electrical signalrepresenting a sound is sampled to create the digital signal. Be sure tochoose a sample rate that is at least twice as high as the highest frequencyin the recording you want to acquire, in order to avoid signal distortiondue to aliasing. See Appendix A, “Digital Representation of Sound” for adiscussion of aliasing and the trade-offs involved in choice of sample rate.Channels The default audio input device on most computers provides for one(mono) or two-channel (stereo) acquisition. For signals that are acquired instereo, the Left and Right channels are identified within Raven as Channel1 and 2, respectively. To acquire only one channel, uncheck either the Leftor Right checkbox. The remaining channel will be acquired as Channel 1.If you selected a device that supports input of more than two channels,each channel is represented by a numbered checkbox. If you disable inputof some channels, data from the channels that are recorded will berepresented in the resulting acquired signal in channel-number order, andrenumbered sequentially beginning at Channel 1. For example, if you arerecording from a 16-channel input device, and you select only inputchannels 1, 5, 7, and 12, then data from these channels will be representedin channels 1, 2, 3, and 4 respectively of the acquired signal.Raven Pro 1.4 User’s Manual83
Chapter 4: Signal Acquisition (Recording)Sample Format The Sample Format drop-down list shows all of the sample formatsavailable for the selected virtual recording device. The default inputdevice on most computers supports two formats, 8-bit and 16-bit signedPCM (Pulse Code Modulation). Some sound cards will support 24-bitsigned PCM. A larger sample size (more bits) results in a better qualitydigitized signal (higher signal-to-noise ratio), but may also increase thestorage requirements for signals saved to disk files. See Appendix A,“Digital Representation of Sound” for a discussion of the trade-offsinvolved in choice of sample size.Raven always represents signals internally with 32-bit floating pointsamples. As a result, Raven accurately stores signals recorded with signalsizes up to 24 bits. If you choose an input sample size greater than 24 bits,the input values may be truncated, resulting in a distorted signal. (formore on floating point values and truncation, see the footnote under“Sample Size” on page 87).Recording DisplayThe Display tab (Figure 4.2) allows you to configure the recorder window,and is displayed for all three recording modes.Figure 4.2 . Recorder Display tab.Figure 4.2. The Display tab of the Configure New Recorder dialog box.Buffer Size The buffer size determines how much of the signal is retained in memoryand can be visible in the recorder window during signal acquisition. You84Raven Pro 1.4 User’s Manual
Chapter 4: Signal Acquisition (Recording)can specify buffer size either in seconds or minutes. You can use the dropdown list to choose time units of seconds or minutes. The default buffersize is 30 seconds.During recording, audio data remain in memory for the duration of thebuffer, and are then discarded to make room for new incoming data. Ifyou’re recording to memory, data that are discarded from the buffer arelost permanently. When recording to a file or a file sequence, data that aregone from the buffer can be retrieved by opening the file(s) that weresaved during the acquisition.Update Rate The update rate determines how many times per second views in therecorder window are redrawn during signal acquisition. The default rateis 10 Hz. There is a trade-off between the perceived smoothness of thescrolling real-time display and Raven’s responsiveness to user interaction.If the update rate is too low, scrolling views move in visibly discrete steps,resulting in a jittery display. If the update rate is too high, Raven will beslow to respond to user actions such as mouse clicks or keyboardcommands. In practice, the best rate will depend on the size of therecorder window, the number and type of views it contains, and the speedof the computer. The default update rate of 10 Hz provides a good balancebetween display smoothness and performance on most computers. Youmay need to experiment to determine what update rate provides the bestperformance on your computer. See “Reconfiguring an existing recorder”on page 98 to learn how to change the update rate once a recorder isrunning.Latency The Latency value on the Display tab specifies the difference, for a runningrecorder, between the current time and the active view’s time axis position(by default, the right-hand edge of the window). Specifying a displaylatency greater than zero introduces a delay in the display of data in realtime views.By specifying a display latency greater than zero, you give Raven someadditional time to compute a view and build the corresponding imagebefore it needs to be displayed. A small display latency (e.g., 0.1 or 0.2seconds) often eliminates the flickering grey band that is sometimesvisible at the right-hand edge of some real-time views, while onlyresulting in a barely-perceptible delay in the display of real-time data.Non-zero display latencies also result in smoother updates to real-timespectrogram slice views.Display latency vs. processing latencyWhen a recorder is running, you may observe a flickering gray band at theright-hand edge of some real-time views. This band is more evident inrecorder windows that are displayed at large sizes or that contain manyviews, when the time axis is zoomed in, and on slower computers. Thisband represents the view’s processing latency, which is the differencebetween the current time (by default the right-hand edge of the window)and the last time for which Raven has displayed data in the view. TheRaven Pro 1.4 User’s Manual85
Chapter 4: Signal Acquisition (Recording)processing latency is always greater than zero because it takes some timefor Raven to build the visual image of the data to be displayed in the view.Real-time views scroll at a fixed rate, irrespective of the rate at whichRaven builds images for display. When a view scrolls and no new imagedata are available for display, Raven draws a gray band to fill in the timeinterval for which the image is not yet available. As soon as the image iscomputed, it replaces the gray band. Processing latency is typically longerfor spectrogram or spectrogram slice views than for waveforms, becausespectrograms require more calculation than waveforms. The processinglatency (hence the width of the gray band) varies from moment to momentfor each view as Raven rapidly switches among the various tasks involvedin updating the views in the recorder window. When the processinglatency is small relative to the time scale shown in a view, the flickeringgray band disappears. When it is larger, the band becomes moreprominent.Window preset The Window Preset drop-down list on the Display tab shows the name ofthe window preset that will be applied to the recorder window when it isfirst created. Window presets define what views are visible in a window,as well as window size, selection mode, and other properties. You canchoose from all of the window presets that are currently defined byclicking on the drop-down menu icon to the right of the Window Presetfield. Window presets are discussed further in “Sound Window Presets”in Chapter 3 (page 71).File FormatThe File Format tab appears only if you choose Record to File or Record toFile Sequence.86Raven Pro 1.4 User’s Manual
Chapter 4: Signal Acquisition (Recording)Figure 4.3. File Format tab.Figure 4.3. The File Format tab of the Configure New Recorder dialogbox.File Format Raven can acquire audio data directly to files saved either in AIFF (AudioInterchange File Format, filename extension .aif) or in WAVE format(filename extension .wav). WAVE files can be opened by most otherprograms that work with audio data. AIFF files can be opened by mostMacintosh programs that work with audio data, and some programs onother platforms. Raven can open either type of file.Sample Size The Sample Size parameter specifies the “bit depth” of the samples savedin the file(s) created during signal acquisition. Raven always representssignals internally with 32-bit floating point samples. Therefore, valuesrecorded using an input sample size greater than 24 bits may be truncated,resulting in distorted signal.1See Appendix A, “Digital Representation ofSound” for a discussion of the trade-offs involved in choice of sample size.1. In general, individual samples in a signal of sample size n can have 2n possiblevalues, from -2n-1 to 2n-1-1. Thus, in general a 32-bit representation has4,294,967,296 ( 232) possible sample values, from -2,147,483,648 to 2,147,483,648. However, by using a floating point representation, Ravenstores each value as a combination of a 24 bit integer and an 8 bit exponent.This allows values across a much greater range to be stored, but limits the precision to which larger values can be represented. As such, signals recordedusing an input sample size greater than 24 bits will be truncated to includeonly 24 bits of precision, resulting in increased distortion for large values.Raven Pro 1.4 User’s Manual87
Chapter 4: Signal Acquisition (Recording)File Size The size of the file(s) to be saved can be specified either in time units(seconds or minutes), storage units (kilobytes or megabytes), or sampleframes. A sample frame consists of one sample for each channel in theacquired signal. For example, if you specify a file size of 100,000 sampleframes for a signal acquired at a sample rate of 22,050 Hz, each acquiredfile would be 4.535 seconds long (4.535 100,000 sample frames / 22,050sample frames per second). If only a single channel is acquired, the filewould contain 100,000 samples; a stereo signal would contain twice thatmany. If the files are saved with a sample size of 16 bits (2 bytes), a singlechannel file would contain 200,000 bytes of data; a stereo file wouldcontain 400,000 bytes.2File namingIf you choose Record to File or Record to File Sequence, the File Name orFile Names tab appears (note the plural tab label when recording to filesequences). The fields on these two tabs allow you to specify where to saveacquired files and how to name them. The only difference between the FileName and File Names tabs is that the latter allows you to specify a namefor a list file, which is required when recording to file sequences. See“Recording to a file sequence” on page 92 for more about list files. Thissection explains how to specify file names for both single-file and filesequence recording.2. The actual total size of AIFF or WAVE files is slightly larger than the number ofbytes of audio data they contain because files in either format include a headerthat contains information such as the sample rate and the number of bytes ofdata in the file.88Raven Pro 1.4 User’s Manual
Chapter 4: Signal Acquisition (Recording)Figure 4.4. Single file name tab.Figure 4.4. The File Name tab of the Configure New Recorder dialogbox.Directory You specify where to save acquired files either by typing a pathname (e.g.,c:\SoundData\wrenProject\05May2002\) or by browsing throughyour computer’s file system. Click the Browse. button to obtain abrowser dialog that lets you choose a directory (folder) in which to saveacquired files.Sound File(s) You specify the name of the file(s) in the Sound File(s) field. For single-fileacquisition, the file name can be a simple text string that you type directlyinto the Sound File field, or it can be a file name template that incorporatesdate and time information that Raven fills in at the time acquisition starts,as discussed below.For file sequences, you must specify a file name template that Raven usesto build a unique name for each file in the sequence. A file name templatecontains some combination of date, time, and sequence number tags(Table 4.1). When each file in a sequence is created, Raven substitutes theRaven Pro 1.4 User’s Manual89
Chapter 4: Signal Acquisition (Recording)corresponding value for each tag in the template to generate the filenames.Table 4.1. Date, time, and sequence tags used in acquired file names.Minimum and maximum values for date and time tags are shown inbrackets.TagDefinition yy year; 2 digits minimum ll month [1 12]; 2 digits minimum dd day [1 31]; 2 digits minimum hh hour [0 23]; decimals permitted;2 digits minimum mm minute [0 59]; decimals permitted;2 digits minimum ss second [0 59]; decimals permitted;2 digits minimum n integer sequence number, starting at 1The date and time values substituted for tags in the template depend onthe Start Time setting, as discussed under “Start Time” on page 91.The number of characters that occur within a date, time, or sequence tagdetermine the number of characters that are written to represent that unitin the file name. For example, if the template is “set1- nn ”, the resultingfilenames will end with two-digit sequence numbers; while “set1- nnn ”would result in filenames ending three-digit sequence numbers.90Raven Pro 1.4 User’s Manual
Chapter 4: Signal Acquisition (Recording)For hour, minute, second, and date tags, you can specify decimal values.See Table 4.2 for examples.Table 4.2. Examples of file names generated by various file nametemplates, assuming a start time of 10:30:00, and a file size of 20 seconds.TemplateResulting file namesBCV- hh mm ss 103100.aif, .BCV- hh mm.mm CV-1031.00.aif, .BCV- hh.hhhh CV-10.5167.aif, .BCV- n .aifBCV-1.aifBCV-2.aifBCV-3.aifBCV-4.aif, .BCV- nnn .aifBCV-001.aifBCV-002.aifBCV-003.aif, .When you enter a filename containing date or time tags, the string labelled“Example:” below the Audio File(s) field shows what the filename wouldbe once the relevant date and time values are substituted for the tags.Start Time You can either specify that Raven use the date and time given by thecomputer’s internal clock (“Now”), or you can specify some other dateand time (such as when the recording was actually made, if you areacquiring from tape). Times are specified using a 24-hour representation; 1PM would thus be represented as 13.File name collisions When recording to a file or file sequence, if a file to be created has thesame name as a file that already exists in a given directory, Raven bydefault creates a new subdirectory and puts the new file there, in order toavoid overwriting the old file. The new subdirectory is named“Recordings-date.time” where date and time identify the time when thedirectory was created, using the format yyyy ll dd . hh mm ss (see Table 4.1 for more details).Raven Pro 1.4 User’s Manual91
Chapter 4: Signal Acquisition (Recording)When this happens, Raven displays a message showing the name of thefile and the directory into which it was placed.Alternatively, you can configure Raven to overwrite existing files whenfile names collide by editing an entry in the Raven preference file, asdescribed in “Overwrite behavior for recorders” in Chapter 11 (page 309).Recording to a file sequenceIf you choose Record to File Sequence, the File Names tab appears(Figure 4.5). The File Names tab contains the same fields as shown on theFile Name tab used for single-file recording (see “File naming” onpage 88), with the addition of a List File field.Figure 4.5. File sequence names tab.Figure 4.5. The File Names tab of the Configure New Recorder dialogbox.When you record to a file sequence, Raven saves the incoming audio datato a continuous series of files as described in “File Format” on page 86 and“File naming” on page 88. In addition, Raven saves a list file, which is aplain text file containing a list of all of the audio files recorded in the filesequence. Once an audio file sequence and its associated list file have beencreated, you can open the sequence as a single signal by opening the list92Raven Pro 1.4 User’s Manual
Chapter 4: Signal Acquisition (Recording)file. Opening a file sequence via a list file is discussed in “Opening filesequences” in Chapter 7 (page 194).If file name collisions (see “File name collisions” on page 91)occur while acquiring to a file sequence, the list file and someof the acquired audio files can end up in different directories.Raven will warn you that this has occurred, and then automatically write the correct relative pathnames into the list file.You can open the list without making any changes to it.Note that if you configure the name of your list file with relative times inthe name of its sub-folder, Raven will generate a new list file whenever therelative times you used are changed. For example, see the following listfile name templates:raven. yyyy ll dd . hh mm ss .txt - this will result in a single listfile for all of your recordings, with the list file’s name determined by whenthe first recording starts.raven. yyyy ll dd / hh mm ss .txt - this will result in a new list filebeing created in a separate folder for each new day that passes. If youchoose this option, you may wish to configure the names of yourrecordings so that they will be separated into the same folders as their listfiles, to allow you to analyze them in a more straightforward manner.Using recorder presetsYou can use recorder presets to save and retrieve sets of parameters for theentire recorder dialog, and for each tab within the dialog. To save arecorder preset for the entire dialog (including parameters on all tabs),first configure all of the parameters on all of the tabs in the dialog the wayyou want to save them, then choose Preset Audio Recorder Save As.from the dialog’s menu bar. When the Save Audio Recorder Preset dialogappears, enter a name for the preset, and click OK.After making changes to an existing recorder, you can save those changesas a recorder preset in the Configure Recorder dialog (View ConfigureRecorder.). If you have made changes to your window layout and you’dlike to preserve them as part of your recorder preset, you must first saveyour changes as a new window preset (View Window Preset SaveRaven Pro 1.4 User’s Manual93
Chapter 4: Signal Acquisition (Recording)As.), and then select that window preset on the Display tab of theConfigure Recorder dialog before you save the recorder preset.Audio recorder presets must be saved in the folder Presets/Audio Recorder/ within the Raven program folder.You can also create additional folders within the AudioRecorder folder by clicking on the New Folder icon withinthe Save Sound Window dialog. These folders will appear assubmenus in the Preset Audio Recorder menu, with eachsubmenu listing the presets in the corresponding folder.To save a preset for a single tab, configure the parameters on that tab, thenchoose Preset tab-name Save As. from the dialog’s menu bar. Forexample, to save a preset for the Input tab (while showing the Input tab)choose Preset Audio Recorder Input Save As. . When the Save dialogappears, enter a name for the preset, and click OK.To retrieve a preset for the entire recorder dialog, choose Preset AudioRecorder preset-name. To retrieve a preset for the current tab, choosePreset tab-name preset-name. When you retrieve a preset, all of theparameters in the Configure Recorder dialog or in the current tab areimmediately set to the saved values. If you then change some parametersand want to revert to the saved values, choose the name of the preset fromthe Preset menu again. If you want to save changes you’ve made underthe name of the last preset you loaded, choose Preset Audio Recorder Save “preset-name” or Preset tab-name Save “preset-name”.The recorder window: real-time views during recordingWhen you click OK in the Configure New Recorder dialog, a new recorderwindow appears on the Raven desktop (Figure 4.6), with the windowlayout that you specified on the Display tab. If you chose recording tomemory in the Configure New Recorder dialog, only the triangular greenRecord-to-Memory button appears at the bottom of the window. If youchose recording to a file or file sequence, the Record-to-Memory andround red Record-to-Disk buttons both appear at the bottom of thewindow.Except for the two record buttons at the bottom of the window, a recorderwindow looks and behaves exactly like any other Raven sound window. Itcan contain multiple views that can be linked to each other in variousways. By default, a new recorder window contains a single waveformview. You can make selections in a recorder window and seecorresponding measurements in the selection table.94Raven Pro 1.4 User’s Manual
Chapter 4: Signal Acquisition (Recording)Figure 4.6. New recorder windowFigure 4.6. A new recorder window, configured for recording to file(s),with a 30 second recording buffer.Creating real-time You can create a new view in a recorder window any time, whether thesignal views recorder is running or stopped. If a recorder window already containsmultiple views, particularly if they are displayed at a large size, Raven’sresponsiveness to keyboard and mouse activity may slow downnoticeably on slower computers while the recorder is running. In suchcases, it may be preferable to create new spectrogram or spectrogram sliceviews while the recorder is stopped.Recording to To begin recording to memory, click the Record to Memory button at thememory bottom of the window. Data begin appearing at the right edge of thewindow (where the position marker is located by default in a recorderwindow) and scroll across from right to left in all of the waveform andspectrogram views that are displayed. If data do not start appearing in therecorder window, refer to “Problems with recording” on page 107. To stoprecording, click the square green Stop Recording button that replaces theRecord to Memory button.Each time you start recording, any data already in the recording buffer are erased.Raven Pro 1.4 User’s Manual95
Chapter 4: Signal Acquisition (Recording)Recording to files Raven always records to memory when recording to a file or file sequence,so that the recorder window can display real-time views duringacquisition. To begin recording to a file or file sequence, click the Recordto File button. The Record to File button is then replaced by the square redStop-Recording to File button. If the recorder is not already recording tomemory, recording to memory and to a file or file sequence beginsimmediately, and all views in the window begin displaying data. If therecorder is already recording to memory when you click the Record to Filebutton, recording to memory continues, and recording to the specified fileor file sequence begins.While recording to a file, Raven displays the name of the file and aprogress bar at the bottom of the recorder window to indicate how muchof the file has been recorded. If you’re recording to a single file, filerecording stops when the file has reached the size specified in theConfigure Recorder dialog (see “File Size” on page 88). If the recorder wasrecording to memory before file recording started, it continues recordingto memory after file recording stops. When a file in a sequence hasreached the specified size, recording to disk continues uninterrupted withthe next file, and continues until you click the Stop Recording to Filebutton.If you are recording from a tape player and would like to hearsome of the recorded sound just after it has been recorded,you can use the Raven scrolling play button to do this. If youuse the play button, you will hear the current buffer from itsbeginning, not the sound as it is being recorded. Also, if youare using a microphone to record, you should not attempt toplay the sounds as they are being recorded because the output sounds from the speakers will feed back into the microphone. This issue may be avoided if headphones (asopposed to speakers) are used to listen to the sounds.Adjusting recording In order to avoid distortion in recorded signals, it is important to adjustlevel the recording level appropriately. You adjust the recording level usingcontrols provided by your operating system, as discussed in Appendix C,“Configuring Audio Input”.Ideally, the level should be adjusted so that the minimum and maximumexcursions of the waveform view are close to the vertical limits of thewaveform scale, without actually reaching those limits. If the recordinglevel is set too low, some features of the signal may not be visible in signalviews. If the recording level is set too high, the acquired waveform will beclipped. Clipping occurs when the magnitude of the original ana
Raven Pro 1.4 User's Manual 81 Chapter 4 Signal Acquisition (Recording) About this chapter This chapter describes how to acquire (digitize) signals with Raven, and assumes that you are familiar with basic Raven concepts and operations as described in earlier chapters. In order to make good recordings with Raven, you should be acquainted