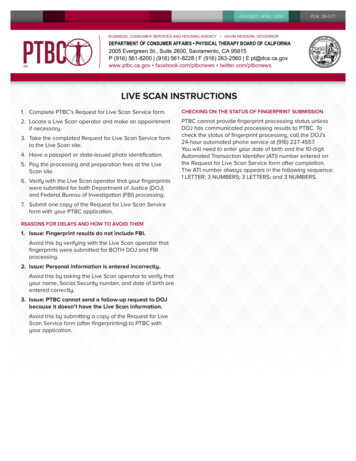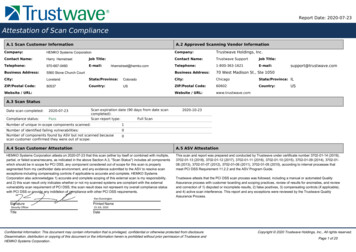
Transcription
Version No: 3.0Card Scan – Installation and Configuration Guide
Card Scan feature Installation guideTable of Contents1. Introduction . 32. System Requirement . 43. Download the files from SFTP . 54. Installation . 6Installation for Applet . 6A. Preinstall drivers . 6B. SDK setup . 10Installation for Active X . 15C. ScanShell 800DXN driver . 15Installation for HTML5. 19D. ScanShell 800DX driver . 195. Configuration . 25A. Configuring the Applet technology . 25B. Configuring the ActiveX technology . 30C. Configuring the HTML5 technology . 326. Configuration in PrognoCIS . 464010 Moorpark Avenue, Suite 222, San Jose, CA 95117. Phone (Sales): 8776936748 Phone (Support): 408873 30322
Card Scan feature Installation guide1. INTRODUCTIONCards such as Business Card, Medical Card, Driver License, Identity Card etc. can bescanned using a device called Card Scanner. When a card is scanned via a card scannerconfigured with PrognoCIS, the Card Scan feature in PrognoCIS automatically pulls all theinformation of the card into the application. However, details can be entered manuallyas well. The Card Scan feature in PrognoCIS supports the following three technologies: HTML5 Applet ActiveXTo use any technology, a User has to set an appropriate value in the property,card.scanner.framework.This document further describes all the procedures to install Card Scan related driversinto User’s system and to implement the same in PrognoCIS.4010 Moorpark Avenue, Suite 222, San Jose, CA 95117. Phone (Sales): 8776936748 Phone (Support): 408873 30323
Card Scan feature Installation guide2. SYSTEM REQUIREMENTFollowing is the list of system requirement for installing Card Scan:Hardware Pentium 100MHz or higher CPU 64MB of DRAM or above VGA monitor with true color and at least 800x600 pixels or above 60 MB free disk space One USB port A CD-ROM driveSoftware Windows 98SE, ME, 2000, XP, Vista, or 7Supported Browsers Internet Explorer 10 and above Chrome 55 and aboveSupported Scanners ScanShell 800DX and 800DXN (Recommended) ScanShell 800R and 800NR ScanShell 3100D and 3100DN ScanShell 2000R and 2000NR Fujitsu, Panasonic4010 Moorpark Avenue, Suite 222, San Jose, CA 95117. Phone (Sales): 8776936748 Phone (Support): 408873 30324
Card Scan feature Installation guide3. DOWNLOAD THE FILES FROM SFTPFollowing four files are required to be downloaded from SFTP,sftp://bizdp4.prognocis.com/CardScan/ into your system:For Applet Preinstall drivers SDK setupFor Active X ScanShell 800DXN driverFor HTML5 ScanShell 800DX driver (for HTML5)Perform the following steps to download the files:1. Login to FTP Voyger or Wincp tool.2. Go to the path, sftp://bizdp4.prognocis.com/CardScan/ and download the requireddrivers or files.4010 Moorpark Avenue, Suite 222, San Jose, CA 95117. Phone (Sales): 8776936748 Phone (Support): 408873 30325
Card Scan feature Installation guide4. INSTALLATIONInstall the following three drivers and SDK in your system to implement Card Scanfeature in PrognoCIS. During Card Scan driver’s installation, do not connect CardScanner to the system.Note: To use Applet technology, install all the below drivers. Whereas to use ActiveXor HTML5 technology, install only ScanShell 800DXN driver or ScanShell 800DX driver(Recommended).A. Preinstall driversB. SDK setupC. ScanShell 800DXN driver (for Active X)D. ScanShell 800DX driver (for HTML5)Installation for AppletA. Preinstall driversPerform the following steps to install Preinstall drivers:1. Go to the default download location where the Card Scan driver’s files are saved.Refer to figure 4-1Figure 4-1: Default downloads location4010 Moorpark Avenue, Suite 222, San Jose, CA 95117. Phone (Sales): 8776936748 Phone (Support): 408873 30326
Card Scan feature Installation guide2. Double click preinstall drivers.exe file; the User Account Control dialog box displays.Refer to figure 4-2Figure 4-2: Preinstall driver's User Account Control dialog box3. Click Yes; the Select Scanner & Signature pad Drivers to install dialog box displays.Refer to figure 4-3Figure 4-3: Select Scanner & Signature pad Drivers to install dialog box4. Select the required Scanner(s) from the list.5. Click Next; the Start Installation dialog box displays. Refer to figure 4-44010 Moorpark Avenue, Suite 222, San Jose, CA 95117. Phone (Sales): 8776936748 Phone (Support): 408873 30327
Card Scan feature Installation guideFigure 4-4: Preinstall driver's Start Installation dialog box6. Click Next; the Windows Security dialog box displays. Refer to figure 4-5Figure 4-5: Windows Security dialog box7. Click Install; the setup wizard installs the preinstall drivers into your system anddisplays the Finish dialog box. Refer to figure 4-64010 Moorpark Avenue, Suite 222, San Jose, CA 95117. Phone (Sales): 8776936748 Phone (Support): 408873 30328
Card Scan feature Installation guideFigure 4-6: Preinstall driver's Finish dialog box8. Click Finish; the Program Compatibility Assistant dialog box displays. Refer to figure4-7Figure 4-7: Program Compatibility Assistant dialog box9. Click This program installed correctly; Preinstall drivers are successfully installed intoyour system and this completes the Preinstall driver’s installation procedure.4010 Moorpark Avenue, Suite 222, San Jose, CA 95117. Phone (Sales): 8776936748 Phone (Support): 408873 30329
Card Scan feature Installation guideB. SDK setupPerform the following steps to install the SDK setup:1. Go to the default download location where the Card Scan setup files are saved. Referto figure 4-8Figure 4-8: Default download location2. Double click sdk setup.exe file; the User Account Control dialog box displays. Referto figure 4-9Figure 4-9: SDK setup's User Account Control dialog box3. Click Yes; the CSSN SDK Setup program dialog box displays. Refer to figure 4-104010 Moorpark Avenue, Suite 222, San Jose, CA 95117. Phone (Sales): 8776936748 Phone (Support): 408873 303210
Card Scan feature Installation guideFigure 4-10: SDK setup Program dialog box4. Click Next; the ReadMe File dialog box displays. Refer to figure 4-11Figure 4-11: SDK setup's Readme File dialog box5. Click I Agree; the Destination Location dialog box displays. Refer to figure 4-124010 Moorpark Avenue, Suite 222, San Jose, CA 95117. Phone (Sales): 8776936748 Phone (Support): 408873 303211
Card Scan feature Installation guideFigure 4-12: SDK setup's Destination Location dialog box6. Click Browse to install SDK at a different location else directly perform step 8; theSelect Destination Directory dialog box displays. Refer to figure 4-13Figure 4-13: SDK setup's Select Destination Directory dialog box7. Select the required location and click OK.8. Click Next on Destination Location dialog box; the Select SDK Components dialog boxdisplays. Refer to figure 4-144010 Moorpark Avenue, Suite 222, San Jose, CA 95117. Phone (Sales): 8776936748 Phone (Support): 408873 303212
Card Scan feature Installation guideFigure 4-14: Select SDK Components dialog box9. Select the options, Business Card and Medical Cards from the list.Note: Business Card and Medical Cards are mandatory options. Select theremaining options if required.10. Click Next; the Software Activation dialog box displays. Refer to figure 4-15Figure 4-15: SDK setup's Software Activation dialog box4010 Moorpark Avenue, Suite 222, San Jose, CA 95117. Phone (Sales): 8776936748 Phone (Support): 408873 303213
Card Scan feature Installation guide11. Select the required scanner(s) from the list.12. Click Next; the Start Installation dialog box displays. Refer to figure 4-16Figure 4-16: SDK setup's Start Installation dialog box13. Click Next; the setup wizard installs the SDK into your system and displays the Finishdialog box. Refer to figure 4-17Figure 4-17: SDK setup's Finish dialog box4010 Moorpark Avenue, Suite 222, San Jose, CA 95117. Phone (Sales): 8776936748 Phone (Support): 408873 303214
Card Scan feature Installation guide14. Click Finish; SDK is successfully installed into your system and this completes theSDK’s installation procedure.Installation for Active XC. ScanShell 800DXN driverPerform the following steps to install the ScanShell 800DXN driver:1. Go to the default download location where the Card Scan driver’s files are saved.Refer to figure 4-18Figure 4-18: Default download location2. Double click scanshell800DXN drivers.exe file; the User Account Control dialog boxdisplays. Refer to figure 4-19Figure 4-19: Scanshell 800DXN driver's User Account Control dialog box4010 Moorpark Avenue, Suite 222, San Jose, CA 95117. Phone (Sales): 8776936748 Phone (Support): 408873 303215
Card Scan feature Installation guide3. Click Yes; the Checking Windows configuration dialog box displays. Refer to figure 420Figure 4-20: Checking Windows configuration dialog box4. Click OK; the ScanShell 800DXN Driver setup program dialog box displays. Refer tofigure 4-21Figure 4-21: Scanshell 800DXN driver’s setup program dialog box5. Click Next; the Readme File dialog box displays. Refer to figure 4-224010 Moorpark Avenue, Suite 222, San Jose, CA 95117. Phone (Sales): 8776936748 Phone (Support): 408873 303216
Card Scan feature Installation guideFigure 4-22: Scanshell 800DXN driver’s Readme File dialog box6. Click Next; the Destination Location dialog box displays. Refer to figure 4-23Figure 4-23: Scanshell 800DXN driver’s Destination Location dialog box7. Click Browse to install ScanShell800DXN driver at a different location else directlyperform step 9; the Select Destination Directory dialog box displays. Refer to figure4-244010 Moorpark Avenue, Suite 222, San Jose, CA 95117. Phone (Sales): 8776936748 Phone (Support): 408873 303217
Card Scan feature Installation guideFigure 4-24: Scanshell 800DXN driver's Select Destination Directory dialog box8. Select the required location and click OK.9. Click Next on Destination Location dialog box; the Start Installation dialog boxdisplays. Refer to figure 4-25Figure 4-25: Scanshell 800DXN driver's Start Installation dialog box10. Click Next; the setup wizard installs the ScanShell 800DXN driver into your systemand displays the Finish dialog box. Refer to figure 4-264010 Moorpark Avenue, Suite 222, San Jose, CA 95117. Phone (Sales): 8776936748 Phone (Support): 408873 303218
Card Scan feature Installation guideFigure 4-26: Scanshell 800DXN driver's Finish dialog box11. Click Finish; ScanShell 800DXN driver is successfully installed into your system andthis completes the ScanShell 800DXN driver’s installation procedure.Installation for HTML5D. ScanShell 800DX driverPerform the following steps to install the Scanshell800DX driver (This driver isrecommended for HTML5 technology).1. Go to the default download location where the Card Scan driver’s files are saved.Refer to figure 4-274010 Moorpark Avenue, Suite 222, San Jose, CA 95117. Phone (Sales): 8776936748 Phone (Support): 408873 303219
Card Scan feature Installation guideFigure 4-27: Default download location2. Double click scanshell800DX64bit.exe file; the User Account Control dialog boxdisplays. Refer to figure 4-28Figure 4-28: User Account Control dialog box for Scanshell800DX3. Click Run; the Choose Setup Language dialog box displays. Refer to figure 4-29Figure 4-29: Choose Setup Language dialog box4010 Moorpark Avenue, Suite 222, San Jose, CA 95117. Phone (Sales): 8776936748 Phone (Support): 408873 303220
Card Scan feature Installation guide4. Select the required language from the dropdown list.5. Click OK; the ScanShell 800DX Setup Wizard displays. Refer to figure 4-30Figure 4-30: ScanShell 800DX Setup Wizard6. Click Next; the End-User License Agreement dialog box displays. Refer to figure 4-31Figure 4-31: End User License Agreement for ScanShell 800DX4010 Moorpark Avenue, Suite 222, San Jose, CA 95117. Phone (Sales): 8776936748 Phone (Support): 408873 303221
Card Scan feature Installation guide7. Select I accept the terms in the License Agreement checkbox.8. Click Next; the Destination Folder dialog box displays. Refer to figure 4-32Figure 4-32: Destination Folder for ScanShell 800DX9. The default installation location is displayed; click Change to select a differentlocation.10. Click Next; the Ready to install ScanShell 800DX dialog box displays. Refer to figure4-334010 Moorpark Avenue, Suite 222, San Jose, CA 95117. Phone (Sales): 8776936748 Phone (Support): 408873 303222
Card Scan feature Installation guideFigure 4-33: Ready to install ScanShell 800DX dialog box11. Click Install; the setup wizard installs the ScanShell 800DX driver into your systemand displays the Scanner Connection dialog box. Refer to figure 4-34Figure 4-34: Scanner Connection dialog box for ScanShell 800DX12. Click Next; the Completed the ScanShell 800DX Setup Wizard displays. Refer tofigure 4-354010 Moorpark Avenue, Suite 222, San Jose, CA 95117. Phone (Sales): 8776936748 Phone (Support): 408873 303223
Card Scan feature Installation guideFigure 4-35: Completed ScanShell 800DX Setup Wizard13. Click Finish; ScanShell 800DX driver is successfully installed into your system and thiscompletes the ScanShell 800DX driver’s installation procedure.4010 Moorpark Avenue, Suite 222, San Jose, CA 95117. Phone (Sales): 8776936748 Phone (Support): 408873 303224
Card Scan feature Installation guide5. CONFIGURATIONTo implement Card scan feature, system requires to be configured with any one of thefollowing technologies: Applet, See Configuring the Applet technology ActiveX, See Configuring the ActiveX technology HTML5, See Configuring the HTML5 technologyA. Configuring the Applet technology1. Enter the URL, http://java.com/en/download/index.jsp in your browser’s addressbar; the Free Java download page displays. Refer to figure 5-1Figure 5-1: Free Java download page2. Click Free Java Download; the End User License Agreement page displays. Refer tofigure 5-2Figure 5-2: Java End User License Agreement page4010 Moorpark Avenue, Suite 222, San Jose, CA 95117. Phone (Sales): 8776936748 Phone (Support): 408873 303225
Card Scan feature Installation guide3. Click Agree and Start Free Download; the confirmation dialog box displays. Refer tofigure 5-3Figure 5-3: Java confirmation dialog boxNote: In Chrome browser, the setup file is directly saved in the default downloadlocation. The confirmation dialog box is not displayed.4. Click Run; the User Account Control dialog box displays. Refer to figure 5-4Figure 5-4: Java User Account Control dialog box5. Click Yes; the Java Setup – Welcome dialog box displays. Refer to figure 5-54010 Moorpark Avenue, Suite 222, San Jose, CA 95117. Phone (Sales): 8776936748 Phone (Support): 408873 303226
Card Scan feature Installation guideFigure 5-5: Java setup - welcome dialog boxNote: To install Java at a different location, Select Change destination foldercheckbox and Click Install . On Destination Folder dialog box, Click Change andselect the required location then Click OK. After selecting the location, Click Next .onthe Destination Folder dialog box and continue to step 7.6. Click Install ; the setup wizard downloads the Java installer and displays the JavaSetup dialog box. Refer to figure 5-6Figure 5-6: Java Setup dialog box4010 Moorpark Avenue, Suite 222, San Jose, CA 95117. Phone (Sales): 8776936748 Phone (Support): 408873 303227
Card Scan feature Installation guide7. De-select the two checkboxes displayed. Refer to figure 5-7Figure 5-7: De-select two checkboxes on Java setup dialog box8. Click Next; the setup wizard installs the Java into your system and displays the JavaSetup – Complete dialog box. Refer to figure 5-8Figure 5-8: Java setup - Complete dialog box9. Click Close; your browser opens the URL to Verify Java Version. Refer to figure 5-94010 Moorpark Avenue, Suite 222, San Jose, CA 95117. Phone (Sales): 8776936748 Phone (Support): 408873 303228
Card Scan feature Installation guideFigure 5-9: Verify Java Version page10. Click Verify Java Version; the Java Detection confirmation dialog box displays. Referto figure 5-10Figure 5-10: Java Detection confirmation dialog box11. Click Run; the Java is successfully installed into your system and displays the VerifiedJava Version. Refer to figure 5-11Figure 5-11: Verified Java Version page4010 Moorpark Avenue, Suite 222, San Jose, CA 95117. Phone (Sales): 8776936748 Phone (Support): 408873 303229
Card Scan feature Installation guideB. Configuring the ActiveX technology1. Open the Internet Explorer browser.2. Click Tools Internet Options; the Internet Options dialog box displays. Refer tofigure 5-12Figure 5-12: Internet Options dialog box3. Click the Security tab.4. Select Trusted sites. Refer to figure 5-134010 Moorpark Avenue, Suite 222, San Jose, CA 95117. Phone (Sales): 8776936748 Phone (Support): 408873 303230
Card Scan feature Installation guideFigure 5-13: Trusted sites icon on Internet Options dialog box5. Click Custom level button. Refer to figure 5-14Figure 5-14: Custom level button on Internet Options dialog box6. Navigate to Active X controls and plug-ins; and enable the options. Refer to figure 5154010 Moorpark Avenue, Suite 222, San Jose, CA 95117. Phone (Sales): 8776936748 Phone (Support): 408873 303231
Card Scan feature Installation guideFigure 5-15: Active X Controls and plug-insC. Configuring the HTML5 technologyTo use HTML5 technology for scanning the card, install the ScanShell 800DX driver (seeinstalling SDK setupPerform the following steps to install the SDK setup:14. Go to the default download location where the Card Scan setup files are saved. Referto figure 4-8Figure 4-8: Default download location4010 Moorpark Avenue, Suite 222, San Jose, CA 95117. Phone (Sales): 8776936748 Phone (Support): 408873 303232
Card Scan feature Installation guide15. Double click sdk setup.exe file; the User Account Control dialog box displays. Referto figure 4-9Figure 4-9: SDK setup's User Account Control dialog box16. Click Yes; the CSSN SDK Setup program dialog box displays. Refer to figure 4-10Figure 4-10: SDK setup Program dialog box17. Click Next; the ReadMe File dialog box displays. Refer to figure 4-114010 Moorpark Avenue, Suite 222, San Jose, CA 95117. Phone (Sales): 8776936748 Phone (Support): 408873 303233
Card Scan feature Installation guideFigure 4-11: SDK setup's Readme File dialog box18. Click I Agree; the Destination Location dialog box displays. Refer to figure 4-12Figure 4-12: SDK setup's Destination Location dialog box19. Click Browse to install SDK at a different location else directly perform step 8; theSelect Destination Directory dialog box displays. Refer to figure 4-134010 Moorpark Avenue, Suite 222, San Jose, CA 95117. Phone (Sales): 8776936748 Phone (Support): 408873 303234
Card Scan feature Installation guideFigure 4-13: SDK setup's Select Destination Directory dialog box20. Select the required location and click OK.21. Click Next on Destination Location dialog box; the Select SDK Components dialog boxdisplays. Refer to figure 4-14Figure 4-14: Select SDK Components dialog box4010 Moorpark Avenue, Suite 222, San Jose, CA 95117. Phone (Sales): 8776936748 Phone (Support): 408873 303235
Card Scan feature Installation guide22. Select the options, Business Card and Medical Cards from the list.Note: Business Card and Medical Cards are mandatory options. Select theremaining options if required.23. Click Next; the Software Activation dialog box displays. Refer to figure 4-15Figure 4-15: SDK setup's Software Activation dialog box24. Select the required scanner(s) from the list.25. Click Next; the Start Installation dialog box displays. Refer to figure 4-164010 Moorpark Avenue, Suite 222, San Jose, CA 95117. Phone (Sales): 8776936748 Phone (Support): 408873 303236
Card Scan feature Installation guideFigure 4-16: SDK setup's Start Installation dialog box26. Click Next; the setup wizard installs the SDK into your system and displays the Finishdialog box. Refer to figure 4-17Figure 4-17: SDK setup's Finish dialog box27. Click Finish; SDK is successfully installed into your system and this completes theSDK’s installation procedure.4010 Moorpark Avenue, Suite 222, San Jose, CA 95117. Phone (Sales): 8776936748 Phone (Support): 408873 303237
Card Scan feature Installation guideInstallation for Active XD. ScanShell 800DXN driverPerform the following steps to install the ScanShell 800DXN driver:28. Go to the default download location where the Card Scan driver’s files are saved.Refer to figure 4-18Figure 4-18: Default download location29. Double click scanshell800DXN drivers.exe file; the User Account Control dialog boxdisplays. Refer to figure 4-19Figure 4-19: Scanshell 800DXN driver's User Account Control dialog box30. Click Yes; the Checking Windows configuration dialog box displays. Refer to figure 4204010 Moorpark Avenue, Suite 222, San Jose, CA 95117. Phone (Sales): 8776936748 Phone (Support): 408873 303238
Card Scan feature Installation guideFigure 4-20: Checking Windows configuration dialog box31. Click OK; the ScanShell 800DXN Driver setup program dialog box displays. Refer tofigure 4-21Figure 4-21: Scanshell 800DXN driver’s setup program dialog box32. Click Next; the Readme File dialog box displays. Refer to figure 4-224010 Moorpark Avenue, Suite 222, San Jose, CA 95117. Phone (Sales): 8776936748 Phone (Support): 408873 303239
Card Scan feature Installation guideFigure 4-22: Scanshell 800DXN driver’s Readme File dialog box33. Click Next; the Destination Location dialog box displays. Refer to figure 4-23Figure 4-23: Scanshell 800DXN driver’s Destination Location dialog box34. Click Browse to install ScanShell800DXN driver at a different location else directlyperform step 9; the Select Destination Directory dialog box displays. Refer to figure4-244010 Moorpark Avenue, Suite 222, San Jose, CA 95117. Phone (Sales): 8776936748 Phone (Support): 408873 303240
Card Scan feature Installation guideFigure 4-24: Scanshell 800DXN driver's Select Destination Directory dialog box35. Select the required location and click OK.36. Click Next on Destination Location dialog box; the Start Installation dialog boxdisplays. Refer to figure 4-25Figure 4-25: Scanshell 800DXN driver's Start Installation dialog box37. Click Next; the setup wizard installs the ScanShell 800DXN driver into your systemand displays the Finish dialog box. Refer to figure 4-264010 Moorpark Avenue, Suite 222, San Jose, CA 95117. Phone (Sales): 8776936748 Phone (Support): 408873 303241
Card Scan feature Installation guideFigure 4-26: Scanshell 800DXN driver's Finish dialog box38. Click Finish; ScanShell 800DXN driver is successfully installed into your system andthis completes the ScanShell 800DXN driver’s installation procedure.Installation for HTML5ScanShell 800DX driver and download the Dynamic Web Twain plugin.Perform the following steps to download the Dynamic Web Twain plugin:1. Go to Card Scan popup (click on Card Scan icon:on Patient Registration screenor Card Scan button on Insurance popup); the Dynamic Web TWAIN plugin popupdisplays. Refer to figure 5-164010 Moorpark Avenue, Suite 222, San Jose, CA 95117. Phone (Sales): 8776936748 Phone (Support): 408873 303242
Card Scan feature Installation guideFigure 5-16: Dynamic Web TWAIN plugin popup2. Click Download to manually install the plugin; the confirmation dialog box displays.Refer to figure 5-17Figure 5-17: Confirmation dialog box for Dynamic Web TWAIN HTML53. Click Run; the User Account Control dialog box displays. Refer to figure 5-184010 Moorpark Avenue, Suite 222, San Jose, CA 95117. Phone (Sales): 8776936748 Phone (Support): 408873 303243
Card Scan feature Installation guideFigure 5-18: User Account Control dialog box for Dynamic Wen TWAIN4. Click Yes; the Dynamic Web TWAIN HTML5 Setup Wizard displays. Refer to figure 519Figure 5-19: Dynamic Web TWAIN HTML5 Setup Wizard5. Click Next; the Confirm Installation dialog box displays. Refer to figure 5-204010 Moorpark Avenue, Suite 222, San Jose, CA 95117. Phone (Sales): 8776936748 Phone (Support): 408873 303244
Card Scan feature Installation guideFigure 5-20: Confirm Installation dialog box6. Click Next to start installation; the installation wizard installs the Dynamic WebTWAIN plugin into your system and displays the Installation Complete dialog box.Refer to figure 5-21Figure 5-21: Installation Complete dialog box7. Click Close to exit.4010 Moorpark Avenue, Suite 222, San Jose, CA 95117. Phone (Sales): 8776936748 Phone (Support): 408873 303245
Card Scan feature Installation guide6. CONFIGURATION IN PROGNOCIS The technology to be used for scanning the card should be set in the property,card.scanner.framework with the required value: 0 – HTML5 1 – Applet 2 – ActiveX If the property, card.scanner.framework is set to 0 – HTML5 and OCR (OpticalCharacter Recognition) scan device is configured in PrognoCIS then depending on thevalue set in the property, card.scanner.html5.useocr, the OCR process is used forscanning the card.Note: The property, card.scanner.useapplet has been made obsolete. If the property, card.scanner.html5.useocr is turned ON then the Personal Details,Address Details, and Insurance Details checkboxes are displayed as selected bydefault on the respective popup invoked from Patient Registration and Insurancescreens. On About popup (click the icon:from Menu bar), the #OCR scan devices fieldunder Other Modules section displays the number of OCR devices that the Clinic has.Refer to figure 6-1Figure 6-1: ‘#OCR scan devices’ field on About popup4010 Moorpark Avenue, Suite 222, San Jose, CA 95117. Phone (Sales): 8776936748 Phone (Support): 408873 303246
Card Scan feature Installation guide While scanning the card (click Scan ID on the Card Scan popup), if the scannercalibration process is NOT done then the Calibration Page dialog box is displayed.Refer to figure 6-2Figure 6-2: Calibration Page dialog box To calibrate the scanner, insert the calibration sheet into the card scanner and clickCalibrate. Refer to figure 6-3Figure 6-3: Calibrating the sheet After the calibration process is done, PrognoCIS card scan feature is ready for use.4010 Moorpark Avenue, Suite 222, San Jose, CA 95117. Phone (Sales): 8776936748 Phone (Support): 408873 303247
Card Scan feature Installation guide 4010 Moorpark Avenue, Suite 222, San Jose, CA 95117. Phone (Sales): 8776936748 Phone (Support): 408873 3032 . into User's system and to implement the same in PrognoCIS. Card Scan feature Installation guide 4010 Moorpark Avenue, Suite 222, San Jose, CA 95117. Phone (Sales): 8776936748 Phone (Support .