Transcription
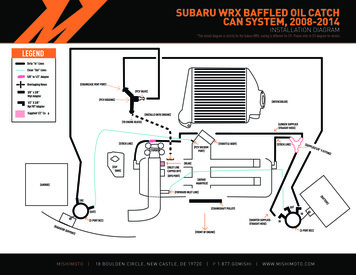
Subaru WRX Baffled Oil CatchCan System, 2008-2014INSTALLATION DIAGRAM*This install diagram is strictly for the Subaru WRX, routing is different for STI. Please refer to STI diagram for details.LEGENDDirty “In” LinesClean “Out” Lines5/8” to 1/2” AdapterOverlapping Hoses[CRANKCASE VENT PORT][PCV VALVE]3/8” x 3/8”Wpt Adapter[PCV HOUSING]1/2” X 3/8”Npt 90 Adapter[INTERCOOLER]Supplied 1/2” Ca p[INSTALLS ONTO ENIGINE][TO ENGINE BLOCK][LONGER SUPPLIEDSTRAIGHT HOSE][STOCK LINE][THROTTLE BODY][PCV VACUUMPORT][TURBO][STOCK LINE][SUPPLIED 5/8” Y-FITTING]][REAR][EXPTANK][INLET LINECAPPED OFF][BPU PORT][INTAKEMANIFOLD][AIRBOX][FORWARD INLET LINE]]RYTTE[BA[IN]IN[SHORTER SUPPLIEDSTRAIGHT HOSE][2-PORT BCC][RADIATOR SUPPORT]MISHIMOTOOUT[CRANKSHAFT PULLEY][OUT][3-PORT BCC][FRONT OF ENGINE] 18 Boulden Circle, New Castle, DE 19720 P 1 . 877 .GOMISHIIN WWW.MISHIMOTO.COM
Subaru STI Baffled Oil CatchCan System, 2008-2014INSTALLATION DIAGRAM*This install diagram is strictly for the Subaru STI, routing is different for WRX. Please refer to WRX diagram for details.LEGENDNUMBER KEY[INTERCOOLER]Dirty “In” Lines1- Dirty 3/8'' ID Curved HoseClean “Out” Lines2- Clean 3/8'' ID Curved Hose3- Dirty 1/2'' ID Curved Hose4- Dirty 1/2'' ID ShortStriaght HoseSupplied 1/2” CapOverlapping Hoses[SHORT 3/8'' CURVED HOSE]1/2” X 3/8”Npt 90 Adapter5- Dirty 1/2'' Long Str Hose6- Clean 1/2'' ID Curved Hose33[CRANKCASE PORT][PCV VALVE]1[1/2'' PLASTICCONNECTOR]1[INSTALL INTOENGINE BLOCK]4[RH STOCKBREATHER LINE][LONG 3/8''CURVED HOSE][VACUUM PORTUNDER THROTTLE BODY][CLOSESTPORTCAPPED OFF]2[LONG 1/2''CURVED HOSE][INTAKE MANIFOLD][IN]5[SUPPLIED 1/2''LONG HOSE]3[FORWARDINLET LINE]6[OUT][MOUNTINGBLOCK][BATTERY][OUT][IN][FRONT OF ENGINE][IN][2-PORT BCC][3-PORT BCC] [LH STOCKBREATHER LINE][SHORT 1/2''CURVED HOSE][INLETHOSE]MISHIMOTO[1/2'' ][PCV RAIL REMOVE]18 Boulden Circle, New Castle, DE 19720 P 1 . 877 .GOMISHI [MOUNTINGBLOCK]W R ITTEN INS TAL L INS TR U CTIO NSO N FO L LOW ING PAG E bWWW.MISHIMOTO.COM
Subaru WRX Baffled Oil CatchCan System, 2008-2014PARTS LIST AND INSTALLATION GUIDEPARTS LISTDisclaimer2PC APPLICATION–SPECIFIC MOUNTING BRACKETS Raise vehicle only on jack stands or on a vehicle lift.1PC CNC-MACHINED MOUNTING BLOCK Allow vehicle to cool completely prior to attempting installation.1PC BLACK, ANODIZED 6061 ALUMINUM TWO-PORT Do not run the engine or drive the vehicle while overheating, asCATCH CANserious damage can occur.1PC BLACK, ANODIZED 6061 ALUMINUM THREE-PORT Please dispose of any liquids properly.CATCH CAN Mishimoto is not responsible for any vehicle damage or6PC BLACK EPDM HOSESpersonal injury due to installation errors, misuse, or removal3PC PLASTIC 1/2” 90 DEGREE BARBED FITTINGSof Mishimoto products.2PC PLASTIC 3/8” BARBED FITTINGS Mishimoto suggests that a trained professional install all1PC PLASTIC 5/8” Y FITTINGMishimoto products.2PC PLASTIC 5/8”–1/2” ADAPTER FITTINGS12PC WORM-GEAR CLAMPS2PC BRONZE FILTERSINSTALLATION INSTRUCTIONS2PC AIR DIVERTERS2PC INTERNAL BAFFLES AND RODS2PC 3/8” NPT PLUGS2PC LARGE O–RINGS1PC SILICONE CAP FOR TURBO INLETMOUNTING HARDWARE(THIS INSTALL WAS PERFORMED ON A WRX. IF YOU AREINSTALLING THE STI KIT, THE APPLICATION-SPECIFIC HOSESWILL BE SLIGHTLY DIFFERENT.)1. Attach the direct-fit bracket to the 2-port catch can lid.(2x 2.5mm Allen bolts and washers, Allen key)2. Attach the CNC-machined mounting block of the direct-fitbracket to the attached bracket.(2x 2.5mm Allen bolts and washers, Allen key)Tools Needed2.5MM ALLEN KEY3/8” DRIVE RATCHET5MM ALLEN KEY11/16” WRENCH10MM DEEP SOCKETNEEDLENOSE PLIERS12MM DEEP SOCKETFLATHEAD SCREWDRIVER1/4” DRIVE 6” EXTENSIONPICK TOOL1/4” DRIVE RATCHET3/8” DRIVE 6” EXTENsIONINSTALLATION TIME: 2 HOURS3. Attach the final direct-fit bracket to the 3-port catch can lid. (2x2.5mm Allen bolts and washers, Allen key)DIFFICULTY LEVEL: 3/5CONTINUED ON FOLLOWING PAGE bMISHIMOTO18 Boulden Circle, New Castle, DE 19720P 1 . 877 .GOMISHI01WWW.MISHIMOTO.COM
Subaru WRX Baffled Oil CatchCan System, 2008-2014INSTALLATION GUIDE4. Thread and hand-tighten the three fittings on the 3-portcatch can. The fittings should face upward at a 45 degreeangle as pictured.9. Loosen the worm-gear clamp on the throttle body hose. (10mmsocket if you have a Mishimoto throttle body hose; flatheadscrewdriver if you have a stock throttle body hose)5. Thread and tighten the two fittings on the 2-port catch can.(11/16th” wrench)10. Remove the two 10mm bolts from the bypass valve (BPV).6. Install the 2-port catch can on the passenger side of the vehiclenear the inner fender. (1x 10mm bolt)11. Remove the 12mm bolt from the intercooler bracket on thedriver side. Loosen but do not remove the other two bolts on thebracket.7. Remove the 10mm nut and then remove the front-side batterytie-down.8. Install the 3-port catch can on the driver side of the engine bay.(1x 10mm nut removed in step 7, 10mm socket)12. Remove the two 12mm bolts from the passenger side of theintercooler that connects to the turbo.13. Remove the intercooler.CONTINUED ON FOLLOWING PAGE bMISHIMOTO18 Boulden Circle, New Castle, DE 19720P 1 . 877 .GOMISHI02WWW.MISHIMOTO.COM
Subaru WRX Baffled Oil CatchCan System, 2008-2014INSTALLATION GUIDE14. Remove the 10mm bolt that holds the plastic molded hose inplace near the turbo inlet.15. Remove the second 10mm bolt on the side of the head asshown below.16. Detach the connection near the BPV, and pull apart the hose.17. Pull apart the other end of the hose at the turbo inlet.18. Pull out the hose.19. Remove the 12mm bolt from the bracket for the boostsolenoid. Remove the 5mm Allen head bolt.CONTINUED ON FOLLOWING PAGE bMISHIMOTO18 Boulden Circle, New Castle, DE 19720P 1 . 877 .GOMISHI03WWW.MISHIMOTO.COM
Subaru WRX Baffled Oil CatchCan System, 2008-2014INSTALLATION GUIDE20. Loosen the clamp holding the hose near the induction hoseand then remove the hose. (Flathead screwdriver)24. Using a clamp, attach the L-shape hose to the outlet of thecatch can on the driver side. (1x worm-gear clamp)21. Shimmy the supplied L-shape hose into the space previouslyoccupied by the hose that was removed in step 20. Tighten theworm-gear clamp. (Flathead screwdriver)25. Remove the metal clamp from the next hose. (Pick tool)22. Reattach the bracket for the boost solenoid using the 12mmbolt and 5mm Allen head bolt from step 19.23. Route the L-shape hose behind some of the wires andharnesses and over toward the catch can on the driver side.26. Loosen the worm-gear clamp on the other side and pull outthe hose.27. Install the silicone cap for the turbo inlet.CONTINUED ON FOLLOWING PAGE bMISHIMOTO18 Boulden Circle, New Castle, DE 19720P 1 . 877 .GOMISHI04WWW.MISHIMOTO.COM
Subaru WRX Baffled Oil CatchCan System, 2008-2014INSTALLATION GUIDE28. Remove the spring clamp from the hose located right next tothe induction housing, and then remove the hose.(Needlenose pliers)29. In the same spot, attach a worm-gear clamp to the next hoseand tighten the clamp. (Flathead screwdriver)32. Attach the crankcase hose to the inlet of the catch can on thepassenger side. Tighten everything on the passenger side.33. Attach a supplied plastic fitting and a worm-gear clamp to thelonger of the two straight hoses. Tighten the clamp.(Flathead screwdriver)30. With a worm-gear clamp already installed on the hose, attachthe next hose to the intake manifold. (Flathead screwdriver)31. Attach a worm-gear clamp to the other end of the intakemanifold hose from step 30, and then route the hose to the outleton the catch can on the passenger side. Tighten the clamp.(Flathead screwdriver)34. Attach the supplied Y-fitting and a worm-gear clamp to theopposite end of the hose from step 33. Tighten the clamp.(Flathead screwdriver)CONTINUED ON FOLLOWING PAGE bMISHIMOTO18 Boulden Circle, New Castle, DE 19720P 1 . 877 .GOMISHI05WWW.MISHIMOTO.COM
Subaru WRX Baffled Oil CatchCan System, 2008-2014INSTALLATION GUIDE35. Attach a worm-gear clamp to the crankcase ventilation (CCV)hose, and then route the hose to an inlet of the catch can on thedriver side. Tighten the clamp. (Flathead screwdriver)36. Attach the straight fitting and a worm-gear clamp to the valvecover vent hose on the passenger side. Tighten the clamp.(Flathead screwdriver)39. Attach a worm-gear clamp to the remaining hose coming fromthe second inlet on the catch can on the driver side. Connect thishose to the other side of the Y-fitting. Tighten the clamp.(Flathead screwdriver)40. Tighten everything on the driver side. (Flathead screwdriver)37. Route the hose toward the valve cover vent on the driver side.38. On the Y-fitting end, attach a worm-gear clamp to the valve covervent hose on the driver side. Connect this hose to one side of theY-fitting, Tighten the clamp. (Flathead screwdriver)41. Reinstall the 10mm bolt (from step 14) that holds the wireharness near the intercooler.42. Reinstall the intercooler.43. Starting on the turbo inlet of the intercooler, reinstall the two12mm bolts.44. Reattach the hose to the BPV.45. Tighten the three 12mm bolts on the intercooler bracket on thedriver side.46. Reattach the BPV using the two 10mm bolts you removedin step 10.47. You have now successfully installed the Mishimoto BaffledCatch Can System for your Subaru. Enjoy!06MISHIMOTO18 Boulden Circle, New Castle, DE 19720P 1 . 877 .GOMISHIWWW.MISHIMOTO.COM
*This install diagram is strictly for the Subaru WRX, routing is different for STI. Please refer to STI diagram for details. Subaru WrX baffled Oil CatCh Can SyStem, 2008-2014 INSTALLATION DIAGRAM LEGEND Dirty "In" Lines Clean "Out" Lines 5/8" to 1/2" Adapter Overlapping Hoses 3/8" x 3/8" Wpt Adapter 1/2" X 3/8" Npt 90 Adapter