Transcription
NetComm Vodafone MachineLink 3GEdge MicroServer Installation andSetup GuideVersion 1.0
NetComm Vodafone MachineLink 3G Edge MicroServer Installation and Setup GuideIntroduction. 2About the NetComm Vodafone MachineLink 3G . 2Installation . 2Connect the NetComm Vodafone MachineLink 3G . 2Download the Edge Microserver . 3Configuration and Setup . 4Uploading the EMS to the NetComm Vodafone MachineLink 3G . 4Deploy EMS . 6Connecting to the Platform . 8Configuring and Confirming a Connection . 8Troubleshooting. 14Compatibility . 14Document Revision History . 15Copyright 2015 PTC Inc. and/or Its Subsidiary Companies. All Rights Reserved.1
NetComm Vodafone MachineLink 3G Edge MicroServer Installation and Setup GuideIntroductionThe Edge MicroServer is a powerful component of the ThingWorx architecture. The Edge MicroServerallows for the rapid deployment of connections between the ThingWorx platform and an associateddata reporting device, with minimal design requirements on the part of the user.The Edge MicroServer provides an “always-on” connection to the platform, and it opens a local webserver that interacts with the REST API available on the platform. This document provides installationand usage instructions for setting up the Edge MicroServer with the NetComm Vodafone MachineLink3G Device.About the NetComm Vodafone MachineLink 3GThe NetComm Vodafone MachineLink 3G is a CDMA IP router device manufactured by NetCommCorporation. It provides GPS service and wifi connectivity to a range of devices, and features an ARM9processor with 64 MB of memory and 256 MB of onboard flash memory storage. The device runsEmbedded Linux v3.6.The Edge MicroServer Linux-ARM distribution may be installed on the NetComm Vodafone MachineLink3G, and this guide will follow the procedure for doing so. This guide will also follow the featuresinvolved with simulating a connection and pushing and pulling data from the NetComm VodafoneMachineLink 3G.InstallationSetup of the DEVICE with an EMS will first require inserting an activated SIM card into the device.Please note that this guide was written for a computer running Microsoft Windows.Refer to the Troubleshooting section of this guide for help with frequently asked questions.Connect the NetComm Vodafone MachineLink 3G1.Begin by verifying that the SIM card is inserted in the device.Connect a power supply to the device. There are three methods of doing so:1. Use a PoE (Power over Ethernet) cable and connect it to the yellow Ethernet port.2. Connect a DC power supply via 2-pin connector.3. Insert wires to the supplied terminal block to power the router with an 8-35V DC power supply.For additional help, contact NetComm or visit their website and download the quick start guide for theNetComm Vodafone MachineLink 3G.Connect an Ethernet cable from the device to your local computer.Copyright 2015 PTC Inc. and/or Its Subsidiary Companies. All Rights Reserved.2
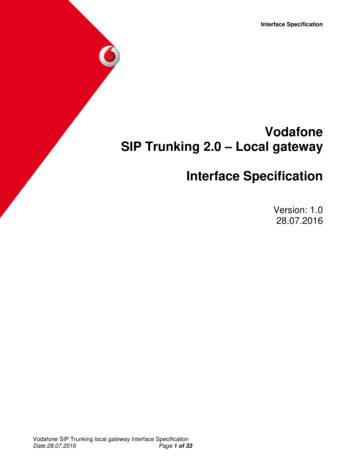
NetComm Vodafone MachineLink 3G Edge MicroServer Installation and Setup Guide2.Assign your computer an IP address in thesame range as that of the NetCommVodafone MachineLink 3G.For Example: The NetComm VodafoneMachineLink 3G’s default IP address is192.168.1.1. Assign your computer’sEthernet adapter an IP address in therange 192.168.1.X, where ‘X’ is a valuesuch as ‘20’.See the screenshot at right.Download the Edge Microserver1.2.Download the ThingWorx Edge MicroServer for the Linux-ARM environment. Alternatively, you can usethe Edge Microserver instance packaged with this Starter Kit.Keep these files in their compressed “tar” state, and store them locally for now.Copyright 2015 PTC Inc. and/or Its Subsidiary Companies. All Rights Reserved.3
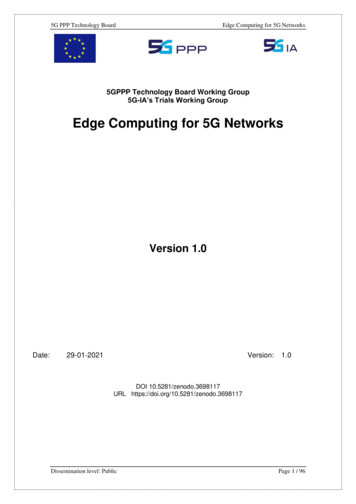
NetComm Vodafone MachineLink 3G Edge MicroServer Installation and Setup GuideConfiguration and SetupUploading the EMS to the NetComm Vodafone MachineLink 3G1. In a browser on the computer connected to the NetComm Vodafone MachineLink 3G, navigate to192.168.1.1.2. You should be presented with theNetComm Wireless Login screen. Thedefault login credentials are:Username: rootPassword: admin3. Click on the “Networking” tab afteryou’ve logged in, and then click on “DataConnection”.From here, edit Profile 1, and set“Automatic APN selection” to OFF, andtype in the APN for your particular SIMcard.Click “Save”, and return to the Statuspage.Copyright 2015 PTC Inc. and/or Its Subsidiary Companies. All Rights Reserved.4
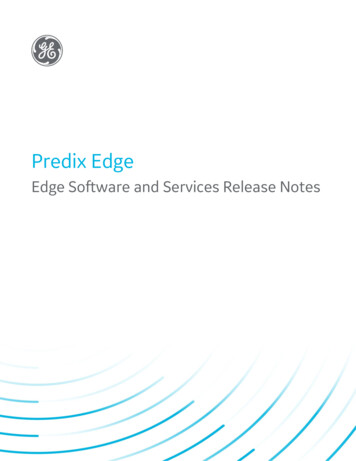
NetComm Vodafone MachineLink 3G Edge MicroServer Installation and Setup Guide4. On the status page, you should seeStatus in Packet data connection statussection showing “Connected”.Copyright 2015 PTC Inc. and/or Its Subsidiary Companies. All Rights Reserved.5
NetComm Vodafone MachineLink 3G Edge MicroServer Installation and Setup GuideDeploy EMS1.In the NetComm Vodafone MachineLink3G’s web interface page, while loggedin, navigate to System AdministrationSettings, and make sure local Telnetenabled.2.Open an SSH client program, such asPuTTy, and initiate a new connection tothe server.User the following parameters:Connection Type: TelnetIP: 192.168.1.1Port: 23Connect using username – root andpassword – admin.Copyright 2015 PTC Inc. and/or Its Subsidiary Companies. All Rights Reserved.6
NetComm Vodafone MachineLink 3G Edge MicroServer Installation and Setup Guide3.In the browser, navigate to System System Configuration Upload Choosea File – and then click Upload andbrowse to the “MicroServer 443.tar”and “MicroServer 80.tar” files.4.In PuTTY, browse to the tar files. Theywill be uploaded to the followinglocation:/opt/cdcs/upload/5.Run the following commandscd /opt/cdcs/uploadtar -xvf MicroServer 80.tartar -xvf MicroServer 443.tarCopyright 2015 PTC Inc. and/or Its Subsidiary Companies. All Rights Reserved.7
NetComm Vodafone MachineLink 3G Edge MicroServer Installation and Setup GuideConnecting to the PlatformConfiguring and Confirming a Connection1.Navigate to the “MicroServer 80” folder, and open“config.json”:cd MicroServer 80vi etc/config.json2.In the config.json file, it’s necessary to configure theparameters to connect to your particular ThingWorxinstance. For additional guidance in configuring theconfig.json file, please reference the following:http://support.ptc.com/cs/help/thingworx hc/thingworx edge/index.jspx and follow the guide sectionentitled “WSEMS Configuration”Be sure to set the IP address of the computerconnected to the device. You can discover yourcomputer’s Ethernet IP address by openingcommand prompt and typing “ipconfig”:In the example above, the IP address to be set in theconfig.json file is “192.168.1.100”.Copyright 2015 PTC Inc. and/or Its Subsidiary Companies. All Rights Reserved.8
NetComm Vodafone MachineLink 3G Edge MicroServer Installation and Setup Guide3.The config.json file should resemble the following:4.Use the following commands to make the wsemsand luaScriptResource binary files executable by allusers:chmod 777 wsemschmod 777 luaScriptResource5.Run the executable using the following command:./wsems6.In the console output, you should see the message “WebSocket Connected!” as confirmation of a successfulconnection.Copyright 2015 PTC Inc. and/or Its Subsidiary Companies. All Rights Reserved.9
NetComm Vodafone MachineLink 3G Edge MicroServer Installation and Setup Guide7.Open a browser, and go to the url of your ThingWorx platform (such .Navigate to the Monitoring section (top right), click on “Remote Things”, and then look under both Bound andUnBound tabs for a device named “MyGateway” (or whatever configuration name it was given in config.json). Ifyou see it, verify its status as “connected”.9.Press Ctrl C to terminate the process. Now, repeat the setup process, but for the MicroServer 443 folder.We will be repeating the process for an https server (if applicable):cd ./MicroServer 44310.Open the config.json file in this folder (./etc directory).vi etc/config.jsonCopyright 2015 PTC Inc. and/or Its Subsidiary Companies. All Rights Reserved.10
NetComm Vodafone MachineLink 3G Edge MicroServer Installation and Setup Guide11.Configure this file to correspond to your https server(if applicable):Note: That in this case it is especially important toconfigure the certificates section and“ws connection” sections as well.12.Make the binary files executable:chmod 777 wsemschmod 777 luaScriptResource13.Run the executable:./wsems14.You should see the “WebSocket Connected!” message inthe console.Copyright 2015 PTC Inc. and/or Its Subsidiary Companies. All Rights Reserved.11
NetComm Vodafone MachineLink 3G Edge MicroServer Installation and Setup Guide15.Open a browser, and navigate to your HTTPS serveraddress. Check the Monitoring Remote Thingssection, and look for the “MyGateway” deviceshowing “Connected”.Note: If you see an error message similar to thefollowing:Refer to the troubleshooting section for more help.16.Verify that your device is listed on the ThingWorx platform as connected:17.Now, open a second PuTTy terminal, and connect to thedevice.Navigate to the “MicroServer 443” folder, and open the“config.lua” file for eding:cd MicroServer 443vi config.luaCopyright 2015 PTC Inc. and/or Its Subsidiary Companies. All Rights Reserved.12
NetComm Vodafone MachineLink 3G Edge MicroServer Installation and Setup Guide18.In the example to follow, we create a remote thingnamed “testThingYang” which relies on the“testTemplate.lua” and “testSample.lua” files.Configure yours to be similar to the following, andthen exit the file (exit by typing “:q!”)19.20.Run the executable luaScriptResource:./luaScriptResourceYou should see a thing named “testThingYang” (or adifferent name according to what yours isconfigured as) in the “Remote Thing” monitor inThingWorx.Copyright 2015 PTC Inc. and/or Its Subsidiary Companies. All Rights Reserved.13
NetComm Vodafone MachineLink 3G Edge MicroServer Installation and Setup GuideTroubleshooting1.ProblemSolution(s)Cannot connect to the device with PuTTy.1.Verify that your PC is connected to the NetComm VodafoneMachineLink 3G via Ethernet Cable.2.Verify that your PC is configured to use an IP address beginning with“192.168.1.*”.3.Verify that you have chosen “telnet” as the connection type in PuTTy,not “SSH”.4.Attempt to factory reset the NetComm Vodafone MachineLink 3G, andthen repeat the steps above.2.No internet access on the NetComm VodafoneMachineLink 3G.1.Check the web interface on the device at 192.168.1.1. Verify the SIMstatus is “SIM OK”. If you’re unable to complete network registration, tryto set the APN for your SIM card manually. Enable the Profile you’recurrently using, and turn off the “Automatic APN selection”.3.Cannot initiate a websocket connection to theThingWorx platform.2.Try a different SIM card.3.Verify that the device has cellular signal. Move to a different location ifpossible.1.Check the IP address you set in the “config.json” file. Verify it is correct.2.Verify the additional settings in the config.json file, especially theAppKey.3.Try to turn off any firewalls on the computer if they are interfering withthe connection.4.You receive a segmentation fault or similarerror while attempting to connect to an HTTPSserver.1.Confirm that your device has cell signal and a secure internetconnection. Verify the validity of the inserted SIM card.2.Verify that no firewalls are present to block your connection.CompatibilityThis guide has been tested for compatibility with the DEVICE and the following ThingWorx platform andoperating system:Copyright 2015 PTC Inc. and/or Its Subsidiary Companies. All Rights Reserved.14
NetComm Vodafone MachineLink 3G Edge MicroServer Installation and Setup GuideThingWorx Platform VersionThingWorx 6.0.1OSWindows 7, Service Pack 1Document Revision HistoryRevision DateAugust 24, 2015Version1.0Description of ChangeInitial Release – Antony CyriacCopyright 2015 PTC Inc. and/or Its Subsidiary Companies. All Rights Reserved.15
The Edge MicroServer Linux-ARM distribution may be installed on the NetComm Vodafone MachineLink 3G, and this guide will follow the procedure for doing so. This guide will also follow the features involved with simulating a connection and pushing and pulling data from the NetComm Vodafone