Transcription
QlikView User GuideLiberty NationalCombined Minimum StandardsDashboard Instruction Guide1QlikView User GuideLNL2013 0511
Contents**Note: The names andproduction data featured inthis document are fictional forthe purposes of training.I.How to Install the MinimumStandards DashboardII. How to Navigate QlikViewIII. Available Filter OptionsIV. Sample Minimum Standards QueryV. How to Export Data to Excel2QlikView User GuideLNL2013 0511
I. How to Install the Minimum StandardsDashboardGo to the Agent Services website throughwww.libertynational.comClick on the QlikView Reports link under OnlineInformation3QlikView User GuideLNL2013 0511
Logging in to QlikView Log in to QlikView using the LNL prefix, backslash (\), BM, and your three digit Branch Number (Seebelow).Your password is the same one you use to log into your Branch Manager e-mail.4QlikView User GuideLNL2013 0511
QlikView AccessPoint will appear. Save this page to your Favorites in your Internet browser.5QlikView User GuideLNL2013 0511
Saving QlikView to Your FavoritesStep 1 : Click on the Favorites buttonand select Add to FavoritesStep 2 : Name the link and clickAdd6QlikView User GuideLNL2013 0511
Using QlikView for the First TimeYou must download the IE Plugin the first time you use QlikView. Double-click on the Download IE Plugin link.Doubleclick onthis link7QlikView User GuideLNL2013 0511
Downloading the IE PluginStep 1 : Click RunStep 2 : Click Run8QlikView User GuideLNL2013 0511
Step 3 : Click NextStep 4 : Click on your countryand click Next9QlikView User GuideLNL2013 0511
Step 5 : Click I Accept and clickNextStep 6 : Type in your name andLiberty National. Click Next10QlikView User GuideLNL2013 0511
Step 7 : Click Next to save underProgram FilesStep 8 : Click Next11QlikView User GuideLNL2013 0511
Step 9 : Click InstallStep 10 : Click Finish12QlikView User GuideLNL2013 0511
Step 11 : Close your Internet browser at this time and reopen. Go back to QlikView Access Point throughthe link on Agent Services. You must do this during the install so the updates are registered in QlikView.Step 12 : Right-click on the yellow warning bar and Run the add-on program.**You only have to do steps 11 and 12 once.13QlikView User GuideLNL2013 0511
Now you’re ready to use the QlikView system. Make sure that IE Plugin is selected for My preferred client.Open the Branch Minimum Standards Dashboard by double-clicking on the icon.Doubleclick onthe icon14QlikView User GuideLNL2013 0511
The Minimum Standards Dashboard will appear.15QlikView User GuideLNL2013 0511
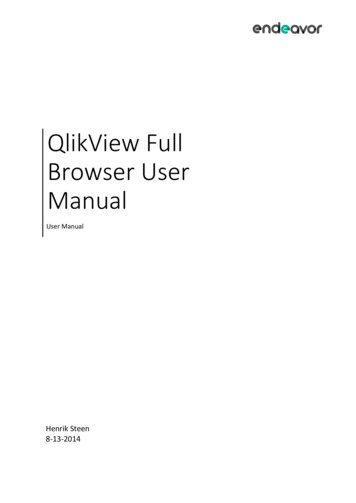
II. How to Navigate QlikViewClick UnDo toremove thelast filter youselected.Report Week lists theavailable reports for youto view. The dates listedin the box represent theFriday cut-off date of the13-week period.Click Clearbefore eachnew search toremoveprevious data.The Filters allowyou tocustomize yourown report byremovingunwanted data.The Branch Manager,Unit Manager, andAgents tables list who isand isn’t featured in thereport.The LastLoaded dateshows whenthe system waslast updated.16QlikView User GuideLNL2013 0511
III. Available Filter OptionsFilter Options Company Source: Liberty business, UA business, orLiberty Med-Supp business (automatically selectedunless your Branch does more than one. Then, itwill default to all available sources.)LNL Branch Office #: Your Branch number(automatically selected)UA Branch Office #: Old UA Branch number(automatically selected)Branch Type: Traditional Liberty or Conversion(automatically selected)Branch Name: Name of your Branch (automaticallyselected)Branch Status: Active or Closed (automaticallyselected)Senior VP: Libnat or Torchmarkcorp (automaticallyselected)Region: Two digit region number (automaticallyselected)Director: Current Director (automatically selected)FYA/RYA: First year Agent or Renewal year Agent(Will default to include both)Active/Terminated: Will default to include bothunless one is selected17QlikView User GuideLNL2013 0511
Selecting FiltersClick on the arrows to select filters.The filters selected here are:FYAA (Active)18QlikView User GuideLNL2013 0511
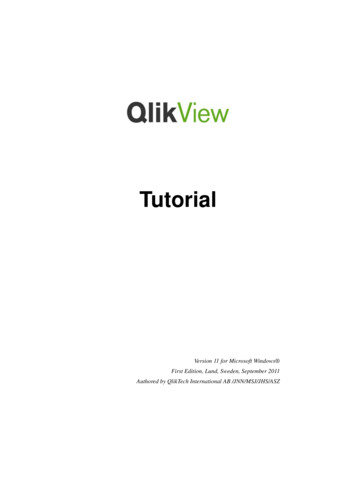
The Current Selections tab is underneath the Filters tab. Double-click on the CurrentSelections tab to view. This tab shows what information will be included in the report.In this example, we have selected report week is 4/1/2011, First year Agents, and ActiveAgents to be featured in this report.Report Week4/1/2011First YearAgentsActive Agents19QlikView User GuideLNL2013 0511
IV. Sample Minimum Standards QueryShows only theBranch ManagerTableShows only theUnit ManagerTableShows only theAgent TableAgent Table: Reflectsproduction by weekfor each Agent in theBranchBranch ManagerTable: Reflects yourproduction by weekQlikView User GuideUnit Manager Table:Reflects productionby week for eachUnit Manager in theBranch20LNL2013 0511
When an Agent, UnitManager, or BranchManager’s 4 week average isless than the 13 weekaverage, the name willappear in Red.T TerminatedM Moved to anotherBranch21QlikView User GuideLNL2013 0511
Branch Summary TabUnit Manager Summary TabNote: The filters you select under the Minimum Standards tab willcarry over into the other tabs.22QlikView User GuideLNL2013 0511
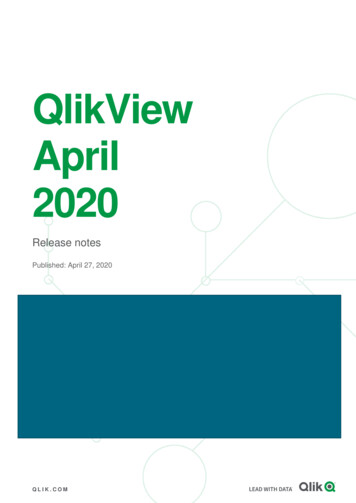
Agent Summary TabFor the Agent Summary, the FYA or RYA is reflectedalong with the Hire Date and Current Status (activeversus terminated). Also listed is the number ofweeks used in the 13-week average calculations. Ifan Agent’s first production was four weeks ago, thenumber of weeks will be four. If the Agent’s firstproduction was over 13 weeks ago, ‘13’ will remainin the column since we are calculating a 13-weekaverage.Let’s look at Angela Roberts for example. She is aRenewal year Agent. She was hired on 7/21/86.Angela is an Active Agent. The report shows it hasbeen 13 weeks since her first week of production.Angela reached the thirteenth week of productionyears ago, yet the report will continue to show ‘13’while Angela is listed in the report.23QlikView User GuideLNL2013 0511
V.How to Export Data to ExcelOnce you have the report the way you want it, youcan export the data to Excel.Click on the XL icon in the top right-hand corner ofthe table. An Excel spreadsheet will automaticallyopen up.24QlikView User GuideLNL2013 0511
Note the file will be named something assigned by QlikView. To rename the file in Excel, go to file and clickSave As. Give the file a name you will remember for future reference.25QlikView User GuideLNL2013 0511
Double-click on the Download IE Plugin link. Double-click on this link 7 . QlikView User Guide LNL2013 0511 Downloading the IE Plugin . Now you're ready to use the QlikView system. Make sure that IE Plugin is selected for My preferred client. Open the Branch_Minimum_Standards_Dashboard by double-clicking on the icon. Double-click on