Transcription
CONTROL PANELInstallation ManualDoc: GLT-261-7-1GLT-261-7-3Doc: GLT-261-7-1Issue:W.I.PDate:Issue: 25/08/2018002Date: 18.04.2019
Velocity Installation ManualContentsIntroduction . 4About the Velocity Fire Alarm System . 4Overall Features . 4Additional Features . 5Document Conventions . 5Circuits and Zones . 5Wiring Styles . 5System Components . 6Panel Types . 6Panel Modules . 8Control Panel Installation and Dimensions . 10Enclosure Dimensions . 100Panel Construction Details . 100Locating the Fire Alarm Control Panel. 111Mounting the Enclosure . 111Mounting Hole Dimensions . 111Planning Cable Entry . 133Cable Grounding. 133Mains Wiring . 133Battery Wiring . 155Securing the batteries . 166Assembling the MMP panel . 18Initial Power Up . 19Module Installation . 19TRM RJ45 Port Address Designation . 20Securing the modules . 20Before Powering the Panel On . 20Power On Procedure . 211Field Wiring . 222Wiring Overview . 222VL-NCA Field Wiring Connections . 233VL-NCB Field Wiring Connections. 244Wiring recommendations for Notification Appliance Circuits (VL-NCA & VL-NCB) . 255VL-NCA & VL-NCB Specifications . 255Compatible Notification Devices . 266Maximum Notification Devices per Circuit. 266VL-MIM Field Wiring Connections . 277Wiring Recommendations for Initiating Device Circuits (VL-MIM) . 277VL-MIM Specifications . 277VL-MRM Field Wiring Connections. 2828VL-MRM Specifications. 2828www.velocitydetection.com2
Velocity Installation ManualVL-ZMA Field Wiring Connections . 29VL-ZMB Field Wiring Connections . 29Wiring Recommendations for Initiating Device Circuits (VL-ZMA & VL-ZMB) . 300VL-ZMA & VL-ZMB Specifications . 300VL-NWM Field Wiring Connections . 311Wiring Recommendations for Network Wiring (VL-NWM) . 322VL-NWM Specifications . 322VL-SLC Field Wiring Connections . 333Wiring Recommendations for Signalling Line Circuits (VL-SLC) . 344SLC Device Wiring and Device Information . 344VL-SLC Specifications . 400Compatible SLC Devices . 400Power Supply. 411PSU Specifications . 411PSU Fuses. . 422Power Supply Status Indications . 422Power Supply Signals . 422Panel Printer.43Loading/Replacing Printer Paper Roll.43Status LED's.44Printer Maintenance.44FAULT FINDING. 435Appendix A: SPECIFICATIONS . 455Appendix B: STANDBY BATTERY REQUIREMENTS . 466Appendix C: DEVICE ADDRESS SETTING (VDOT-AD2) . 477Appendix D: PRODUCT CODES . 48Appendix E: Ground Fault Impedance values. 49www.velocitydetection.com3
Velocity Installation ManualIntroductionAbout the Velocity Fire Alarm SystemThe Velocity Control Panel is a powerful intelligent fire alarm control system with a user friendly 4.3 inch touch screen display, whichhas been designed to provide reliable life safety and property protection, while also being easy to install, commission and operate. TheVelocity system is totally modular which enables it to satisfy any size building fire alarm needs.By adding intelligent loop modules, the Velocity can be upgraded to support up to 4000 detectors and devices spread across a flexibleSLC loops (maximum of sixteen SLC). The system can also be expanded by adding Form C relay output modules, network interfacemodules, NAC modules, and zone monitor class A & B modules for conventional detectors and devices.The Velocity system’s touchscreen interface is designed to make status information clear, and system control functions simple tooperate. Through the use of function buttons on the systems display the user can easily “Acknowledge” events, “Silence” or“Unsilence” building audibles, or “Reset” the system. The system status presentation is structured to allow the different types ofsystem events (Alarms, Supervisory, and Trouble) to be viewed independently. Each system event presents the user with a messagedescribing the location of the alarm report and the type of event (manual alarm, smoke, or heat). If additional details about the natureof the alarm report or its location are required, the user can add a text label to the device or zone.The 32-bit microcontroller (MCU) at the heart of Velocity, rapidly processes logical decisions based on the status of the smokedetection and other initiating devices to control the system outputs. The Windows based software configuration tool Velocity Connectis used to configure the system’s operation based on the customer specified operating requirements, and reducecommissioning/installation times.The Velocity system continuously checks all software and hardware for proper operation. It checks all control panel electronichardware, system memory components, and the system program. A hardware watchdog circuit is provided to ensure that Systemprograms are functioning properly. If a problem develops with the program or processor, the watchdog circuit places the System into atrouble condition and resets it.The Velocity system is equipped with a backup microprocessor on its termination board. To ensure reliable operation, if the mainpanel’s CPU stops, the backup CPU will take over and allow the system to still be able to detect and annunciate alarms.The fire alarm operation is always processed as the highest priority over all other operating modes.Overall Features Modular construction allows a panel to be specified using just the required modules.Up to 4, 6 or 16 SLC modules (depending on panel model).4.3” colour touch screen display.Capacity for up to 6 intelligent modules (depending on panel model).Full system redundancy.Extensive Day/Night mode programming.Full cause & effect programming via front of panel or the Velocity Connect PC software.254 Velocity devices per SLC.254 available programmable zones.Up to 64 panel peer-to-peer network.Positive Alarm Sequence.Automatic Drift Compensation.Alarm Verification.Mains Trouble output delay of up to 30 minutes.NAC special application 24V mode.5, 10 or 15 AMP PSU available (depending on panel model).www.velocitydetection.com4
Velocity Installation ManualAdditional FeaturesThere is PC configuration software, a mobile monitoring application, a remote annunciator and a LED Expander PCB available.PC Configuration Software: Velocity ConnectRemote Annunciator: VL-MMP/RALED Expansion PCB: VL-MMP/ZLXDocument ConventionsCircuits and ZonesCircuit this refers to an actual electrical interface, initiating (detection), indicating (signal), or relay.Zone this is a logical concept for a fire alarm protected area, and will consist of at least one circuit.The terms zone and circuit are used interchangeably throughout this manual.On the Velocity, circuits can be either conventional or addressable inputs or outputs. Both hardwired conventional inputs and outputs,and addressable inputs and outputs may be grouped together to form logical zones.Wiring StylesSLC Circuits have a redundant pathway (powered from both sides of the circuit) and are able to be wired either in the Class Adesignation or in the Class X designation (designed to operate past any a single short circuit with the addition of UL listed isolators).ZM Circuits are available in two different wiring classes. The VL-ZMA has 1 Class A circuit that has a redundant path to operate past asingle open circuit. The VL-ZMB has 2 Class B circuits that do not have a redundant path; they simply terminate at the last device.NAC Circuits are available in two different wiring classes. The VL-NCA has 1 Class A circuit that has a redundant path to operate past asingle open circuit. The VL-NCB has 2 Class B circuits that do not have a redundant path; they simply terminate at the last device.Typical Velocity Network Fire Alarm Wiringwww.velocitydetection.com5
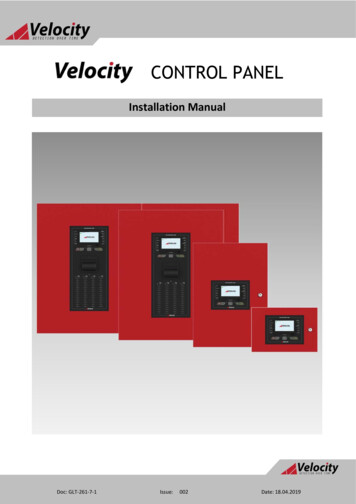
Velocity Installation ManualSystem ComponentsPanel MP/6 W:380mm x H:530mmSpace for up to 6 small modulesSupplied with a 5A PSUAvailable in black or redSpace for 2 x 12Ah batteries.VL-MMP/10 W:500mm x H:600mmSpace for up to 10 small modulesSupplied with a 10A PSUAvailable in black or redSpace for 2 x 17Ah batteriesVL-MMP/10/64 W:500mm x H:600mmSpace for up to 10 small modulesEquipped with 64 zone LED expansionSupplied with a 10A PSUAvailable in black or redSpace for 2 x 17Ah batteriesVL-MMP/10/P W:500mm x H:600mmSpace for up to 10 small modulesEquipped with UL listed panel printerSupplied with a 10A PSUAvailable in black or redSpace for 2 x 17Ah batteriesVL-MMP/10/P/64 W:500mm x H:600mmSpace for up to 10 small modulesEquipped with UL listed panel printerEquipped with 64 zone LED expansionSupplied with a 10A PSUAvailable in black or redSpace for 2 x 17Ah batteries6
Velocity Installation ManualVL-MMP/26 W:1000mm x H:665mmSpace for up to 26 small modulesSupplied with a 15A PSUAvailable in black or redSpace for 2 x 38Ah batteriesVL-MMP/26/64 W:1000mm x H:665mmSpace for up to 26 small modulesEquipped with 64 zone LED expansionSupplied with a 15A PSUAvailable in black or redSpace for 2 x 38Ah batteriesVL-MMP/26/P W:1000mm x H:665mmSpace for up to 26 small modulesEquipped with UL listed panel printerSupplied with a 15A PSUAvailable in black or redSpace for 2 x 38Ah batteriesVL-MMP/26/P/64 W:1000mm x H:665mmSpace for up to 26 small modulesEquipped with UL listed panel printerEquipped with 64 zone LED expansionSupplied with a 15A PSUAvailable in black or redSpace for 2 x 38Ah batteries W:300mm x H:200mmVelocity Remote AnnunciatorPlease refer to GLT-261-7-3 VelocityMMP Repeater Manual for furtherinformationVL-MMP/RAAll panel versions are also available in tection.comDescriptionVelocity MMP 6 expansion port panel, BlackVelocity MMP 10 expansion port panel, BlackVelocity MMP 10 expansion port panel, with zonal LED indication, BlackVelocity MMP 10 expansion port panel, with built in printer, BlackVelocity MMP 10 expansion port panel, with zonal LED indication and built in printer, BlackVelocity MMP 10 expansion port panel, Black7
Velocity Installation L-MMP/RA-BVelocity MMP 10 expansion port panel, with zonal LED indication, BlackVelocity MMP 10 expansion port panel, with built in printer, BlackVelocity MMP 10 expansion port panel, with zonal LED indication and built in printer, BlackVelocity MMP Remote annunciator, BlackPanel Moduleswww.velocitydetection.comModel No.DescriptionVL-SLCSignaling Line Circuit ModuleThe plug-in SLC moduleprovides power for, andhandles communications tothe analogue addressabledevices. It has 4 troublestatus LED’s for added faultfinding assistance.VL-NCANotification Appliance CircuitModule (Class A)The plug-in NAC moduleprovides power for, andhandles the operation for thenon-addressable notificationappliances (horns and sirens).It has 1 x class A circuit andcan be programmed toprovide a 24VDC auxiliaryoutput.VL-NCBNotification Appliance CircuitModule (Class B)The plug-in NAC moduleprovides power for, andhandles communications tothe non-addressablenotification appliances (hornsand sirens). It has 2 x class Bcircuits and can beprogrammed to provide two24v DC auxiliary outputs.VL-MRMMulti Relay Module – Form CA Relay module that isdesigned to be DIN mountedinside of a Velocity controlpanel. It’s powered andinterfaced to the CIE via aRJ45 connection. Can beconfigured as aprogrammable relay or acommon alarm, commontrouble or commonsupervisory relay via thepanel settings.TechnicalMaximum SLC Current: 500mAMaximum SLC Capacity: 254 AddressesMaximum SLC Length: 2KMMaximum SLC Resistance: 22Ω to , 22Ω - to -)Maximum SLC Capacitance: 100nFMaximum SLC Baud Rate: 4334 bits per secondWiring Class: Class A or Class XCompatible Devices: VDOT-PY, VDOT-PYH, VDOT-S6,VDOT-SCI, VDOT-SCM-SCI, VDOT-ZMU-SCI, VDOTDIP-SCI, VDOT-DOP-AC240V-SCI, VDOT-DOP-SCI,VDOT-DPH, VDOT-H2, VDOT-MinilPNAC Voltage: 29VDC NominalMaximum NAC Current: 1AMaximum NAC Impedance: 4ΩMaximum NAC Length: Depends on AWGWiring Class: Class A [Power limited & Supervised]Special Applications: Auxiliary 24 VDC Output[Power limited & Unsupervised]Compatible Devices: VL-MH, VL-W-C, VL-W-M,VL-W-CS-W, VL-W-CS-R, VL-C-CS-W, VL-C-CS-R,VL-W-MS-R, VL-W-MS-W, VL-C-MS-R, VL-C-MS-W,VL-W-S-W, VL-W-S-R, VL-C-S-W, VL-C-S-R.NAC Voltage: 29VDC NominalMaximum NAC Current: 500mA per circuitMaximum NAC Impedance: 4ΩMaximum NAC Length: Depends on AWGWiring Class: 2 x Class B [Power limited &Supervised]Special Applications: Auxiliary 24 VDC Output[Power limited & Unsupervised]End of Line Resistor: 4K7ΩCompatible Devices: VL-MH, VL-W-C, VL-W-M,VL-W-CS-W, VL-W-CS-R, VL-C-CS-W, VL-C-CS-R,VL-W-MS-R, VL-W-MS-W, VL-C-MS-R, VL-C-MS-W,VL-W-S-W, VL-W-S-R, VL-C-S-W, VL-C-S-R.Relay Type: Form C x 3Switching Capacity: 5 A, 30 VDC (resistive)5 A, 250 VAC (general use)Quiescent Current @ 30V: 39.3mARelay Operated Current (LEDs ON): 115.26mA8
Velocity Installation ManualVL-NWMwww.velocitydetection.comNetwork ModuleThe Velocity system networkhas the facility to monitor,indicate and control thefunctions of a fire alarminstallation, thus allowingsignals to be distributedaround a large site. Thenetwork will accommodateup to 64 nodes. The networkuses RS485 datacommunication.Communication Protocol: RS485Maximum Network Size: 64 NodesMaximum Distance Between Nodes: 1KM (using ascreened data cable) or 100M (using a standardfireproof cable)Network Wiring Typologies: Bus or RingNOTE: Only 1 network module allowed per panel. Ifa second module is fitted, it will be powered downwhen the panel starts.VL-MIMMulti Input module (Class B)An input module that is usedto monitor and raise alarmfrom any ancillary equipmentsuch as sprinkler flow switch,aspiration detectors,secondary fire control panel,beam detectors, externalpower supplies etc.Input Voltage: 23.7VDC NominalWiring Class: Class B x 6Quiescent Current @ 30V: 39.3mAInput Max Impedance: 10ΩInput End of Line: 4K7ΩAlarm Triggering Resistor: 1KΩVL-ZMAZone Monitor(Class A)A zone monitor that can betypically used forconventional devices and/orfor special detectors that arenot available in addressableform. It has 3 x Class A inputcircuits.Zone Voltage 29VDCWiring Class: Class A x 3 [Power limited &Supervised]Zone Maximum Line Impedance: 10ΩAlarm Triggering Resistor: 1KΩCompatible Detectors: Nittan EVCA-P (UL268 Listed)VL-ZMBZone Monitor(Class B)A zone monitor that can betypically used forconventional devices and/orfor special detectors that arenot available in addressableform. It has 6 x Class B inputcircuits.Zone Voltage: 26VDC NominalWiring Class: Class B x 6 [Power limited &Supervised]Zone Maximum Line Impedance: 10ΩEnd of Line Resistor: 4K7ΩAlarm Triggering Resistor: 1KΩCompatible Detectors: Nittan EVCA-P (UL268 Listed)9
Velocity Installation ManualControl Panel Installation and DimensionsEnclosure DimensionsSee table 1 for full dimensions see table 1.Table Knockouts12828BottomKnockouts4420MaxBatterySize2 x 12Ah2 x 38Ah2 x 65AhPanel Construction DetailsAll components are manufactured from Zintec.Large and Medium MMP EnclosuresBack box and door 1.5 mmDoor plate 0.9 mmAll internal parts are 0.9 mmSmall MMPAll parts are 0.9 mmRepeater MMPAll parts 0.9 mm.The paint colour for the main box and door is RAL3020 Red Leatherette (Red Version) or RAL9005 Black Leatherette (Black version).The internals are RAL9005 Black Leatherette.www.velocitydetection.com10
Velocity Installation ManualThe control cabinet can be semi flushed into a wall or surface mounted.Locating the Fire Alarm Control PanelThe control panel should be installed per NFPA 70 and NFPA 72 recommendations: The panel should be close to the main entrance of the building, so that it can be viewed by any fire-fighting personnel entering thebuilding. It should be fitted to a sturdy wall that will not flex unnecessarily.It should ideally be mounted at eye level, for it to be viewed without need of a ladder.It should be installed in a dry, weatherproof place, preferably NOT in direct sunlight.It should be easily accessible, so that the responsible person can perform their regular fire alarm checks.The panel must be in a clean, dry position, which is not subject to excessive shock or vibration and at least 2 meters away from pagersystems or any other radio transmitting equipment. The operating temperature range is 0 C (32 F) to 49 C (120 F); maximum humidityis 95%.Mounting the EnclosureFix the enclosure to the wall using all the mounting points provided:MMP6: 4 x Mounting Points. See Fig 1MMP10: 4 x Mounting Points See Fig 2MMP26: 6 x Mounting Points. See Fig 3Check the build and condition of the wall to decide a suitable screw fixing. The mounting holes are designed for No 8 roundhead orcountersunk woodscrews (or similar). Remove any debris from the enclosure. Take care not to damage the FACP during installation.ATTENTION: DO NOT DRILL ANY ENTRY HOLES INTO THE PSU SECTION OF THE ENCLOSURE WHICH IS LOCATED ON THE LEFTHAND SIDE OF THE CONTROL PANEL CABINET.Mounting Hole DimensionsFig 1www.velocitydetection.com11
Velocity Installation ManualFig 2Fig 3www.velocitydetection.com12
Velocity Installation ManualPlanning Cable EntryThe Knock-out cable entries can be easily removed by Tapping with a suitable screwdriver or chisel from outside the control panel box.Alternatively, the entry can be drilled out, using a 20mm hole cutter. Care should be taken if using a drill. Consider removing the PCBsto prevent damaging them.The VELOCITY MMP comes with many cable entry holes. If another entry hole is required, it is strongly recommended that the paneldoor is removed to avoid accidental damage. Also, the power supply and termination board should be removed and stored in a safeplace. This would also help while fixing the back box to the wall.ATTENTION: DO NOT DRILL ANY ENTRY HOLES INTO THE PSU SECTION OF THE ENCLOSURE.Cable GroundingThe MMP panel provide earth bars located along the top of the panel for grounding incoming wiring if needed.The MMP 6 panel has 1 x 12 way Earth barThe MMP 10 panel has 2 x 12 way Earth barThe MMP 26 panel has 3 x 12 way Earth barMains WiringNote: The AC (mains) input wiring, and the back-up battery connections are non-power-limited. All other connections on theMMP panel are power limited. Ensure that a minimum ¼” separation exists between non-power-limited and power-limitedcircuits.www.velocitydetection.com13
Velocity Installation ManualRecommendationsThe Mains supply to the FACP is fixed wiring, using Fire resisting 3-core cable (Between 1 mm² and 2.5mm²), or equivalent, fed from anisolating double pole switch fused spur, and fused at 5A. This should be secure from unauthorized operation and be marked ‘FIREALARM: DO NOT SWITCH OFF’. The supply must be exclusive to the Fire Panel.Connecting the Mains PowerThe AC Live (L), Earth (E) and Neutral (N) connections are marked on the power supply cage. It is essential that the mains Earth cable isconnect
The plug-in SLC module provides power for, and handles communications to the analogue addressable devices. It has 4 trouble status LED's for added fault finding assistance. Maximum SLC Current: 500mA Maximum SLC Capacity: 254 Addresses Maximum SLC Length: 2KM Maximum SLC Resistance: 22Ω to , 22Ω - to -) Maximum SLC Capacitance: 100nF