Transcription
Orion Star andStar Plus MeterUser Guide English Español Français Deutsch Italiano
ROSS and the COIL trade dress are trademarks of Thermo Fisher Scientific Inc.AQUAfast, Cahn, ionplus, KNIpHE, No Cal, ORION, perpHect, PerpHecT, PerpHecTion, pHISA, pHuture, PureWater, Sage, Sensing the Future, SensorLink, ROSS, ROSS Ultra, Sure-Flow, Titrator PLUS and TURBO2 areregistered trademarks of Thermo Fisher.1-888-pHAX-ION, A , All in One, Aplus, AQUAsnap, AssuredAccuracy, AUTO-BAR, AUTO-CAL, AUTO DISPENSER,Auto-ID, AUTO-LOG, AUTO-READ, AUTO-STIR, Auto-Test, BOD AutoE Z, Cable-Free, CERTI-CAL, CISA, DataCOLLECT,DataPLUS, digital LogR, DirectCal, DuraProbe, Environmental Product Authority, Extra Easy/Extra Value,FAST QC, GAP, GLPcal, GLPcheck, GLPdoc, ISEasy, KAP, LabConnect, LogR, Low Maintenance Triode, MinimumStir Requirement, MSR, NISS, One-Touch, One-Touch Calibration, One-Touch Measurement, Optimum Results,Orion Star, Pentrode, pHuture MMS, pHuture Pentrode, pHuture Quatrode, pHuture Triode, Quatrode, QuiKcheK,rf link, ROSS Resolution, SAOB, SMART AVERAGING, Smart CheK, SMART STABILITY, Stacked, Star Navigator 21,Stat Face, The Enhanced Lab, ThermaSense, Triode, TRIUMpH, Unbreakable pH, Universal Access aretrademarks of Thermo Fisher.Guaranteed Success and The Technical Edge are service marks of Thermo Fisher.PerpHecT meters are protected by U.S. patent 6,168,707.PerpHecT ROSS are protected by U.S. patent 6,168,707.ORION Series A meters and 900A printer are protected by U.S. patents 5,198,093, D334,208 and D346,753.ionplus electrodes and Optimum Results solutions are protected by US Patent 5,830,338.ROSS Ultra electrodes are protected by US patents 6,793,787.Orion ORP Standard is protected by US Patent 6,350,367.Orion NoCal electrodes are protected by US Patent 7,276,142. 2008 Thermo Fisher Scientific Inc. All rights reserved. RDO is a registered trademark of In-Situ Inc.,Fort Collins, CO USA. All other trademarks are the property of Thermo Fisher Scientific Inc. and its subsidiaries.The specifications, descriptions, drawings, ordering information and part numbers within this document aresubject to change without notice.This publication supersedes all previous publications on this subject.
ENENGLISH SECTIONTable of ContentsChapter I IntroductionMeter Features . . . . . . . . . . . . . . . . . . . . . . . . . . . . . . . . . . . . . . . . . . . . . . . . . . . EN-2Chapter II DisplayGeneral Description . . . . . . . . . . . . . . . . . . . . . . . . . . . . . . . . . . . . . . . . . . . . . . . . EN-3Chapter III KeypadGeneral Description . . . . . . . . . . . . . . . . . . . . . . . . . . . . . . . . . . . . . . . . . . . . . . . . EN-5Key Definitions . . . . . . . . . . . . . . . . . . . . . . . . . . . . . . . . . . . . . . . . . . . . . . . . . . . .EN-6Chapter IV PreparationInstalling the Power Adapter . . . . . . . . . . . . . . . . . . . . . . . . . . . . . . . . . . . . . . . . . EN-7Installing the Batteries . . . . . . . . . . . . . . . . . . . . . . . . . . . . . . . . . . . . . . . . . . . . . . EN-8Connecting the Electrodes . . . . . . . . . . . . . . . . . . . . . . . . . . . . . . . . . . . . . . . . . . EN-9Turning on the Instrument . . . . . . . . . . . . . . . . . . . . . . . . . . . . . . . . . . . . . . . . . . EN-10Meter Maintenance . . . . . . . . . . . . . . . . . . . . . . . . . . . . . . . . . . . . . . . . . . . . . . . EN-10Chapter V Meter SetupSetup Menu . . . . . . . . . . . . . . . . . . . . . . . . . . . . . . . . . . . . . . . . . . . . . . . . . . . . .Setup Menu Table . . . . . . . . . . . . . . . . . . . . . . . . . . . . . . . . . . . . . . . . . . . . . .General Menu Settings . . . . . . . . . . . . . . . . . . . . . . . . . . . . . . . . . . . . . . . . . . . .Time and Date Settings . . . . . . . . . . . . . . . . . . . . . . . . . . . . . . . . . . . . . . . . . . . .AUTO-READ , Continuous or Timed Measurement Settings . . . . . . . . . . . . . . .Selecting the Measurement Parameter . . . . . . . . . . . . . . . . . . . . . . . . . . . . . . .Method Setup . . . . . . . . . . . . . . . . . . . . . . . . . . . . . . . . . . . . . . . . . . . . . . . . . . .EN-11EN-12EN-14EN-15EN-16EN-17EN-18Chapter VI pH TechniquepH Setup Menu . . . . . . . . . . . . . . . . . . . . . . . . . . . . . . . . . . . . . . . . . . . . . . . . . .pH Calibration . . . . . . . . . . . . . . . . . . . . . . . . . . . . . . . . . . . . . . . . . . . . . . . . . . .pH Measurement . . . . . . . . . . . . . . . . . . . . . . . . . . . . . . . . . . . . . . . . . . . . . . . .pH Temperature Display and Calibration . . . . . . . . . . . . . . . . . . . . . . . . . . . . . . .EN-19EN-20EN-21EN-22Chapter VII mV, Relative mV and ORP TechniqueRelative mV and ORP Calibration . . . . . . . . . . . . . . . . . . . . . . . . . . . . . . . . . . . . .EN-23mV, Relative mV and ORP Measurement . . . . . . . . . . . . . . . . . . . . . . . . . . . . . . EN-24Chapter VIII Dissolved Oxygen TechniqueDissolved Oxygen Setup Menu . . . . . . . . . . . . . . . . . . . . . . . . . . . . . . . . . . . . . .Dissolved Oxygen Calibration . . . . . . . . . . . . . . . . . . . . . . . . . . . . . . . . . . . . . . .Dissolved Oxygen Measurement . . . . . . . . . . . . . . . . . . . . . . . . . . . . . . . . . . . .Dissolved Oxygen Temperature Display and Calibration . . . . . . . . . . . . . . . . . . .Thermo Scientific Orion Star and Star Plus Series Meter User GuideEN-25EN-26EN-28EN-29EN-I
ENChapter IX RDO Optical Dissolved Oxygen TechniqueRDO Cap Overview . . . . . . . . . . . . . . . . . . . . . . . . . . . . . . . . . . . . . . . . . . . . . . . EN-31RDO Optical Dissolved Oxygen Setup Menu . . . . . . . . . . . . . . . . . . . . . . . . . . . EN-32Setup Menu for RDO Optical Dissolved Oxygen Sensor . . . . . . . . . . . . . . . . .EN-33RDO Optical Dissolved Oxygen Calibration . . . . . . . . . . . . . . . . . . . . . . . . . . . . . EN-35RDO Optical Dissolved Oxygen Measurement . . . . . . . . . . . . . . . . . . . . . . . . . . EN-37RDO Optical Dissolved Oxygen Temperature Display and Calibration . . . . . . . . . EN-38Chapter X Conductivity TechniqueConductivity Setup Menu . . . . . . . . . . . . . . . . . . . . . . . . . . . . . . . . . . . . . . . . . .Conductivity Calibration . . . . . . . . . . . . . . . . . . . . . . . . . . . . . . . . . . . . . . . . . . . .Conductivity Measurement . . . . . . . . . . . . . . . . . . . . . . . . . . . . . . . . . . . . . . . . .Conductivity Temperature Display and Calibration . . . . . . . . . . . . . . . . . . . . . . . .EN-39EN-40EN-41EN-42Chapter XI ISE TechniqueISE Setup Menu . . . . . . . . . . . . . . . . . . . . . . . . . . . . . . . . . . . . . . . . . . . . . . . . .ISE Calibration . . . . . . . . . . . . . . . . . . . . . . . . . . . . . . . . . . . . . . . . . . . . . . . . . . .ISE Measurement . . . . . . . . . . . . . . . . . . . . . . . . . . . . . . . . . . . . . . . . . . . . . . . .ISE Temperature Display and Calibration . . . . . . . . . . . . . . . . . . . . . . . . . . . . . . .EN-43EN-44EN-45EN-46Chapter XII Data Archiving and RetrievalDatalog and Calibration Log . . . . . . . . . . . . . . . . . . . . . . . . . . . . . . . . . . . . . . . . .Automatic Datalog Feature . . . . . . . . . . . . . . . . . . . . . . . . . . . . . . . . . . . . . . .Datalog Deletion Setting . . . . . . . . . . . . . . . . . . . . . . . . . . . . . . . . . . . . . . . . .Viewing and Printing the Datalog and Calibration Log . . . . . . . . . . . . . . . . . . .EN-47EN-47EN-48EN-49Chapter XIII Declaration of ConformityDeclaration of Conformity . . . . . . . . . . . . . . . . . . . . . . . . . . . . . . . . . . . . . . . . . . EN-51WEEE Compliance . . . . . . . . . . . . . . . . . . . . . . . . . . . . . . . . . . . . . . . . . . . . . . . . EN-52Chapter XIV TroubleshootingMeter Self Test . . . . . . . . . . . . . . . . . . . . . . . . . . . . . . . . . . . . . . . . . . . . . . . . . . EN-53Meter Error Codes . . . . . . . . . . . . . . . . . . . . . . . . . . . . . . . . . . . . . . . . . . . . . . . . EN-54General Troubleshooting . . . . . . . . . . . . . . . . . . . . . . . . . . . . . . . . . . . . . . . . . . . EN-56Chapter XV Meter SpecificationsMeter Specifications . . . . . . . . . . . . . . . . . . . . . . . . . . . . . . . . . . . . . . . . . . . . . . EN-59Ordering Information . . . . . . . . . . . . . . . . . . . . . . . . . . . . . . . . . . . . . . . . . . . . . . EN-63Appendix A Meter Setup Menu FeaturespH Setup Menu Features . . . . . . . . . . . . . . . . . . . . . . . . . . . . . . . . . . . . . . . . . .Dissolved Oxygen Setup Menu Features . . . . . . . . . . . . . . . . . . . . . . . . . . . . . .Conductivity Setup Menu Features . . . . . . . . . . . . . . . . . . . . . . . . . . . . . . . . . . .ISE Setup Menu Features . . . . . . . . . . . . . . . . . . . . . . . . . . . . . . . . . . . . . . . . . .EN-IIEN-65EN-65EN-66EN-68Thermo Scientific Orion Star and Star Plus Series Meter User Guide
Chapter IIntroductionCongratulations! You have selected an industry-leading Thermo Scientific Orion Staror Star Plus series meter that is designed for electrochemistry measurements in thefield or in the laboratory. 2-Star meters provide the single parameter measurement of pH. 3-Star Plus meters provide the single parameter measurement of pH,dissolved oxygen, RDO optical dissolved oxygen or conductivity. 4-Star Plus meters provide the dual parameter measurements ofpH/dissolved oxygen, pH/conductivity, pH/ISE (ion selective electrode) orpH/RDO optical dissolved oxygen. 5-Star Plus meters provide the multi-parameter measurements ofpH/ISE/dissolved oxygen/conductivity, pH/dissolved oxygen/conductivity orpH/RDO optical dissolved oxygen/conductivity.All meters include a temperature measurement function. All meters with pHmeasurement capability include a mV/relative mV/ORP function.Built to meet the demands of busy, multiple user laboratory or plant environments,all Orion Star and Star Plus series meters are microprocessor controlled, which aidsin the delivery of accurate and precise measurements. The waterproof portablemeters can even withstand submersion for short periods of time.The 3-Star Plus, 4-Star Plus and 5-Star Plus meters have been enhanced to includean increased number of datalog points, improved temperature displays and a newtemperature calibration mode for each measurement parameter. Benchtop 3-StarPlus, 4-Star Plus and 5-Star Plus meters include autosampler capability and arecompatible with the AutoTration -500 autosampler. Refer to the AutoTration-500user guide for information on operating the Star Plus meters with the autosampler.Note: Please read this user guide thoroughly before using your benchtop orportable meter. Any use outside of these instructions may invalidate your warrantyand cause permanent damage to the meter.Thermo Scientific Orion Star and Star Plus Series Meter User GuideEN-1
IntroductionMeter FeaturesTo better meet the needs of users in environmental protection and control, food andbeverage, pharmaceutical and consumer product laboratories, the Orion Star andStar Plus series meters include these key features: Password Protected Methods – The meter will save up to ten custommeasurements and calibrations for future reference. Password protection ofeach method eliminates any tampering with methods as multiple users accessonly the procedure most appropriate to their work. AUTO-READ – The meter takes a measurement and automatically prints orlogs data when the reading becomes stable. The measurement is frozen on thedisplay until the user prompts the meter to take a new measurement. Stirrer Control – Benchtop meters (3-Star and higher) have a stirrer controlfor the stirrer probe, Cat. No. 096019, and the AUTO-STIR BOD probe, whicheliminates the need for additional stir plates and stir bars. SMART STABILITY and SMART AVERAGING – Remove theguesswork by automatically compensating for measurement conditions andoptimizing the meter response time. Display Backlight – All 3-Star, 4-Star and 5-Star meters include a displaybacklight feature. When the meter is on, a quick press ofwill turn thebacklight on and off. When the meter is operating on battery power, thebacklight will automatically turn off after two minutes to conserve power. Whenbatteries are low, the backlight will no longer turn on. Automatic Shutoff – The meters will shut down after 20 minutes withouta keypress. This maximizes battery power on portable meters and benchtopmeters that are being run on battery power. Audible Signals – The meter will beep whenever a key is pressed, providingimmediate verification that the user’s input was received.An easy-to-use reference guide, attached to each meter, supports daily meter use.EN-2Thermo Scientific Orion Star and Star Plus Series Meter User Guide
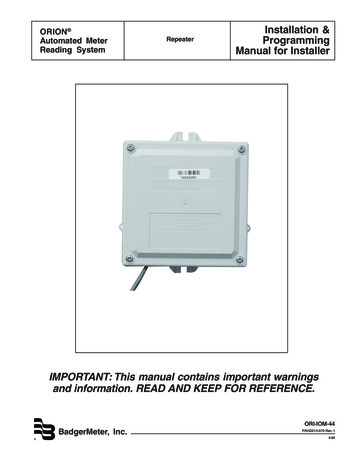
Chapter IIDisplayGeneral DescriptionThroughout a given process, the display on an Orion Star or Star Plus series meterprovides temperature and calibration data. The temperature appears in the left, topcorner of the display. Theicon indicates that a calibration mode or calibrationsetup menu is active. The man, 2, 4, 7, 9, 10, and 12 icons indicate which pHbuffers were saved after a pH calibration is performed. The setup icon only appearswhen the meter is in setup mode. Theicon indicates an error condition andwhen it is displayed with theicon, a calibration alarm or sensor quality issueexists. Theicon indicates that the AUTO-READ measurement mode is activeand is discussed in greater detail in the Meter Setup tivityUnitDO Unit5 Star MeterThis is the display of the 5-Star meter capable of multi-parameter measurements.The single and dual parameter meters will have fewer measurement lines,depending on the meter capabilities.Note: In the measurement mode, the three main lines of data on the meterdisplay correspond to what is being measured.Thermo Scientific Orion Star and Star Plus Series Meter User GuideEN-3
DisplayMeasurement Unit IconsIn the measurement mode, the arrow icon on the left side of the display screenindicates the active line. Pressto move the arrow icon to the desired line andpress/to scroll through the measurement unit icons associated with theselected line. The measurement unit icons for the 5-Star multi-parameter meter areshown below. The single and dual parameter meters will have fewer measurementlines and icons, depending on the meter capabilities.A pH, mV, relative mV, ISE,or temperatureB Conductivity, TDS, salinity, resistivity,or temperatureC issolved oxygen as % saturation,Ddissolved oxygen as concentration,barometric pressure or temperatureThe units of measurement, which are displayed on the right side of the screen, willflash until the reading is stable.Note: If a measurement line is not needed, pressto move the arrowicon to the measurement line that is not needed and press/until themeasurement line is completely blank.EN-4Thermo Scientific Orion Star and Star Plus Series Meter User Guide
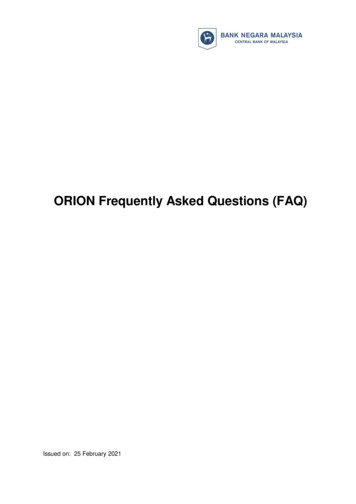
Chapter IIIKeypadGeneral DescriptionThe keypad layout is the same for all Orion Star and Star Plus series meters. Theportable and 2-Star benchtop meters have nine keys. The 3-Star, 4-Star and 5-Starbenchtop meters have 10 keys due to the addition of the stir key –.Portable ll UpDigitsLine SelectScroll DownSetupView LogBenchtop KeypadPowerBacklightCalibrateScroll UpMeasureSave/PrintStirrer On/Off,(not on 2-Star)DigitsLine SelectSetupView LogScroll DownThermo Scientific Orion Star and Star Plus Series Meter User GuideEN-5
KeypadKey DefinitionsKeyDescriptionKeyTurns the meter on, if the meteris off.Toggles the backlight on and off,if the meter is on (3-Star, 4-Starand 5-Star meters only).If the meter is on, hold downthe key for about three secondsto turn off the meter.EN-6DescriptionChanges the measurementunits of the selected line in themeasurement mode.Changes the value on theselected line in the setup,methods and log view modes.Edits the value of the flashingdigit for setup, password entryand calibration modes.Scrolls the arrow icon on left ofscreen among the three displaylines, so the selected line canbe edited or calibrated.Selects the next digit to editand moves the decimal pointfor setup, password entry andcalibration modes.Starts the calibration forthe selected line in themeasurement mode.Prints and logs a measurementin the continuous or timedmeasurement modes.If the arrow icon points to thetop line and the displayed unitsare pH, pressing the key willstart a pH calibration.Prints, logs and freezes thedisplay when the readingbecomes stable in the AUTOREAD measurement mode.Each time the key is pressed inthe calibration mode, the meterwill accept the calibration pointand move to the next pointuntil the maximum number ofcalibration points are reached.Exits the setup menu and returnsto measurement mode.Enters the setup menu, startingwith selected line in themeasurement mode.Enters the log view anddownload menu.If the arrow icon points to thetop line and the displayed unitsare ISE, pressing the key willenter the ISE setup screen.Turns the stirrer on and off.Accepts the calibration andreturns to measurement mode.Thermo Scientific Orion Star and Star Plus Series Meter User Guide
Chapter IVPreparationInstalling the Power AdapterThe universal power adapter that is included with your benchtop meter is the onlypower adapter recommended for use with this unit. The use of any other poweradapter will void your meter warranty. The external electrical power adapter is ratedto be operated at 100 to 240 VAC, 0.5 A, 50/60 Hz.Based on your wall outlet, select one of the four plug plates provided (110 V, 220 V,240V) and slide it into the grooves on the adapter. A click will be heard when theplug is properly in place.Connect the output plug of the power adapter to the power input on the benchtopmeter. Refer to the diagram in the Connecting the Electrodes section.Batteries can be installed in the benchtop Orion Star or Star Plus series meters, sothe meter setup settings are protected if the meter is disconnected from the walloutlet or a brief power outage occurs.Thermo Scientific Orion Star and Star Plus Series Meter User GuideEN-7
PreparationInstalling the BatteriesOrion Star and Star Plus series meters use four AA alkaline batteries. Do not uselithium or rechargeable batteries. Improper installation of non-alkaline batteriescould create a hazard.Note: For benchtop meters, the installation of batteries is not required if the unitwill always be connected to a power source via the universal power supply. Forportable meters, the batteries are supplied from the factory. To access the batterycompartment in portable meters, loosen the two screws in the back of the meter.1. Confirm that the meter is off and gently place the meter upside down on aclean, lint-free cloth to prevent scratching the LCD.2. Remove the battery case cover.3. Insert new batteries with the side orientation as depicted in the batterycompartment housing.4. Replace the battery case cover.5. Stored data, calibrations and methods will remain in the meter’s nonvolatilememory when the batteries are being replaced. However, the date and timemay need to be reset when the batteries are changed.EN-8Thermo Scientific Orion Star and Star Plus Series Meter User Guide
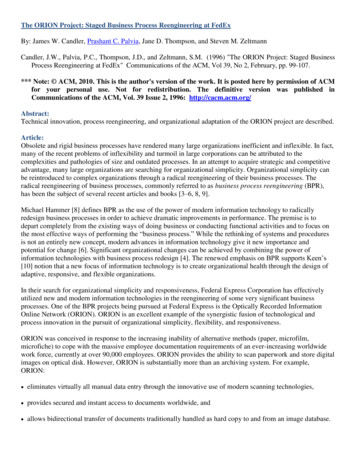
PreparationConnecting the ElectrodesFollow the diagrams below to correctly connect electrodes and probes to the meter.The multi-parameter meter is depicted; single parameter and dual parameter meterswill have fewer connections, depending on the meter measurement capabilities.Benchtop Meter Electrode ConnectionsStirrer jack,stirrer or BODAUTO-STIR probe8 pin miniDIN,Cond or ATCReference,pH, ORPor ISEBNC,pH, ORPor ISERS2329 pinminiDIN,DOPowerGroundPortable Meter Electrode Connections8 pin miniDIN,Cond or ATCBNC,pH, ORPor ISERS2329 pinminiDIN,DOThermo Scientific Orion Star and Star Plus Series Meter User GuideEN-9
PreparationMeter Connections with Multiple Functions Use the BNC input to connect pH, ISE and ORP electrodes with a BNC orwaterproof BNC connector. Benchtop meters have a reference input that is used to connect a separatereference electrode. Reference electrodes require an separate, appropriatesensing electrode for measurements. The 970899WP dissolved oxygen probe can be used on the BNC input. Use the 8 pin miniDIN input for conductivity probes or for automatic temperaturecompensation (ATC) probes. The DO AUTO-STIR probe uses the 9 pin miniDIN input and the stirrer jack. Connect a printer or computer to the RS232 input using the appropriate cable.Turning on the InstrumentWith the batteries installed in the portable meters and the power adapter attachedor the batteries installed in the benchtop meter, pressto turn on the meter.If using a 3-Star, 4-Star or 5-Star meter, presswhen the meter is powered onto toggle the backlight on and off. When the benchtop meter is drawing line power,the backlight will stay on untilis pressed.To turn off the meter, press and holdfor about three seconds.Meter MaintenanceFor routine meter maintenance, dust and wipe the meter with a damp cloth. Ifnecessary, a warm water or a mild water-based detergent can be used. Performmeter maintenance on a daily, weekly or monthly basis, as required by theenvironment in which the meter is operated.Immediately remove any spilled substance from the meter using the proper cleaningprocedure for the type of spill.EN-10Thermo Scientific Orion Star and Star Plus Series Meter User Guide
Chapter VMeter SetupSetup MenuTo navigate the setup menu:1. Pressto enter the setup menu.2. Press/3. Pressto move the arrow icon to the middle line.4. Press/5. Pressto move the arrow icon to the bottom line.until the desired setup option is displayed on the top line.until the desired setup option is displayed on the middle line./until the6. To scroll through a list of options on the bottom line, pressdesired option is displayed. To enter a numeric value for an option on the bottomline, press/to adjust each digit andto move to the next digit.For example, to change the pH measurement resolution pressto scroll from0.01 to 0.001 on the bottom display line.7. Pressto move the arrow icon to the top line.8. Repeat steps 2 through 7 to program a new setup option or pressthe setup menu and return to the measurement mode.to exitNote: Refer to Appendix A for a description of the special setup menu features.Thermo Scientific Orion Star and Star Plus Series Meter User GuideEN-11
Meter SetupSetup Menu Table – The following table is for the complete line of Orion Star andStar Plus meters. Meters may not include all of the options listed in this table.Top LineMiddle LineBottom LineSetup Menu Description (default setting, method specific)PHrES0.1, 0.01, 0.001pH measurement resolution (0.01, yes)PHbUFUSA, EUr0pH buffer set for automatic buffer recognition during calibration,USA buffers are 1.68, 4.01, 7.00, 10.01, 12.46 and EUrO buffers are1.68, 4.01, 6.86, 9.18 (USA, yes)ISErES1, 2, 3ISE measurement resolution in significant figures (1, yes)ISEUnItm, mgL, PEr, PPb, n0nEISE measurement units (PPb, yes)ISErAngL0w, HIgHISE concentration range for calibration stability criteria (HIgH, yes)ISEnLInAUt0, 0FFISE automatic blank correction for low-level calibration (AUt0, yes)C0ndtC0FF, LIn, nLFConductivity temperature compensation type, LIn is for linear, nLF isfor non-linear pure water samples (LIn, yes)C0ndC0EF0.0 to 10.0Conductivity temperature compensation coefficient in % change inconductivity per C, appears if LIn was selected for tC (2.1, yes)C0ndtdSF0.00 to 10.0Conductivity TDS factor value (0.49, yes)C0ndCELL0.001 to 199.0Conductivity default cell constant value for automatic conductivitycalibration mode (0.475, yes)C0ndtrEF5, 10, 15, 20, 25Conductivity reference temperature (25, yes)C0ndtyPEStd, 1, 2, 3, 4, 5, 6, 7, USPConductivity cell type and selectable range (Std, yes)See the Setup Menu for RDO Optical Dissolved Oxygen Sensor section for details on the RDO sensor information menus.d0rES0.1, 1 % satDO % saturation measurement resolution (0.1, yes)d0rES0.01, 0.1 mg/LDO mg/L measurement resolution (0.01, yes)d0bArAUt0, mAnDO barometric pressure compensation type (AUt0, yes)d0PrES450.0 to 850.0DO manual barometric pressure compensation value, appears ifmAn was selected for bAr (760.0, yes)d0SALAUt0, mAnDO salinity correction type (AUt0, yes)d0SALF0 to 45DO manual salinity correction value, appears if mAn was selectedfor SAL or a DO meter without a conductivity mode is used (0, yes)d0CALtAIr, H20, mAn, SEt0DO calibration type (AIr, yes)d0LIFE365 to 0RDO cap replacement countdown in days – 3, 4 and 5 Star Plus RDOmeters only (Set by RDO sensor, no)dUEPH0 to 9999pH calibration alarm value in hours, 0 is off (0, yes)dUE0rP0 to 9999ORP calibration alarm value in hours, 0 is off (0, yes)dUEISE0 to 9999ISE calibration alarm value in hours, 0 is off (0, yes)dUEC0nd0 to 9999Conductivity calibration alarm value in hours, 0 is off (0, yes)dUEd00 to 9999DO calibration alarm value in hours, 0 is off (0, yes)EN-12Thermo Scientific Orion Star and Star Plus Series Meter User Guide
Meter SetupTop LineMiddle LineBottom LineSetup Menu Description (default setting, method specific)rEAdtyPEAUt0, tImE, C0nt,Measurement read type as AUTO-READ, timed or continuous(AUt0, yes)rEAdtInE00:05 to 99:59Timed measurement value in minutes and seconds (01:00, yes)L0gdELn0, YESDelete datalog after download option, select YES to delete thedatalog when it is downloaded or select nO to loop through thedatalog and not delete the datalog when it is downloaded (n0, yes)L0gAUt00FF, 0nAutomatic datalog point saving option (0FF, yes)gEndEgC-5.0 to 105Manual temperature value (25.0, yes)gEnStIr0FF, 1, 2, 3, 4, 5, 6, 7Stirrer speed – 3, 4 and 5 Star benchtop meters only (4, yes)gEnPASS0000 to 9999Meter password entry (0000, yes)gEnAUt00n, 0FFAutomatic meter shutoff option (0n, no)gLPSEt0FF, 0nGLP option, GLP feature enables or disables methods (0FF, no)dAtEH0UrHH00 to HH23Hour setting (HH12, no)dAtEtInEmm00 to mm59Minute setting (mm00, no)dAtEtYPEmdY, dmYDate format as month, day, year or day, month, year (mdY, no)dAtEYEAr2000 to 2099Year setting (2004, no)dAtEdAtEmm01 to mm12Month setting (mm01, no)dAtEdAYdd01 to dd31Day of the month setting (dd01, no)r232bAUd1200, 2400, 4800, 9600Baud rate setting (9600, no)r2320UtFPrnt, C0mPOutput format for printer or computer, COmP format is commadelimited (Prnt, no)AUt0SAPL0FF, 0nAutosampler – 3, 4 and 5 Star Plus benchtop meters only (OFF, no)AUt0trAY28, 48Beaker tray setting (28, no)AUt0rInb1, 2, 3, 4, 5Number of rinse beakers (3, no)AUt0rSEC5 to 60Rinse time in each rinse beaker, seconds (10, no)AUt0PH0, 1, 2, 3pH calibration points (3, no)AUt00rPn0, YESORP calibration option, appears if 0 was selected for PH (n0, no)AUt0ISE0, 2, 3ISE calibration points, appears if 0 was selected for PH (2, no)1AUt0ISE1Concentration value of ISE standard 1, appears if 2 or 3 wasselected for the ISE calibration points (1, no)10AUt0ISE2Concentration value of ISE standard 1, appears if 2 or 3 wasselected for the ISE calibration points (10, no)100AUt0ISE3Concentration value of ISE standard 1, appears if 3 was selected forthe ISE calibration points (100, no)AUt0C0nd0, 1, 2, 3Conductivity calibration points (3, no)AUt0n0SA0 to 47Number of sample beakers (1, no)Thermo Scientific Orion Star and Star Plus Series Meter User GuideEN-13
Meter SetupGeneral Menu Settings Manual Temperature controls temperature compensationwhen no temperature sensor is attached to the meter. Stirrer Speed sets the stirrer speed from 1 (slowest)through 7 (fastest) and off (3-Star, 4-Star and 5-Starbenchtop meters only). Password Protection protects setup menu options andmethods from being accidentally erased or tampered with(3-Star, 4-Star and
Thermo Scientific Orion Star and Star Plus Series Meter User Guide EN-5 Chapter III Keypad General Description The keypad layout is the same for all Orion Star and Star Plus series meters . The portable and 2-Star benchtop meters have nine keys . The 3-Star, 4-Star and 5-Star benchtop meters have 10 keys due to the addition of the stir key - .