Transcription
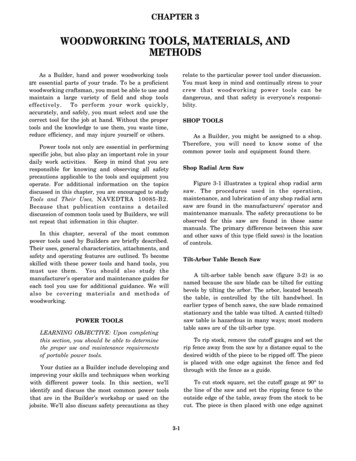
Compliments of Fine Woodworkingmaster classCarve a ball-and-claw footB yE u g e n eL a n d o nfrontsidebackbottom102F I N E woo d wo r k in gThe ball-and-claw foot isthought to have originatedin China as a dragon’s clawgrasping a pearl, but bythe mid-18th century it hadbecome firmly associatedwith the Chippendale furniture style.The design lends itself to interpretationand there are variations associated withdifferent parts of the 13 colonies. Whilethe claws and the talons may appearintimidating, carving them isn’t.The secret is in the layout lines. Withthese to guide you and by followingthe correct sequence of cuts, carvingthese feet is like carving by numbers.Nor do you need a cabinet full ofcarving gouges: Five or six will get youby, with a 1 2-in. bench chisel doingmuch of the work. After perhaps onepractice foot on an easily carved woodsuch as basswood, you’ll be ready toslice into mahogany.Bandsaw the blank and lay out the linesAfter bandsawing the leg blank (in thiscase 23 4 in. sq. and at least 16 in. long),I begin by marking out the base of thefoot (see photos, facing page).Many carvers use a chisel to define theedges of the talons, but I saw down thelayout lines until I reach the outer circle.(I know this quicker method was usedin the past, because I have found tracesof sawtooth marks when examiningantiques.) On the front talon and thefront faces of the side talons, you cankeep the saw perpendicular to the baseof the foot; but on the remaining cuts,saw only the bottom half of the ball toavoid cutting into the ankle. In all cases,saw just outside the line to preserve thefull width of the talon.Now lay out the rest of the ball (seephotos, facing page). First draw lineson the bottom of the foot from theintersection of the talon lines and outercircle to the edge of the foot. Then, onall sides of the foot, mark the breakpoint (the widest point of the ball), theheight of the ball, and the center point ofPhotos: Mark Schofield; drawings: Bob La Pointe
1 in.34Lay out the footTurnedtenon,1 in. dia.Lay out the leg.Use the templateto lay out thecabriole leg onadjacent sides ofthe blank.Topof legT e m p l ate141 4 in.Carving starts51 4 in. from thebottom.Lay out the base. Draw lines connecting theopposite corners and lines 1 4 in. on eitherside to define the width of the talons. Thenuse a compass to scribe the diameter of theball at its widest point and at the floor.TalonWebKnuckle23 4 in.Ball dia. atfloor, 21 4 in. in.7813 4 in.Ball dia. atbreak point,25 8 in.Talonwidth,1 2 in.www.F i neWoodwor k i n g.com in.34 in.1 2Break point,7 8 in. from floorClawDefine the talons. Use a fine-tooth saw to cut justoutside the lines marking the width of the talons.Where the talonsmeet the ball.Draw lines parallelwith the edge of thefoot from where theouter diagonal linesintersect with theouter circle.The top of the ball.Extend the lines youdrew in the previous step until theyreach the breakpoint of the ball.Then draw an arcfrom these pointsthat connects themidpoint at the topof the ball.SEPTEMBER/OCTOBER 2006103
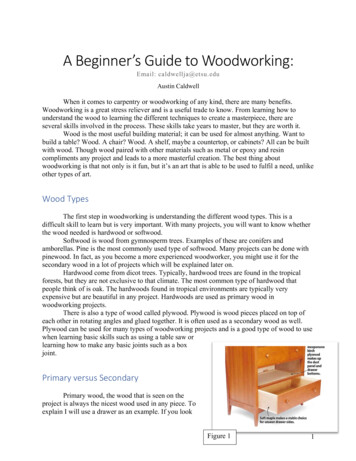
master classcontinuedCarve the ballbegi n by m a k i n g a c y l i n d e rStart with the back quadrants. Use a#7-18 mm gouge to define the arc of the balland then to remove the wood outside it, creating a trench around what will become the ball.the ball. Next, extend the lines you drewon the bottom up to the break point,and then outline the top curve of the ballconnecting the center point down to thebreak point. Now you can finally pick upa gouge and start carving.Carve the front and rear of the ballThe first step is to relieve the woodaround the sides of the ball. Beginningwith the back quadrants of the foot,make vertical cuts around the top halfof the ball and then relieve the cuts byremoving wood from the top side ofthe cuts. The cut needs to extend 5 16 in.deep; measure it with a depth gauge orimprovise with a nail driven through asmall piece of wood. Extend the channeldown the bottom sides of the ball.Before shaping the ball, establish acylinder. Pare away wood until you getdown to the outer line on the bottom ofthe foot. Use a square to check that thesurface of this cylinder is flat.Carving the front quadrants beginsslightly differently. Where the linemarking the top of the ball and thecenter line of each quadrant intersect,make a series of vertical cuts with a#7-18 mm gouge, working progressivelytoward the front. Next, with a 1 4-in.bench chisel, make small horizontal cutsto create a semicircular hollow. Then104F I N E woo d wo r k in gCreate a cylinder. Use a 1 2-in. bench chisel.Cut down to the outer circle and use a square tocheck that the whole surface is perpendicular tothe bottom of the foot.The front quadrants are different. Use agouge and chisel to create a semicircularhollow that forms the top of the ball, thenshape the cylinder at the base.th e n Turn the cylinder in to a ballMark the middle of the ball.Before turning the cylinder intoa ball, use a gauge to mark thewidest point, known as the breakpoint. From here, the ball breaksdownward in both directions.Now carve a ball. Usea 1 2-in. chisel to turn thetop of the cylinder into aball. Don’t worry aboutleaving a series of facets;these can be sandedlater. Round over thebottom half of the balluntil it meets the innercircle on the bottom ofthe foot (left). You shouldnow have a multifacetedbut recognizable balldivided into four parts bythe unfinished talons.
www.F i neWoodwor k i n g.comSEPTEMBER/OCTOBER 2006105
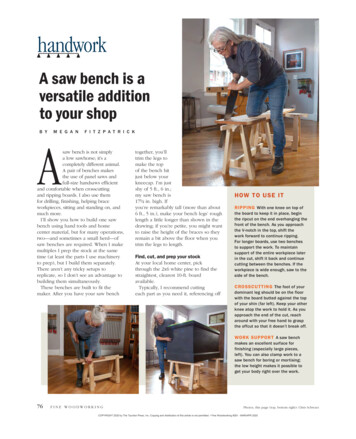
master classcontinuedCarve the talons and clawsRasp the talons. Use a patternmaker’srasp to flatten the triangular profile from thesecond knuckle to the base. Then create theconcave profile between the second and thirdknuckles (above).Create the claw profile. Use a chisel to slicedownward from the first knuckle to the base ofthe ball to create a flat, sloping plane.Carve the claws. With a chisel, square offthe bottom of the first knuckle, then paredownward on both sides from the centerline. Finally, cut away the claw (above) until itcomes to a point at the bottom of the ball.follow the same steps as the backquadrants and establish a flat cylinder.Reestablish the break-point line at 7 8 in.from the bottom. With the 1 2-in. chisel,create the top curve of the ball (seebottom photos, p. 104) and then paredown to the inner circle on the bottomof the foot to establish the lower curveof the ball.center of the slope to mark the center ofthe claw. With the chisel parallel to thebottom of the foot, drive it into eitherside of the slope at the first knuckle untilthe corners of the chisel just touch thecenter line and the surface of the ball.You are undercutting the first knuckle.Then pare away the wood on either sideof the center line to create the claw.The final step is to create the concavearea between the front tendon and thetwo side ones. Known as the web, itrepresents the stretchy skin found on thefeet of birds of prey. Create the centerof the groove, and then establish thetop and the sides. Then flatten the centerof the web with a #5-16 mm gouge, andif necessary, reestablish the line wherethe webbing meets the ball with the#7-18 mm gouge.Your ball-and-claw foot is complete.Go back and smooth the ball with smallrasps and files, and the ankle and talonswith files and a scraper. Leave a fewcarving facets to show that this wascreated by man and not a machine. MShape the talons, claws, and webIt doesn’t matter if you start shapingthe talons before you finish carving thelower side of the ball. The first step isto use a #49 patternmaker’s rasp on thetriangular bottom section of each talon;then create a concave profile betweenthe second and third knuckles. Use therasp to round the ankle of the leg andround over the shin area.Round over the flat-topped knuckleand claw section using a 1 2-in. chisel.With a marking gauge set to 1 2 in., markthe junction of the first knuckle and theclaw. With the chisel, refine the concavesections between the lower two knuckleson the front three talons. The rear talonhas only the lowest knuckle.To carve the claws, use the 1 2-in.chisel, and start by carving a flat slopefrom the first knuckle down to the innercircle on the bottom of the foot. Extendthe line on the bottom of the foot up the106F I N E woo d wo r k in gCarve the web. Use a #8-13 mm gouge tohollow out the areas between the center andside talons (left). Work upward from the balluntil you feel the wood start to tear, and thenmake relief cuts downward. Use a #9-7 mmgouge to create the sharp transition from theweb into the tendons (above).
and claw section using a 1 2-in. chisel. With a marking gauge set to 1 2 in., mark the junction of the first knuckle and the claw. With the chisel, refine the concave sections between the lower two knuckles on the front three talons. The rear talon has only the lowest knuckle. To carve the claws, use the 1 2-in.